Pyle PLMRB38B User manual

MarineStereoReceiverPowerAmplifier
AM/FM/MP3/USB/AUX/SD Card Reader Marine
Stereo Receiver, Single DIN, 30 Preset Memory Stations,
LCD Display with Remote Control

www.PyleUSA.com
2
INSTALLATION
Preparation
The preparation kit is necessary to mount the radio on the dashboard, this kit is
available at electronics stores and car audio specialists, check the installation kit
before using it to make sure it is the right one for your vehicle.
INSTALL THE DEVICE
1. Lift the left or right top corner of the plastic outer trim ring
then pull it out to remove it.
2. Insert the two bracket keys into the left and right side of
the chassis to separate the chassis from the housing.
3. Install the mounting knob on the board. Check the
opening size of the sliding panel to be mounted. If the
measurement is not large enough, carefully cut it until it
slips easily on the opening. Do not force the handle in the
opening so as not to bend it. Locate the series of dubbing
tabs above, below and all sides to be mounted. Completely
insert it to the opening of the board, bend the tabs as
necessary towards outside to ensure it ts the board.
4. Slide the stereo into the opening in the dash, ensuring that
the wires behind are tucked and not pinched.
5. Follow the wiring diagram carefully.
Verify you’ve connected them correctly.
CAUTION! Connect the unit to a 12 Volt power source
with adequate ground.
6. Now that your wires are all completed, attach the front
panel and turn ON the unit (the vehicle must be switched on). If the unit does not
work, check the calibration again until the problem is solved. With the new car
stereo secured into the bracket, all you need to do is plug the wiring harness back
into the stereo and put the assembly back into place.
7. Slide the stereo into the opening in the dash, ensuring that the wires behind are
tucked and not pinched. Sometimes this may take a few times when the vehicle
has a tight dash opening. Tuck the wires back into an opening behind the unit.
8. Install the plastic outer trim ring
9. Snap all the pieces of trim back into place over the stereo. Double check that all
screws and trim pieces are securely in place.Try out the new stereo. Turn the car
power on again and play around with the stereo and its settings to be sure
everything is in working order.

www.PyleUSA.com
3
WIRING CONNECTIONS
CONTROL PANEL BUTTONS
WIRING DIAGRAM
PRECAUTION
+12V DC
NEGATIVE
EARTH
AMPLIFIER OUTPUT
White: Rear Output
Left
White: Front Output
Left
Red: Right Front Output
Red: Rear Right Output

www.PyleUSA.com
4
CONTROL PANEL BUTTONS
1. (Power)/MODE (source) button
2. SEL (select/menu) button and VOL (volume) knob
3. Back to the previous conguration point
Pess /Bass enhances the pulse function
4. In power on mode, press the MUTE button to toggle mute ON or OFF.
/DISP (CLK) button
5. (pause/start), Button 1 preset station
6. INT (intro), Station preset button 2
7. RPT (repeat), button 3 preset
8. RDM (random), button 4 preset
9. -10 (10 following songs), preset station 5 button
10. +10 (10 following songs), preset button 6 station
11. Phone button
12. (tune back, search back, crawl back, fast reverse)
13. (tune forward, search forward, crawl forward, fast forward)
14. Release button cover
15. IR remote control sensor
16. LCD screen
17. BAND (band) button/AS
(automatic storage/preset station search, automatic search)
18. USB/SD port
19. AUX IN (auxiliary input)
20. MIC hole (integrated microphone)
GENERAL OPERATION
Turn Unit ON/OFF
• Press the power /MODE button on the front panel to turn ON the unit, and
press and hold it again to turn OFF the unit.
• Press the power button on the remote control to turn the unit ON or OFF.
Adjust Volume (VOL)
• Rotate the VOL knob on the front panel or press the VOL+ /VOL- button on
the remote control to increase or decrease the volume level.
Adjust Menu Options (SEL)
• Press the SEL button on the front of the panel or on the remote control repeatedly
to navigate through the following audio functions: BASS (Low), TREBLE (treble),
BALANCE (Balance), FADER (attenuate), EQ (Equalizer) OFF (o), CLASS (classic)

www.PyleUSA.com
5
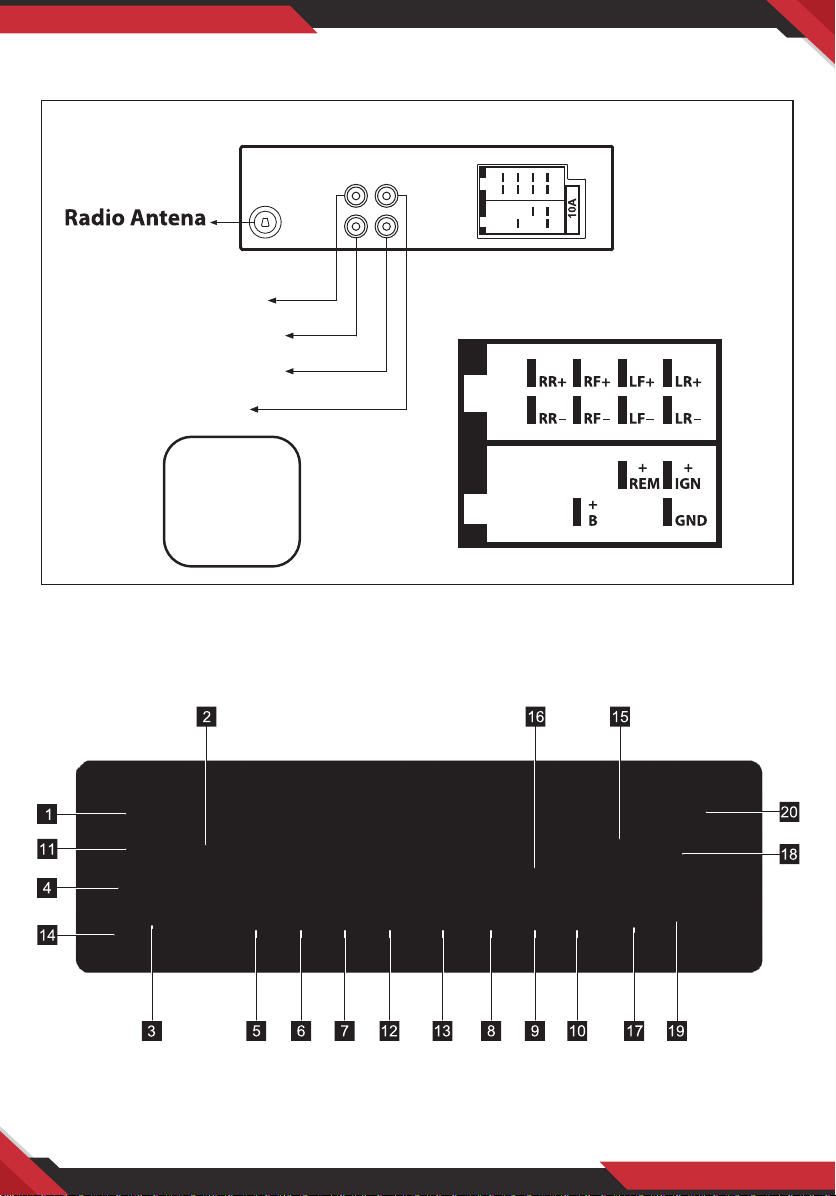
ROCK/POP/FLAT (at), LOUD ON/OFF (volume), DX/LOC, STEREQ/MONO, CLOCK
12/24, BLUE/RED/CYAN/GREEN/PURPLE/YELLOW/WHITE/AUTO.
Turn the VOL knob on the front panel or press the VOL+ /VOL- button on
the remote control to set the selected item. Press SEL button to select SWE
(subwoofer) Rotate the knob to select ON/OFF
• Press SEL button then press band button get into 10EQ control mode. Press band
button to select EQ volume then turn volume knob to select EQ level.
• BALANCE (Balance): L7, L6, ~, L1, 0, R1, ~, R6, R?
• FADER (attenuate sound): R7, R6-, R1,0, F1, ~, F6, Fr
• EQ (Equalize) Set: OFF, CLASS, ROCK, POP, FLAT,JAZZ,COUNTRY.
• Loudness (reduce sound): LOUD ON / OFF.
• DX/LOCAL: Enables or disables the local broadcast mode (LOCAL).
• Stereo/Mono: change the reception mode STEREO or MONO in Radio.
• CLOCK 12/24: Changes the clock format between 12 and 24 hrs.
• Change buttons of 7 color in the lighting:
Preset as blue, red, clan, green, purple, yellow, white or Auto (the color changes
automatically one by one).
Set the clock (DISP) (CLK)
1. To display the Time press the CLK button.
2. To set the time, press and hold the CLK button and the time will start ashing.
3. Press the or button on the front panel or on the remote control to set the
time.
4. Press the CLK button and the minutes will start ashing.
5. Press the or button on the front panel or on the remote control to set the
minutes.
Change the source mode (MODE)
Press the MODE button to switch between the button RADIO, BT (Bluetooth), USB
(with a USB device inserted), SD (with SD card inserted) and AUX-IN mode (input
assistant).
Mute ON/OFF
In power on mode, briey press the MUTE button to mute or continue. The silent
state will be released when the volume knob is used.
Loudness: LOUD ON/OFF
Press the LOUD button on the remote control to change the loud volume to boost
the bass output frequency, press again, to turn it o.
This manual suits for next models
3
Table of contents