quadient DS-200iQ User manual

USER GUIDE
DS-200iQ / DS-600iQ

iiUSER GUIDE
DS-200iQ / DS-600iQ
WARNING
Improper installation, use, adjustment, alteration, service
and or maintenance may result in property damage and
or serious bodily injury!
Ensure all safety information detailed in section 1.3 Safety
including it’s sub-sections are read and understood in it’s
entirety before installation, operation, maintenance and or
servicing of this machine!

TABLE OF CONTENTS
iiiUSER GUIDE
DS-200iQ / DS-600iQ
3.1 IMOS Control Panel 11
3.2 Menu Screen 12
3.2.1 Libraries 12
3.2.1.3 Documents Library 13
3.2.1.4 Envelopes Library 13
3.2.1.5 Postal Products Library 13
3.2.2 Admin Settings - Supervisor 13
3.2.2.1 System Security Level 14
3.2.2.2 Archive Data 15
3.2.2.3 Languages 15
3.2.2.4 Machine Id 16
3.2.2.5 Machine Name 16
3.2.2.6 Generate Licence File 17
3.2.2.7 Licenced Features 17
3.2.2.8 Imported Files 18
3.2.3 Service Settings - Supervisor 18
3.2.3.1 Diagnostics 19
▪Typical Sensor Values 19
3.2.3.2 System Options 22
3.3 Jobs Screen 23
1 SAFETY STANDARDS COMPLIANCE 1
1.1 About this Manual 2
1.2 Standards and Compliance 2
1.3 Safety 2
1.3.1 Safety Symbols 3
1.3.2 General Safety Notes 3
1.3.3 Power Connections Safety Notes 4
1.3.4 Emergency Safety Notes 4
2 INTRODUCTION 5
2.1 General Overview 6
2.2 Functional Overview 6
2.3 Overview of Components 6
2.3.1 Insert Head Components 7
2.3.2 Versatile Feeder Components 7
2.3.3 Flex Folder Components 7
2.3.4 Output Conveyor Components 7
2.3.5 Output Sorter Components 8
2.3.6 Turner Components 8
2.5 Powering on the System 9

ivUSER GUIDE
DS-200iQ / DS-600iQ
4.2.2 Creating a New Envelope 38
4.2.3 Document Mailset 39
4.2.3.1 Advanced Document Mailset Settings 41
4.2.4 Creating a New Document 42
4.2.5 Enclosure Mailset 43
4.2.6 Creating a New Enclosure 43
4.3 Place Mailset 44
4.4 Fold Settings 44
4.4.1 Advanced Fold Settings 45
4.5 Mail Sorting 47
4.5.1 Postal Product 47
4.5.2 Mail Sort Settings 48
4.6 Output Placement 50
4.7 Output Settings 50
4.7.1 Turner Output Settings 51
4.7.2 Franker Output Settings 52
4.7.3 Output Conveyor Settings 52
4.7.4 Printer Output Settings 53
4.8 Saving the Job 54
5 OPERATOR INSTRUCTIONS 56
5.1 Setting up a Job 57
5.1.1 Loading the Envelope Hopper 57
5.1.1.1 Envelope Separator Adjustment 59
5.1.2 Loading the Versatile Feeder Hopper 59
5.1.2.1 Versatile Feeder Separator Adjustment 60
5.1.3 Loading the Flex Folder Hopper 62
5.1.3.1 500-Sheet Hoppers 62
5.1.3.2 1000-Sheet Hoppers 63
3.4 Run Screen 24
3.4.1 Testing the Mailset 25
3.4.1.1 Present at Exit 25
3.4.1.2 Finger Sequence 26
3.4.1.3 Envelope Stop Position 27
3.4.1.4 Finger Adjust 27
3.4.2 Job Count Settings 28
3.4.3 Batch Count Settings 28
3.5 Help Menu 29
3.5.1 Remote Assistant 30
3.6 Users Screen 30
3.6.1 Switching Users 31
3.6.2 User Access Rights 31
3.7 IMOS F-Keys 32
3.7.1 F1 Key 32
3.7.2 F2 Key 32
3.7.3 F3 Key 32
3.7.4 F4 Key 33
3.7.5 F5 Key 33
3.7.6 F6 Key 33
3.7.7 F7 Key 34
3.7.8 F8 Key 34
3.7.9 F9 Key 34
4 OPERATOR IMOS SETTINGS 35
4.1 Creating a Job 36
4.2.1 Envelope Mailset 37
4.2.1.1 Advanced Envelope Mailset Settings 38

vUSER GUIDE
DS-200iQ / DS-600iQ
6 OPERATOR MAINTENANCE 86
6.1 Cleaning the Machine 88
6.1.1 Cleaning Sensors 88
6.1.1.1 Cleaning Insert Head Sensors 88
6.1.1.2 Cleaning Versatile Feeder Sensors 92
▪Mark-reading Versatile Feeders 93
6.1.1.3 Cleaning Flex Folder Sensors 94
6.1.1.4 Cleaning Output Sorter Sensors 94
6.1.1.5 Cleaning Turner Sensors 96
6.1.2 Cleaning Conveyor Belts 96
6.1.3 Cleaning Rollers 96
6.2 Clearing Paper Jams 97
6.2.1 Insert Head Paper Jams 97
6.2.1.1 Collate Pocket Paper Jams 98
6.2.2 Versatile Feeder Paper Jams 98
6.2.3 Flex Folder Paper Jams 99
6.2.3.1 Base Unit Paper Jams 99
6.2.3.2 Tower Unit Paper Jams 100
6.2.3.3 Accumulator Paper Jams 100
6.3 Changing Feed Tyres and Pickup Rollers 101
6.3.1 Insert Head Feed Tyres and Pickup Rollers 101
6.3.2 Versatile Feeder Feed Tyres 103
6.3.3 Flex Folder Pickup Rollers 105
6.3.3.1 Hopper 1 Pickup Rollers 105
6.3.3.2 Hopper 2, 3, and 4 Pickup Rollers 106
6.4 Maintaining the Wetter System 106
6.4.1 Cleaning the Wetter Tank 106
6.4.2 Changing the Reservoir Bottle 107
5.1.3.3 Reading Orientations 64
5.1.3.4 Non-Reading Orientations 66
5.1.3.5 Accumulator Side Guide Adjustment 68
5.1.3.6 Flex Folder Separator Adjustment 69
5.1.3.7 Curled Paper Guide Adjustment 70
5.1.3.8 CIS Reader Adjustment 70
5.1.4 Paper Control Adjustment 72
5.1.5 Insert Head Catch Tray Adjustment 73
5.1.6 Output Conveyor BackStop Adjustment 73
5.1.6.1 Angled Version (Default) 73
5.1.6.2 In-line Version 74
5.1.7 Output Conveyor Backrest Adjustment 74
5.1.8 Output Sorter Catch Tray Adjustment 75
5.1.9 Turner Side Guide Panel Adjustment 75
5.1.10 Turner Backstop Adjustment 76
5.1.11 Infeed Rollers Adjustment 76
5.2 Fine Tuning a Job 77
5.2.1 Unit Fine Tuning 77
5.2.2 Insert Head Hopper Fine Tuning 78
5.2.3 Document Fine Tuning 79
5.2.3.1 CIS Reader Diagnostics 79
5.3 Running a Job 82
5.3.1 Single Cycle 1 x Procedure 82
5.3.2 Cascading Job 83
5.3.3 Daily Mail 83
5.3.3.1 Daily Mail - Versatile Feeder 84
5.3.3.2 Daily Mail - Flex Folder 84
5.3.3.3 Stapling Restrictions 85

viUSER GUIDE
DS-200iQ / DS-600iQ
7 TROUBLESHOOTING GUIDE 108
7.1 General Troubleshooting 109
7.2 Insert Head Troubleshooting 109
7.3 Versatile Feeder Troubleshooting 109
7.4 Flex Folder Troubleshooting 109
7.5 Output Conveyor Troubleshooting 110
7.6 Output Sorter/Turner Troubleshooting 110
8 TECHNICAL SPECIFICATIONS 111
8.2.1 Cycling Speeds 115
8.2.2 Pack Details 115
8.2.3 Envelope Details 116
8.3.1 Enclosure Details 118
8.3.2 Daily Mail - Versatile Feeder 118
8.4.1 Paper and Fold Details 120
8.4.2 Daily Mail - Flex Folder 120
8.6.1 Compatible Franking Machines 121
8.6.2 Compatible C4 Envelopes 121
9 DISPOSAL INSTRUCTIONS 123
9.1 End of Life 124

1USER GUIDE
DS-200iQ / DS-600iQ
1
SAFETY STANDARDS COMPLIANCE

2
JUN 2020
USER GUIDE
1SAFETY STANDARDS COMPLIANCEDS-200iQ / DS-600iQ
REV 00
1.1 ABOUT THIS MANUAL
Disclaimer
The data contained herein is the most current known to the manufacturer at the time
of preparation and is believed to be accurate.
described or suitability for a particular application.
This guide is published without any warranty. Improvements and changes to the online
guide (if applicable) necessitated by typographical errors, inaccuracies of current
information, or improvements to programs and or equipment, may be made at any
time and without notice.
Such changes will, however, be incorporated into new editions of the PDF version of
this guide (if applicable).
1.2 STANDARDS AND COMPLIANCE
Safety and Legal Markings
Environmental Legal Compliance
This product complies with EU Directive 2012/19/EU, Waste of Electrical and Electronic
Equipment (WEEE), in all EU member states.
This product complies with EU Directive 2011/65/EU, Restriction of Hazardous
Substances (RoHS), in all EU member states.
This product complies with FCC 47CFR Part 15B Class A, Federal Communications
Commission (FCC), in all states and territories of the United States.
Applicable Directives
Low Voltage Directive 2014/35/EU
Electromagnetic Compatibility Directive 2014/30/EU
The product presented in this guide meets the requirements of applicable directives.
Low Voltage Directive, and Electromagnetic Compatibility Directive.
For further information please contact your authorized distributor.
1.3 SAFETY
The information presented in this section is given as a guide to general precautions
and safety procedures that should be exercised during installation, operation,
maintenance and or servicing of this machine.
operators, and service technicians of this machine are reminded of their responsibilities
to comply with all relevant legislations including Risk/COSHH Assessments if applicable
and Approved Codes of Practice.
Always be aware of all warnings and notes that are listed within this manual or noted
anywhere on the machine itself. Various symbols are used in this manual, and on the
product itself to ensure correct usage, to prevent danger to the user and others, and to
prevent property damage.
The meanings of these symbols are described in section 1.3.1 Safety Symbols, and
is important these symbols are observed, and their descriptions read thoroughly to
understand their meanings.
Prior to carrying out any installation, operation, maintenance or servicing procedures
on this machine, ensure you have fully observed and understood all safety notes
detailed in this section.

3
JUN 2020
USER GUIDE
1
SAFETY STANDARDS COMPLIANCE
DS-200iQ / DS-600iQ
REV 00
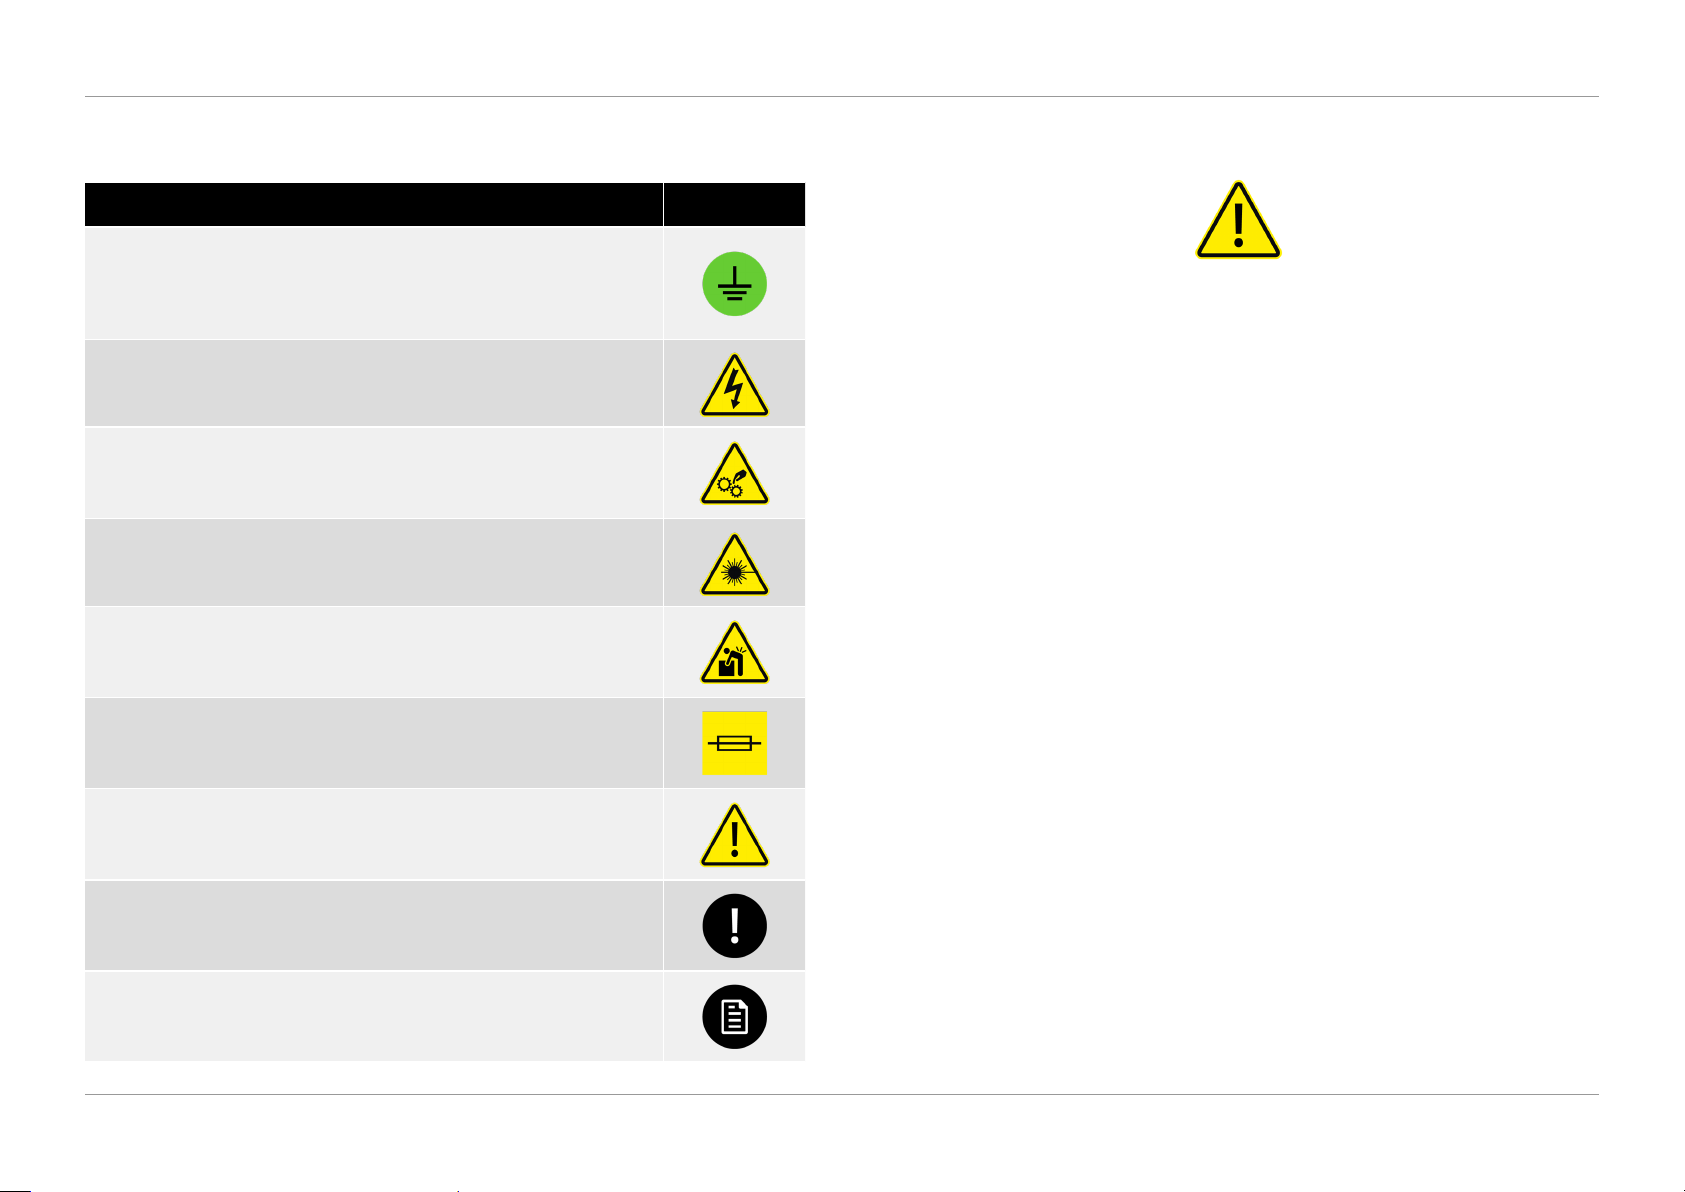
1.3.1 SAFETY SYMBOLS
Description Symbol
Protective Earth (Ground)
or protective earth (ground) electrodes, protecting against electric
shock in case of a fault.
Caution - Risk of Electric Shock
Caution - Moving Parts
Indicates the instructional safeguard to keep away from moving
parts.
Caution - Laser Beam
Indicates warning of a laser beam.
Caution - Heavy Object
Indicates the object is heavy, adhere to the safety instructions for
provisions of lifting and moving.
Caution - Fuse
where possible before replacing.
Caution/Warning
Indicates a situation in which minor, moderate, or serious injury
could occur because of the hazard present.
Important Note
Refers to the important note referenced/detailed within the
manual.
Refer to Manual
Refers to the relevant instructions referenced/detailed within the
manual.
1.3.2 GENERAL SAFETY NOTES
WARNING
▪Keep the work area around the machine clean. A minimum one metre of clear
unobstructed working space is always required around the machine.
▪The machine must be used only as intended by the manufacturer and should
not be tampered with or altered in any form.
▪The machine must be operated, maintained and or serviced only by trained
and authorised personnel.
▪Do not operate the machine unless all of the covers are in place and
undamaged, and all warning labels are in place and legible. If any external
cover is damaged, it must be replaced only by authorised personnel or
▪
interlock safety switches, and do not attempt to operate the machine without
covers, or if any of the interlock safety switches are inoperable.
▪Do not wear any loose clothing or jewellery, and long hair must be tied back
or tucked under a hat when working near the machine, as they may become
caught in any one of the moving parts resulting in injury.
▪Before any cleaning, maintenance and or servicing, the machine must be
completely isolated from the power source, by pressing the toggle switch
mains power cable completely from the electrical power supply.
▪
outside the cabinets. If paper dust is collecting inside the machine, open the
duster only.
▪Although the manufacturer takes care to eliminate sharp edges to reduce
danger, please handle all manufactured parts with care to avoid any risks of
cutting.
▪When the machine is not in use, the mains power cable should be completely
disconnected from the electrical power supply, stored and positioned safely.

4
JUN 2020
USER GUIDE
1
SAFETY STANDARDS COMPLIANCE
DS-200iQ / DS-600iQ
REV 00
1.3.3 POWER CONNECTIONS SAFETY NOTES
WARNING
▪Ensure any isolation or disconnect device, including the mains power supply
remain unobstructed at all times.
▪Ensure the mains power cable and its connectors are sound and undamaged.
Should any electrical cable become damaged do not operate the machine,
and rated replacement by the manufacturer.
▪A voltage of 230V may be present inside this machine. The power source can
produce enough voltage and current to be very dangerous.
▪This machine is equipped with a three-pronged plug. One of the prongs on the
plug provides a safety grounding (protective earth) feature. Ensure the plug
is always connected to a properly wired three-prong outlet. Do not use a two-
prong adapter without grounding the machine properly.
▪The machine must be earthed. Never remove the third prong from the plug.
The safety grounding (protective earth) feature provides extra protection in
the event of an electrical problem.
▪The mains power supply is fused on both live and neutral sides. Service
personnel should be aware that a mains voltage can exist even if no lighted
neon shows.
1.3.4 EMERGENCY SAFETY NOTES
WARNING
▪
switch and stop the machine operation (including all moving parts).
▪Should a fault occur with the machine, immediately isolate the machine
completely from the power source, by pressing the toggle switch located
power cable completely from the electrical power supply.

5USER GUIDE
DS-200iQ / DS-600iQ
2
INTRODUCTION

6
JUN 2020
USER GUIDE
2INTRODUCTIONDS-200iQ / DS-600iQ
REV 00
2.1 GENERAL OVERVIEW
The DS-200iQ / DS-600iQ machine is a high-volume Inserter/Folder. It is of modular
2.2 FUNCTIONAL OVERVIEW
The function of the DS-200iQ / DS-600iQ machine is to fold forms to ‘C’, ‘Z’, ‘V’ or
Enclosures such as inserts, reply envelopes etc. may be added.
Folded forms and enclosures are collated in the collation area in the Insert Head
before insertion into the envelope. Forms may be inserted without sealing the envelope
for subsequent checking or hand insertion.
NOTE:
Unfolded forms and enclosures may also be collated before insertion into C4
envelopes.
Batch processing functions allows a pre-set number of cycles to be completed before
the machine automatically stops.
Barcode/2D/OMR (with a number of barcode symbologies) are compatible for use
with a mark-reading Versatile Feeder or Flex Folder, allowing a group of forms to be
collated on the track prior to folding.
The DS-200iQ / DS-600iQ is equipped with a PC controlled Integrated Mail Operating
System (IMOS), and is accessed via touch-screen monitor or keyboard/mouse
from where jobs can be programmed and run. The number of jobs that can be
programmed is limited only by the capacity of the PC.
A daily mail function can be used as an optional feature on a Versatile Feeder or Flex
Folder and allows groups of documents (stapled or loose) to be hand-fed; they will
then be folded and inserted into an envelope (Flex Folder only).
If other hoppers are loaded, further forms can be collated.
No manual setting of the fold plates or envelope closer is required, as these are
adjusted automatically according to the settings within IMOS.
The DS-200iQ / DS-600iQ machine may consist of a number of module units,
depending upon the machine build ordered - these units are listed below:
▪Insert Head
▪Versatile Feeder
▪Flex Folder
▪Output Conveyor
▪Output Sorter
▪Turner
2.3 OVERVIEW OF COMPONENTS
Figure 2.1.
QTL-RND-GEN-00000105-A-00
Figure 2.1 – DS-200iQ / DS-600iQ main components

7
JUN 2020
USER GUIDE
2
INTRODUCTION
DS-200iQ / DS-600iQ
REV 00
2.3.1 INSERT HEAD COMPONENTS
Insert Head collates all documents in a pocket before insertion, feeds the envelope,
Envelope Feeder
that operates on demand to move the envelope stack forward.
Collation and Insertion Area
Folded forms either separately or in groups, are collated here into one pack (along
with enclosures) by the collate pocket. The pack is then inserted into the envelope.
Touch Sensitive Monitor
Touch Sensitive Monitor is used to operate and navigate IMOS and responds to button
pushes through the Graphical User Interface (GUI). A keyboard and mouse may also
2.3.2 VERSATILE FEEDER COMPONENTS
Versatile Feeder is a track mounted unit, with an end-station variant also available.
onto the track for subsequent insertion.
Versatile Feeder is available with a single feed hopper only, holding up to 1000 80gsm
A4 inserts, with mark-reading variants available for OMR/Barcode/2D (top read only).
2.3.3 FLEX FOLDER COMPONENTS
the Insert Head on its own, or in conjunction with Versatile Feeders. It folds documents
of feed pods (maximum of 2 feed pods).
NOTE:
Folding, including no-fold options may be set within IMOS, and used for
certain job types if required.
standard, though a no-read option is also available on some variants.
Feed Pod
each pod consists of either of the following with mark-reading available as an option:
▪2 x 500-Sheet Hopper
▪1 x 1000-Sheet Hopper
Accumulator
2.3.4 OUTPUT CONVEYOR COMPONENTS
Output Conveyor is an output device intended for use with a Sorter, Franker, Envelope
orientations.
Speed of the Output Conveyor can be adjusted within IMOS for the relevant job, and
batches can be ‘jogged’ to provide a gap between each batch.
The Output Conveyor can be attached to the Inserter in two orientations:
▪Angled 90º to the Inserter in the direction of the operator (default orientation)
▪In-line with the Inserter
Adjustable Backrest
Adjustable Backrest allows envelopes to stack up against it once they reach the end of
the conveyor, and may be adjusted to suit the required amount of tilt.

8
JUN 2020
USER GUIDE
2
INTRODUCTION
DS-200iQ / DS-600iQ
REV 00
2.3.5 OUTPUT SORTER COMPONENTS
Output Sorter is an output device and receives mail-pieces from an Inserter and directs
them to two or more output paths, e.g. an Output Conveyor. Operation of the Output
Sorter Catch Tray
the envelopes in a stack to allow subsequent hand removal. It may be adjustable to
suit a variety of envelope sizes.
2.3.6 TURNER COMPONENTS
Turner is an output device that delivers mail-pieces to a franker and turns certain sized
envelopes through 90º in order to correctly orientate them for subsequent franking
operation: mainly applicable to C4 envelopes, and C5 with vertical windows.
2.4 iQ iQ CONFIGURATIONS
options dependent upon what units have been ordered. Figure 2.2 shows an example
▪Insert Head
▪Versatile Feeder (2 x units)
▪Flex Folder (up to 2 feed pods, accumulator, and divert tray)
▪Output Conveyor (2 x units)
▪Output Sorter (2 x units, sorter catch tray)
▪Turner
▪Franking Machine
DS-600iQ, please contact your local Manufacturer Customer Support representative.
QTL-RND-GEN-00000100-A-00
Figure 2.2 –

9
JUN 2020
USER GUIDE
2
INTRODUCTION
DS-200iQ / DS-600iQ
REV 00
2.5 POWERING ON THE SYSTEM
Both the machine and PC must be switched on independent of each other.
1.
right panel of the Insert Head as shown in Figure 2.3.
QTL-RND-OPS-00000261-A-00
Figure 2.3 – Rear I/O toggle switch
2. Then press the front I/O power button located at the front bottom left panel
of the Insert Head as shown in Figure 2.4.
QTL-RND-OPS-00000179-A-00
Figure 2.4 – Front I/O power button
NOTE:
A green LED indicates that the machine is switched on/powering on.
3. Open the cupboard below the Insert Head to access the PC, and press the I/O
button on the PC to power it on.
The system can be set to automatically power-down after 60
minutes of idling (no activity), see section 3.2.3.2 System Options
for further assistance.
Pushing and holding down the front I/O power button for one
second will power-down both the machine and PC.

10USER GUIDE
DS-200iQ / DS-600iQ
3
INTEGRATED MAIL OPERATING SYSTEM (IMOS)

11
JUN 2020
USER GUIDE
3DS-200iQ / DS-600iQ
REV 00
3.1 IMOS CONTROL PANEL
The IMOS control panel as shown in Figure 3.1 is the main user interface between the
operator and the machine.
QTL-RND-SCR-00000001-A-00
Figure 3.1 – IMOS user interface control panel
The user interface allows access from hardware and unit set-ups, to setting up and
running jobs.
Menu screen
▪Libraries for storing, creating new documents, envelopes, barcodes and labels
▪Admin and Engineer services for hardware and unit set-ups, and diagnostics
NOTE:
Access to the Menu screen is only available once logged in as a Supervisor or
Engineer.
Jobs screen
▪Selecting or editing an existing job
▪
Run screen
▪Running or stopping a job
▪Fine tuning a job
Help
▪Help, and Remote assistance
Users / Shut-down
▪
▪Changing user password
▪Shut-down machine
Correct access rights must be granted before gaining access to
certain functions of IMOS.

12
JUN 2020
USER GUIDE
3
DS-200iQ / DS-600iQ
REV 00
3.2 MENU SCREEN
To access the Menu screen, press the ‘Menu’ button located in the top right of the
control panel as indicated in Figure 3.2.
QTL-RND-SCR-00000063-A-00
Figure 3.2 – Menu screen
Access to the Menu screen is only available once logged
in as a Supervisor or Engineer.
Access to Admin Settings is only available once logged in
as a Supervisor.
3.2.1 LIBRARIES
Libraries list the available existing OMR, BCR, Documents, Envelopes, and Postal
be used for mailsets.
QTL-RND-SCR-00000104-A-00
Figure 3.3 –
NOTE:

13
JUN 2020
USER GUIDE
3
DS-200iQ / DS-600iQ
REV 00
Both Supervisors and Engineers can copy, edit and create
3.2.1.1 OMR DEFINITIONS LIBRARY
.
contact your local Support Engineer.
3.2.1.2 BCR DEFINITIONS LIBRARY
.
contact your local Support Engineer.
3.2.1.3 DOCUMENTS LIBRARY
4.2.4 Creating a New Document for further assistance.
3.2.1.4 ENVELOPES LIBRARY
4.2.2 Creating a New Envelope for further assistance.
3.2.1.5 POSTAL PRODUCTS LIBRARY
4.5.1 Postal Product for further assistance.
3.2.2
Admin settings can only be accessed by a Supervisor, by selecting ‘Admin’ under
Services within the Menu screen as shown in Figure 3.4.
QTL-RND-SCR-00000105-A-00
Figure 3.4 – Supervisor Admin settings
Admin settings allow access to the following functions and settings:
▪System Security Level
▪Archive Data
▪Languages
▪Machine Id
▪Machine Name
▪Generate Licence File
▪Licenced Features
▪Imported Files

14
JUN 2020
USER GUIDE
3
DS-200iQ / DS-600iQ
REV 00
3.2.2.1 SYSTEM SECURITY LEVEL
System Security allows security levels to be set for the machine.
To set a security level, select a level from the list, and press ‘Ok’ once complete as
shown in Figure 3.5.
QTL-RND-SCR-00000106-A-00
Figure 3.5 – System security levels
Table 3.1 shows the security level options available, and an example list of certain
operations and features available to each associated security level.
Security
Level
Security
Type
Operator
Level Description On Startup
Low
(default)
Least
Secure
Expert
Operator
Operator can run/edit/create jobs
but cannot access Main menu
Run screen
displayed
Medium More
Secure
Standard
Operator Operator can only run jobs Run screen
displayed
High Most
Secure None Operator has no access to the
system. All users must log on
User screen
displayed
Table 3.1 – Security level operations and features
Other manuals for DS-200iQ
2
This manual suits for next models
1
Table of contents
Other quadient Printer manuals