Quest Engineering Conor Air 320 Drive Away User manual

Condor A 320 Drive Away Awning
Instructions

Page: 2
Condor Drive Away (air) instructions
These instructions are for your Condor air drive away awning. You should read these thoroughly before
you use the awning. Always keep these instructions as you may need to refer to them at a later date.
!
Before first use: Check your awning before its first use.
• Thank you for the purchase of this Quest Condor drive away awning.
• This awning has been tested for defects and flaws at the production facility,
but we recommend checking your awning by erecting it on your vehicle
before you go away in case there is an issue with it.
• Ensure your awning channel is free from debris and any rough edges as this
can damage the awning when being erected.
• Note: During heavy rainfall there could be the chance of water running in
between the awning and the connection tunnel, so we always recommend
that any items are kept inside the awning rather than left in the tunnel space.
Parts List
Description Quantity
Awning canvas 1
Steel Pegs 33
Quest Falcon Air Technology hand pump 1
Safety Advice: Fire, cooking and essential safety advice
• Check any camp site fire and safety regulations and fully digest this important information. All members of your group should be aware of these precautions
and know how to respond in the event of an emergency.
• Your awning entrances should be kept clear at ALL times in case of the event of an emergency and exit is required. Flame and heat sources should be kept well
away from your awning or flammable furniture.
• NEVER use a fuel-burning appliance inside or close to your awning, including stoves, barbecues, lanterns or candles. Apart from the danger of fire, burning
fuels such as gas or petrol without sucient ventilation produces carbon monoxide, a colourless, odourless but deadly gas. A charcoal barbecue produces
carbon monoxide even when it is working well and continues to do so until it is completely cold.
• When your fuel-burning appliance is finished, fully extinguish the coals and move it away from your awning. Even a cool appliance can give o lethal
amounts of carbon monoxide.

Page: 2
Condor Drive Away (air) instructions
Page: 3
Condor Drive Away (air) instructions
1
No Description
1Awning beading
2Connection tunnel (purchased separately)
3Main air beams
4Inflation point of air beam
2
5
Details
Details about your Condor awning
No Description
5Rear pegging point
6Removable front pane (removed in this image)
64
3

Page: 4
Condor Drive Away (air) instructions
Page: 5
Condor Drive Away (air) instructions
Details
Floor plan for your Condor awning and optional extras
220cm
100cm
300
cm
180cm
70cm
1
No Description
1Optional Connection Tunnel
2Optional Extension
3Condor Air 320 Drive Away Awning
2
3

Page: 4
Condor Drive Away (air) instructions
Page: 5
Condor Drive Away (air) instructions
Drive Away Awnings
Using the connection tunnel
Drive away awnings: Tunnel fitting
Your drive away awning has an optional zip on / zip o connection tunnel. This connection tunnel is used to connect your awning to your vehicle. There are
multiple dierent methods available for fitting it to your vehicle. Each of these are listed below. You can use whichever method you prefer, or find easiest to attach
to your vehicle.
‘Over the top’ :
• This is the oldest method of connecting the tunnel to your vehicle. You take one of the storm straps or guy lines located at the end of the beading on the tunnel and throw this
over your vehicle. Then peg this storm strap or guy line in the ground as normal.
• Repeat this at the opposite end of the tunnel.
• Then adjust the storm straps/guy lines so the tunnel sits just on ridge of the roof of your vehicle.
TIP : If you have a high vehicle you may have to attach a second storm strap or guy line (not supplied) to the existing one in order to be the correct length. It can also be simpler
and easier if you attach something like a tennis ball to the storm strap or guy line as this makes it easier to throw over the roof of the vehicle.
Using the beading
• If your vehicle has a channel (like a Reimo rail or similar) on it, you can use the beading on the connection tunnel.
• Your connection tunnel has dual beading (both 4mm and 6mm) on it as standard. If your channel is 4mm then use the 4mm (the smaller) of the beading. If your channel is
6mm then use the 6mm (the larger) of the beadings.
• NOTE: Your connection tunnel zips on and o the main awning, so even if you are planning to drive away and leave the awning pitched, you do not need to purchase an
extra drive away kit as you do with other awnings.
• Feed this into your channel and pull the tunnel until it is positioned where you want in the channel.

Page: 6
Condor Drive Away (air) instructions
Drive Away Awnings
Using the connection tunnel
Drive away awnings: Tunnel fitting.....continued
Using a wind out canopy
NOTE : This method connects the tunnel to your canopy. As you are only using the tunnel (as it is zipped o your awning, there is no change of damaging your canopy due to
weight and it makes this process much easier.
• All wind out canopies (such as Fiama F45, Thule Omnistore, Prostor etc.) have a channel along the front of them. This channel can be used the same as the ‘using the
beading’ example previously.
• Roll out your wind out canopy so the front of the canopy is at a manageable height.
• Slide the tunnel into the canopy and position where required. Once on the canopy, wind the canopy back into its cassette, so the tunnel is taken right up against the side of
your vehicle.
• At this point you are now ready to zip the tunnel to your awning to complete your pitching. (See pitching instructions later)
Using a magnetic Drive Away Kit
One option to connect your connection tunnel to your vehicle is a magnetic drive away kit. These are optional and have to be purchased separately. They are used to connect a
tunnel to your vehicle when you do not have any other method (such as a VW camper van). To use a magnetic drive away kit :
• Take the figure of eight connectors (there will be more than one section) from the magnetic drive away kit and slide them onto the beading on the tunnel.
• Then slide the magnetic drive away kit into the other side of the figure of eight.
• Then you can place the magnetic side of the drive away kit to the side of your vehicle.
TIP: Whilst the magnetic drive away kit will hold the tunnel to your vehicle, it will not support the tunnel in moderate to high winds (we have found this during testing of many
dierent brands of magnetic drive away kits), so we also recommend that if you are using a magnetic drive away kit we still use the two guy lines at the ends of the tunnel (similar
to the ‘Over the top’ solution above) to secure the tunnel to the vehicle, in conjunction with the magnetic drive away kit.

Page: 6
Condor Drive Away (air) instructions
Page: 7
Condor Drive Away (air) instructions
Drive away awnings: Adjusting your tunnel
Once you have connected the tunnel to your vehicle you will have to adjust the tunnel. This will depend upon how the tunnel is
connected, the ground that the awning is being pitched on and the height of your vehicle. The amount you have to adjust your tunnel
will again depend upon the height of your vehicle and the version of the drive away awning you have. The closer you are to the lowest
setting on the tunnel, the more adjustment you will have to make. The closer you are to the maximum height of the tunnel the less
adjustment you will have to make.
• Attach the top of the tunnel to the vehicle using the instructions on the pitching page(s).
• Next un-clip the webbing strap located on the outside of the tunnel, that goes from the top corner of the tunnel down to 180 cm from the ground.
• Then move the awning away from the vehicle until the roof of the tunnel becomes tight. This is the point where you start to pitch the rest of the
awning (instructions shown later).
• Once the awning is pitched you adjust the tunnel.
• Finally you adjust the tunnel as best you can. The tunnel is adjustable, but as the material can only be cut once it only truly fits at one height (which is
set to the maximum), all other heights are a compromise and will require adjusting the tunnel. You can make the adjustment anyway you wish, but we
recommend using the method below.
• Extend the webbing strap you un-clipped earlier to its full length.
• Then clip the webbing strap to the top of the awning and then adjust the webbing strap. Once this is done the material at the top of the tunnel should
become ‘rued’ so it resides in the area above the side door. If your van is near the lowest setting (180 cm) then you may find that it does not all go
above the top of the door. It should look like the photo to the right.
TIP : If you are towards the very lowest end of the tunnel connection height you can peg the tunnel out at an angle. This will take some of the extra material up and help get a
better connection. We recommend trying the above first and then if you find you have to, then move the rear pegging point out to angle the tunnel.
Drive Away Awnings
Adjusting the connection tunnel

Page: 8
Condor Drive Away (air) instructions
Pitching
How to pitch your Condor air drive away awning
Pitching: How to erect your awning.
• Guideline : This instruction is a guideline on how to erect your awning. With time and experience you may find your own way to erect your awning, but
whatever way you erect your awning, you should always ensure that the fabric is tight, use all pegging points and storm straps and you have enough water
run o to ensure no issues occur during use.
• Step 1 : Preparation
First remove the awning from the bag and separate the awning from the pump and peg(s). Place the awning on the floor next to your vehicle, ensuring that it
is not twisted and caught up in the storm straps as this can make it more dicult to pitch the awning.
• Step 2 : Connect the tunnel (Optional)
If you are connecting your Condor awning to your vehicle you will need the optional connection tunnel. In this case the first step is to connect the tunnel to
your vehicle. There are dierent methods of connecting the tunnel to your vehicle, all of which are explained previously. Once you have connected the tunnel
to your vehicle you simply zip the tunnel to your awning and continue with the pitching. Sometimes we have found it easier to inflate the awning (step 3 below)
before zipping the tunnel to your awning, but this is just down to your preference.
• Step 3 : Inflating the air beams
The condor has three beams on it and they can be done in any order. Simply screw the value into the beam (air inflation positions shown on image previously)
and then inflate the air beam using the pump provided. The pump has a dump valve on it to ensure you do not over inflate the awning. Simply inflate the
beam until the air comes out of the dump valve rather than into the awning, at which point you will hear a dierence as the air will come out of the dump
valve when you depress the pump. Repeat for the other beams. Once you have done all the beams you are ready to peg the awning.
TIP : If you are in very windy conditions then it can make it easier to peg the Condor’s 4 corners down first before inflating the air beams as once inflated the awning with catch
the wind. If you do peg before inflating you will have to unpeg to adjust and move the awning into place.

Page: 8
Condor Drive Away (air) instructions
Page: 9
Condor Drive Away (air) instructions
Pitching: How to erect your awning.... continued
• Step 4 : Move the awning and adjust the tunnel
Now your awning is inflated and connected to your vehicle (if you are using the optional tunnel), you need to move the awning and adjust the tunnel. If you
are not connecting the awning to your vehicle simply move the awning into the position you want and proceed to step 5.
If you are connecting it to your vehicle then first peg the two rear pegging points at the bottom of the tunnel under the vehicle, then move the awning away
from your vehicle until the connecting tunnel goes tight, at which point your awning is in the correct position. The tunnel sides are angled in towards the
awning as shown on the floor diagram previously. Once the awning is in the correct position you can continue with pegging the awning.
• Step 5 : Pegging
The rear points are already pegged, so now move to the front corners, pulling the awning tight as you go around. Repeat this for all of the pegging points
around the awning. Once all the pegging points have been done, you should then peg the storm straps (or guy lines). Always peg the storm straps (or guy
lines) even in good weather as the weather can change at any time and failure to peg all points and the storm straps (or guy lines) may lead to the awning
failing.
• Step 6 : Optional Extras (purchased separately) : Extension
As well as the optional connection tunnel explained previously you may also extend your awning with the Condor extension. This extension increases the
size of your awning. To pitch the extension you simply remove the extension out of the bag. Then zip the extension onto the front of the Condor (if you have
pegged the storm straps (or guy lines) out then you make have to unpeg some of them). Then inflate the single beam in the extension.
The extension will then inflate and add an extra 180 cm of space to your awning. Once inflated peg it out. Once pegged you can unzip the panel from the
front of the Condor and zip this into the front of the extension, or you can leave the front panel in the awning and have the extension as a covered canopy/
patio area.
Pitching
How to pitch your falcon air drive away awning

Page: 10
Condor Drive Away (air) instructions
Maintenance
How to maintain your condor air drive away awning.
Maintenance: How to keep your awning in tip top condition.
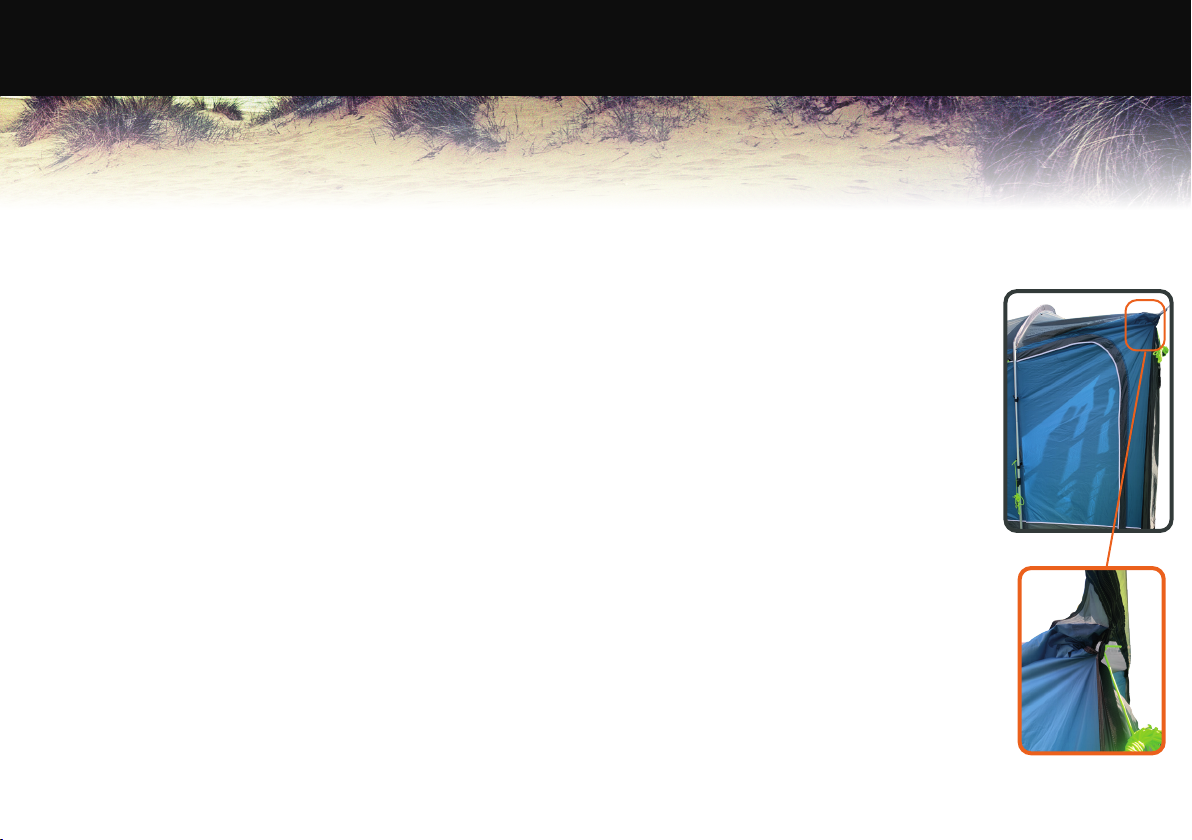
• Ongoing maintenance - tube twist : When you get your awning all the tubes should be correct positioned without any twisted tubes or bladders. They are
held in position with velcro, straps and a sleeve, but due to the nature of air tubes they do move. They can move when in use, when being inflated or deflated,
when they are being dragged though the awning channel during pitching, or even more during transit. This is unavoidable and can happen at any time.
Whilst this should not aect the performance or running of the awning, it can sometimes cause your awning to look looser than it should. When this happens
it can aect the tautness of the roof. Whilst this may not aect the performance of the awning, you should always be aware of the tubes especially if they
are twisted. Tubes can be untwisted by yourself at any time and should be done whenever you notice that they are twisted.
• Ongoing maintenance - valve movement : Due to the nature of valves and air pressure any of the valves can become loose over time and should be checked
each time you use your awning. If this is not done and a valve has worked loose your awning may deflate over time.
• Suitability : This is a lightweight touring awning and should never be used as a long term or seasonal pitch awning. To ensure no issues it should also be taken
down in adverse weather conditions, especially in strong winds or snow fall.
• Condensation : Your awning will suer from condensation. The amount of condensation will dier depending upon ground conditions, the weather and how
the awning is pegged. We recommend using the ventilation doors whenever possible as this will lessen the amount of condensation you get.
• Fading : Your awning is coated against the suns harmful rays, but this will degrade over time and only delays the eect. Fading will aect the colour of your
awning, but not its performance and is not covered under your warranty as it is a natural process with any synthetic material used outdoors.
• Weathering and Seams :The main seams on this awning have been taped to help prevent water ingress. Some seams (such as the seams on the webbing
material by the awning channel) cannot be as eectively taped and may need weathering. Weathering is the process where the awning gets wet and the
cotton thread used in the manufacturing expands to fill the gap caused when the product is sewn. When the cotton dries it shrinks back, but never fully. This
process then ensures that the cotton thread fills the gap and seals against water ingress. Sometimes this process is not completed the first time and needs to
be done a few times, depending upon your expectations you may find it necessary or quicker to treat the seams with seam sealant. Also over time the seams
may become damaged or have peeled away during normal wear and tear then these should also be treated with seam sealant to give extra protection and
help water ingress.

Page: 10
Condor Drive Away (air) instructions
Page: 11
Condor Drive Away (air) instructions
Maintenance
How to maintain your condor air drive away awning.
Maintenance: How to keep your awning in tip top condition...... continued
• U.V. Coating : Your Falcon porch awning has a U.V. coating on it which helps protect it against the harmful suns rays, but this coating will degrade over time.
This time will dier depending upon the weather and how often you use the awning. We always recommend re-coating your awning each year as this can
add years of extra life to your awning. If you do re-coat your awning we recommend cleaning it first with a dedicated awning cleaner and then re-coating it
immediately after it has dried, again with a dedicated re-proofing solution.
• Drying : You should never pack away a wet awning. If you pack away your awning wet it can lead to mould growth and this can damage your awning. If you
do have to pack away the awning wet, once back home you should immediately remove the awning from its bag and dry both the awning and the bag before
re-packing it away. Also ensure that the adjustable pole is taken apart and dried separately as if water is left inside the pole this can cause damage.
• Cleaning : You should aways keep your awning clean as dirt, water and mud can lean to mould growth and damage the awning, the coating, or both. We
recommend firstly brush o any lose dirt with a soft brush and then clean your awning with warm soapy water, without using any chemicals or solutions. If
you have more stubborn stains or dirt then use a dedicated awning cleaner, but remember if you use a dedicated awning cleaner you should also re-proof it
afterwards as the act of cleaning can damage the coating that has been applied to your awning.

Page: 12
Condor Drive Away (air) instructions
Page: 13
Condor Drive Away (air) instructions
Warranty Claim
• In the unlikely event of a warranty claim, you must contact your retailer.
• Take the product to your retailer that you purchased it from along with your proof of purchase and explain the issue with the retailer.
• You will be required to fill out a warranty form at the retailers once you have been though the issue with the retailer.
• The retailer will then check the product and get in touch with the wholesaler or manufacturer.
• The retailer will keep you informed of the progress of the claim.
The wholesaler or manufacturer will not (unless under special circumstances) get in touch with you as all information will be passed back directly to the retailer.
Warranty Information
• This product comes with a full 12 month manufacturers defect warranty and covers any manufacturers defects for one (1) year from the date of the original
purchase. It does not cover any damage occurred though:
• The product falling or being dropped.
• The product has been technically changed by the owner or another third party
• Improper use of the product and normal wear and tear, which includes fading and degradation of seams.
• The aected part will be replaced or repaired (manufacturers option) if they are found to be defective within the one (1) year time frame.
• The warranty will be void if the product has been subject to neglect, misuse, improper installation, misapplication, alteration or accident including, but not
limited to, improper installation, maintenance or use of unauthorised parts or attachments.
• Damage caused by not following the instruction manual in full will invalidate the warranty, if this results in consequential damages, Quest will not be liable
for these damages or any costs incurred due to these damages.
• Quest will not be liable for material damage or personal injury caused by improper use or if the safety instructions are not properly executed in full.
• All claims must be made though the retailer you purchased the product from and not direct with the wholesaler or manufacturer.
• Warranty claims cannot be honoured without an original dated receipt and or proof of purchase.
• By executing repairs the original warranty period of (1) one year will not be extended, nor the right to a complied new warranty. This warranty is only legal
on European soil. This warranty does not overrule the European directive 2011/83/EU.
• This product may not be amended or changed.
Warranty
Your Condor awing warranty details.

Page: 12
Condor Drive Away (air) instructions
Page: 13
Condor Drive Away (air) instructions
Your Name Your Email
Address
Model • Condor 320 • Condor Low Tunnel • Condor High Tunnel • Condor Extension • (Delete as appropriate)
Frame Falcon Air Technology (FAT) Batch Number (found on sewn in label inside the awning)
Purchase Date
Retailer Name
and address
Additional info

twitter.com/questleisure facebook.com/questleisure youtube.com/questleisure
www.questleisure.com
Template Version : 2 • Instruction Version : 3
Table of contents
Other Quest Engineering Accessories manuals