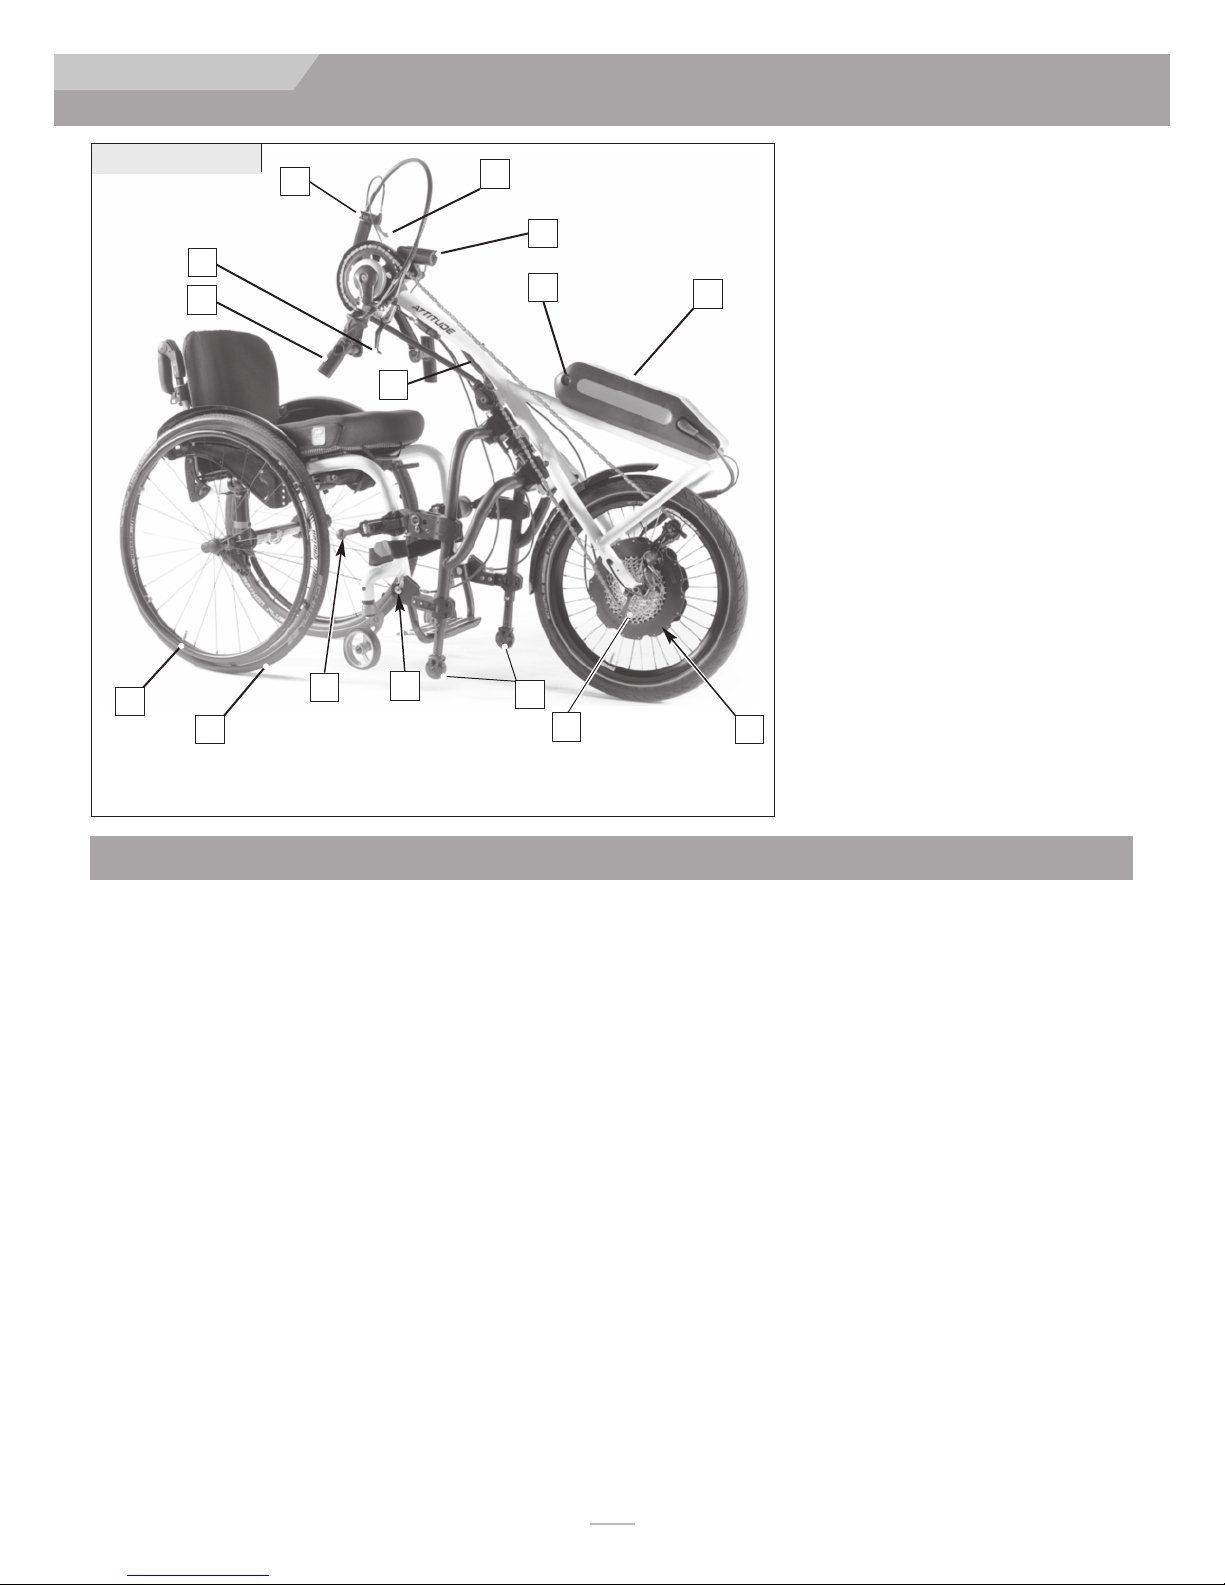
Quickie Attitude User manual

SECTION ENGLISH
QUICKIE ATTITUDE
Owner’s Manual
Qu ck e®ATTITUDE
Supplier: This manual must be given to the rider of this bike.
Rider: Before using this bike read this entire manual and save for
future reference.
Manual de Instrucciones
Qu ck e®ATTITUDE
Distribuidor: Este manual debe ser entregado al pasajero de esta silla de
ruedas.
Pasajero: Antes de usar esta silla de ruedas, lea este manual en su totali-
dad y guárdelo para futura referencia.
Cada una de las sillas se envía con un manual de instrucciones en inglés. El manual en español
o francés está disponible en formato PDF en nuestra página en Internet:
www.SunriseMedical.com. Ingrese a la página del producto específico para descargar el manual,
o comuníquese con el proveedor autorizado de Sunrise Medical.
Manuel d’instructions
Qu ck e®ATTITUDE
Au Fournisseur: Ce manuel doit être remis à l’usager de ce fauteuil
roulant.
À l’Usager: Veuillez lire tout le manuel et le conserver pour référence
ultérieure.
Chaque fauteuil est livré avec un manuel d’instructions en anglais. Les versions en espagnol
et en français sont à votre disposition en format PDF sur le site : www.SunriseMedical.com.
Veuillez vous rendre à la page de votre produit pour télécharger le manuel dans la langue
souhaitée, ou contactez un fournisseur agréé Sunrise Medical.

I. INTRODUCTION
MK-100393 Rev. A 2
QUICKIE A TTITUDE
SUNRISE MEDICAL LISTENS
Thank you for choosing a Quickie product. We want to hear your questions or
comments about this manual, the safety and reliability of your bike, and the
service you receive from your Sunrise supplier. Please feel free to write or call
us at the address and telephone number below:
Sunrise Medical (US) LLC
Customer Service Department
2842 Business Park Ave
Fresno, CA 93727
(800) 333-4000
Be sure to return your warranty card, and let us know if you change your
address. This will allow us to keep you up to date with information about
safety, new prod-ucts and options to increase your use and enjoyment of this
product. If you lose your warranty card, call or write and we will gladly send you
a new one.
FOR ANSWERS TO YOUR QUESTIONS
Your authorized dealer knows your product best, and can answer most of your
questions about chair safety, use and maintenance. For future reference, fill in
the following:
Supplier: _____________________________________________________
Address: _____________________________________________________
Telephone: ___________________________________________________
Serial #: ______________________ Date/Purchased: _________________
ADDITIONAL INFORMATION YOU SHOULD KNOW
No component of this chair was made with Natural Rubber Latex.
DISPOSAL AND RECYCLING INFORMATION
When this product reaches the end of its life, please take it to an approved
collection or recycling point designated by your local or state government. This
product is manufactured using a variety of materials, Your product should not
be disposed of as ordinary household waste. You should dispose of your
product properly, according to local laws and regulations. Most materials that
are used in the construction of this product are fully recyclable. The separate
collection and recycling of your product at the time of disposal will help
conserve natural resources and ensure that it is disposed in a manner that
protects the environment.
Ensure you are the legal owner of the product prior to arranging for the product
disposal in accordance with the above recommendations.

MK-100393 Rev. A
3
QUICKIE ATTITUDE
I. INTRODUCTION ............................................................... 2
II. TABLE OF CONTENTS ...................................................... 3
III. YOUR BIKE AND ITS PARTS............................................ 4
IV. NOTICE-READ BEFORE USE............................................ 5
A. Choose the Right Bike ............................................... 5
B. Review This Manual Often ........................................ 5
C.Warnings....................................................................... 5
V. EMI (ELECTROMAGNETIC INTERFERENCE).............. 5
A. What is EMI? ............................................................... 5
B. What effect can EMI have? ....................................... 5
C. Sources of EMI ............................................................ 5
D.Distance from the source .......................................... 5
E. Immunity level .............................................................. 6
F. Report all suspected EMI incidents ........................... 6
G. EMI from your chair .................................................... 6
VI. GENERAL WARNINGS....................................................... 6
A. Weight limits ................................................................ 6
B. Intended use ................................................................ 6
C. Attendants and caregivers ......................................... 6
D.Accessories ...................................................................
6
E. Know your bike ..............................................................
6
F. Reduce the risk of an accident.................................... 6
G. Obstacles .......................................................................
7
H. Safety checklist ............................................................
7
I. Changes & adjustments ...............................................
7
J. Operating surfaces ........................................................
7
K. Environmental conditions ...........................................
7
L. Center of balance ..........................................................
7
M.Street use ......................................................................
N.Moving backward..........................................................
8
O. Transit ............................................................................
8
P. Power on/off .................................................................
8
Q. Fasteners .......................................................................
8
R. Pneumatic tires .............................................................
8
S. Carrying or moving the bike .........................................
8
T. Motor temperature and trapping points.....................
8
U. Safety instructions (after you ride) .............................
8
VII. BATTERY AND CHARGER ................................................... 9
A. Introduction .....................................................................
9
B. Battery type .....................................................................
9
C. Low battery levels ..........................................................
9
D.Battery safety .................................................................
9
E. Battery Storage ...............................................................
10
F. Charging..........................................................................
VIII. USE AND MAINTENANCE ................................................... 11
A. Introduction ...................................................................
11
B. Critical Safety checks...................................................
11
C.Cleaning..........................................................................
D.Safety checklist ............................................................
11
E. Troubleshooting chart....................................................
11
F. Safe riding techniques ..................................................
11
G. Docking the Attitude.....................................................
12
H. Un-Docking the Attitude...............................................
12
I. Battery and Power (Hybrid) ..........................................
13
J. Parking/docking stand ..................................................
13
K. Brakes.............................................................................
L. Coaster brake (Optional)................................................
14
M.Derailleur gears / Gear Hub.........................................
14
N.Quick-Release (Freewheel) (Optional) ........................
14
O. Check proper crank(pedal) adjustment......................
15
P.Inspect.............................................................................
15
IX DEALER SERVICE & ADJUSTMENT ..................................... 17
A. Dealer Service Introduction..........................................
17
B. Critical Maintenance Tips .............................................
17
C.Cleaning............................................................................
D.Simple Disc Brake adjustment....................................
17
E. Simple Derailleur (positive shifting) adjustment........ 18
X. SUNRISE LIMITED WARRANTY .......................................... 18
II. TABLE OF CONTENTS
10
13
17
11
8

MK-100393 Rev. A 4
QUI CK IE ATTITUDE
III. YOUR BIKE AND ITS PARTS
1. One hand docking and store handle.
2. Undocking or release lever.
3. Headlight
4. Key and battery removal (Hybrid only)
5. Battery pack (Hybrid only)
6. Attitude power drive (Hub motor,
Hybrid only)
7. Sprocket set (8 or 10 gears)
8. Support wheels
9. Docking pins
10. Docking lock lever
11. Hand crank
12. ear shift lever
13. Parking brake
14. Rear tire
15. Handrim
100 kg
28-46 cm
170 grams
14.5 kg
100 kg
28-46cm
170 grams
21.5 kg
220 lbs
11-18 in
6 ounces
47.5 lbs
20”
250 Watts
14.5 amp/hour
Trigger/Grip shift
10
6.7 in 170mm
18.5 in
470mm Disc
160mm Yes
28 Frame colors
QUICKIE ATTITUDE
QUICKIE ATTITUDE
Rider weight capacity
Front frame width
Weight of parts at chair
Total bike weight
Wheel size
Motor
Battery
Gearing shifters
Gearing speeds
V-crank width
Crank Length
Brake
Parking brake
Frame colors
1
6
5
2
14
11
15
12
7
MANUAL
220 lbs
11-18 in
6 ounces
32 lbs
20”
-------
-------
Trigger/Grip shift
8 & 30
6.7 in 170mm
18.5 in
470mm Disc
160mm Yes
28 Frame colors
NOTE: All features may not be available with
some bike setups or in conjunction with anoth-
er bike feature.
NOTE- The Quickie Attitude is designed to fit
on a variety of Quickie products. Each Quickie
product has a different mounting area that is
designed to accept the Quickie Attitude.
For any questions, please consult your author-
ized dealer for information.
HYBRID
8
9
10
3
4
13

V. EMI (ELECTROMAGNETIC INTERFERENCE)
A. WHAT IS EMI?
WARNING
1. Electromagnetic interference. (EMI) comes from radio wave
sources such as radio transmitters and transceivers.
(A “transceiver” is a device that both sends and receives
radio wave signals).
2. There are a number of sources of intense EMI in your daily
environ-ment. Some of these are obvious and easy to avoid.
Others are not, and you may not be able to avoid them.
3.
4.
Powered products may be susceptible to electromagnetic
interfer-ence (EMI) emitted from sources such as radio
stations, TV stations, amateur radio (HAM) transmitters, two
way radios, and cellular phones.
EMI can also be produced by conducted sources or electro-
static discharge (ESD).
WARNING
Heed all warnings to reduce the risk of unintended chair movement:
1. Beware of the danger from hand-held transceivers. Never turn on
or use a hand-held transceiver while power to your bike is on.
Use extra care if you believe that a transceiver may be in use
near your bike
2. Be aware of nearby radio or TV stations, and avoid coming close
to them.
3. If unintended movement occurs, turn off the power switch on
your bike as soon as it is safe to do so.
B. WHAT EFFECT CAN EMI HAVE?
WARNING
1. EMI can cause your bike, without warning, to:
•Move by itself
•Move in unintended directions.
If any of these occur, it could result in severe injury to you or
others.
2. EMI can damage the control system of your chair. This could
create a safety hazard, and lead to costly repairs.
C. SOURCES OF EMI
WARNING
The sources of EMI fall into three broad types:
1. Hand-Held Transceivers:
The antenna is usually mounted directly on the unit. These include:
•Citizens band (CB) radios
•“Walkie-talkies”
•Security, fire and police radios
•Mobile phones
•Lap-top computers with phone or fax
•Other personal communication devices
•Electronic article surveillance systems
NOTE – These devices can transmit signals while they are on, even if not
in use.
2. Medium-Range Mobile Transceivers:
These include two-way radios used in police cars, fire trucks,
ambulances and taxi cabs. The antenna is usually mounted on the
outside of the vehicle.
3. Long-Range Transceivers:
These include commercial radio and TV broadcast antenna towers and
amateur (HAM) radios.
NOTE - The following are not likely to cause EMI problems: Lap-top
computers (without phone or fax), Cordless phones, TV sets or AM/FM
radios, CD or tape players.
D. DISTANCE FROM THE SOURCE
WARNING
Electro-magnetic energy rapidly becomes more intense as you get
closer to the source. For this reason, EMI from hand-held devices is of
special con-cern. A person using one of these devices can bring high
levels of EM energy very close to your bike without you knowing it.
MK-100393 Rev. A
5
QUICKIE ATTITUDE
IV. NOTICE– READ BEFORE USE
A. CHOOSE THE RIGHT BIKE
This product is intended for single person use only. Final selection of
the type of product, options and adjustments that are used with either
the Manual version, or Power Hybrid Technology rests solely with you
and your health care professional. Choosing the best bike for your
unique mobility needs, will depend on such things as:
1. Your disability, grasping strength, balance and coordination.
2. The types of hazards you must overcome in daily use (where you
live and work, and other places you are likely to use your bike).
.
3 Because this product is generally used in traffic, and on roads, the
rider must be aware that they are subject to any and all traffic
laws that apply to vehicles on the road.
B. REVIEW THIS MANUAL OFTEN
Before using this bike you, and each person who may assist you, should
read this entire manual and make sure to follow all instructions. Review
the warnings often, until they are second nature to you.
C. WARNINGS
The word “WARNING” refers to a hazard or unsafe practice that may
cause severe injury or death to you or to other persons. The “Warnings”
are in three main sections, as follows:
1. V - EMI
Here you will learn about electromagnetic interference and how
it can affect your bike
2. VI. - GENERAL WARNINGS
Here you will find a safety checklist and a summary of risks
you need to be aware of before you ride this bike.
Throughout this owner’s manual and on the product you will see the
icons listed below to identify warnings and potential hazards.
ESD: Electrostatic Discharge can damage printed circuit boards.
NOTE – Where they apply, you will also find “Warnings” in other sec-
tions of this manual. Heed all warnings in these sections. If
you fail to do so a fall, tip-over or loss of control may occur
and cause severe injury to the rider or others.
3. VII. - BATTERY AND CHARGER (Hybrid Model)
Here you will learn about the safe use and handling of your
hybrid battery and charger.

MK-100393 Rev. A 6
QUI CK IE ATTITUDE
F. REPORT ALL SUSPECTED EMI INCIDENTS
WARNING
You should promptly report any unintended movement or brake
release. Be sure to indicate whether there was a radio wave source
near your bike at the time. Contact:
Sunrise Medical, Customer Service Department at (800) 333-4000.
G. EMI FROM BIKE
WARNING
The bike itself can disturb the performance of electromagnetic fields
such as emitted by alarm systems of shops.
E. IMMUNITY LEVEL
WARNING
1. The level of EM is measured in volts per meter (V/m). Every
power assist bike can resist EMI up to a certain level. This is
called its
“immunity level”.
2. The higher the immunity level, the less the risk of EMI. It is
believed that a 20 V/m immunity level will protect the power
assist user from the more common sources of radio waves.
3. The common configuration tested and found to be immune to at
least 20 V/m is: Quickie Attitude mounted to a Quickie 2
Product using Lithium Nickel Manganese Cobalt Oxide Batteries.
V.ELECTROMAGNETIC INTERFERENCE
VI. GENERAL WARNINGS
WARNING
There is no way to know the effect on EMI if you add accessories or
modi-fy this bike. Any change to your bike may increase the risk of EMI.
Parts not specifically tested or parts from other suppliers have unknown
EMI properties.
A. WEIGHT LIMITS
WARNING
NEVER exceed the weight limit specified by Sunrise Medical. The
weight capacity identified is for the combined weight of a rider and
items carried using on-board storage. If you exceed the weight limit,
damage to your chair, or bike, a fall, tip-over or loss of control may
occur and cause severe injury to the rider or others.
Weight Capacity
Attitude Manual - 220lbs/(100kg).
Attitude Hybrid - 220lbs/(100kg).
B. INTENDED USE
The Quickie Attitude is a lifestyle bike for a wheelchair that is intended
to empower physically challenged persons by providing a means of
enhanced mobility. This Owner’s Manual refers to the Manual and
Hybrid bike only. For warnings and information about the correct use
and care of your wheelchair, please refer to the Owner’s Manual
provided with that chair.
WARNIN
DO NOT use this bike for purposes other than what is intended by the
manufacturer. Unauthorized modifications and use of parts or accessories
not supplied or approved by Sunrise Medical may change the chair struc-
ture. This will void the warranty and may cause a safety hazard. If the
warning is ignored, damage to your chair, and the potential for severe
injury of the person using the chair for unintended purposes can occur.
C. ATTENDANTS AND CARE IVERS
WARNIN
Before you assist a rider, be sure to read all warnings contained in this manu-
al, and follow all instructions that apply. Be aware that after consulting a
healthcare professional, you will need to learn safe and proven body mechan-
ics to use and create assistive methods best suited to your abilities.
D. ACCESSORIES
WARNING
Unauthorized modifications or use of parts, or accessories not supplied
or approved by Sunrise Medical may change the chair structure. This
will void the warranty and may cause a safety hazard.
Some problems that may occur, but are not limited to:
1. Incorrect Wheels and/or tires that put the rider at risk of a fall or
tip-over.
2. Any modification or disassembly can potentially create an unsafe
situ-ation where rider and/or attendant are put at risk.
E. KNOW YOUR BIKE
WARNING
Take the time to learn the feel of this bike before you begin riding.
Start slowly, with easy, smooth strokes. If you use too much force,
damage to your chair, a fall, tip-over or loss of control may occur and
cause severe injury to the rider or others.
F. REDUCE THE RISK OF AN ACCIDENT
WARNING
1. BEFORE you begin riding, you should speak with your
Authorized Dealer about the safe use of this bike.
2. Be aware that you must develop your own methods for safe
use best suited to your level of function and ability.
3.
4.
NEVER try a new maneuver on your own. Ask the advice of your
Health Care Professional to lower the risk of a fall or tip over.
Get to know the areas where you plan to use your bike. Look for
hazards and learn how to avoid them.
5. ALWAYS use the main brake to slow down your bike. In the case
of a main brake failure the parking brake can be used to slow or
stop the bike.
6. Avoid strong braking actions when maneuvering thru curves and
bends in a pathway.
7. Always make sure your bike has been correctly and securely
attached/docked to the wheelchair before riding.

MK-100393 Rev. A
7
QUICKIE ATTITUDE
. OBSTACLES
WARNIN
Riding over curbs or obstacles can cause tipping and serious bodily harm.
If you have any doubt that you can safely cross any curb or obstacle,
ALWAYS ASK FOR HELP. Be aware of your riding skills and personal
limitations. Develop new skills only with the help of a companion.
To avoid the risk of traversing obstacles:
1. Keep a lookout for danger – scan the area well ahead of your
bike as you ride.
2. Make sure riding areas where you live and work are level and free
of obstructions, stairs, and extreme slopes. Maximum obstacle
height is 1.25in (30mm).
3. USE EXTREME CAUTION WHEN using the bike on any type of
ramp, either going up or down. Corners and slopes may put the
rider at risk of a fall, tip-over, or injury.
4. To Help Correct Your Center Of Balance:
a. Lean your upper body FORWARD slightly as you go UP over
an obstacle.
b. Press your upper body BACKWARD as you go DOWN from a
higher to a lower level.
5. Keep both of your hands on the handcranks as you go over an
obstacle.
6. Never push or pull on an object (such as furniture or a doorjamb)
to propel your chair/bike.
If you fail to heed these warnings damage to your chair/bike, a fall, tip-over
or loss of control may occur and cause severe injury to the rider or others.
H. SAFETY CHECKLIST
WARNING
Before Each Use Of Your Bike:
1. Make sure the unit rolls easily and that all parts work smoothly.
Check for noise, vibration, or a change in ease of use. (This may
indicate low tire pressure, loose fasteners, or damage to the unit.)
2.
3.
Inspect for any problems. Your Authorized Dealer can help you find
and correct the problem(s).
Make sure that the weight limit does not exceed 220lbs between
the rider and any additional items (travel bags, water etc.)
4. Be sure to check main brake and the parking brake before each
ride to ensure they are in good working order and can stop the
unit in case there is a need for an emergency stop.
5. Be sure to check that all lights are working. Using your forward
and rear facing lights, even in daylight, will make you more visible
to other people and vehicles.
6. Check tire pressure and fill to psi shown on the sidewall of tire.
7. Ensure that your feet cannot slip off of the footplate of your chair.
8. Check all cables and electrical connections.
9. Check that the battery is locked and fully charged.
10. Double-check that connecting points are fully locked before travel
11. Always wear a helmet.
I. CHANGES & ADJUSTMENTS
WARNING
1. It is best to see your healthcare professional, or an authorized
dealer to have them re-assess the basic fit and performance
measure-ments, and adjust seating components when the
Quickie Attitude is added to an existing chair.
2. Unauthorized modifications or use of parts not supplied or
approved by Sunrise may change the bike structure. This will
void the warranty and may cause a safety hazard.
If you fail to heed these warnings, damage to your chair/bike, a fall, tip-
over or loss of control may occur and cause severe injury to the rider or
others
J. OPERATING SURFACES
WARNING
1. NEVER ride on unpaved or loose surfaces (e.g. on loose gravel,
in sand, mud, snow, or ice.
2. NEVER ride off-road, where obstacles are unpredictable.
3. Typical riding surfaces will be concrete, smooth pavement, and
smooth, packed riding surfaces that are typical of well-
maintained bike paths.
4. Use caution and go slow when steering around corners.
5. Take care when turning on any degree of slope..
If you fail to heed these warnings, damage to your chair/bike, a fall, tip-
over or loss of control may occur and cause severe injury to the rider or
others
WARNING
1. Use extra care if you must expose the
Quickie Attitude to wet or cold conditions.
2. Contact with water or excess moisture may cause your unit to
rust or corrode. Electronic components may also be effected.
Avoid all extreme weather situations if possible.
a. Do not use your bike in a shower, pool or other body of water,
or use a sprayer to wash it. Some parts are not water-tight
and may rust or corrode from the inside.
b. Avoid excess moisture (for example, do not leave the unit out-
side in the rain).
c. Dry your bike as soon as you can if it gets wet, or if you use
water to clean it.
If you fail to heed these warnings, damage to your chair/bike, a fall,
tip-over or loss of control may occur and cause severe injury to the rider
or others.
L. CENTER OF BALANCE
WARNING
Adding the Quickie Attitude to an existing chair will effect the center
of balance. The point where this bike will tip forward, back or to the
side depends on its center of balance and stability. How your chair
and bike are set up, the options you select and the changes you
make may affect the risk of a fall or tip-over.
1. The Center Of Balance Is Also Affected By:
a. A change in your body position, posture or weight
distribution.
b. Riding your chair/bike on a ramp or slope.
c. A back pack or other options and the amount of added
weight.
2. To Reduce The Risk Of An Accident:
a. Consult your authorized dealer BEFORE you modify or
adjust this bike. Be aware that you may need to make other
changes to correct the center of balance.
b. Have someone help you until you know the balance points
of your chair/bike and how to avoid a tip-over.
c. Use anti-tip tubes.
d. Always use extreme caution and reduce speeds when using
your bike in unfamiliar areas or conditions.
If you fail to heed these warnings, you are at a high risk of a fall, tip-
over or loss of control that could cause severe injury to the rider or
others.
VI.GENERAL WARNINGS
K. ENVIRONMENTAL CONDITIONS

MK-100393 Rev. A 8
QUI CK IE ATTITUDE
1. ONLY use fasteners provided by an authorized dealer (or ones of
the same type and strength, as indicated by the markings on the
heads).
2. Over- or under-tightened fasteners may cause them to fail or
cause damage to bike parts.
3. If bolts or screws become loose, tighten them before continuing
to use your bike.
R. PNEUMATIC TIRES
WARNING
Proper inflation of the tires extends the life of the tires and makes the
bike easier to use.
1. Do not use this bike if tires are under- or over-inflated. Check
weekly for proper inflation level, as listed on the tire sidewall.
2. Low pressure in a rear tire may cause the wheel lock on that side
to slip and allow the wheel to turn when you do not expect it.
3. Low pressure in any of the tires may cause the bike to veer to
one side and result in a loss of control.
4. Over-inflated tires may burst.
If you fail to heed these warnings damage to your bike, a fall, tip-over or
loss of control may occur and cause severe injury to the rider or others.
S. CARRYING OR MOVING THE BIKE
WARNING
Do not lift the product by its crank, the battery, cables or any item that
may detach from the bike. This may cause damage. Do not lift the
prod-uct and its rider together, the rider must dismount the bike if it is
being moved or transported, even for short distances. If you fail to
follow this warning, there is a risk of tipping over or falling out. If you
must move or transport the bike, please observe the following:
•Engage the wheel locks on both wheels so that they cannot
turn.
•Switch off the power supply.
•Make sure the rider dismounts the bike.
•Disengage the bike from the chair so the items can be lifted
separately..
•Use the handle between the cranks to move or store the bike.
T. MOTOR TEMPERATURE AND TRAPPING POINTS
WARNING
The motor can get very hot. Do not touch the motor and be cautious of
children and pets that may touch the motor after a trip. As with all
mov-ing parts, there is a risk that fingers could become trapped.
Please handle the bike carefully and observe the following:
•DO NOT put hands or fingers near the chain or gears while they
are moving.
•DO NOT touch the motor after a trip, it will be very hot.
•Lift the product only by the frame or specified handle.
•ALWAYS make sure that the derailluer on the drive wheel is set
properly.
U. SAFETY INSTRUCTIONS (AFTER YOU RIDE)
WARNING
For Hybrid Attitude - Remember to switch off the product immediately
when it is not in use to avoid accidental operation and/or movements
caused by accidentally touch-ing the crank handle. Switching off also
helps to preserve the battery charge.
M. STREET USE
WARNING
1. This product can be operated on a sidewalk, bike path, or street.
2. Avoid busy streets whenever possible.
3. Obey and follow all laws that apply to pedestrians and bicycles.
4.
5.
Be aware that when riding in a bike lane or on a paved roadway, the
rider is subject to the same traffic laws as any vehicle on the road.
Be alert to the danger of motor vehicles in parking lots, or if you
must cross a road. Be aware that this unit will be hard to see for
some motor vehicles because it has a lower profile than a bicycle.
6. Use Curb cutouts whenever possible and use extreme caution
when going straight up or straight off curbs. The danger of
tipping over, and the wear and tear on the unit could put the rider
at great risk. The maximum obstacle height is 1.25in (30mm).
7. Familiarize yourself with braking distances at different speeds.
8. Avoid hasty steering movements when travelling at speed.
9. When waiting for traffic at a stop ALWAYS activate the brake.
10. Always ensure your reflectors and lights are properly positioned
and functioning.
N. MOVING BACKWARD
WARNING
Use extra care when you move your chair/bike backward. Your chair/bike
is most stable when you propel yourself forward. You may lose control or
tip over if one of the rear wheels hits an object and stops rolling.
1. Propel your chair/bike slowly and smoothly.
2. If your chair/bike has anti-tip tubes, make sure to lock them in place.
3. Stop often and check to be sure your path is clear.
If you fail to heed this warning, you are at a high risk of damage to
your chair/bike, a fall, tip-over or loss of control that may occur and
cause severe injury to the rider or others.
WARNING
The transit option is not available with the Attitude.
1. The Transit option should not be added to any product that is
being used with the Attitude.
2. ALWAYS remove the rider from the chair and use OEM Vehicle
restraints when transport is necessary.
If you fail to heed this warning, you are at a high risk of damage to
your Bike, and may cause severe injury to the rider or others.
P. POWER ON/OFF (Hybrid only)
WARNING
Do not remove the battery while in operation. Turn off the power
switch and apply the brake in crowded or unpredictable situa-tions
where someone might bump or push the bike causing the product to
move unexpectedly.
Do not apply the ON/OFF button while on a slope.
1. Before applying the ON/OFF
button:
a. Park in a level area.
b. Apply the parking brake.
WARNING
Many of the screws, bolts and nuts on this bike are special high-
strength fasteners. Replacing these bolts with improper fasteners
may cause your bike to fail.
VI.GENERAL WARNINGS
If you fail to heed this warning, damage to your chair, or bike and a
possi-ble collision may occur and cause severe injury to the rider or
others.
Q. FASTENERS
O. TRANSIT

VII. BATTERY AND CHARGER (HYBRID MODEL)
MK-100393 Rev. A
9
QUICKIE ATTITUDE
A. INTRODUCTION
1. Battery Notes–
•The battery supplies the power for your bike. It contains a finite amount of energy and has limits
on how long it can store and supply energy. Use only the charger supplied with your battery.
•You can charge the battery only a certain number of times before it will fail and no longer hold a
charge.
•When storing or transporting your chair and bike, ALWAYS remove the battery to protect it from
damage or theft.
•For answers to more questions or concerns about the battery on this bike, consult your authorized
supplier.
2. Use the Proper Battery:
Your bike operates on one battery.
•Use the battery supplied with the bike.
•When you buy a replacement, purchase the same type of battery that was supplied with the bike.
3. Before removing the battery:
•Turn off the Power switch (A).
•Disconnect the battery plug and/or Charger plug (B).
4. Removing the battery:
•Unlock the Battery using the battery key (C).
•Slide the battery off of the battery holder/carriage (D).
There is one type of battery supplied with the Quickie Attitude.
Li-ion 00 (Lithium ion) comes with its own charging system. Do not use a charger other than the one
provid-ed with your specific battery. Damage to the battery, and/or the charger unit can occur if using
a charging unit other than what was provided by the manufacturer.
DANGER! - Failure to comply with the safety precautions and instructions regarding battery use and
charging may damage the product or result in electric shock, fire and/or serious injuries. The
Lithium Ion battery contains chemical stbstances which may cause hazardous reactions if the safety
instructions are not followed.
C. LOW BATTERY LEVELS
WARNING
ALWAYS be aware of the battery life. Check it frequently using the battery life indicator (E) located
on the side of the battery. It is best to carry a spare battery when taking prolonged rides. If you
continue to use the power assist function and the battery is completely discharged, the battery
warning light will be constantly illuminated and you will hear a "beep” tone. The power assist
function will switch off. You must change to a replacement battery.
1. Position your product on a safe level surface. Turn the power supply off and switch to the
replacement battery. If you have no replacement battery with you, leave the power supply
turned off while driving.
2. If you cannot change the battery on your own, an attendant must be present.
D. BATTERY SAFETY
WARNING
The battery on the Quickie Attitude is not very large but stores a large amount of charge. Improper
use can cause damage or in certain circumstances lead to burns or fire.
•Only use battery for the intended purpose of power assist for a product.
•Keep the battery out of reach of children and anyone who is not familiar with it.
•When transporting the product, remove the battery from the product.
•If the battery housing is damaged, a corrosive liquid (KOH) can be emitted. Avoid any
contactwith the skin and discontinue use, if you notice any damage to your unit.
•Do not allow battery connection to come into contact with wires or metal.
•Do not expose the battery to impact.
•Do not add or remove parts to the battery.
•Do not expose the battery to heat or place near fire or water.
•Do not use a broken or damaged battery.
•Do not disassemble or modify the battery.
•Do not charge or store the battery near pets or children.
4321
5
1
2
3
A
B
4
5
C
D
E
B. BATTERY TYPE

MK-100393 Rev. A 10
QUI CK IE ATTITUDE
VII.BATTERY AND CHARGER
E. BATTERY STORAGE
WARNING
When storing a fully charged and disconnected battery, make sure to store it at a temperature from
40°F (5°C) to 77° (25°C) and humidity not exceeding 80 percent. The battery contacts must be
covered or protected. Exposed contacts on the the battery can cause short circuits and lead to a fire
or battery rup-ture. Never Store the battery in direct sunlight or outdoors.
F. CHARGING
1. Please refer to the Safety instructions and precautions for the charging process enclosed with the
charging unit and pay careful attention to the following warnings.
WARNING
a. Fully charge the battery before its first use. The charging process ends automatically as soon
as the battery is fully charged. This avoids overcharging. Only charge the battery in a ventilated,
dry and dust-free environment.
b. DO NOT charge the battery in the presence or vicinity of flammable liquids or gases.
c. DO NOT expose the battery to moisture of any kind during charging. Examples would include:
high humidity (indoors or outdoors), water, rainwater, snow, etc)
d. Charge the battery only if the ambient surrounding temperature is between 32°F (0°C) and
104°F (40°C). If the battery is charged outside of these temperatures it may shut itself off,
and/or may sus-tain damage. The battery will reach its maximum service life if it is charged at
temperatures between 50°F (10°C) and 86°F (30°C)
e. When charging is complete, disconnect the charger from the wall socket first before
disconnecting it from the battery.
f. If the battery is damaged or not taking a charge, discontinue use.
g. A damaged charger (damage to plug, housing, or cable) should not be used. It should be
replaced by an authorized supplier.
h. Be aware of condensation. If the charger is brought from the cold into a warm room,
condensation may form. In this case, refrain from using the charger until all condensation has
dissipated. Please note that this may take several hours.
i. Never carry the charger by its power cable or the charger cable. Be careful not to pinch the
cord or lay it in an area where someone might trip over it.
J. Do not use or disassemble the charger if it has received a hard blow or has been dropped or
damaged in any way.
k. Do Not let children handle the charger.
l. Never touch the plugs with wet hands, or use a cord if it is wet or dirty. If it is wet or dirty, wipe
it with a clean cloth before use.
6 7
6
Battery
Charge port
7

Symptom
Bike slowing down
Bike won’t move
Shortage of power
Sluggish turning
Squeaks and rattles
Bike veers to side
VIII. USE AND MAINTENANCE
MK-100393 Rev. A
11
QUICKIE ATTITUDE
WARNING
The owner of this bike is responsible for making sure that it has been
set up and adjusted by a trained service professional under the advice
of a healthcare professional. The bike may require periodic safety and
function checks or certain in-use adjustments that can be performed by
the owner, caregiver or authorized dealer if desired. Always use parts
and/or acces-sories that have been recommended or approved by
Sunrise Medical when servicing this bike.
A. INTRODUCTION
1. Proper maintenance will improve performance and extend the
useful life of this bike.
2. Clean your bike regularly. This will help you find loose or worn
parts and make your chair/bike easier to use. You will need a
mild detergent solution and plenty of cleaning rags.
3. If discovered, have loose, worn, bent or damaged parts replaced
before using the bike.
4. All major maintenance and repair work should be completed by
your authorized dealer or local bikeshop.
5. Inspect and maintain this bike strictly per the safety checklist.
6. If you detect a problem, make sure to order parts, or have
service,and repair work done at your authorized dealer, or local
bikeshop before using the unit.
7. At least once per year, have a complete inspection, safety check,
and service of your bike made by an authorized dealer.
B. CRITICAL SAFETY CHECKS
1. Tire Air Pressure:
Check air pressure in pneumatic tires before every use. The tires will
not grip properly if you fail to maintain the air pressure shown on tire
sidewall.
2. Axles :
When checking axles, make sure they are clean and tight. Loose axles
can damage the bike and will effect performance.
3. Gears, deraileur unit, and chain
Inspect the drive train and chain before every use, ensuring that all
fasteners are tight and that no parts have moved from their preset
positions.
4. Brakes
Inspect the brakes and cables before every use, ensuring that all
fasteners are tight and that no parts have moved from their preset
positions.
C. CLEANING
1. Paint Finish
a. Clean the painted surfaces with mild soap or detergent as
needed.
b. Protect the paint with a coat of non-abrasive auto wax every
three months.
2. Chain and Moving Parts
a. Clean around gears and moving parts with a slightly damp (not
wet) cloth. Use a small amount of chain oil to improve the per-
formance of the bike
b. Wipe off or blow away any fluff, dust or dirt on axles or moving
parts.
3. Basic Maintenance Materials available at local Bike store
a. Tire pump
b. Tire pressure gauge
c. Clean rags or cotton cloth.
d Mild detergent.
Annually
Tire inflation level and wear
Wheel locks
Visually check for loose hardware
Axle
Inspect drive chain for any damage
Main brake and emergency brake
Clamps and attachment hardware
R Service by Authorized Dealer
Safety & Function Check
D. SAFETY CHECKLIST
Solution
NOTE - The user or caregiver should perform these weekly and
monthly checks to maintain the safety of their bike. If an item
is not working properly, please contact your authorized dealer,
local bike shop, or call Quickie Technical service. Do not use
the bike until all components are in proper working condition.
E. TROUBLESHOOTING CHART
RRRRR Make sure tire pressure is correct
and equal in both rear tires and front
caster tires, if pneumatic.
R R R R Make sure all nuts and bolts are tight.
RRR Make sure all spokes and nipples are
tight on radial spoke wheels.
R R R Check Battery, Charge Battery, Reset
the Power on the Battery.
F. SAFE RIDING TECHNIQUES
The hand cranks (pedals) are designed for movement in tandem. Make
sure that both hands are on the hand cranks at all times while riding the
bike.
1. Remember to start slowly applying the same pressure to both hand
cranks (pedals) in tandem.
2. Positioning belts and helmet should always be worn when riding.
3. If you need to pull over, pull off of the roadway and park in a safe
spot out of the way of traffic
4. Good posture while using your bike is important, make sure that
your chair and bike are adjusted to support good posture while
riding.
5. It is important to practice turning and other techniques before get-
ting on the road.
6. Always slow down before turning or maneuvering the bike.
Make sure chain is properly lubricated
and positioned on sprocket.
R
R
Every use
R
R
R
R
R
R
R

MK-100393 Rev. A 12
QUI CK IE ATTITUDE
. DOCKIN THE ATTITUDE
WARNIN
If the bike has a power system, always make sure the power switch is off before docking. Dock the wheel-
chair to the bike on a surface that is level and dry. As with all moving parts, there is a risk that fingers
and/or clothing could become trapped. Be careful of pinch points when docking, or undocking.
1. Engaging the docking pins.
a. Drive the wheelchiar as close as possible to the Attitude.
b. The two docking pins(A) should line up with the lower docking connector(B).
c. Engage the wheel locks on your chair, and pull the Attitude towards the wheelchair using the hand-
grip(C) until the two docking pins lock into the docking connector(B). An audible click will be heard.
2. Locking the wheelchair to the Attitude.
a.
b.
Push the Attitude upwards/forwards until the stand wheels(D) and the castors(E) leave the ground.
Swing the upper docking connector(F) on both sides, downwards until it stops. Clamping must be
on the aluminum tubing with no parts or clothing in the clamping area.
c. Pull the red locking levers(F) towards the rider until it locks firmly and completely.
d. Ensure that the docking pins are fully engaged, and the levers are locked before travel.
WARNIN
Always make sure after locking the wheelchair to the Attitude, that the stand wheels(D) are a minimum
of 1.25in (30mm) above the ground. If they are not, they stand wheels will need to be adjusted. If not
properly adjusted the wheels could hook onto an obstacle unexpectedly and cause the wheelchair and
Attitude to become unstable.
H. UN-DOCKIN THE ATTITUDE
WARNIN
If the bike has a power system, always make sure the power switch is off before undocking. Undock on a
surface that is level and dry. As with all moving parts, there is a risk that fingers and/or clothing could
become trapped. Be careful of pinch points when docking, or undocking.
1. Unlocking the two units.
a. Engage the wheel locks on your wheelchair.
b. Open the red locking levers(F) on both sides.
c. Using the handgrip (C), push the Attitude forwards/upwards until the upper docking connector has
no contact with the front frame or the wheelchair.
d. Swing the upper docking connector(F) upwards.
2. Disengage the locking pins.
a. Lower the Attitude forward/upward until the stand wheels(D) and the castors(E) are in contact
with the ground.
b. Pull the locking pin release lever by the handgrip( ).
c. Using the handgrip(C) pull the Attitude towards you until the docking pins are totally disengaged.
d. Hold the position and push the Attitude forward away from the wheelchair, until it is clear of your
wheelchair.
131211
13121110
1211109 9
10
11
C
A
E
12
VIII. USE AND MAINTENANCE
13
B
D
F
Locked

MK-100393 Rev. A
13
QUI C KI E ATTITUDE
I. BATTERY AND POWER (HYBRID)
Once the Attitude has been added to the chair, and the power plug(A) to the battery pack from the
Attitude power unit has has been plugged in, it is ready for battery power.
Before adding power to your chair, Apply the wheel locks on the wheelchair, and make sure the chair is
parked on a stable and level surface.
NOTE - Make sure that Battery(B) is firmly attached and locked(C) to the Attitude unit, check all support
points. Because of the added weight of the battery, the battery pack must be secure for travel.
1. Power switch
a. Before travel, Make sure to turn on the Power switch (D)
b. Always turn off the power immediately after you are finish travelling.
J. PARKIN /DOCKIN STAND
The lower docking frame also acts as a parking stand, which can be height adjusted for a smooth docking
or undocking with the Attitude unit.
1. Height adjustment
a. Using a 5mm hex key and wrench, remove the hardware(E) and use one of 4 adjustment holes
to set the correct height for your docking stand.
b. After the adjustment, check the height of the parking stand with the Attitude attached to the
wheelchair, to make sure that it is at least 1.25in (30mm) above the road surface.
c. Re-adjust the height if necessary.
K. BRAKES
The Attitude has two brakes that work independently from one another. The main braking system allows
the unit to safely and comfortably brake while riding the Attitude. If the main braking system fails, the
parking brake may be used for an emergency brake. There is also an optional coaster brake which is
activated by back pedaling the hand cranks.
1. Parking Brake
a. To engage the parking brake, press the lever(F) until it locks in place the unit should not move.
b. To dis-engage the parking brake, hold the lever(F) in place and press on the release tab( ).
2. Main Braking system.
a. Apply pressure to the brake lever(H) to stop or slow down the unit
b. Start slowly, and brake gently until you feel comfortable with the system.
WARNIN
Hard and sudden application of the brakes may cause a shift in your center of gravity resulting in possible
injury. Always stabilize your upper body by holding onto the handles firmly with both hands when braking.
The braking efficiency can be greatly reduced by any of the following:
1. Worn tire Tread or brake pads.
2. Low Air pressure in tires.
3. Dirty or wet braking surface.
4. Mis-adjusted, dirty, or loose brake pads.
5. The riding surface can also effect your braking effeciency if it is wet, dirty, sandy, rocky, uneven or
soft like grass. it is best to avoid riding on these types of surfaces.
6. If you detect a problem, make sure to order parts, or have service, and repair work done at your
authorized dealer before use.
1514
16
1817
14
15
16
A
B
D
17
F
VIII. USE AND MAINTENANCE
C
E
18
H
WARNING

MK-100393 Rev. A 14
QUI CK IE ATTITUDE
L. COASTER BRAKE (Optional)
For persons with limited finger strength the coaster brake allows braking by back-pedaling the hand-
cranks. The braking system can be de-activated by disengaging lever (A). Only deactivate the coaster
brake when maneuvering the bike in confined areas. When pedaling forward the braking system
will disengage automatically.
Riding with the coaster brake deactivated is not recommended and can lead to an increased risk of
accidents or possible injury.
M. DERAILLEUR EARS / EAR HUB
ear shifting on the Attitude is controlled using a trigger or grip shift switch, which are attached to the
hand-grips. Attitudes with derailleur gear shifting can only be engaged while pedaling the hand cranks.
Reducing the pedaling force during a gear shift will allow a smoother gear change. Attitudes with geared
hubs can also be operated in a parked position.
1. Trigger switch
a. The trigger switch located on the left handle(B) controls the larger (3-gear) upper sprocket. The
trigger (grip shifter) switch located on the right handle controls the (8 or 10 gear) lower sprocket.
b. Clicking the larger lever(C) will select the next lower gear
c. Clicking the smaller lever(D) will select the next higher gear.
d. The current gear is indicated on the dial for each trigger switch(E).
2. rip shift switch
a. The rip switch located on the right handle(F) controls the (8 or 10 gear) sprocket.
b. Turning the grip shift to the left activates the next lower gear
c. Turning the grip shift to the right activates the next higher gear.
d. If the gears are not working smoothly, or you are not able to shift into an appropriate gear for the
terrain your in, please contact your authorized supplier to adjust your derailleur.
N. QUICK-RELEASE (FREEWHEEL) (Optional)
The front tire of the attitude has a freewheel option which uses a quick-release mechanism to easily
remove the main drive wheel of the bike.
1. Remove the Front Wheel (Hybrid only)
a. Loosen the freewheel nut (A) several rotations.
b. Pull out on the quick-release handle(B) and rotate the handle several turns.
c. If the bolt and handle are loose enough (distance D), the wheel can be removed.
d. If the wheel doesn’t disengage on the first try, continue to increase (distance D) until the wheel can
be removed from the bike.
2. Install Front Wheel
a. Slide the exposed areas of the axle into the bike fork
b. Holding the nut(A) rotate the quick-release handle(B) several turns until (distance C) is close
enough so that the wheel can be secured when the handle is locked.
c. Lock the quick-release by pushing the quick-release handle(B) until it is in contact with the fork.
d. It is critical to check that the wheel is locked in place.
e. If there is any looseness in the wheel Re-adjust so that the wheel is secure.
19
19 20 21
22
VIII. USE AND MAINTENANCE
19
A
20
D
21
F
B
C
E
22
A
D
C
LOCKED
UNLOCKED
B
WARNING

MK-100393 Rev. A
15
QUI C KI E ATTITUDE
O. CHECK PROPER CRANK(PEDAL) ADJUSTMENT
The default position of the crank is based on data which depicts the average best fit. If this is not suit-
able for you, please contact your authorized Sunrise Medical dealer. The hand crank (pedal) can be
adjusted for the user by an authorized Sunrise Medical dealer. When checking proper crank(pedal) fit,
please pay attention to the following guidelines.
1. The cranks must not touch the knee or thigh while pedaling, especially through bends.
2. The elbow should not completely extend when the crank handles are furthest away from the
body.
3. If you have poor seating stability, or weak trunk muscles, a suitable restraint must be used.
Please contact your authorized dealer.
P. INSPECT
After the installation of the Quickie Attitude, and with the product assembled and adjusted, it should
roll smoothly and easily. All accessories should perform smoothly. If you have any problems, follow
these procedures:
1. Review the order form and shipped items to make sure bike specifications match the wheelchair's
physical characteristics.
2. Review the troubleshooting chart at the beginning of this section.
3. If your problem persists, contact your authorized dealer. If you still have a problem after contact-
ing your authorized dealer, contact Sunrise customer service. See the Introduction Page for details
on how to contact your authorized dealer or Sunrise customer service.
VIII. USE AND MAINTENANCE

MK-100393 Rev. A 16
QUI CK IE ATTITUDE
NOTES

MK-100393 Rev. A
17
QUI C KI E ATTITUDE
WARNIN
The owner of this bike is responsible for makiing sure that it has been setup and adjusted by a trained
service professional. Service and/or adjustments should only be done by a professional. Always use parts
and/or accessories that have been recommended and approved by Sunrise Medical when servicing this
bike.
A. DEALER SERVICE INTRODUCTION
1. At least once per year, this bike should have a complete inspection, safety check, and regular serv-
ice made by an authorized dealer.
2. If you have discovered a worn, bent, or damaged part, repair or replace them with recommended
parts before returning this bike to service.
3. All major maintenance and repair work should be done by an authorized dealer, or local bike shop
where applicable.
B. CRITICAL MAINTENANCE TIPS
1. Paint Finish
a. Clean the painted surfaces with mild soap or detergent.
b. Protect the paint with a coat of non-abrasive auto wax.
2. Axles and Moving Parts
a. Clean around axles and moving parts with a slightly damp (not wet) cloth.
b. Wipe off or blow away any fluff, dust or dirt on axles or moving parts.
c. Except for the chain, DO NOT USE 3 in 1 oil, or WD-40 ® for lubrication. Only use Teflon based
Lubricant when working on this bike.
D. SIMPLE DISC BRAKE ADJUSTMENT
If the brakes are either too loose (braking is not immediate) or if the brake pads rub the disc brake while
riding, the brakes will need to be adjusted.
1. Adjusting the brake cable
After each use the brake cables may stretch, causing the braking action to be limited. To tight-
en up the cable:
a. Turn the cable adjustment knob(A) to the right 1/4 turn and check the engagement of the brakes.
b. Repeat this action 1/4 turn at a time until the brake pads are fully engaged but do not rub on the
disc after the brake handle is released.
23
IX. DEALER SERVICE AND ADJUSTMENT
23
A
1. Torque settings:
A torque setting is the optimum tightening which should be made on a particular fastener. It is important
to use proper torque settings where specified. When not specified, torque settings should be 62 in-lbs.
2. Dealer Service and Adjustment Reference materials:
For help with the following adjustments go to www.sunrisemedical.com for parts manuals, instruction
sheets, and instructional videos that will aid in the repair of the Attitude bike.
You may also refer to the following documents:
Additional information on individual bike components may be available on the component manufacturer's
website. See the manufacturer's brand name printed on the individual component.
C. CLEANIN
The brakes are a critical component to the performance of your bike. If you have not been trained in
proper bicycle maintenance, or are not familiar with the components on this product, all maintenance
should be performed by a professional bike shop. Improper adjustments to the brake system may
cause damage to the mechanism and affect the safety of the bike.

MK-100393 Rev. A 18
QUI CK IE ATTITUDE
E. SIMPLE DERAILLEUR (POSITIVE SHIFTIN ) ADJUSTMENT
If shifting becomes difficult or sporadic, the Derailleur will need to be adjusted.
1. Adjusting the Derailleur cable (lower/upper)
After each use the Derailleur cables may stretch, causing the shifting action to be inconsistent,
or not allow the chain to engage all of the gears. To adjust the travel of the Derailleur in or
out with a cable adjustment:
a. Turn the cable adjustment knob(A) clockwise 1/4 turn to decrease the travel of the derailleur and
check the engagement of the gears while shifting. Turn the cable adjustment knob(A) counter
clockwise 1/4 turn to increase the travel of the derailleur and check the engagement of the gears
while shifting.
b. Repeat this action 1/4 turn at a time until each click of the shifter results in a positive gear change.
24
IX. DEALER SERVICE AND ADJUSTMENT
24
A
The derailleur is a critical component to the performance of your bike. If you have not been
trained in proper bicycle maintenance, or are not familiar with the components on this product,
all maintenance should be performed by a professional bike shop. Improper adjustments to the
derailleur may cause damage to the mechanism and affect the safety of the bike.
X. SUNRISE LIMITED WARRANTY
QU I CKIE ATT ITUDE
A. FOR 2 (TWO) YEARS
Sunrise warrants the Quickie Attitude frame against
defects in materials and workmanship for two (2) years.
B. FOR ONE (1) YEAR
Sunrise warrants the Quickie Attitude battery and the electric
motor against defects for one year from the date of first
consumer purchase.
C. LIMITATIONS
1. We do not warrant:
a. Damage from neglect, accident, misuse, or from improper
installation or repair.
b. Products modified without Sunrise Medical’s express written
consent.
c. Damage from exceeding the weight limit.
2. This warranty is VOID if the original unit serial number tag is
removed or altered.
3. This warranty applies in the USA and Canada only. Check with
your supplier to find out if international warranties apply.
4. This warranty is not transferable and only applies to the first con-
sumer purchase of this unit through an authorized Sunrise
Medical dealer.
D. WHAT WE WILL DO
Our sole liability is to repair or replace covered parts. This is the
exclusive remedy for consequential damages.
E. WHAT YOU MUST DO
1. Obtain from an authorized supplier, while this warranty is in
effect, prior approval for return or repair of covered parts.
2. Return the bike or part(s), freight pre-paid, to Sunrise Medical
at: 2842 Business Park Avenue, Fresno, CA 93727-1328.
3. Pay the cost of labor to repair, remove or install parts.
F. NOTICE TO CONSUMER
1. If allowed by law, this warranty is in place of any other warranty
(written or oral, express or implied, including a warranty of mer-
chantability, or fitness for a particular purpose).
2. This warranty gives you certain legal rights. You may also have
other rights that vary from state to state or province to province.
G. ADDITIONAL WARRANTY INFORMATION
For goods provided by Sunrise Medical Pty Ltd in Australia, our goods
come with a guarantee by Sunrise that cannot be excluded under the
Australian Consumer Law. You are entitled to a replacement or refund
for a major failure and for compensation for any other reasonably
forseeable loss or damage. You are also entitled to have the goods
repaired or replaced if the goods fail to be of acceptable quality and the
failure does not amount to a major failure. The benefits to you given by
this warranty are in addition to your other rights and remedies under a
law in relation to the goods to which the warranty relates.
Record your serial number here for future reference:
___________________________________________

©2016 Sunrise Medical (US) LLC
9.16 MK-100393 Rev. A
Customer Service: 800.333.4000
www.SunriseMedical.com
Sunrise Medical • 2842 Business Park Ave. • Fresno, CA 93727 • USA
In Canada (800) 263-3390
Other manuals for Attitude
3
Table of contents
Other Quickie Bicycle manuals