930479 Rev. C
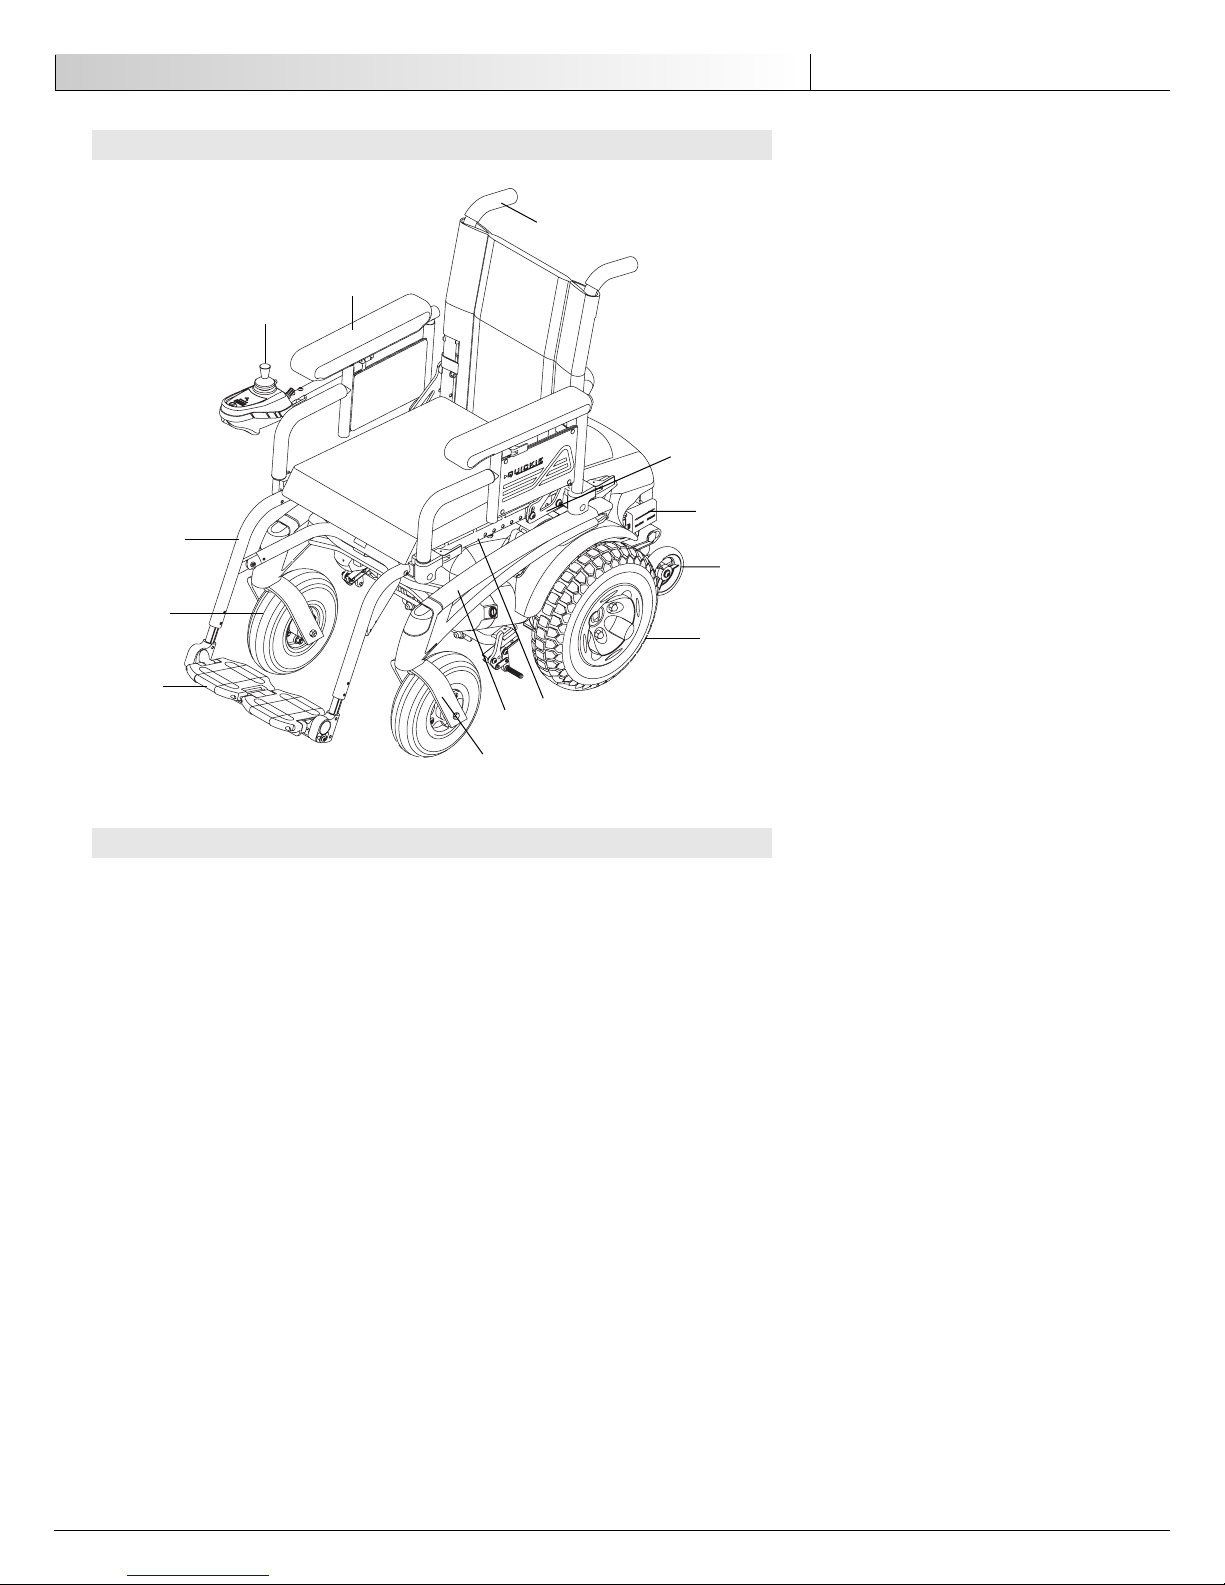
III. YOUR CHAIR AND ITS PARTS
QUICKIE/SOPUR P-220
III. Your Chair and Its Parts 5
English
1. Armrest
2. Joystick
3. Seat Cushion (optional)
4. Fixed front hanger
5. Caster tyre
6. Two-piece, locking, flip-up footplate
7. Backrest
8. Push handle
9. Backrest hinge plate
10. Freewheel release lever
11. Seat frame
12. Dynamic stabiliser
13. Drive wheels
14. Base frame
15. Caster fork
Weight:
66 kg with swing-away footrests and armrest,
without batteries
Drive Wheels
12" x 4" (300 x 100 mm) Aluminium
Tyre types: standard – pneumatic
Option – 12" x 2" (300 x 50 mm)
Option – airless insert
Joystick
Standard – integral joystick (right-hand or left-
hand mount)
Option – Pilot+ control (right-hand or left-hand
mount)
Option – swing-away retractable, Omni+ USCM
(Universal Specialty Control Module)
Batteries
(2 deep-cycle batteries required to operate
chair)
Standard – 12 V/74 Ah
Battery Charger
Standard – 24 V/8 A primary pulse
Colours
Standard – blue, black, red, midnight purple,
pearl pink, forest green, burgundy, blue green,
yellow, candy teal, candy purple, toxic green,
black opal, blue velvet. Custom splatter colours
– purple chase.
Seat Frame dimensions
Frame width: standard – 16", 18" (406, 457 mm)
Option – 14", 15", 17", 19", 20" (356, 381, 432,
482, 508 mm)
Seat depth – 14" – 20" (356 – 508 mm)
Seat height: standard – 18" (458 mm), option –
19" (480 mm), 20" (508 mm)
Seat sling: standard – parapak
Option – aluminium seat pan
Option – cushion: 2" (50 mm)
Backrest Folding
Standard – 15.5" (393 mm)
Option – 17.5", 19.5" (445 mm, 495 mm)
Caster Fork
Standard – fixed
Option – Spring suspension (8" (200 mm) tyre
only)
Footrest
Standard – swing-away with composite foot-
plates and heel loops, or two-piece locking.
Option – fixed tapered (80º) or fixed straight
(70º), elevating legrests, angle-adjustable foot-
plate, extended, toe loops, extension tubes,
solid one-piece, two-piece locking
Casters
Standard – 8" (200 mm) pneumatic
Option – 8" (200 mm) airless insert, 8" (200
mm) suspension, 9" (225 mm) pneumatic, 9"
(225 mm) airless insert
Armrests
Standard – dual-post, upholstered with standard
or full-length pad
Option – dual-post height-adjustable, uphol-
stered with standard or full-length pad
Manual Wheelchair Conversion Kit
Conversion Kit Axles
Option – quad-release axle nuts
Rear Wheels
Standard – Aluminium
Tyre types: pneumatic, airless insert, full-profile
polyurethane, low-profile polyurethane, Kevlar,
high-pressure clincher
Handrim
Standard – aluminium
Option – plastic-coated, long tabs vertical or
oblique projections
Wheel Locks
Standard – push-to-lock
Option – pull-to-lock 6" or 9" (150 mm or 230
mm) extension handles
All features may not be available with some
chair set-ups or in conjunction with another
chair feature. Please consult your supplier for
more information. Your authorised supplier can
also provide you with more information on
accessories.
The Quickie/Sopur P-220 is a class B wheelchair
as defined in EN 12184.
Department of transport class 3 vehicle.
This chair has not been crash tested.
1
2
3
4
5
6
7
8
9
10
11
12
13
14
15