Quinny TM 06620 Curbb User manual

Spanish Guide Included
Guía en español incluida
TM
06620
User Guide
Guía del Usuario

Contents
TM
i
Warnings 1
Features 2
Before You Begin 2
Wearing & Adjusting Carrier 3
Securing the Child 4
Checklist 5
Removing the Child 5
Care & Maintenance 6

Warnings
W
TM
•SMALL CHILDREN CAN FALL THROUGH A LEG OPENING. FOLLOW INSTRUCTIONS FOR USE.
•Only use this carrier for children between 8-LBS (3.6-kg) and 20-LBS (9.1-kg).
•CHILD ALWAYS MUST FACE TOWARDS YOU.
•Keep instructions for future use.
•Read all instructions before assembling and using the soft carrier.
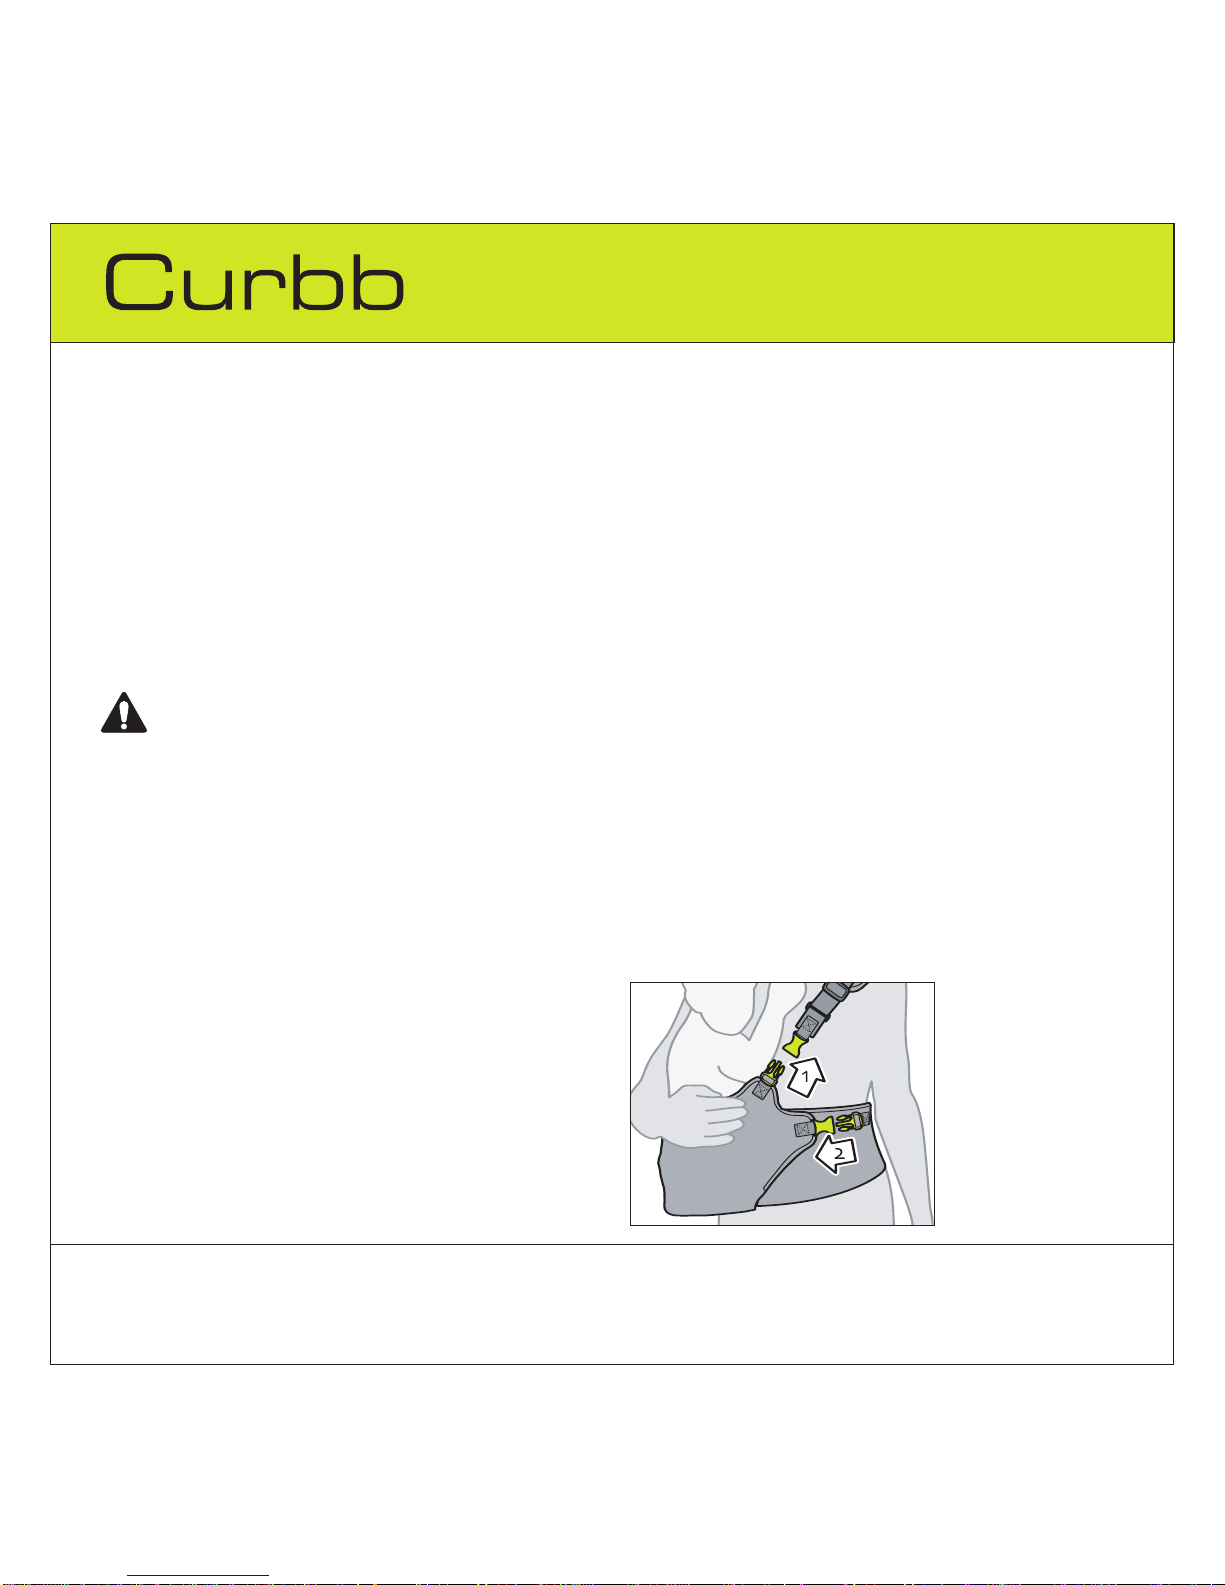
•Check to assure all buckles, snaps, straps, and adjustments are secure before each use.
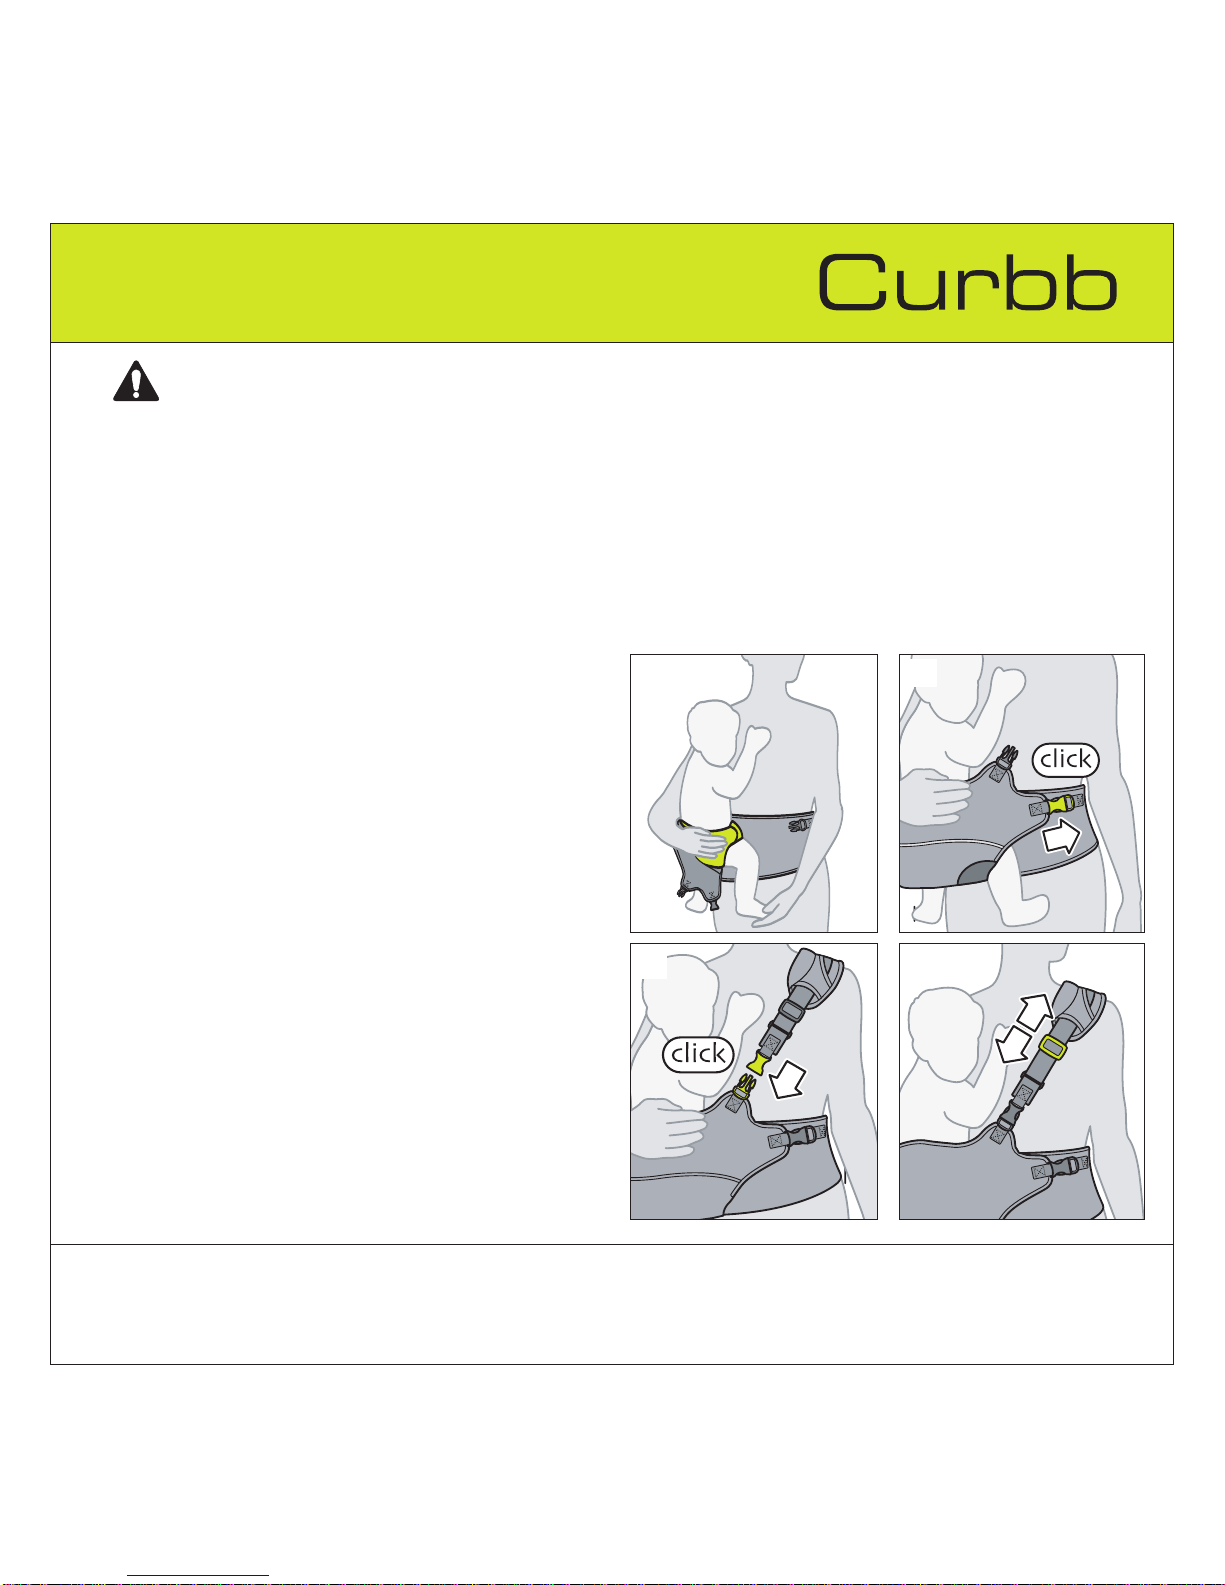
•Proper placement of child in product including leg placement.
•When placing a baby in the carrier, the baby’s right and left leg should extend through the bottom leg
openings.
•For proper placement, the baby’s head should rest on the adult’s shoulder.
•DO NOT place a baby into the carrier before the carrier is properly positioned and secured to the care-
giver.
•DO NOT wear this carrier near an open flame or while participating in an activity that could potentially
injure a baby.
•DO NOT lean over with straight legs as that may cause a baby to fall from the carrier.Crouching or
leaning with bent knees will help keep baby secure.
•The carrier should only be used to carryababy on your hip. NEVER use the carrier to carry a baby on
your back or in front of you.
•Carriers are meant to be used while walking or standing. NEVER wear a carrier while engaged in
fast-paced or rigorous activity such as running, biking, jogging, or operating a motorized vehicle.
•DO NOT place a baby in a carrier that is not being worn, or leave a baby unattended in a loose carrier.
•If baby should fall asleep in the carrier, turn baby’s head to the side. This will ensure that the baby can
breathe easily. Always keep some distance between the baby’s face and the adult’s body to ensure
easy breathing.
•To avoid the possibility of baby being pinched, make sure that their skin, fingers, etc. are out of the
way when snapping or locking the buckles.
•The correct fitting of the adjustment straps is vital for the safety of your child. For this also see the
label on the inside of the carrier strap.
•DO NOT wear carrier if you are pregnant.
WARNING – FALL HAZARD
1

Features
Before You Begin
W
TMT
2
a. Shoulder protector
b. Shoulder strap
c. Sliding part to adjust length of
shoulder strap
d. Shoulder clasp, female
e. Shoulder clasp, male
f. Seat clasp, male
g. Seat clasp, female
h. Hip strap
i. Adhesive patch
j. Hip strap clip
k. Hip clasp
l. Seat insert, with soft padding
•Keep these instructions for futureuse.
•Lay out and identify all parts.
•Do not return this product to the
place of purchase. If any parts are
missing, call Consumer Relations at
(800) 951-4113. Or visit our website
at www.quinny.com.
•Include the model number and man-
ufacturedate and a brief description
of the part.
The manufacturing date
code is on the back of the wash
and carelabel.
Before You Begin
•This infant carrier is designed to carry a child on the left or right hip.
•The child should be able to support his/her own head.
•The child should alwayssit with his/her stomach towards you.
NOTE: Weight range is from 8-LBS to approximately 20-LBS (3.6-kg. to 9.1-kg).

Wearing & Adjusting Carrier Securing the Child
C
TMT
3
4On the back, fasten both the seat clasp (1) and the
shoulder clasp (2) (Figure 4).Do this before the child is
put in the carrier.
1Wrap the hip strap around the hips (Figure 1).
NOTES:
•Make sure that the hip strap is not twisted.
•The adhesive patch should be on the left to carry the
child on the right hip (or on the right to carrythe child
on the left hip).
•The examples show the carrier being worn on the left
shoulder to carry the child on the right hip.
To adjust fit to the adult:
2Pull the hip strap tight and secure adhesive patch (Figure 2).
3Fasten the hip clasp (it will click) (Figure 3). Tighten the
strap securely (Figure 3a). Put strap end through strap
clip.
NOTE: If the hip strap is fitted properly, the child will sit at
the front, top of the hip bone.
Adhesive Patch
Side View
Back View
1
2
33a
4
Strap Clip
Shoulder Clasp
Seat Clasp

Securing the Child
C
TM
4
WARNING
•When placing a baby in the carrier, the baby’s right and left leg should extend through the
bottom leg openings.
•For proper placement, the baby’s head should rest on the adult’s shoulder.
•To avoid the possibility of baby being pinched, make sure that their skin, fingers, etc. are out
of the way when snapping or locking the buckles.
•Always make sure there is enough room around your baby’s face such that air flow is not
obstructed.
NOTE: The examples show the carrier being worn on the
leftshoulder to carrythe child on the right hip.
1Sit down. Lift the child up and place him/her on the hip on
which the seat is positioned. Put the child’s legs through
the leg openings in the seat insert (Figure 1).
2Make sure that the child is sitting in the middle and fasten
the front seat clasp on the hip strap (Figure 2).
3Place the shoulder strap over the shoulder.Attach the
front shoulder clasp to the shoulder strap (Figure 3).
NOTE: If the carrier is placed on the right hip, place the
shoulder strap over the left shoulder and if the child is to
be carried on the left, the strap over the right shoulder.
NOTES:
•Makesurethat the shoulder strap is not twisted.
•Check that the shoulder strap is the right length, if
necessaryadjust with the sliding parton the shoulder
strap (Figure 3a).
•The shoulder protector should alwaysbe in the center of
the shoulder.
To secure child in the carrier: 1
3
2
3a

Checklist
Removing the Child
TM
T
5
Recheck the following after placing your baby in the carrier:
•The hip strap has been tightened properly, is not twisted and the hip clasp is fastened.
•The child is sitting properly in the middle of the seat all clasps are fastened securely.
•The shoulder strap is not twisted and has been adjusted to the correct length.
•The shoulder protector is positioned properly in the center of the shoulder.
• Important: If you are unable to fasten the clasps properly, do not use the carrier under any circumstances.
•Never let your child play with the fasteners.
•If the shoulder weight is too great, either the hip strap is not tight enough or the shoulder strap has been adjusted too
tightly. The hip strap should not be positioned too high up on the waist.
•Always use the shoulder protector; this is important for the weight distribution.
WARNING – FALL HAZARD
•SMALL CHILDREN CAN FALL THROUGH A LEG OPENING. FOLLOW INSTRUCTIONS FOR USE.
•Only use this carrier for children between 8-LBS (3.6-kg) and 20-LBS (9.1-kg).
•CHILD MUST ALWAYS FACE TOWARDS YOU.
•The correct fitting of the adjustment straps is vital for the safety of your child. For this also see
the label on the inside of the carrier strap.
1Sit down.
Support the baby while you unfasten
front
shoulder clasp (Figure 1, arrow 1).
2Unfasten the seat clasp on the hip strap (Figure 1,
arrow 2).
3Lift the baby out of the carrier.
1
To remove the baby/child:

Care & Maintenance
C
TM
Care & Maintenance
•Hand wash in cool water. Use only mild detergent. DO NOT BLEACH. Line dry. Do not iron.
•Important! Never lubricate the fasteners on the carrier!
•The proper functioning of the fasteners contributes substantially to the security of your baby. The most common
reason that the fasteners do not function properly is because of dirt (dust, grime, milk, etc.).
If you experience any of the following problems, please apply the instruction given under “Solutions”.
6
Problems
•When opening the fasteners, the latch
sections are released slowly.
•The fasteners can only be opened with
considerable force.
•It is difficult to click the latch sections
together (too much resistance), or do not
remain fastened (they are released again
immediately).
•There is no “click” sound when locking
the fastener.
Solutions
•Release the fastener. Rinse the fastener
thoroughly with lukewarm water and let it
dry completely.
•If you are unable to lock the fasteners or if
you are unsure whether you have solved the
problem correctly, contact Consumer
Relations at (800) 951-4113. Do not use
the carrier under any circumstances!

7

Contenido
TM
8
Advertencias 9
Características 10
Antes de comenzar 10
Uso y ajuste del portabebé 11
Cómo asegurar al niño 12
Listade verificación 13
Cómo retirar al bebé 14
Cuidado y mantenimiento 15

Advertencias
U
TM
•LOS NIÑOS PEQUEÑOS PUEDEN CAERSE A
TRAVÉS DE LAS ABERTURAS PARA LAS PIER-
NAS. SIGA LAS INSTRUCCIONES DE USO.
•Only Utilice este portabebé únicamente para
niños entre 8-LBS (3.6-kg) y 20-LBS (9.1-kg).
•EL NIÑO SIEMPRE DEBE ESTAR DE FRENTE A
USTED.
•Guarde estas instrucciones para su uso futuro.
•Lea todas las instrucciones antes de armar y usar
el portabebé.
•Verifique que todas las hebillas, broches de presión,
correas y ajustes estén bien asegurados antes de
usarlos.
•Colocación correcta del niño en el producto, inclu-
ida la posición de las piernas.
•Al colocar al bebé en el portabebé, las piernas
derecha e izquierda del bebé deben pasar por las
aberturas inferiores de las piernas.
•Para colocarlo correctamente, la cabeza del bebé
debe estar apoyada en el hombro del adulto.
•NO coloque al bebé en el portabebé hasta que el
mismo esté correctamente colocado y asegurado
ala persona que lo transportará.
•NO lleve colocado este portabebé en lugares cer-
canos a llamas expuestas o mientras participe en
una actividad que podría lesionar al bebé.
ADVERTENCIA –
PELIGRO DE CAÍDA
9
•NO incline el cuerpo hacia delante con las piernas
rectas, ya que ello podría provocar la caída del
bebé del portabebé. Agacharse doblando las rodil-
las ayudará a mantener seguro al bebé.
•El portabebé sólo debe usarse para transportar a
un bebé en la cadera. NUNCA lo use para trans-
portar al bebé en la espalda o delante de usted.
•Los portabebé se usan para caminar o estar de
pie. NUNCA se coloque un portabebé si está prac-
ticando actividades rápidas o rigurosas tales como
correr, andar en bicicleta, hacer jogging, o con-
ducir un vehículo motorizado.
•NO coloque a un bebé en un portabebé que no
esté colocado en la persona. NUNCA deje a un
bebé sin supervisión en un portabebé que no esté
colocado en la persona.
•Si el bebé se queda dormido en el portabebé, gire
la cabeza del bebé hacia un lado para asegurar que
pueda respirar fácilmente. Deje siempre una dis-
tancia entre la cara del bebé y el cuerpo del adulto
para asegurar la correcta respiración del bebé.
•Para evitar la posibilidad de pellizcar o apretar la
piel, los dedos u otra parte del cuerpo del bebé,
asegúrese de que ninguna parte del cuerpo del
bebé esté en contacto con los broches o las hebil-
las al cerrarlos.
•La posición correcta de las correas ajustables es
esencial para la seguridad de su niño. Para ello,
vea también la etiqueta de la parte interna de la
correa del portabebé.
•NO utilice el portabebé si usted está embarazada.

Características
Antes de comenzar A
TMT
10
a Protector de hombro
b. Correa de hombro
c. Parte deslizable para ajustar el largo de
la correa de hombro
d. Broche de hombro, hembra
e. Broche de hombro, macho
f. Broche del asiento, macho
g. Broche del asiento, hembra
h. Correa de caderas
i. Parche adhesivo
j. Clip de correa de caderas
k. Broche de cadera
l. Inserto del asiento, con almohadillas
blandas
Antes de comenzar
•Este portabebé está diseñado para llevar un niño en la cadera izquierda o derecha.
•El niño debe poder mantener la cabeza erguida.
•El niño siempredebe sentarse con el estómago hacia usted.
NOTA: Para bebés de aproximadamente 8 a 20 libras de peso (3.6 kg a 9.1 kg).
•Guarde estas instrucciones para su uso
futuro.
•Despliegue e identifique todas las piezas.
•No devuelva este producto al lugar donde
lo adquirió. Si faltan piezas, llame al
Departamento de Relaciones con el
Consumidor, (800) 951-4113, o visite
nuestrositio web www.quinny.com.
•Tenga a mano el número de modelo y el
código de fecha (fecha de fabricación),
que se encuentran en la parte posterior
del rótulo de lavado y cuidado.

Uso y ajuste del portabebé Cómo asegurar al niño
C
TM
11
4En la parteposterior,ajuste tanto el broche del asiento (1)
como el del hombro(2) (Figura 4).Haga esto antes de
colocar al niño en el portabebé.
1Coloque la correa de cadera alrededor de la cadera
(Figura 1).
NOTAS:
•Asegúrese de que la correa de cadera no esté torcida.
•El parche adhesivo debe estar a la izquierda para llevar al
bebé en la cadera derecha (o a la derecha para llevarlo
sobre la cadera izquierda).
•Los ejemplos muestran el portabebé utilizado en el hom-
bro izquierdo para llevar al niño sobre la cadera derecha.
To adjust fit to the adult:
2Ajuste la correa de cadera y fije el parche adhesivo (Figura 2).
3Asegure el broche (se oirá un clic) (Figura 3).Ajuste
firmemente la correa (Figura 3a). Haga pasar el extremo
de la correa a través de su clip.
NOTA: Si la correa de caderas está correctamente coloca-
da, el niño quedará sentado delanteyarriba del hueso de
la cadera.
Parche adhesivo
Vista lateral
Vista posterior
1
2
33a
4
Clip de
correa
Broche de hombro
Broche del asiento

Cómo asegurar al niño
C
TM
L
12
ADVERTENCIA
•Al colocar al bebé en el portabebé, las piernas derecha e izquierda del bebé deben pasar por las
aberturas inferiores de las piernas.
•Para colocarlo correctamente, la cabeza del bebé debe estar apoyada en el hombro del adulto.
•Para evitar la posibilidad de pellizcar o apretar la piel, los dedos u otra parte del cuerpo del bebé,
asegúrese de que ninguna parte del cuerpo del bebé esté en contacto con los broches o las
hebillas al cerrarlos.
•Asegúrese siempre de que haya suficiente espacio alrededor de la cara del bebé para no obstruir
el flujo de aire.
NOTA: Los ejemplos muestran el portabebé utilizado en el
hombroizquierdo parallevar al niño sobrela cadera
derecha.
1Siéntese. Levante al niño y colóquelo en la cadera sobre la
que está colocada el asiento.Introduzca las piernas del niño
en las aberturas para las piernas del asiento (Figura 1).
2Asegúrese de que el niño esté sentado en el medio y ajuste el
broche frontal de la caderaen la correa de cadera(Figura2).
3Coloque la correa de hombrosobreel hombro. Ajuste el
broche frontal del hombro a la correa de hombro (Figura
3).
NOTA: Si el portabebé está colocado en la cadera
derecha, coloque la correa de hombro en el hombro
izquierdo; si desea llevar al niño a la izquierda, colóquela
en el hombro derecho.
NOTES:
•Asegúrese de que la correa de hombro no esté torcida.
•Verifique que la correa de hombro tenga el largo ade-
cuado; en caso de ser necesario ajústela con la parte
deslizable (Figura 3a).
•El protector de hombro debe estar siempre en el centro
del hombro.
Cómo asegurar al niño en el portabebé: 1
3
2
3a
clic
clic

Lista de verificación
Cómo retirar al bebé
TM
T
13
Verifique lo siguiente antes de colocar al bebé en el portabebé:
•La correa de cadera ha sido correctamente ajustada, no está torcida y el broche de la cadera está abrochado.
•El niño está correctamente sentado en medio del asiento y todos los broches están firmemente ajustados.
•La correa de hombro no está torcida y ha sido ajustada en el largo correcto.
•El protector de hombro está colocado correctamente en el centro del hombro.
• Importante: En ninguna circunstancia utilice el portabebé si no logra ajustar adecuadamente los broches.
•Nunca permita que el niño juegue con los elementos de sujeción.
•Si el peso sobre el hombro es excesivo, la correa de cadera no está suficientemente ajustada o la correa de hombro ha
sido ajustada excesivamente. La correa de cadera no debe estar colocada demasiado alta sobre la cintura.
•Utilice siempre el protector de hombro; es importante para la distribución del peso.
ADVERTENCIA – PELIGRO DE CAÍDA
•LOS NIÑOS PEQUEÑOS PUEDEN CAERSE A TRAVÉS DE LAS ABERTURAS PARA LAS PIER-
NAS. SIGA LAS INSTRUCCIONES DE USO.
•Utilice este portabebé únicamente para niños entre8-LBS (3.6-kg) y 20-LBS (9.1-kg).
•EL NIÑO SIEMPRE DEBE ESTAR DE FRENTE A USTED.
•La posición correcta de las correas ajustables es esencial para la seguridad de su niño. Para
ello, vea también la etiqueta de la parte interna de la correa del portabebé.
1Siéntese. Sujete al bebé mientras suelta el broche
frontal del hombro (Figura 1, flecha 1).
2Desabroche el broche del asiento ubicado en la correa de
caderas (Figura 1, flecha 2).
3Levante al bebé para retirarlo del portabebé.
1
Cómo retirar al bebé/ el niño:

Cuidado y mantenimiento
C
TM
Cuidado y mantenimiento
•Lávelo a mano con agua fría. Utilice únicamente detergente suave. NO UTILICE BLANQUEADORES. Séquelo al aire
libre. No lo planche.
•¡Importante! ¡Nunca lubrique los elementos de sujeción del portabebé!
•El funcionamiento adecuado de los elementos de sujeción contribuye sustancialmente a la seguridad del bebé. La
razón más habitual por la que los elementos de sujeción no funcionan correctamente se debe a la suciedad (polvo,
tierra, leche, etc.).
Si tiene alguno de los siguientes problemas, siga las instrucciones indicadas en la columna “Soluciones”.
14
Problemas
•Al abrir los sujetadores, las trabas se
sueltan lentamente.
•Los elementos de sujeción sólo pueden
abrirse empleando una fuerza consider-
able.
•Es difícil encajar las trabas (demasiada
resistencia) o no permanecen ajustadas
(se sueltan de inmediato).
•No se oye ningún “clic” al trabar el suje-
tador.
Soluciones
•Suelteel sujetador. Enjuague totalmente el
sujetador con agua templada y déjelo secar
por completo.
•Si no puede destrabar los sujetadores o si
no tiene certeza de haber solucionado cor-
rectamente el problema, comuníquese con
el Departamento de Relaciones con el
Consumidor al (800) 951-4113. ¡No utilice
el portabebé en ninguna circunstancia!

©2007 Dorel Juvenile Group. All Rights Reserved.
www.quinny.com
(800) 951-4113
Made in CHINA. Hecho en CHINA.
Styles and colors may vary.Los estilos y los colores pueden variar.
Distributed by (distribuido por) Dorel Juvenile Group, Inc.,
2525 State St., Columbus, IN 47201-7494
Dorel Distribution Canada, 873 Hodge, St. Laurent, QC H4N 2B1
02/09/07 4358-4238
TM
This manual suits for next models
1
Table of contents
Languages:
Other Quinny Baby Carrier manuals

Quinny
Quinny BUZZ User manual

Quinny
Quinny Zapp Lux User manual

Quinny
Quinny Speedi SX Dreami Troubleshooting guide

Quinny
Quinny Buzz Dreami User manual

Quinny
Quinny zapp xtra User manual

Quinny
Quinny Speedi Dreami Troubleshooting guide

Quinny
Quinny BUZZ Troubleshooting guide

Quinny
Quinny Zapp Xtra2 User manual

Quinny
Quinny 1473 User manual

Quinny
Quinny SAFETY CARRYCOT Troubleshooting guide