R82 Panda Futura 5 Series User manual

07.2015 - rev. 005
EN 12182 EN1021-1
EN 12183 EN1021-2
ISO 7176-19
English Manual
panda futura 5
TM
© 2008 R82 A/S. All rights reserved.
The R82 logo and the Panda Futura chairs are registered trademarks of R82 A/S.

2
G
B
GB CONTENTS
Intented use....................................................................... 3
Tools .................................................................................. 3
Declaration of conformity................................................... 3
R82 Warranty .................................................................... 3
Symbols............................................................................. 4
Disposal............................................................................. 4
Safety ................................................................................ 5
Maintenance...................................................................... 6
Accessories and spare parts ............................................. 6
Service interval.................................................................. 6
Ready for use .................................................................... 7
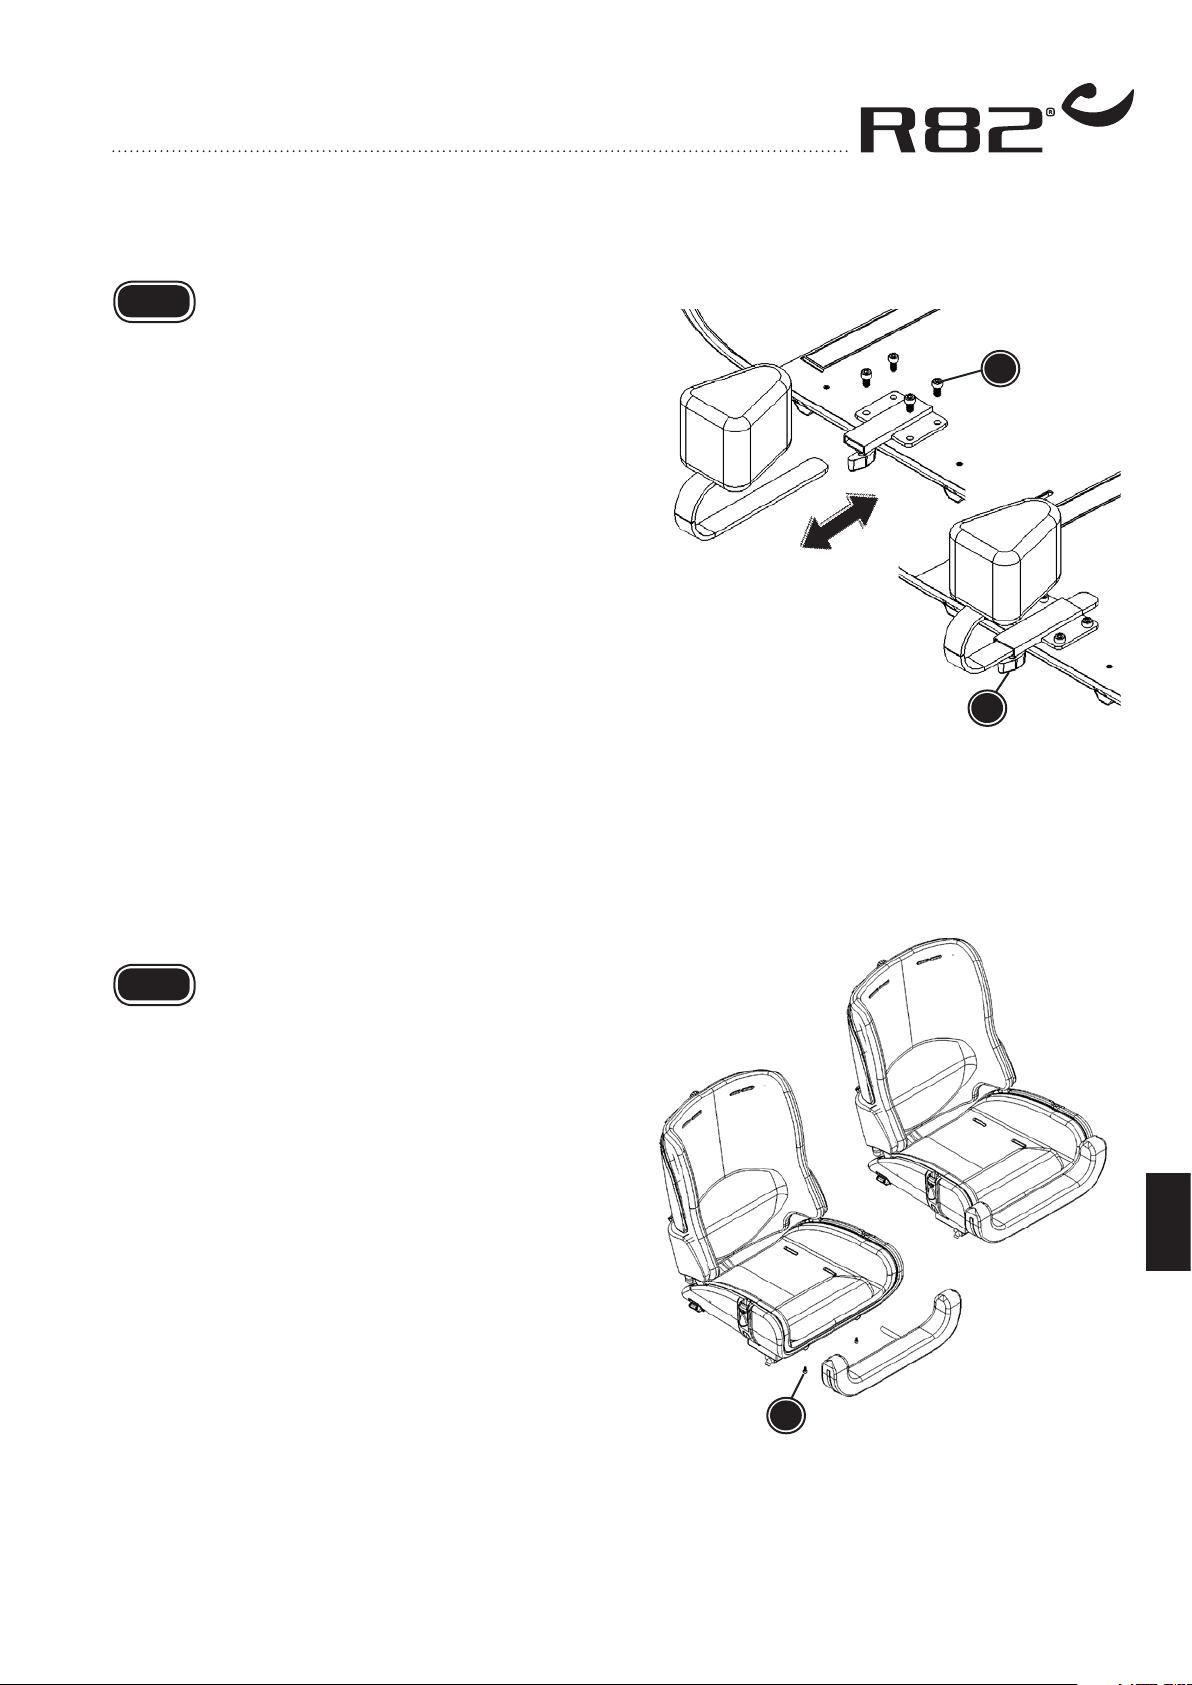
Mounting / dismounting of sides........................................ 7
Back recline....................................................................... 8
Lumbar support ................................................................. 8
Pommel ............................................................................. 9
Seat extension................................................................... 9
Back extension ................................................................ 10
Head support................................................................... 10
Back extension and head support ................................... 10
Side supports................................................................... 11
Swing-away side supports .............................................. 11
Armrest............................................................................ 12
Tray ................................................................................. 12
Cross vest........................................................................ 13
Hip belt ............................................................................ 13
Panda Futura 5 on High-low:x frame size 2 .................... 14
Push brace for High-low:x indoor frame .......................... 15
Swing-away knee supports.............................................. 15
Panda Futura 5 on Combi Frame size 4.......................... 16
Transportation in motor vehicles ..................................... 17
Secure the product in the vehicle .................................... 18
Product identification ....................................................... 19
Measures......................................................................... 20
Technical data.................................................................. 21
Manufacturer ................................................................... 21
Maintenance.................................................................... 21
Distributor ........................................................................ 21
List of accessories........................................................... 22

3
G
B
Tools
Enclosed tool; 5 mm Allen keys.
Declaration of Conformity -
This product conforms to the requirements of the Medical Devices Directive (93/42/EEC).
The CE mark must be removed when rebuilding the product, when used in combination with
a product from another manufacturer or when using other than original R82 spare parts
and fittings. Further, this product conforms to the requirements according to ISO 7176/19,
EN12182, EN12183, EN1021-1 and EN1021-2
R82 Warranty
R82 offers a 2-year warranty against defects in workmanship and materials and a 5-year war-
ranty on breakage of the metal frame caused by defects in welds. The warranty would be ad-
versely affected if the customer’s responsibility of servicing and/or daily maintenance is not
carried out according to the guidelines and intervals prescribed by the supplier and/or stated in
the manual. For further information, we refer to the R82 homepage/download.
The warranty can only be sustained if the R82 product is in use in the same country where it
was purchased and if the product can be identified by the serial number. The warranty does not
cover accidental damage, including damage caused by misuse or neglect. The warranty does not
extend to consumable items e.g. tires or upholstery, which are subject to normal wear and tear
and need periodic replacement.
The warranty is null and void if non-original R82 parts/accessories are used, or if the product
has not been repaired or altered according to the guidelines and intervals prescribed by the sup-
plier and/or stated in the instructions for use (IFU). R82 reserves the right to inspect the prod-
uct being claimed for and the relevant documentation before agreeing to the warranty claim,
and to decide upon whether to replace or repair the defective product. It is the customer’s
responsibility to return the item being claimed for under warranty to the address of purchase.
The warranty is given by R82 or, subsequently, an R82 dealer.
We appreciate your choice of a new product from R82 - a worldwide supplier of technical aids
and appliances for children and teenagers with special needs. To fully benefit from the options
offered by this product please read this manual before use and save it for further reference.
Intended use
The Panda Futura 5 seat is available in two different versions: Panda Standard and Panda Ac-
tive. The Standard seat is primarily for children with the need of support around the arms and
shoulders. The Active seat is for the active children who need more freedom of movement.The
Panda Futura 5 is e.g. suitable for users within GMFCS level 4-5.

4
G
B
Symbols
For indoor and outdoor use
Never leave the user unattended in this product
Consult instructions
The latest versions of the instructions are always available on the
R82 website and can be printed in larger sizes
Caution
Incorrect use of the product may cause serious damage to the
product and the environment and may cause injury
Caution
Be careful not to get your fingers caught
Correct lifting points for safe moving and handling
Caution
Do not pull/lift the chair by the push brace/handles, especially on stairs
Caution
Do not use the foot support for standing transfers
Inspection
Carry out inspections frequently
Cleaning
Keep clean to maintain optimum function
Disposal -
When a product reaches the end of its lifetime, it should be separated by material type so that
the parts can be recycled or disposed of properly. If required, please contact your local dealer
for a precise description of each material. Please contact your local authorities to be informed
of the options available for recycling in an environmentally-friendly way.

5
G
B
Safety -
Signs, symbols and instructions placed on this product must never be covered or removed and
must remain present and clearly legible throughout the entire lifetime of the product. Immedi-
ately replace or repair illegible or damaged signs, symbols and instructions. Contact your local
dealer for instructions.
Caregiver
Read all of the instructions carefully before use and keep them for future reference.
Incorrect use of this product may cause serious injury to the user
Always use the correct lifting techniques and aids for this purpose
Never leave the user unattended in this product. Ensure permanent supervision by
an adult
Repair/replacements must only be made using new original R82 spare parts and
fittings and carried out in accordance with the guidelines and service intervals pre-
scribed by the supplier
If there is any doubt as to the continued safe use of your R82 product or if any
parts should fail, stop using the product immediately and contact your local dealer
as soon as possible
Environment
For the purpose of safety and comfort, always move the product away from the sun
and allow to cool before use
Be aware of reduced maneuverability on slippery roads
User
If the user is close to the max. load limit and/or has a lot of involuntary movements,
e.g. rocking, a larger size with a higher max. load or a different R82 product should
be considered
Product
Carry out all positional adjustments on the product and accessories and ensure that
all knobs, screws and buckles are securely fastened before use. Keep all tools out
of the reach of children
Activate the brakes before placing the user into the product
Ensure the stability of the product is maintained before placing the user in it
We recommend you notify the user before angling the seat and back
Ensure the wheels are fully-functional and secure before use
Inspect the product and all of its accessories and replace any worn out parts before
use

6
G
B
Maintenance responsibilities table
Maintenance of a medical device is wholly the responsibility of the owner of that device. Failure
to maintain a device in accordance with the instructions may invalidate the device’s warranty.
Furthermore, failure to maintain a device may compromise the clinical condition or safety of
users and/or their caregivers.
Frequency Description
1st Day Read the instructions for use (IFU) carefully before use and store
them in a safe place for future reference
Store the enclosed tools on/at the product
Daily Use a dry cloth to clean the product
Visual inspection. Repair or replace any damaged or worn-out parts
Ensure that all fasteners are in place and fitted correctly
Check all fittings and buckles for signs of worn out parts
Be aware of any max mark indications before adjustment
Weekly Check that all wheels are moving freely and that all wheel locks/
brakes are easily activated
Wipe off any residue and dirt from the product using a cloth with
warm water and a mild detergent and dry before use
Monthly All nuts and bolt on this product must be checked and tightened
to avoid unnecessary failures
Oil the swing-away parts. We recommend you use a professional
lubricant system, e.g. Veidec Dry Lube
Annually
Inspect the frame for cracks or signs for worn-out parts and carry
out annual service. Never use a product which appears to be sub-
standard or faulty
Accessories and spare parts
The products from R82 can be supplied with a variety of accessories which comply with the
needs of the individual user. Spare parts can be ordered on request. Find the specific accesso-
ries on our website or contact your local dealer for further information.
Service interval
A detailed inspection of the product must be made every 12 months (every 6 months for heavy
users) and every time the product is reissued for use. The inspection should be carried out by a
technically competent person who has been trained in the use of the product.
Contact your local dealer for instructions on repairs e.g. dealing with tyre punctures
The lifetime of this product in normal use is 5 years if all maintenance and servicing is carried
out in accordance with the manufacturer’s instructions and demonstrably recorded.

7
A
B
A
B
G
B
READY FOR USE
The Panda Futura 5 seat is available as (A)
STANDARD and as (B) ACTIVE.
The main difference between the two models is
the shaping of the seats. The ACTIVE seat is
shaped to allow greater upper extremity move-
ment and is ideal for more active children.
The STANDARD seat is shaped with sides, gi-
ving the child more support and less mobility.
A child’s support requirements will determine
which model is most appropriate. One seat can
easily be changed into the other model (see
below). The back cushion must be replaced
when changing model. Both seats are prepared
for the large range of accessories.
GB
MOUNTING /
DISMOUNTING OF
SIDES
Follow the description below to mount/dismount
the sides correctly:
Mounting:
* Place the sides in the slots of the back (A)
* Fasten from the back using the enclosed bolts
and 5 mm Allen key (B)
Dismounting:
* Remove the bolts (B) from behind using the
enclosed 5 mm Allen key
* Remove the sides
GB

8
A
A
G
B
LUMBAR SUPPORT
The Panda Futura 5 is delivered including adju-
stable lumbar support in the back cushion. Move
the lumbar support up or down (A) according to
the need for support.
GB
BACK RECLINE
Push the handle (A) up to recline the back.
To prevent sudden recline, firmly grab
the back of the chair before pushing the
handle.
GB

9
A
B
A
G
B
SEAT EXTENSION
The Panda Futura 5 is prepared for mounting of
seat extension.
* Push the bars from the seat extensions into
the two slots beneath the seat.
* Slide into position and fasten with the enclo-
sed bolts and 5 mm Allen key (A).
GB
POMMEL
The Panda Futura 5 is prepared for mounting
of pommel.
* Fasten the mounting bracket by using the
enclosed 4 mm Allen key (A).
* The pommel is fitted into the bracket and is
adjusted in depth by using the handle (B).
GB

10
A
B
A
A
B
G
B
BACK EXTENSION
The Panda Futura 5 is prepared for mounting of
back extension.
* Mount the bar from the back extension into
the fitting on the back and fasten with the
thumbscrew (A).
* Loosen the thumbscrew (A) or (B) to adjust
the height.
GB
HEAD SUPPORT
The Panda Futura 5 is prepared for mounting
of head support.
* Mount the head support bar into the fitting
on the back and fasten with the thumbscrew
(A).
GB
BACK EXTENSION
AND HEAD
SUPPORT
Follow the description below to mount back ex-
tension and head support at the same time.
* Slide the head support bar through the hole
in the back extension and into the slot on the
back.
* Adjust the height of the head support and
fasten with the thumbscrew (A).
* Adjust the height of the back extension and
fasten with the thumbscrew (B).
GB

11
B
B
C
A
A
G
B
SIDE SUPPORTS
The Panda Futura 5 is prepared for mounting
of side supports.
* Place the side supports in the slots.
* Place the nuts, one by one, through the hole
(A) in the back and into the slots in the side
support.
* Fasten from behind with enclosed bolts (B)
and 5 mm Allen key.
* Adjust the height and fasten.
GB
SWING-AWAY SIDE
SUPPORTS
The Panda Futura 5 is prepared for mounting of
swing-away side supports.
* Place the side supports in the slots.
* Place the nuts, one by one, through the hole
(A) in the back and into the slots in the side
support.
* Fasten from behind with enclosed bolts (B)
and 5 mm Allen key.
* Adjust the height and fasten.
The swing-away side supports are released
by pressing the red button (C) and then swing
away.
The carer should check and oil the swing-
away parts occationally - at least every 3
months.
GB

12
A
C
D
B
A
B
G
B
TRAY
A) Mounting and depth adjustment
B) Tilting the tray, by tilting the armrests.
The tray can only be mounted on a Panda
Futura 5 equipped with armrests.
GB
ARMREST
Height adjustment:
Open the handle (A) to move the armrest into po-
sition. Place the small screw (B) in desired height
position. Close the handle after adjustment.
Tilting the armrest cushion:
Loosen the handle (C).
Adjust and angle of the armrest cushion sidewise:
Loosen the screws (D) beneath the cushion.
Arm rest height above seat cushion
170 - 350 mm (6½ - 13½")
GB

13
A
B
C
A
A
B
C
A
B
C
A
C
A
G
B
CROSS VEST
The vest and cross vest can be opened and
closed by using the buckles and the zip.
* Mount the shoulder straps through the hole in
the back cushion and into the fixlock fittings
on the upper back (A).
* Mount the upper straps in the sides in the
fixlock fittings on the back (B).
* Mount the lower straps in the belt fittings on
the lower back (C).
Take care that all the fixations and ad-
justments are placed and fitted correctly.
Check these on a regular basis.
GB
HIP BELT
The hip belt can be opened and closed by using
the buckles.
* Mount the straps in the belt fittings under the
seat (A).
Take care that all the fixations and ad-
justments are placed and fitted correctly.
Check these on a regular basis.
GB

14
B
B
A
G
B
PANDA FUTURA 5
ON HIGH-LOW:X
FRAME SIZE 2
This combination must not be used for
severely spastic children with vigorous
movements.
To mount the seat:
Place the seat in the adapter and push it all the
way back, until it „clicks” into place. Lock the red
handle (A) to secure the stability of the seat.
Do not use the first hole it „clicks” into. This
is just the „safety hole” which will „catch”
the seat if the knob accidently should pop
out of the correct hole.
To dismount the seat:
Unlock the red handle (A). Pull out the knob (B),
pull the seat forward, and lift at the same time.
Max. load on the frame is 60 kg.
The Panda Futura 5 can NOT be mounted
on an frame size 1.
We refer to the 'Frames Manual' for further
information on version and functions of the
frame size 2
GB
i

15
A
A
B
DE
F
C
G
B
PUSH BRACE
FOR HIGH-LOW:X
INDOOR FRAME
Depth adjustment:
Loosen the screws (A) on both sides of the frame
and adjust the depth of the push brace. The
push brace adjusts in two positions and clicks
into place with the security nut.
Fasten in the required position.
Never use the push brace to lift/pull the
frame up or down stairs, landings, curbs
ect. The frame can only be lifted by two
persons grabbing hold of the frame. Never
use the push brace to lift the frame.
GB
SWING-AWAY KNEE
SUPPORTS
Attach the fitting (A) beneath the seat with the
4 mm Allen key. Insert the knee supports in the
fitting and fasten with the 6 mm Allen key (B)
* Loosen the screws (C) with the 6 mm Allen
key to adjust the angle of the knee support
bars.
* Loosen the screws (B) or (D) with the 4 or 6
mm Allen keys to adjust the depth.
* The knee supports themselves are angle and
sideway adjustable (E) using the 4 mm Allen
key.
* Push down the red button on the tting (F) to
swing away the knee supports.
The carer should check and oil the swing
away parts occasionally - at least every 3
months.
GB

16
A
C
E
F
B
D
G
B
PANDA FUTURA 5
ON COMBI FRAME
SIZE 4
Follow the instructions below to mount an interface
for Panda Futura 5 on a frame
1. Mount the interface on the frame as shown on
picture (A). Fasten the interface together with the
enclosed metal plates (B) on the seat base. Place
the enclosed bolts from the top and fasten with
a nut beneath the seat base. Fasten all screws
securely using a 4 mm Allen key and a 10 mm
spanner.
2. The interface can be moved 5 cm backwards and
forwards, depending on the required positioning.
Remove the four bolts (C), move into position and
remount the bolts.
3. Place the seat adapter in the interface and push
it all the way back, until it „clicks” into place (D).
4. Lock the red, adjustable handle tightly once the
chair is positioned correctly. The red handle can
be adjusted to fasten more or less. Loosen the
screw and move the handle closer to or further
away from the seat.
Do NOT use the first hole the seat „clicks” into.
This is just the „safety hole” which will „catch”
the seat if the knob accidently should pop out
of the correct hole.
In some cases it might be neccessary to dis-
mount the metal plate (F) beneath the seat
base, to be able to mount the interface cor-
rectly.
Caution
Be careful not to get your fingers caught
GB

17
G
B
The chair is approved according to ISO
7176/19-2001 and 16840-4:2009.
The Panda Futura 5 seat is approved for
transporting the user in motor vehicles.
Please look at MEASURES in the back of
this manual for the max load. indication.
The approval is not valid on specially made
chairs and frames.
The user should transfer to the vehicle seat
and use the vehicle-installed restraints
system whenever possible.
Seat and frame must be placed in a for-
ward-facing position, when used as a seat
in a motor vehicle. Use an approved 4-point
strap-type tiedown system according to
ISO 10542-2.
Use an approved 3-point belt according to
ISO 10542-1 in the wheelchair. Restraints
should not be held away from the body by
wheelchair components such as armrests
or wheels. It is NOT enough only to use a
hipbelt or vests and belts not approved by
ISO 10542.
The front wheels need to be turned under
the frame so as to be in line wit the frame
before fixation.
All accessories must be removed from the
wheelchair and secured separately in the
vehicle. Accessories which can not be rem-
oved out of consideration of the user, must
be secured to the wheelchair but positioned
away from the user with energy-absorbing
padding placed between the accessories
and the user.
The product should be inspected by the
dealer before re-use following involvment
in any type of vehicle collison.
The following instructions on how to pre-
pare the seat and frame, must be carried
out before transportation.
GB
Restraints should not
be held away from
body by wheelchair
components such as
armrests or wheels
TRANSPORTATION
IN MOTOR
VEHICLES
The Panda Futura 5 seat on either a Combi
Frame or a Multi Frame, is approved for trans-
porting users in motor vehicles, when the chair
and frame are placed in forward-facing position.
All information in this chapter must be carried
through to maintain safety.
i

18
B
15° 15°
30°
1,2 m
65 cm
40 cm
G
B
GB SECURE THE
PRODUCT IN THE
VEHICLE
* Mount the 4-point strap-type tiedown sy-
stem in the vehicle. (Follow the manufacture
instructions)
* Secure the pushchair to the vehicle, using the
4-point strap-type tiedown system. Use either
a hook or a strap in the fitting.
Use a 4-point strap-type tiedown system
approved according to ISO 10542-2 and
SAE J2249.
Position inside vehicle:
* Remove all accessories from the pushchair
before transportation.
* Place the child in forward-facing position.
Be aware of the recommended safety zone
when moving children in vehicles.

19
Date: YYYY-MM-DD Max.Load: XX KG
SN: XXXXXX Ver.: XX
Art.No: XXXXXX
Product - Size X
(01)0570729530134(21)256829
Parallelvej 3
DK-8751 Gedved
www.R82.com
Made in Denmark
A B
A
B
A
B
A
B
G
B
PRODUCT
IDENTIFICATION
Panda Futura 5 seat
A) Serial number
The label is placed on the seat under the
cushion. In the top right-hand corner.
B) Manufacturer
The label is placed on the seat under the
cushion. In the top left-hand corner.
High-low:x frame size 2
A) Serial number
The label is placed on the left side of the frame.
B) Manufacturer
The label is placed on the left side of the frame.
Combi frame
A) Serial number
The label is placed to the left on the front cross
bar beneath the seat.
B) Manufacturer
The label is placed far left on the front cross
bar beneath the seat.
GB

20
C
G
A
F1
F2
C
G
A
F
1
F
2
I
B
H
IB
H
350 (13½") 350 (13½")
430 (16¾") 430 (16¾")
590 (23") 590 (23")
350 (13½") 380 (15")
320 (12½") 270 (15½")
170 - 350 (6½ - 13½") 170 - 350 (6½ - 13½")
560 (22") 560 (22")
560 (22") 560 (22")
670 (26") 670 (26")
15 kg (33 lb) 15 kg (33 lb)
85 kg (187 lb) 85 kg (187 lb)
-5° to 30° -5° to 30°
G
B
MEASURES
GB
Panda Futura 5 Active Panda Futura 5 Standard
mm (inch) mm (inch)
Seat width (A)
Seat depth (B)
Back height (C)
Back width, top (F2)
Back width, below (F1)
Arm rest height above seat cushion
Total width (G)
Total length (H)
Total height (I)
Weight
Max user weight
Max user weight at transportation
Back angle
The Panda Futura 5 is measure according to ISO 7176-5 with seat in horizontal and back in vertical position. We sup-
ply various types of accessories which is why the weight and measurements are listed without. Different settings than
descriped in the standard, may result in another measuring
This manual suits for next models
2
Table of contents
Other R82 Medical Equipment manuals