Cleaning and Storage:
The Probe Lens is the most delicate part of the thermometer. Use with
care when cleaning the probe lens to avoid damage.
a. Allow the lens to fully dry for at least 1 minute.
b. Keep the unit dry and away from any liquids and direct sunlight.
c. Please use the alcohol swab or the soft cotton moistened with the 70% alcohol to clean the probe lens.
d. Clean the probe and probe lens after each use to ensure an accurate reading and avoid cross contamination.
Important Notes:
1. Before the measurement, please stay in a stable environment for 5mins and avoid the exercise, bath for 30mins.
2. Remember to keep the temple area clean and away from sweat, cosmetics and scar while taking temperature.
3. During the measurement, please away from the direct sunshine and wind.
Figure 4.1
Figure 4.2.1 Figure 4.2.2
TH05F Forehead Thermometer
Thank you for purchasing this Forehead thermometer.
This thermometer is designed with an advance infrared and ambient
temperature compensation technology for accurate and fast
temperature measurements. It also has a wide range mode to scan
real time temperature. Do not use this device for Live & Dead decision
or Safety related applications.
Operating Instructions:
1Always make sure the probe lens is clean without any damage, and the forehead is clean.
2Power on: Press the “ON/MEM” button.
3Mode selection:
3.1 FOREHEAD Mode: The preset mode of thermometer is forehead.
The thermometer is ready for use after the “HEAD” icon stops flashing and two beep sound.
3.2 SCAN Mode: In “Power On” mode, press and hold the “ON/MEM” button, then press the “SCAN” button,the ‘ ’
icon will replace “HEAD” icon in the LCD display.
4Temperature taking:
4.1 The temporal artery connect to heart via the carotid artery. Forehead thermometer is designed to
measure the skin surface over the temporal artery, the major artery of the head ( Fig.4.1 ).
4.2 Measuring the FOREHEAD temperature:
Attach the device to the required measurement location on the forehead ( Fig.4.2.1 ). Press the
“SCAN” button, and gently scan around the temple area( Fig.4.2.2 ).Measurement is
completed after a long beep is heard. (The time of measurement might be between
5~8sec (up to 30sec). That depends on how long the thermometer get the highest
temperature of the forehead.)
4.3 Attach the thermometer to the required measurement location on the forehead. For
the best location, please see the Figure.
(You can select the left side of the left temples or the right side of the right temples.)
Note: Forehead temperature is displayed in Oral Mode. This mode converts the forehead temperature to
display its "Oral equivalent."
4.4 Measuring temperature under SCAN mode: When you press the “Scan” button, you will get the temperature
immediately about 0.6 sec. If you keep pressing the scan button, the reading of measurement will update
continuously.
Note: Scan mode shows the actual, unadjusted temperatures, which is different from the forehead mode.
5Switching between Fahrenheit(°F) and Celsius(°C):
To change the LCD from °C to °F: In “Power Off” mode, press and hold the “SCAN” button, then press the “ON/MEM”
button for 3 seconds, icon “°C” will be switched to icon “°F”. You can also use the same process to change the LCD
display from °F to °C.
6Memory Function: Press the “ON/MEM” button to see the temperature stored. This thermometer provides 25 sets
memory for the last measurements. ** Please notice that only the “HEAD” function’s reading will be recorded. (When
the thermometer is turned off, the last measurement data is saved into memory.)
7Power off: Device will automatically shut down after 1 minute pending to extend battery life. At next
power on, it will go back to the default setting of “HEAD” temperature function
Holding the thermometer too long may cause a higher ambient temperature reading of the probe.
This could make the body temperature measurement lower than usual.
Fever Alarm:
If the thermometer detects a temperature >37.5°C (or 99.5°F) under forehead mode, three short beep
sound will follow one long beep sound to warn the user for potential fever.
Specifications:
Compliance with ASTM E1965-98, IEC60601-1, IEC60601-1-2(EMC) standards.
Temperature measurement range: Forehead mode34~42.2°C (93.2~108°F), Scan mode: -22~80°C (-7.6~176°F)
Accuracy is +/-0.3°C(0.5°F)during 22~42.2°C (71.6~108°F), others +/-4% or +/-2°C(4°F) whichever is greater.
**Storage temperature range: It should be stored at room temperature between -20~+50°C, RH≦85%
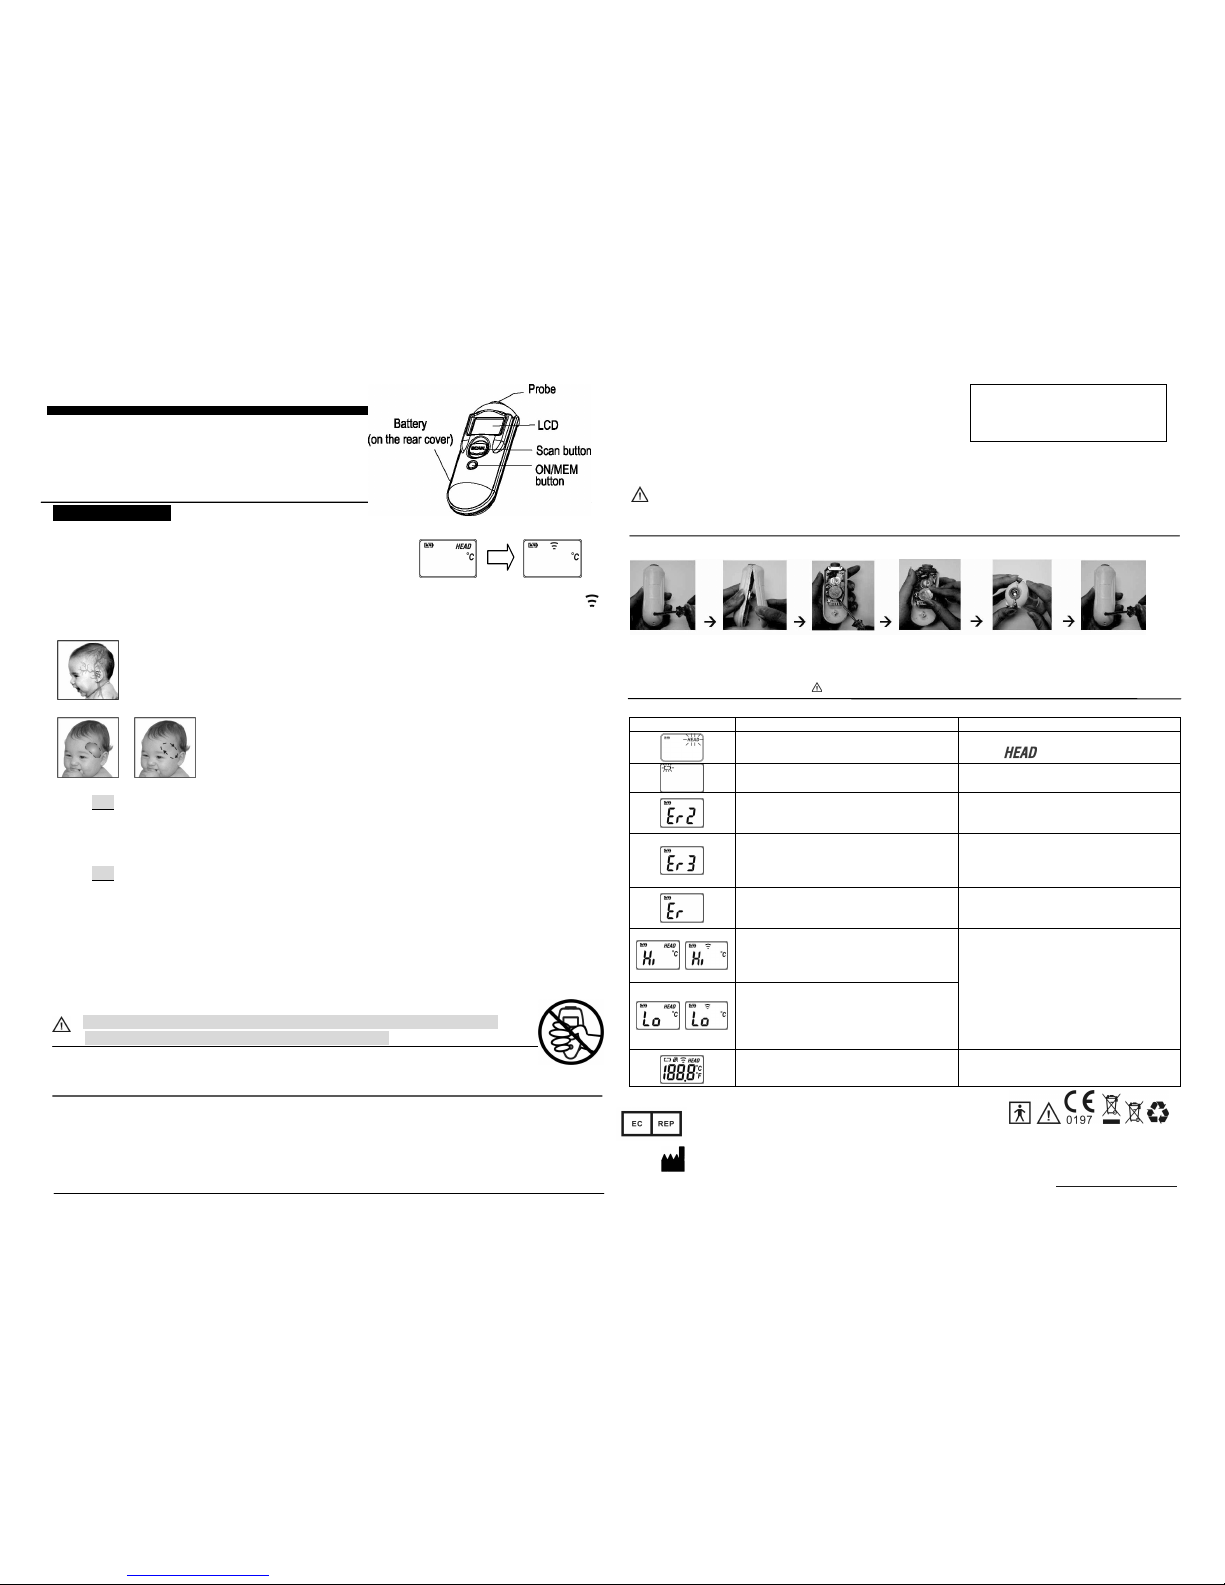
Changing the Battery: It is supplied with one lithium cell (CR2032x1pcs)
○
1Loosen the screw on the back housing of anti-clockwise to open the back housing. ○
2Hold the device and use the screwdriver
to flip out the battery. ○
3Replace the new battery and put it on the left side of back housing (Make sure the battery is hooked.)
Then, press the battery until you hear the “click” sound. ○
4Close the upper side and then close the bottom side.
○
5Fasten the screw on the back housing. Keep the battery away from children.
Troubleshooting:
Error Message Problem Solution
Device stabilization in process.
Wait until stops flashing.
Battery is low and no more measurements are
possible. Replace the battery.
The device showing a rapid ambient temperature
change.
Allow the thermometer to rest in a room for at least
30 minutes at room temperature:
10°C and 40°C(50°F~104°F).
The ambient temperature is not within the range
between 10°C and 40°C (50°F~104°F).
Allow the thermometer to rest in a room at least 30
minutes at room temperature: 10°C and
40°C(50°F~
104°F).
Error 5~9, the system is not functioning properly.
Unload the battery, wait for 1 minute and repower it.