manuals.online logo
Brands
  1. Home
  2. •
  3. Brands
  4. •
  5. Raidon
  6. •
  7. Enclosure
  8. •
  9. Raidon SafeTANK GR3660-TB2 User manual

Raidon SafeTANK GR3660-TB2 User manual

DC IN
12V
RESET
RAID 0 RAID 1 JBOD
+
前視圖 背視圖
GR3660-TB2
主體 x1
打開包裝外盒後,包裝內容應包含下列組件 :
3. 硬碟安裝完成後,請將抽取盒平移放入主機內,並關上把手。
2. GR3660-TB2開機下在電腦進入系統待命或是休眠裝態時,會一起進入待命狀態。當電腦恢復正常
運 作,則GR3660-TB2也會一併回復到正常使用狀態。
5. 在新增或變更 RAID 模式後需重新啟動產品,以確保完成更新為新的 RAID 模式。
3. 切換RAID設定的標準程序:
4. RAID 模式一旦設定完成,若要進行切換,因切換過程中將會清除硬碟中的資料,請務必先將硬碟
中的資料另行備份後再行切換。
4.
透過機體背面的RAID模式開關,切換至JBOD模式。
5.
將相關連接線接上,最後接上電源轉接器。
電腦 Thunderbolt™ 連接埠
6.
將機體背面的電源開關打開。
7.
a. 如機器啟動後,抽取盒燈號會由「紅燈恆亮 > 熄滅 >藍燈恆亮」燈號,即為完成機器安裝設定。
b. 如機器啟動後,抽取盒燈號如出現「紅燈恆亮 > 熄滅 >藍紫閃爍」燈號,請使用頂針插入「重置鍵」
3秒後鬆開頂針,待燈號由「藍紫閃爍」燈號轉變為「藍燈恆亮」燈號時,即為完成機器安裝設定。
8.
機器安裝設定完成後,即可依需求設定RAID模式,請參考「產品使用注意事項/3.切換RAID設定的標
準程序」,做RAID模式切換設定。
請參照下列步驟,完成GR3660-TB2的硬體安裝 :
1. 請使用零件包內附的鑰匙插入鑰匙孔後,抽取盒門閂將會輕彈開啟,即可將硬碟機抽取盒取出。
2. 將硬碟安裝到抽取盒上,並以零件包內附的螺絲加以固定,以避免不必要的移動對硬碟造成傷害。
產品配件表
產品示意圖與配件表
燈號說明
硬體安裝
產品使用注意事項
GR3660-TB2
DC IN
12V
RESET
RAID 0 RAID 1 JBOD
+
硬碟讀取燈A
B硬碟抽取盒把手
C電源開關
D電源埠
EThunderbolt™ 連接埠
FRAID 切換鈕
GRESET 鈕
硬碟狀態燈
紅燈恆亮
藍燈恆亮
呼吸燈(藍色)
狀態
電源開啟 / 無硬碟
電源開啟 / 硬碟閒置
資料重建(來源)
資料重建(目標) 紫燈恆亮
步驟1:請在GR3660-TB2連線到電腦後,一併打開電腦和ST2的電源開關。
步驟2:請在藍燈恆亮時,將在GR3660-TB2背板上設定RAID設定的「切換開關」調到你所要的設
定位置。
步驟3:請使用頂針插入「重置鍵」,待前面板抽取盒上的閃爍藍紫燈結束、並轉成恆亮藍燈後鬆
開頂針。
步驟4:請您再做一次關、開GR3660-TB2電源的動作後,您已經改變、並重新設定了GR3660-TB2
的RAID。
1. 第一次使用本產品進行設定時,資料會被全數清除。請於硬碟置入前,確認硬碟已備份,避免資料
遺失。
7.強烈建議除了使用GR3660-TB2的資料儲存功能外,請針對重要資料備份到另一個儲存裝
置上或遠端備份,雙重備份您重要的資料。若您儲存在GR3660-TB2的資料損毀或遺失,RAIDON 將
不負任何的責任。
6. GR3660-TB2使用 12V/5A 規格 Adapter,請勿使用其他非原廠規格 Adapter 以免損壞機器及資料。
快速安裝導引 x1
Thunderbolt™ 連接線 x1
電源轉接器 x1
電源線 x1
腳墊 x4
螺絲及鑰匙
V1.3 (Jan. 2019)
請先確認相關配件與產品本身是否有受損或是缺少配件,若有任何疑問,請與您的經銷商或業務
人員聯絡。
請前往官網-產品資料下載頁面 (http://www.raidon.com.tw/RAIDON2016/download.php)
下載驅動程式以及其餘相關資源。
˙
˙
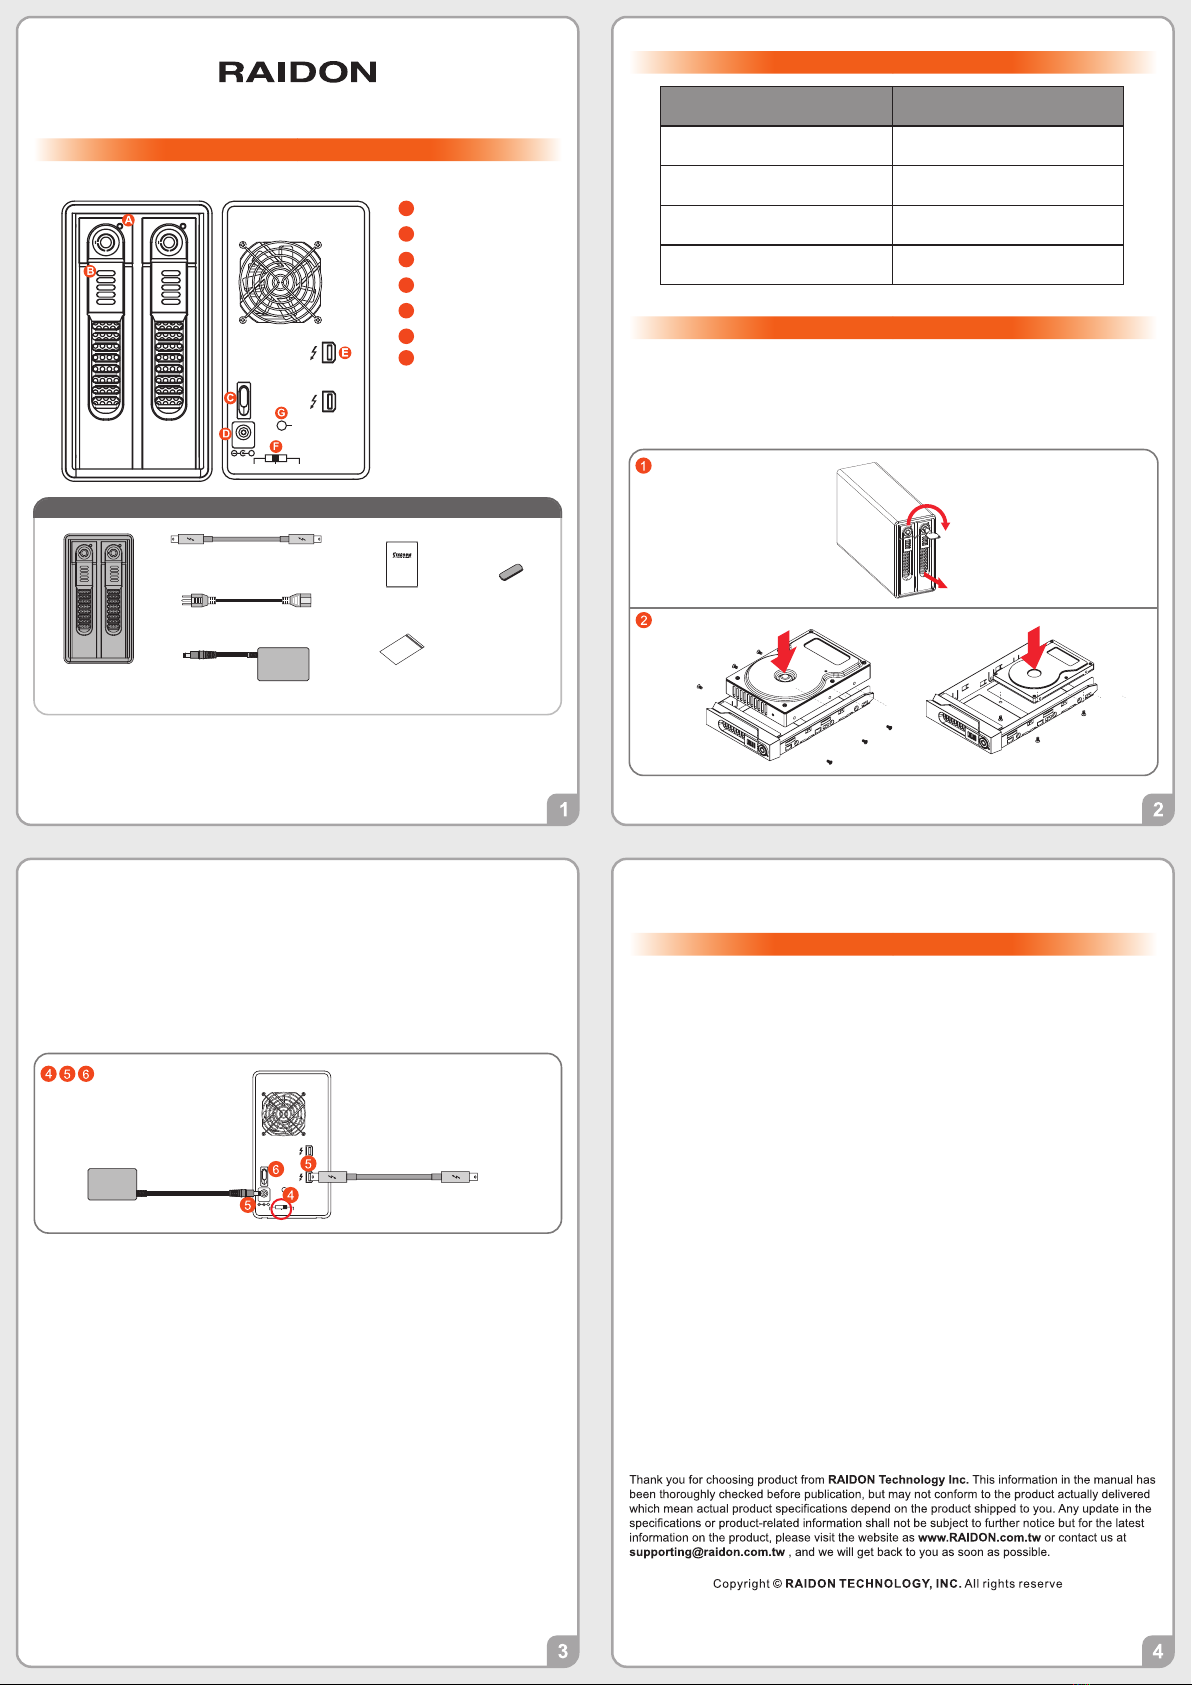
Front View Rear View
GR3660-TB2
Main Unit x1
3. After installing two HDDs into Trays, please insert them into GR3660-TB2, and then latch the
tray thandle.
2. GR3660-TB2 will be forced to switch to SLEEP mode while your Mac Computer is in either IDLE
or SLEEP mode.
4. Please switch RAID Dip-switch to JBOD mode on back-plate.
5. Please connect the Thunderbolt Cable, and then connect AC/DC Adapter to the product.
6. Please turn on power.
7.
a. After turning on power, the HDD/SSD Indicator will be changed with the following sequence, Red
> Off > Blue, and then, GR3660-TB2 is ready for use.
b. In case if the HDD/SSD Indicator shows Red > Off > Blue Flashing, please use a pin to press the
RESET Button for 3 seconds, and wait until the HDD/SSD Indicator is changed to Blue from Blue
Flashing, your GR3660-TB2 is then ready for use.
8. While your GR3660-TB2 is ready for use, please adjust the RAID Setting per step 3 ”in the
Important Notice” on page 4. You can start now to use your GR3660-TB2.
Please follow the following procedure to have your GR3660-TB2 installed:
1. Use the provided key in the Accessories Kit and insert it into the Key Access to eject the Tray Latch
handle and the handle can be used to extract the tray.
2. Mount your hard drives onto the removable drive tray and secure them with the screws included in the
accessory kit.
Product Diagram & the Contents of Package
The Indication of HDD Status
Hardware Installation
Important Notice
GR3660-TB2 Quick Installation Guide
HDD Status IndicatorA
HDD tray key lockB
CPower Switch
DPower Socket
EThunderbolt™ port
FRAID Dip-switch
GHidden Reset Button
LED Light Status
Solid Red Light
Solid Blue Light
Breathing Blue Light
Status
Power ON / No HDD
Power ON / Two HDDs
Rebuilding-Source
Rebuilding-Target Solid Purple Light
6. GR3660-TB2 uses a 12V/5V AC/DC Adapter. Please do not use other non-certified Power Adapter
to avoid damaging your GR3660-TB2 unit.
7. We strongly recommend you to keep an extra copy at your important personal data other than
stored in your GR3660-TB2 product. RAIDON will not be responsible of your data loss in this
device.
3. The Standard Procedure to Switch RAID Setting:
4. WARNING: if you decide to delete or switch your original RAID mode setting please always make sure
you keep your personal data or files in another storage device.
Step 1: Please first connect GR3660-TB2 to your Mac.
Step 2: Please set RAID Dip Switch to the position you demand.
Step 3: Please use the Key to press the hidden RESET key at the back-panel, hold and wait for
the Blue-Purple LED blinking, and continue to hold it till a stable Blue light comes out.
Step 4: Please turn off your GR3660-TB2, and turn it back on again. You now have reset GR3660-
TB2 with a new RAID mode successfully.
1. Since GR3660-TB2 will erase all data files in your two HDDs/SSDs at its first-time use, It’s very
important that you save all your personal data files into another storage device before setting your
up new GR3660-TB2.
DC IN
12V
RESET
RAID 0 RAID 1 JBOD
+
Computer Thunderbolt Port
DC IN
12V
RESET
RAID 0 RAID 1 JBOD
+
Quick Installation
Guide x1
Contents of Product Package
Thunderbolt™ Cable x1
AC/DC Adapter x1
Power Cord x1
Foot Pad x4
Screws and keys
Please check the product and accessories for any defect or missing parts. If you
have any questions, please contact your product supplier.
Please visit the official website (www.raidon.com.tw) to download user manuals,
drivers and other related resources.
˙
˙
V1.3 (Jan. 2019)
5. The product needs to be restarted after adding or changing the RAID mode, and the update is
guaranteed to be the new RAID mode.

Other manuals for SafeTANK GR3660-TB2

1

Other Raidon Enclosure manuals

Raidon SL3650-LB2 SafeTANK User manual

Raidon

Raidon SL3650-LB2 SafeTANK User manual

Raidon GR8670-TB3 User manual

Raidon

Raidon GR8670-TB3 User manual

Raidon GR8670-TB3 User manual

Raidon

Raidon GR8670-TB3 User manual

Raidon GR5630-WSB3+ User manual

Raidon

Raidon GR5630-WSB3+ User manual

Raidon SAFETank Series User manual

Raidon

Raidon SAFETank Series User manual

Raidon ST7610-4S-S2P User manual

Raidon

Raidon ST7610-4S-S2P User manual

Raidon GearRAID GR3630-2S-SB2+ User manual

Raidon

Raidon GearRAID GR3630-2S-SB2+ User manual

Raidon GT1670-SB3 User manual

Raidon

Raidon GT1670-SB3 User manual

Raidon SOHORAID GR4670-TB3 User manual

Raidon

Raidon SOHORAID GR4670-TB3 User manual

Raidon iR2774-S3 User manual

Raidon

Raidon iR2774-S3 User manual

Raidon InTANK iR2022 User manual

Raidon

Raidon InTANK iR2022 User manual

Raidon InTANK Series User manual

Raidon

Raidon InTANK Series User manual

Raidon SR7650-4S-U3D User manual

Raidon

Raidon SR7650-4S-U3D User manual

Raidon iT2776-S3 User manual

Raidon

Raidon iT2776-S3 User manual

Popular Enclosure manuals by other brands

Renkforce RF-2124108 operating instructions

Renkforce

Renkforce RF-2124108 operating instructions

Dell PowerVault MD3060e Series Getting started guide

Dell

Dell PowerVault MD3060e Series Getting started guide

Innovation First 2UBOX-160 installation manual

Innovation First

Innovation First 2UBOX-160 installation manual

Fantec QB-X8US3R Brochure & specs

Fantec

Fantec QB-X8US3R Brochure & specs

Pulsar AWO 363 Assembly instructions

Pulsar

Pulsar AWO 363 Assembly instructions

Techly I-CASE SU31-25TY user manual

Techly

Techly I-CASE SU31-25TY user manual

Aerocool P7-C0 Pro user manual

Aerocool

Aerocool P7-C0 Pro user manual

Akitio NT2 U3 user manual

Akitio

Akitio NT2 U3 user manual

Altec Lansing 816V LF SPEAKER CABINET manual

Altec Lansing

Altec Lansing 816V LF SPEAKER CABINET manual

Alto MS12A owner's manual

Alto

Alto MS12A owner's manual

Dynacord D 8A - V06 owner's manual

Dynacord

Dynacord D 8A - V06 owner's manual

Geeek A30 installation guide

Geeek

Geeek A30 installation guide

Mustang Sampling Pony Installation operation & maintenance

Mustang Sampling

Mustang Sampling Pony Installation operation & maintenance

OUTSTEEL VENITIAN installation instructions

OUTSTEEL

OUTSTEEL VENITIAN installation instructions

Simply Automated UPB ZTP2 instructions

Simply Automated

Simply Automated UPB ZTP2 instructions

Icy Box IB-1821ML-C31 manual

Icy Box

Icy Box IB-1821ML-C31 manual

Sliger SM5X0 Series Assembly guide

Sliger

Sliger SM5X0 Series Assembly guide

Outback Power Systems FLEXware 1000 user guide

Outback Power Systems

Outback Power Systems FLEXware 1000 user guide

manuals.online logo
manuals.online logoBrands
  • About & Mission
  • Contact us
  • Privacy Policy
  • Terms and Conditions

Copyright 2025 Manuals.Online. All Rights Reserved.