Rainbow Pool Products RB User manual

Installation and Operating Instructions
RB Robotic Pool Cleaner
Product 11712
Product Inst 320
Rainbow Pool Products
PO Box 2388, Mansfield Qld 4122
Telephone STD 61-7-3849 5385
Facsimile STD 61-7-3849 5384
Web: www.rainbowpoolproducts.com.au
Rainbow Pool Products
PO Box 2388, Mansfield Qld 4122
Telephone STD 61-7-3849 5385
Facsimile STD 61-7-3849 5384
Email: [email protected]
Web: www.rainbowpoolproducts.com.au

IMPORTANT SAFETY INSTRUCTIONS
READ AND FOLLOW ALL THE INSTRUCTIONS
CAUTION: Do not plug the power supply into a grounded outlet or do not switch the
pool cleaner “ON” if it is not fully immersed in water. Operating the cleaner out of water
will cause severe damage immediately and will result in loss of warranty.
Allow the cleaner to remain in the pool for 15 to 20 minutes following the end of its
cleaning cycle. This will allow the motors to cool adequately. Do not leave the cleaner
in the pool all the time.Always remember to turn the power supply “OFF” and unplug it
from the power outlet before removing the cleaner from the pool.
WARNING: The cleaner must not be used when people are in the water. For use
with swimming pool only
Safety Note
- The unit must be supplied through a residual current device (RCD) having a rated
residual operating current not exceeding 30 mA
- The connection to the branch circuit should be consistent with the local and national
wiring rules (electrical code).
- Mishandling of the unit can result in leakage of lubricants.
- If the supply cord is damaged, it must be replaced by the manufacturer’s service
agent or a qualified and trained person in order to avoid hazards.
Dear Customer,
Thank you for choosing our product to clean your pool. We hope that you will enjoy
using your new robot to maintain your swimming pool for years to come.
Before you begin to use your robot, please take a few minutes to carefully read these
operating instructions.
Again, thank you for choosing our product.
2
Components
Your new automatic pool cleaner contains:
- The robotic pool cleaner with its floating cable.
- The Power Supply (transformer).
Please read this manual completely before operating your pool cleaner.
While the appearance of your cleaner and some of its components may differ from those
shown here, the function of the cleaner, operating procedures and maintenance
practices are the same.
WARNING: A Ground Fault Current Interrupter (GFCI-USA) or a Residual Current
Device (RCD-EUROPE) must be installed to protect your electric outlet and prevent
any possible electric shock.
This appliance is not intended for use by persons (including children)
with reduced physical, sensory or mental capabilities, or lack of
experience and knowledge, unless they have been given supervision or
instruction concerning use of the appliance by a person responsible for
their safety. Children should be supervised to ensure that they do not
play with the appliance.
Side Plate
Handle
Handle Lock
Mechanism
Drive Track
Scrubbing Brush
Unit Body
Outlet Top
SAVE THESE INSTRUCTIONS

12 cm
(4 inch)
3.6m/11.8ft
1
1a
1. Place the power supply (transformer) at least 3.6 meters / 11.8 feet from the pool and at
least 12 cm / 4 Inch above the surface (fig.1). The transformer will supply low voltage to
the cleaner.
2. Uncoil the cable.(fig.1a)
3. For proper operation, lock the moveable handle diagonally across the top of the
cleaner's body. Push down on the handle lock mechanism and slide the handle all the
way to the end (recommended one slot before the end), then release the lock.
Depending on your model, the handle lock button might be vertical or horizontal
(fig.2a, 2b). The handle will remain fixed in this position. Repeat this process on the
other side of the cleaner.
Remember, the handle must be fixed diagonally (fig.2c)
2b
unit
2c2aHandle lock vertical Handle lock horizontal
Operating the pool cleaner
4. Place the unit in the water. Turn the unit
side to side in the water to allow air to
escape from the body and then let the
cleaner sink to the bottom of the pool
(fig.3). Then, spread the cable over the
surface of the pool as evenly as possible
(fig.1).
3
3
5. Plug the cable into the power supply. Make sure the key on the plug corresponds
exactly with the key slot on the socket of the power supply (fig. 3a).
Plug the power supply into a grounded outlet. Ensure that the electric outlet has been
properly grounded (fig.3b). Press the “ON” button on the power supply. The light will
glow indicating that the system is “ ON “ and the pool cleaner will start the cleaning
cycle. The unit keeps record of the number of cleaning cycles. Only an authorized
service center can display the accumulated cleaning cycles. (See details on the next
page)
3b
3a

2SHUDWLQJWKHSRROFOHDQHU
$%VORW
NH\
&'
3OXJV7\SH,
7RSOXJWKHFDEOH)LJ$LQWRWKHVRFNHWRQWKHSRZHUVXSSO\)LJ%SOHDVHGRWKH
IROORZLQJ
3UHSDUHWKHSOXJDVVHHQLQ)LJ&ZLWKWKHNH\DQGRXWVLGHVORWVH[DFWO\DVVKRZQ
)LWH[DFWO\WKHNH\DQGWKHVORWVIURPFDEOHSOXJZLWKWKHFRUUHVSRQGLQJNH\DQGVORWV
IURPWKHSRZHUVXSSO\VRFNHW)LJ'
3XVKWKHSOXJLQWRWKHVRFNHWRIWKHSRZHUVXSSO\DOOWKHZD\LQ
2QFHWKHSOXJLVLQURWDWHWKHSOXJWRWKHULJKWWRORFNLWLQWRSODFH)LJ(
7RUHPRYHWKHSOXJILUVWURWDWHWKHSOXJWRWKHOHIWWRXQORFNLWWKHQSXOOLWRXW)LJ)
6RFNHW%
&DEOHSOXJ$
VORW
NH\
3XVKDQGURWDWH
ULJKWWRORFN
(
5RWDWHOHIWDQG
SXOOWRXQORFN
)
FDEOH
SOXJ
FDEOH
SOXJ
SRZHUVXSSO\
VRFNHW
FDEOH
SOXJ SRZHUVXSSO\
VRFNHW
([WHUQDO7LPHU&DSDELOLW\
7KLVIHDWXUHZLOOHQDEOHWKHHQGXVHUWR
SURJUDPWKHFOHDQLQJVFKHGXOHWKURXJK
DQH[WHUQDOWLPHUVROGVHSDUDWHO\
*URXQGLQJ
7KHSRZHUVXSSO\PXVWEHFRQQHFWHGWRDJURXQGHGFRQGXFWRUVRFNHW7KHPDLQVSRZHUVXSSO\
PXVWEHFRQQHFWHGYLDD*)&,JURXQGIDXOWFLUFXLWLQWHUUXSWHURU5&'UHVLGXDOFXUUHQWGHYLFH
KDYLQJDUDWHGUHVLGXDORSHUDWLQJFXUUHQWQRWJUHDWHUWKDQP$
)XVH
7KHIXVHPXVWEHFKDQJHGE\DQDXWKRUL]HGVHUYLFHDJHQWRUWUDLQHGDQGTXDOLILHGSHUVRQRQO\
)RUFRQWLQXHGSURWHFWLRQDJDLQVWULVNRIILUHUHSODFHRQO\ZLWKWKHVDPHW\SHDQGUDWLQJRIIXVH
0DLQWHQDQFHDQGVDIHW\
7KHFRYHUVKRXOGQRWEHUHPRYHGH[FHSWE\DQDXWKRUL]HGVHUYLFHDJHQWRUWUDLQHGDQGTXDOLILHG
SHUVRQ1RLQWHUQDODGMXVWPHQWRUFRPSRQHQWUHSODFHPHQWFDQEHFDUULHGRXWE\WKHXVHU7KH
SRZHUFDEOHPXVWEHGLVFRQQHFWHGEHIRUHUHPRYLQJWKHFRYHU
,IWKHSRZHUVXSSO\FRUGLVGDPDJHGLWPXVWEHUHSODFHGE\DQDXWKRUL]HGVHUYLFHDJHQWRUWUDLQHG
DQGTXDOLILHGSHUVRQ'RQRWRSHUDWHWKHVXSSO\LIWKHFRUGLVGDPDJHG
(QYLURQPHQWDOFRQGLWLRQV
7KHSRZHUVXSSO\LVGHVLJQHGWRZRUNERWKLQGRRUVDQGRXWGRRUV+RZHYHUWKHXQLWVKRXOGQRWEH
RSHUDWHGLQGLUHFWVXQOLJKWRUEHH[SRVHGWRZDWHU7KHSRZHUVXSSO\VKRXOGQRWEHRSHUDWHGLQDQ
DPELHQWWHPSHUDWXUHLQH[FHVVRI&
3K\VLFDO
'LPHQVLRQV:'+
:HLJKW
(OHFWULFDO
,QSXWUDWLQJ
2XWSXWUDWLQJ
6WRUDJHWHPSHUDWXUH
2SHUDWLQJWHPSHUDWXUH
,QJUHVVSURWHFWLRQ
PPPPPP
.J
9a+]:
9$
&&
&&
,3
8QLW
&DEOH
3RZHUVXSSO\
3RZHUVXSSO\SOXJ
([WHUQDOWLPHU
2XWOHW

2SHUDWLQJWKHSRROFOHDQHU
D3RZHU/('
7KHEOXH/('IODVKHV ZKHQ WKH SRZHU VXSSO\ LV LQ VWDQGE\ PRGH DQG OLJKWV
FRQWLQXRXVO\ ZKHQ WKH SRRO FOHDQHU LV RSHUDWLQJ7KH SRZHU EXWWRQ VZLWFKHV
EHWZHHQ21DQG67$1'%<
E32:(5EXWWRQ
7KHEXWWRQVZLWFKHVEHWZHHQ21DQG67$1'%<
,03257$17$IWHUHYHU\F\FOHWKHSRROFOHDQHUZLOODXWRPDWLFDOO\JRWRVWDQGE\
,QFDVH\RXZDQWWRWXUQWKHPDFKLQHRIIGXULQJWKHZRUNLQJF\FOHSUHVVWKH
SRZHUEXWWRQRQFHDQGWKH/('ZLOOVWDUWIODVKLQJLQGLFDWLQJWKDWWKHPDFKLQH
KDVVWRSSHGUXQQLQJ
,03257$17
3OHDVHEHVXUHWRDOZD\VNHHS\RXUSRROFOHDQHUSURSHUO\VWRUHGDQ\ZKHUHEHWZHHQWRGHJUHHV&HOVLXVWRGHJUHHV)DKUHQKHLW7KLVZLOONHHSWKHPRWRUV
SODVWLFVDQGVHDOVSURWHFWHG)DLOXUHWRFRPSO\ZLOOUHVXOWLQORVVRIZDUUDQW\
5RERWFDQEHXVHGLQZDWHUZLWKWHPSHUDWXUHVUDQJLQJIURP&WR&)WR)+RZHYHUWKHUHFRPPHQGHGRSWLPDOWHPSHUDWXUHLVEHWZHHQ&DQG&)
DQG)
&$87,21
7R DYRLG VFUDWFKHV DQG RWKHU EOHPLVKHV
DSSHDULQJ RQ \RXU URERW VLPSO\ ILQG D
VPRRWK VXUIDFH IRU LW WR UHVW RQ ZKHQ
FOHDQLQJ WKH GHEULV EDJ RU SHUIRUPLQJ
PLQRUDGMXVWPHQWV
7KHVHVFUDWFKHVFRXOGSURGXFHFKDQJHV
LQ WKH URERWV VRIW DQG VPRRWK HGJHV
UHVXOWLQJ LQ SRWHQWLDO GDPDJH WR VRPH
IOH[LEOHSRROVXUIDFHV
VPRRWK
VXUIDFH VPRRWK
VXUIDFH
0DLQWHQDQFHDQGDGMXVWPHQW

VPRRWK
VXUIDFH
ORFNWDE
0DLQWHQDQFHDQGDGMXVWPHQW
&/($1 7+( ),/7(5 %$* $)7(5 (9(5< &/($1,1*
&<&/(
D8QSOXJWKHSRZHUVXSSO\3OHDVHNHHSWKH SOXJDZD\
IURPFRQWDFWZLWKZDWHU
E,IWKHXQLWLVLQWKHSRROJHQWO\SXOOWKHFOHDQHUWRZDUG\RX
XVLQJWKHFDEOHXQWLOWKHKDQGOHLVZLWKLQUHDFK8VHWKH
KDQGOHQRWWKHFDEOHWRSXOOWKHFOHDQHURXWRIWKHSRRO
DIWHUDOORZLQJPRVWRIWKHZDWHUWRGUDLQIURPWKHXQLW
F/D\WKHXQLWRQLWVEDFNRQDVPRRWKVXUIDFHLQRUGHUWR
SUHYHQWVFUDWFKHV RQ WKH PDFKLQH ERG\ UHOHDVH WKH
ORFNWDEVDQGUHPRYHWKHERWWRPOLGDVVHPEO\ILJD
EFG
FRQWLQXHRQWKHQH[WSDJH
127(
'HSHQGLQJRQ\RXUPRGHOWKHUHDUHW\SHVRI ERWWRPOLG
UHOHDVLQJPHFKDQLVPV/2&.7$%RU6:,9(/7$%3OHDVH
IROORZWKHLQVWUXFWLRQVGLDJUDPDFFRUGLQJWR\RXUPRGHO
D
VPRRWK
VXUIDFH
VPRRWK
VXUIDFH
VZLYHOWDE
VPRRWK
VXUIDFH
/2&.7$% 6:,9(/7$%
/2&.7$% 6:,9(/7$%
/2&.7$% 6:,9(/7$%
E
F
G

Maintenance and adjustment
(continued from the previous page)
d. Remove the filter bag from the support bars, turn it inside out and wash off all the dirt
with a garden hose or in a sink. Squeeze the bag gently until the rinse water is clear. If
necessary, machine wash the bag using only cold water with NO DETERGENT!
(fig.5)
e. Re-install the bag on the support bars with the label in the center of one of the long
sides of the bottom lid (5a)
f. Re-install the bottom lid assembly in the body. Push down on it until lock tabs will snap
into place properly.
Shut off and unplug the power supply every time you remove the cleaner from the
water.
Clean the filter bag after every cycle.
Reverse the handle after every cleaning cycle to avoid tangling the cable.
Periodically straighten out the floating cable.
Replace worn brushes to ensure maximum cleaning performance
Make sure that your pool cleaner positions itself properly on the wall. The machine
handle must rest parallel to the water line upon reaching the surface of the water.
Save your cleaner's packaging for off-season storage or for shipping the unit to your
dealer if service is required.
Leave your pool cleaner in the water for 15 to 20 minutes after every cleaning cycle.
Do not leave your cleaner in direct sunlight when not in use.
Never leave the power supply in direct sunlight and avoid leaving it in the rain.
Occasionally, you should rinse your cleaner in clean, fresh water. This will lengthen
the service life of the drive belts, drive tracks and scrubbing brushes.
Clean the propeller once a month
IMPORTANT TIPS:
Cleaning the pump propeller:
1) Take out the 2 (4) screws from the outlet top
2) Take out the outlet top and remove hair and other debris around propeller
CABLE CARE
The cable may become twisted after a period of time in use. To correct this condition,
simply lock the moveable handle on the top of the cleaner in the opposite diagonal
direction. The pool cleaner will now travel in the opposite direction while cleaning your
pool and the cable will uncoil. Check the cable periodically for external damage. If the
problem persists, use the E-Z Swivel device.
Place the robot on the ground and unplug the cable
from the transformer. With one hand, holding the E-Z
Swivel, walk away from the robot, pulling the cable to
its full length. The core will rotate inside the cover
and in this way will untangle the cable.
patent pending
outlet top
propeller
Cable Assy
Core
Handle
Cover
Screws
7
E-Z SWIVEL
label
30°C / 85°F
Filter bag

Troubleshooting Guide
8
PLEASE CHECK THE FOLLOWING BEFORE CALLING YOUR SERVICE CENTER
Before troubleshooting, the pool cleaner must be disconnected from the power supply and the power supply must be unplugged from the electrical outlet to prevent damage to the
unit and possible personal injury.
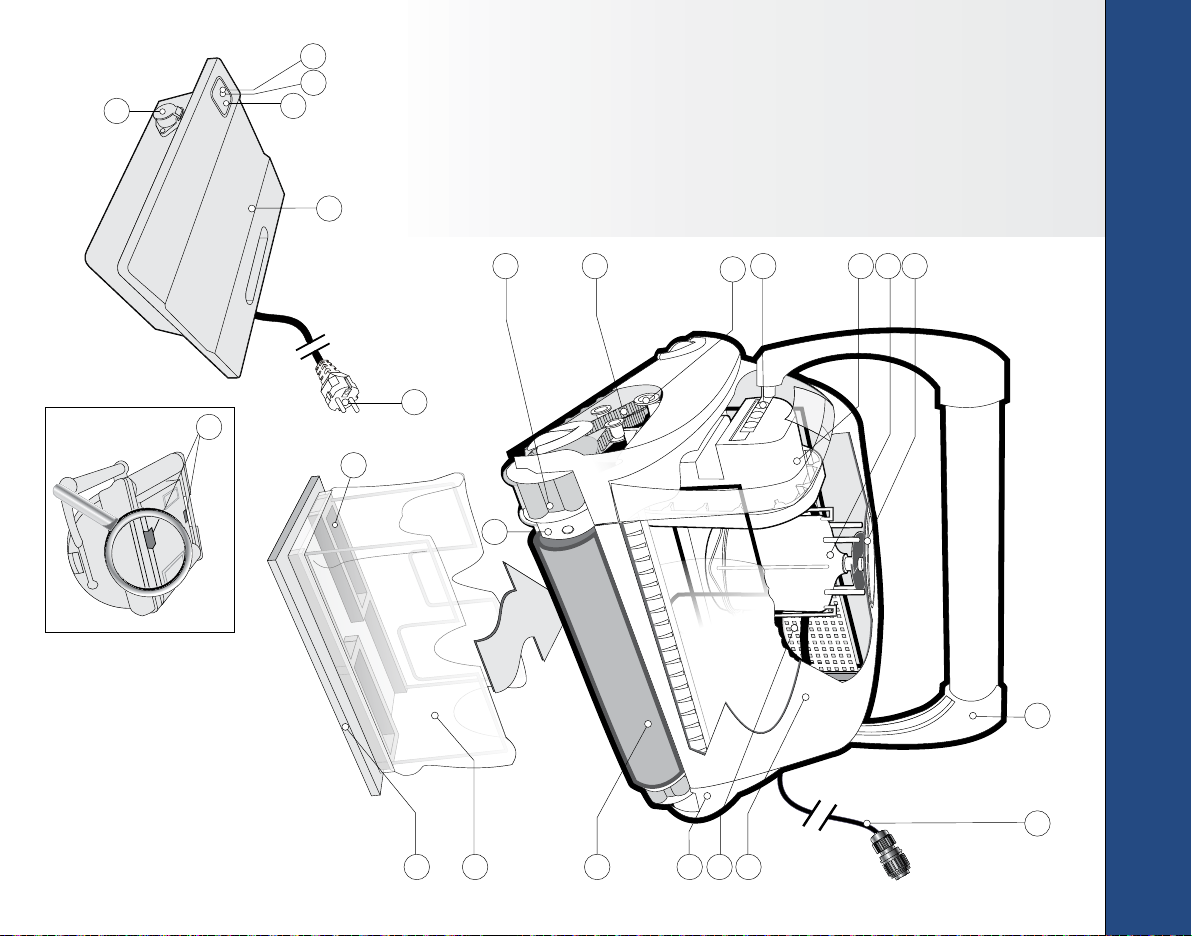
For reference numbers, consult the parts list diagram located on the last page of the instructions.
1. Unit does not pump water or move:
a) Check to see if electric outlet (22) has power.
b) Check if transformer (16) is plugged into a grounded outlet and the grey cable
assembly is plugged into the transformer.*
c) Switch the power supply “OFF” and “ON” a few times. Allow 45 seconds
between “ON” and “OFF”.
d) Check for and remove any debris such as hair, string, or leaves that may be
obstructing the free movement of the Drive Pulley (5), Drive Belts (6) , or
Drive Tracks (7) .
e) Check that the Drive Belts (6) and Drive Tracks (7) are properly aligned and
are taut. Adjust or replace if necessary.
2. Unit does not pump water at all, or pumps slowly but moves:
a) Check to see if propeller (1) is seized due to accumulation of hair or debris on
the propellers. Remove the top screws on each outlet top (1) and clean the
propeller. When reassembling the top cover, do not overtighten the screws.
b) Check to see if the filter bag (12) is thoroughly clean. Clean as necessary.
c) If a and b are negative, check the pump motors (2). If they are not functioning
send the unit to your service center.
3. Unit does not move but does pump water:
a) Check to see if forward/reverse motion is obstructed by foreign matter; hair,
debris, etc. on drive belts (6) or drive tracks (7) or there is an entanglement
with the power cord. Clean as necessary.
b) Check if drive belts (6) have slipped out of place. Also check for proper
tension of drive belts (6). If necessary replace belts.
c) Check for loose drive motor (3) connections.
d) If a, b, and c are negative, check the Master and Slave motors. If one or the
other is not functioning, send the unit to your service center.
*The transformer cord can only be replaced with the aid of special purpose tools normally available only to
authorized dealers, distributors and service centers.
4. Unit does not pick up dirt and debris:
a) Check 2a and 2b of this guide.
b) Check the Intake Valve Flaps (23) on the underside of your unit. The Flaps
should move freely to open and close. Clean and free the Valve Flaps (23) if
necessary.
5. Unit does not seem to cover the entire pool:
a) Most likely a thorough cleaning of the filter bag (12) is needed.
b) Check to see that the grey cable (15) is properly spread out and is untangled.
c) Allow the unit to run in the pool for the entire cleaning cycle.
d) Make sure that the Floating Handle (14) is locked diagonally across the top of
your unit's body.
e) Check that the Pump Motor (2) is operating. Please refer to the
Troubleshooting section titled “Moves But Does Not Pick Up Dirt And
Debris”
f) After following all of the above, if there is still a problem, call your dealer for
specific additional assistance.
6. Debris Comes Out Of The Aquabot When Removing It From Pool
(Bottom Lid Does Not Close Properly)
a) Lock Tabs (24) - Check that the Lock Tabs (24) are not warped. They should
be straight and aligned with the unit's body.
b) Intake Valves (23) - Check that the Intake Valve Flaps on the underside of
your unit (in the Bottom Lid ) move freely to open and close. Clean Flaps if
necessary.
7. The cable is twisted:
a) Reverse the diagonal position of the handle.
b) Use the E-Z Swivel (see “Cable Care” chapter)

2XWOHW7RSDQGSURSHOOHU
3XPS0RWRU
'ULYH0RWRU
+DQGOH/RFNLQJ%UDFNHW
3XOOH\$VVHPEO\
'ULYH%HOW
'ULYH7UDFN
%RG\$VVHPEO\
)LOWHU6FUHHQ
6LGH3ODWH
39$%UXVKHV
)LOWHU%DJ
%RWWRP/LG$VVHPEO\
+DQGOH$VVHPEO\
&DEOH$VVHPEO\
3RZHU6XSSO\7UDQVIRUPHU
7UDQVIRUPHU6RFNHW
:KHHO7XEH$VVHPEO\
³2))´EXWWRQ
/('
³21´EXWWRQ
3RZHU&RUG2XWOHW
,QWDNH9DOYH)ODSV
/RFN7DEV
3DUWV/LVW2SHUDWLQJWKHSRROFOHDQHU
5RERWVSHFLILFDWLRQ
,QSXWYROWDJH9'&
3XPSSRZHU:DWWPD[LPXP
'ULYHSRZHU:DWWPD[LPXP
9ROXPHRIZDWHUILOWHUHGPK
'HSWKZRUNLQJLQZDWHUʇP

WARRANTY TERMS AND CONDITIONS
10
Astral Pool Australia Pty Ltd (ABN 97 007 284 504) ("Astral Pool") provides the following warranty in relation
to its Robotic Pool Cleaners.
Our goods come with guarantees that cannot be excluded under the Australian Consumer Law. You are
entitled to a replacement or refund for a major failure and for compensation for any other reasonably
foreseeable loss or damage. You are also entitled to have the goods repaired or replaced if the goods fail to
be of acceptable quality and the failure does not amount to a major failure.
The benefits of this warranty are in addition to any rights and remedies imposed by Australian state and
federal legislation that cannot be excluded. Nothing in this warranty is to be interpreted as excluding,
restricting or modifying any state or federal legislation applicable to the supply of goods and services which
cannot be excluded, restricted or modified.
Your Astralpool Robotic Pool Cleaner is covered by a limited 3 year warranty against defect in material and assembly.
Warranty Period
Robot Motor, Drives and Electrical System
Transformer
The rollers, tracks, pulleys, filter cartridge or bag
Caddy (if included)
3 Years
2 Years
1 Year
1 Year
Parts

WARRANTY CLAIMS
11
1.If a fault covered by warranty occurs, the customer must first contact AstralPool at the contact address listed
below, or an Authorised AstralPool Service Agent.
2. Any warranty claim must be accompanied by:
(a) proof of purchase;
(b) full details of the alleged defect; and
(c) appropriate documentation (such as historical and maintenance records).
3. The customer must make the Product available to AstralPool or its Authorised AstralPool Service Agent for
inspection and testing. AstralPool or its Authorised AstralPool Service Agent will attend the premises where the
Product is installed for inspection and testing.
4. If such inspection and testing finds no defect in the Product, the customer must pay AstralPool's usual costs
of service work and testing. If such inspection and testing finds a defect that is not covered by this warranty, the
customer must pay AstralPool's usual costs of service work plus any parts and labour required to repair the
Product, unless recoverable from AstralPool on the failure of any statutory guarantee under the ACL.
5. If your Robot Cleaner needs to be returned to Astralpool the following is required:
6. For Service please return to your nearest AstralPool Trade Centre which can be found at:
http://www.astralpool.com.au/contact
(a) Your Robot Cleaner must be packaged carefully including your name, address and contact
number.
(b) Delivered freight prepaid to your nearest AstralPool Warehouse.
(c) You must also include a copy of your invoice showing date of purchase or date of handover of
your swimming pool.
(d) Description of the fault.

EXCLUSIONS AND LIMITATIONS
12
EXCLUSIONS
The warranty will not apply where:
(a) the customer is in breach of the Terms and Conditions of Sale;
(b) the Product was used for a purpose other than one it was intended for;
(c) the Product was repaired, modified or altered by any person other than AstralPool;
(d) the Product has not been installed, maintained and/or operated in complete compliance with the
installation and operating instructions and any instructions by AstralPool;
(e) the Product has been subject to accident, negligence, alteration, abuse or misuse.
The warranty does not extend to:
a) normal wear and tear;
b) weather and other environmental conditions including but not limited to storm, flood, and/or heat wave
damage; or
c) service and maintenance items.
Examples of exclusions include but are not limited to:
,QFRUUHFWLQVWDOODWLRQ
([WHUQDOSRZHUVSLNHVVXUJH
1RUPDOZHDUDQGWHDURIFRQVXPDEOHSDUWVVXFKDVUROOHUVSXOOH\VGULYHEHOWVDQGILOWHUFDUWULGJHEDJ
LIMITATIONS
AstralPool makes no express warranties or representations other than set out in this warranty.
The repair or replacement of the Product or part of the Product is the absolute limit of AstralPool's liability under
this express warranty.
Table of contents