Rainbow Steamer HC 1222 User manual

0
Owner’s Manual
Model Number: HC 1222

1
Introduction
Thank you and congratulations for choosing the Rainbow Steamer, the Fresher,
Cleaner, Healthier steam cleaner.
The Rainbow Steamer is an environmentally friendly cleaning tool that sanitizes and
deodorizes naturally. Converting ordinary tap water into pressurized steam cleaning
power, the Rainbow Steamer loosens the bond of surface dirt or stains as it
deodorizes and disinfects. Since it performs deep cleaning chores without toxic
chemicals, it eliminates exposure to harsh chemicals and allergens.
The Rainbow Steamer cleans and disinfects all types of surfaces capable of
withstanding high temperatures including kitchen counters and cooking surfaces,
bathroom tiles, sealed wood, windows, shower doors, glass doors, mirrors, ovens,
refrigerators, BBQ grills, and the list goes on.
To disinfect bathroom and kitchen surfaces, just hold the steamer one inch above the
surface to be cleaned and slowly apply steam across the entire area. In seconds the
steam blasts away dirt, grease, mold, and grime.
More effective and hygienic than conventional cleaning methods, the Rainbow
Steamer kills dust mites and some types of bacteria including E-coli. The Rainbow
Steamer provides huge benefits for allergy sufferers as it eliminates bacteria, viruses,
dust mites, mold, and other allergens from curtains, pillows, bedding and mattresses.
The Rainbow Steamer deodorizes and removes wrinkles from almost any fabric
including garments, clothing, drapery, and upholstery. Wrinkles are instantly removed
when the material is gently touched and steam applied slowly across the entire area.
Wrinkles can be removed form either side depending on the type of fabric. It is a
proven fact that steam is a faster, safer, gentler and more efficient way of deodorizing
and removing wrinkles compared to ironing.
The Rainbow Steamer‘s ergonomic design allows fingertip steam control and the
extra large water tank permits extended cleaning. The Rainbow Steamer® steam
cleaner is precision built, tested and inspected before leaving the factory.

2
Important Safety Instructions
Please read these instructions carefully before using the Rainbow Steamer. It is
important to follow basic safety precautions when using an electrical appliance.
DANGER OF SCALDING
To reduce the risk of fire, electric shock, or injury the
procedures follows these procedures.
Precautions:
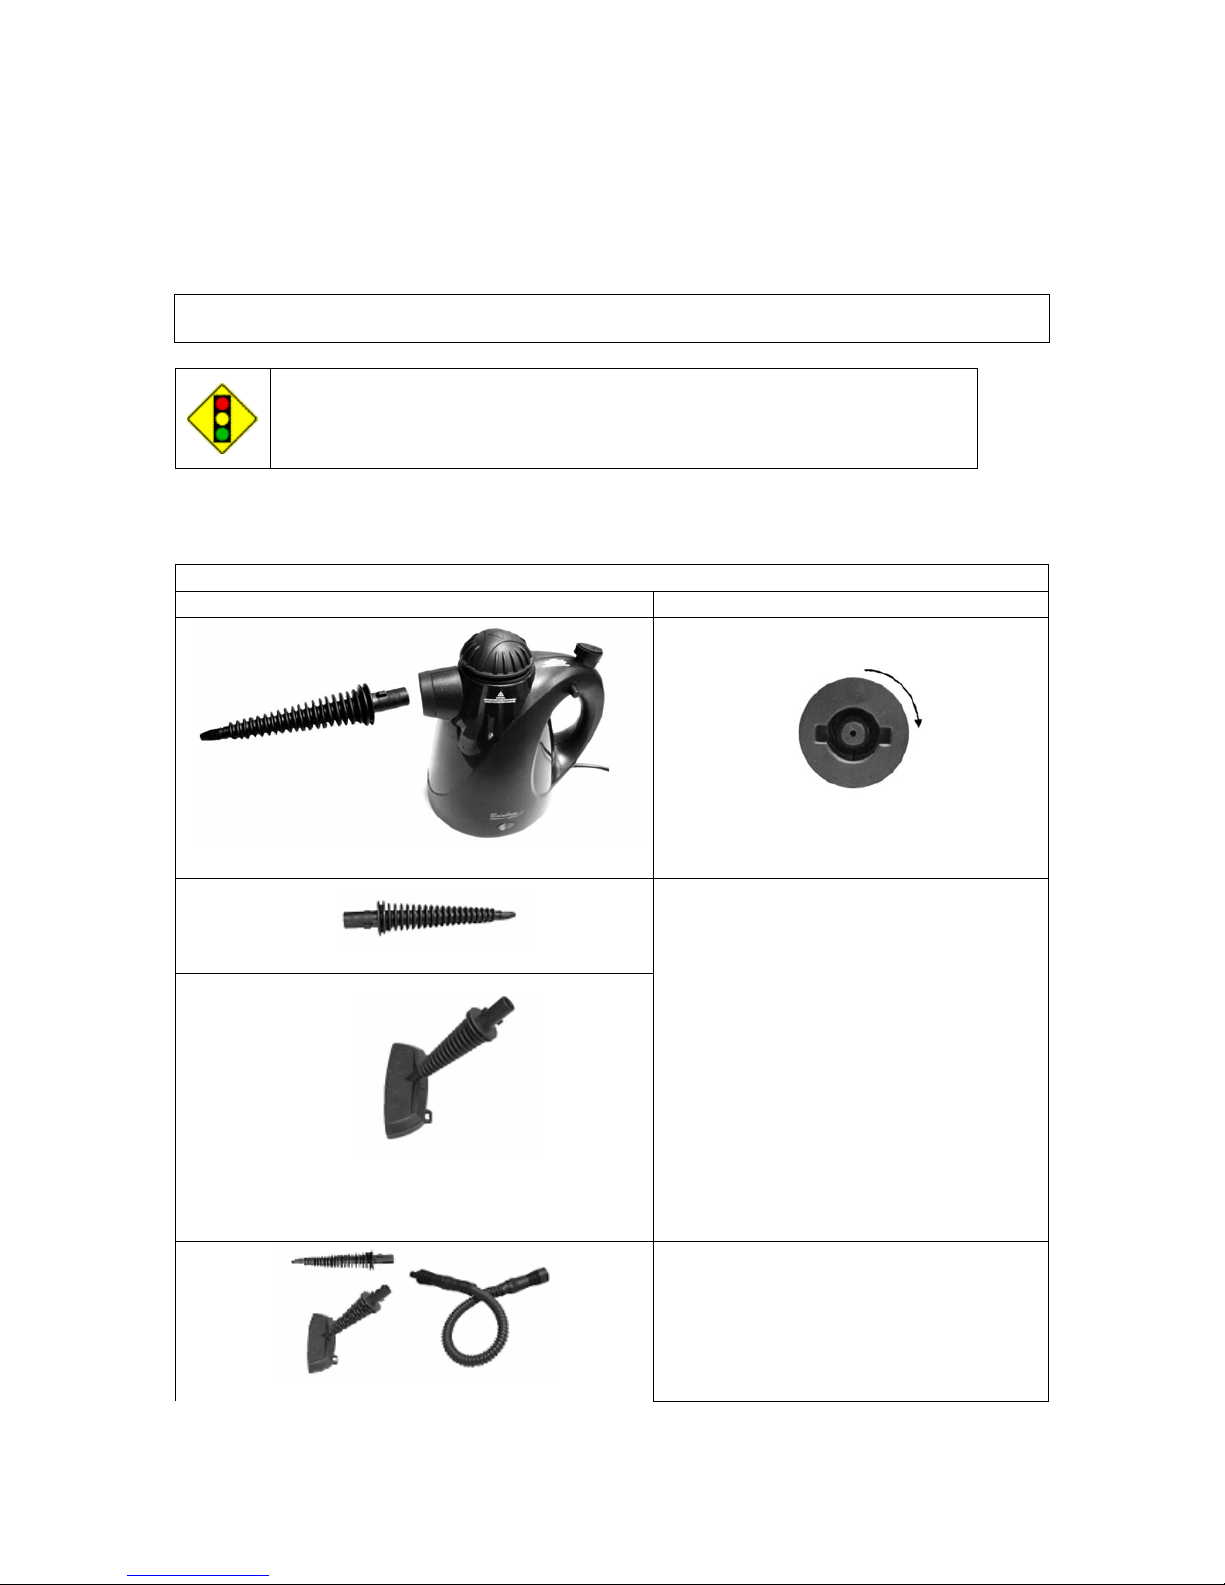
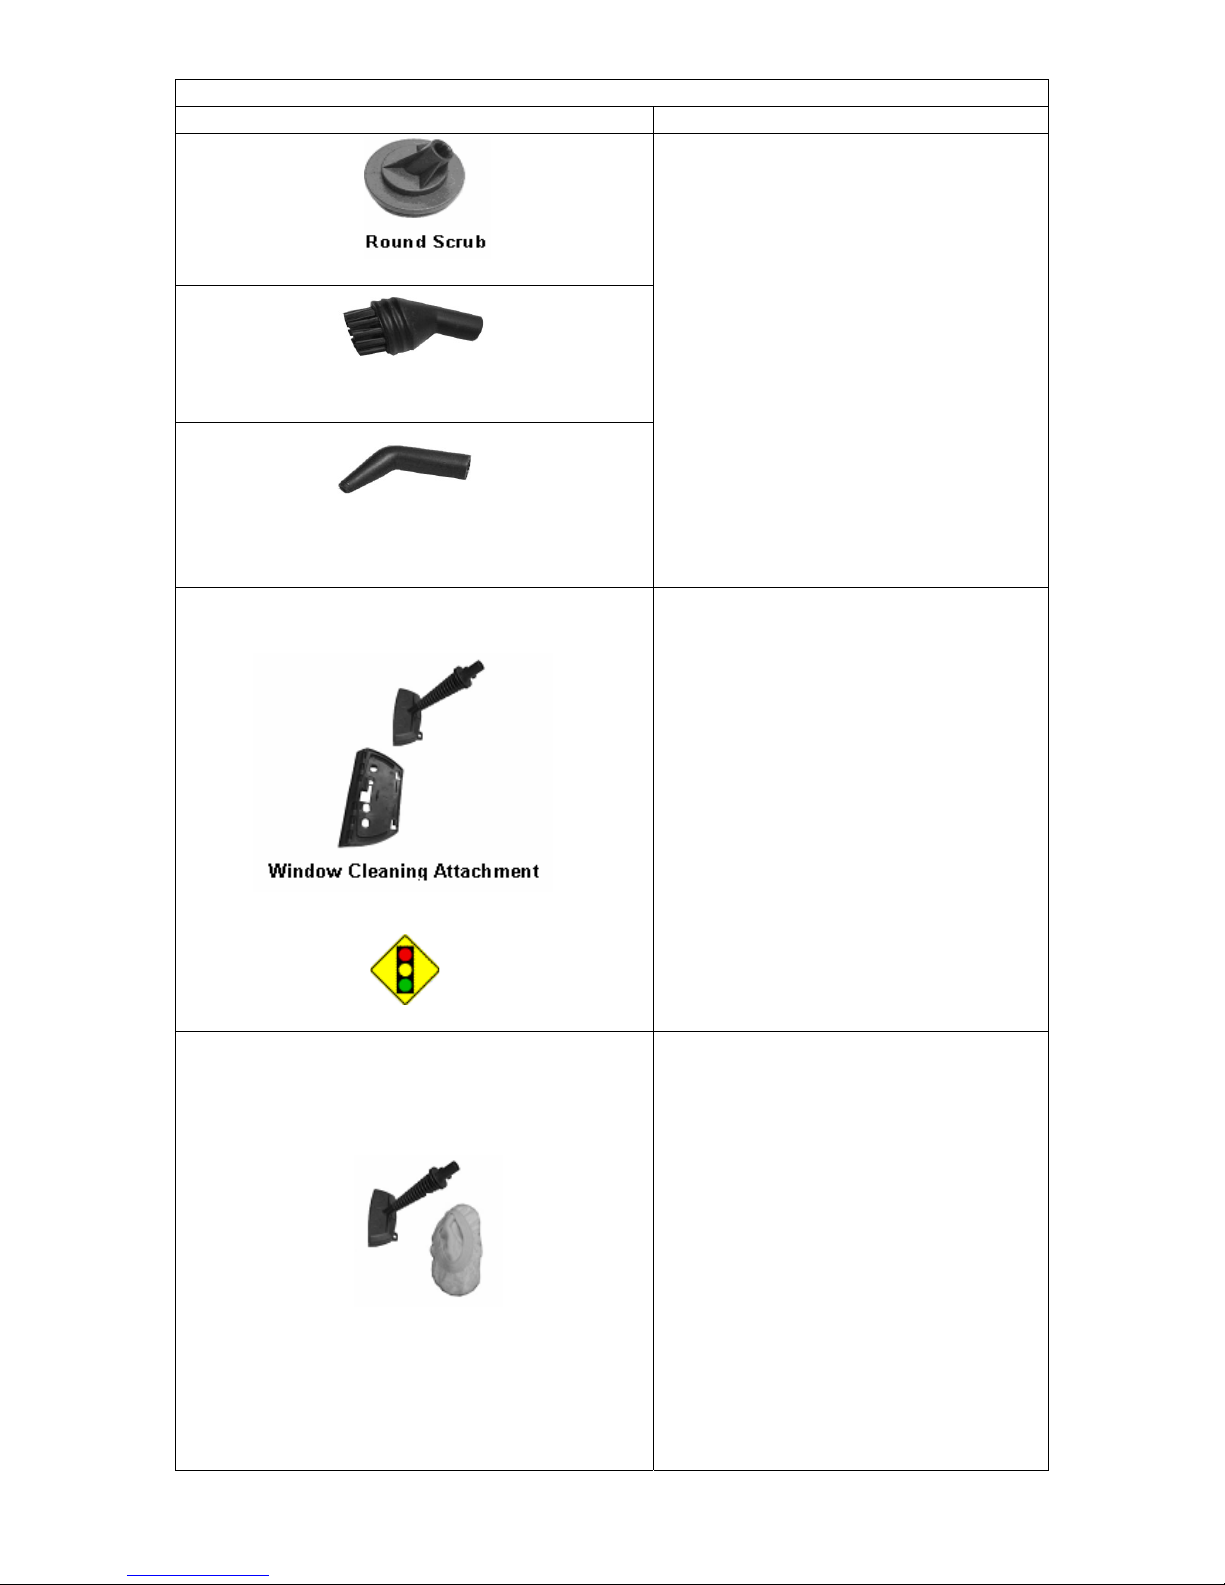
1. Use the steamer only for its intended use for non-commercial, non-industrial, indoor household uses only.
Use only as directed in this manual. Use only the manufacturer’s recommended accessories.
2. Use regular tap water or distilled/purified water if the tap water in your area is very hard.
3. The steamer has a grounded 3-prong plug. Use only in 3-prong electrical outlets. Do not attempt to bypass
this safety feature.
4. Wear shoes when operating the steamer. Never handle the steamer or plug with wet hands. Keep your work
area well lighted.
5. Carefully follow the instructions for filling the water tank. Always unplug the power cord when filling the water
tank. The water tank cap must be closed during use.
6. The steamer is not intended for use by children. Pay close attention when using the steamer near children,
pets, or plants. Never direct steam towards people, animals, or plants.
7. The appliance and accessories will get hot during use. Stop the release of steam and allow cooling before
changing heated accessories. Burns can occur by touching hot parts, hot water or steam. To prevent risk of
injury, keep hands, hair, and clothing away from the hot parts, hot water or steam.
8. The steamer should be unplugged prior to changing accessories.
9. Unplug the power cord after use. To unplug, grasp the plug not the cord. Never pull the cord itself.
10. Store your steamer indoors in a cool, dry place. Allow the steamer to cool before storage. Stop the release of
steam and unplug the power cord when not in use or before servicing.
Caution:
1. Do not add any cleaning solutions, detergents, scented perfumes, oils, solvents, chemicals or substances to
the water used in this steamer as this may damage the unit and/or make it unsafe for use. Moreover, doing
so will automatically and with immediate affect void the steamer warranty.
2. Do not leave the steamer unattended while switched on.
3. Do not use the steamer to clean surfaces or objects unable to withstand high temperature. Please note that
the force and the heat of the steam from the steamer may damage certain surfaces or textiles. Always test on
a small, concealed area of the surface or material that you are steam cleaning. Plastic can be dulled; fabric
such as linen, satin, acrylic, and velvet can react sensitively; painted wood or leather can get bleached to the
hot steam.
4. Do not immerse any part of steamer in water or other liquids to avoid the risk of shock.
5. Do not use the steamer if it is not working properly or if it has been dropped, damaged, left outdoors, or
immersed in water. Consult our customer support.
6. Do not use the steamer if it appears to be functioning in a faulty manner or if it is not working properly,
damaged, left outdoors or dropped into water.
7. Do not operate the any other high wattage appliance on the same circuit. Do not use extension cords or
outlets with inadequate current carrying capacity. Do not use the steamer if its cord or plug is damaged. Keep
the cord away from heated surfaces. Do not carry the steamer by the cord or use the cord as a handle. Do
not close a door on the cord or pull the cord around sharp edges or corners. Do not pull the cord when
disconnecting the steamer as it may damage the cord and / or the plug.
8. Do not insert objects into openings. Do not use the steamer with any openings blocked.
9. Do not use the steamer for cleaning the motors of electric appliances.
10. To avoid the risk of electric shock, do not disassemble or attempt to repair the steam cleaner. Doing so will
automatically and with immediate affect void the steamer warranty.
11. Never turn the appliance over on its side when operating.
Save these instructions for future reference.
.

3
Parts & Accessories
No. Description Function
1 Base Unit Comprises of the water tank and the steam generator.
2 Power and Steam Generation
Indicator
The green light indicates that the electric power is on.
When the red light is on the water is heating. The unit is
ready for use when the red light goes off.
3 Handle Enables one-handed control of the unit.
4 Steam Release Button Regulates the amount of steam discharged.
5 Water Tank Cap Childproof lock secures the water tank.
6 Flexible Hose Fits directly onto the Base Unit.
Eases cleaning of hard-to-reach areas.
7 Wide Steam Nozzle Fits directly onto Jet Nozzle or Flexible Hose.
8 Cloth Covering for Wide Steam
Nozzle (Quantity 4)
Attaches to the Wide Steam Nozzle and cleans and
deodorizes fabrics as it removes wrinkles.
9 Curved Nozzle
Fits onto the Jet Nozzle.
Recommended for cleaning small and hard-to-reach areas
like windowsills and toilet bowls.
10 Jet Nozzle Fits directly onto the Base Unit.
Handy for cleaning floors, edges, and corners
11 Round Brush (2 nylon & 2 copper) Fits onto the Jet Nozzle.
Cleans sinks, cooking surfaces, and tabletops.
12 Squeegee
Fits onto the Jet Nozzle.
Cleans smooth areas such as mirrors, windows, and
shower doors.
13 Measuring Cup (11 oz.) Prevents over-filling the water tank.
14 Power Cord (Length?) Plugs into grounded 3-prong AC electrical outlet which is
rated 120V / 60 Hz.
15 Funnel Prevents spills when filling the water tank.
16 Steam Lock Button Child safety feature prevents scalding.
17 Round Scrub Pad Fits onto the Jet Nozzle.
For scrubbing and cleaning tiles, tub, and floors.
18 Carrying bag Storage bag for the steamer and accessories
17
18

4
Filling Water in the Steamer
1. Always unplug the steamer before filling or re-filling it with
water.
2. Place the steamer on a flat surface when filling water.
3. Do not add more than 11 oz. as this will cause water
dripping in the steam and could damage the Steamer.
1. The Water Tank Cap features a childproof lock. Press Down on the Water Tank Cap
to unscrew it and insert the funnel.
2. Fill the tank with one measuring (11 Oz.) cup of water.
3. Screw the Water Tank Cap back into place by pressing it down and turning clockwise.
Tightening the cap too much can damage the steamer.
Refilling Water in the Steamer
1. Press the Steam Lock Button until all the steam pressure is released.
2. Wait approximately 3 minutes for the appliance to cool down before opening the Water
Tank Cap.
3. Push and slowly turn the Water Tank Cap one half turn and wait for the hissing sound (if
any) to completely stop. The hissing sound indicates residual pressure not released while
holding the Steam Release Button.
4. Continue pressing the Steam Lock Button while carefully pressing down on the Water
Tank Cap to unscrew it (this will release the child safety lock).
5. Pour out any water that might have remained from an earlier use. Pouring out the water
before filling it in the water tank helps make sure that the correct amount is added.
Hot water and steam could spurt out if cold water is dropped in
the hot water tank.

5
6. The Water Tank Cap features a childproof lock. Press Down on the Water Tank Cap to
unscrew it and insert the funnel.
7. Fill the tank with one measuring cup (11 Oz.) of water.
8. Screw the Water Tank Cap back into place by pressing it down and turning clockwise.
Tightening the cap too much can damage the steamer.
Accessory Assembly
When Assembling Accessory for use makes sure Rainbow
Steamer is unplugged.
There are two types of Rainbow Steamer accessories: Type 1 attaches directly to the base
unit of Rainbow Steamer or to the Flexible Hose and Type 2 attaches to Type 1 accessories.
Type 1 Accessories
Item Assembly
Jet Nozzle
Wide Steam Nozzle
1. The Jet Nozzle, Wide Steam
Nozzle and Flexible Hose fit directly
onto the base unit of the steamer.
2. Align the accessory’s locking tabs
with the corresponding slots on the
steamer body.
3. Push the locking tabs into the slot
and turn the accessory clockwise
as indicated above to lock securely
in place
Jet Nozzle and Wide Steam Nozzles can
also be attached to Flexible Hose that it
self fits directly onto the base unit of the
steamer.

6
Type 2 Accessories
Item Assembly
1. The Round Scrub, Round Brush, and
the Curved Nozzle Accessory attach
to the end of the Jet Nozzle.
2. Use the hexagonal alignment as a
guide and push the accessory onto
the end of the Jet Nozzle.
1. The Squeegee clips onto the Wide
Steam Nozzle.
2. Hook the Wide Steam Nozzle’s two
hinges onto the Squeegee’s tabs.
3. Flip the Squeegee around to the top
of the Wide Steam Nozzle.
4. Clip the latch onto the Wide Steam
Nozzle to secure it.
5. To remove the Squeegee, lift the
latch to unclip and separate.
Using the Squeegee on cold glass
may cause the glass to break
1. For fabrics, stretch the Cloth
Covering to fit over the Wide Steam
Nozzle.
2. It is recommended that the Wide
Steam Nozzle be attached to the
Flexible Hose for maximum
accessibility for clothing, upholstery,
and window furnishings.
3. Check the care instructions on all
fabrics or upholstered surfaces. If
there are no instructions the
manufacturer for cleaning
instructions.
4. Do not steam clothes on a persons
body.
Round Brush
Curved Nozzle

7
Operating the Steamer
1. PLEASE READ THE SAFETY INSTRUCTIONS ON PAGE 2 OF
THIS MANUAL BEFORE OPERATING THE STEAMER
2. Do not leave the steamer unattended while waiting for steam
to generate.
3. To prevent children using the steamer you can lock the
Steam Release Button by pressing the Steam Lock Button.
4. Do not use the Rainbow Steamer on unsealed wood floors
or direct steam on any wood floor for extended time periods.
This may cause the wood grain to rise.
5. Steam Cleaning is not recommended for use on unsealed
wood surfaces, cold glass, or soft plastic surfaces.
6. Always check the manufacturer’s usage instructions
before using the Steamer on a surface.
7. Please note that the force and the heat of the steam from the
steamer may damage certain surfaces or textiles. Always
test on a small, concealed area of the surface or material
that you are steam cleaning.
1. Before using the Steamer attach the proper accessory for the type of surface to be
cleaned.
2. Plug the power cord into an electrical outlet. This will switch the power indicator lights on.
3. The green light indicates that the unit is plugged in.
4. The red light indicates that the unit is heating the water. When the red light goes off, the
unit is at full pressure and you are ready to begin cleaning.
5. Allow 3 - 5 minutes for the appliance to generate the steam.
6. Press the Steam Release Button to emit the steam and begin passing slowly over the
surface intended for cleaning.
7. For disinfecting areas, hold the steamer no more than one inch away from the surface
and pass over slowly until entire area is covered.
8. To deodorize and remove wrinkles, gently touch the fabric and pass the steamer in an up
and down motion over it. Wrinkles can be removed form either side depending on the
type of fabric.
9. Wax may be removed by the heat and steam action on wax-treated surfaces.

8
Care, Maintenance and Storage
1. Ensure that the Rainbow Steamer is unplugged and cooled
down before performing any cleaning or maintenance.
2. Do not immerse the steamer in water.
3. Do not fill the steamer (or add to the filling water) chemicals,
detergents, vinegar or any other substance as this can
damage the steamer and make and/or make it unsafe for
use. Moreover, doing so will automatically void the steamer
warranty.
1. Always empty any excess water from water tank after each use.
2. To ensure the highest level of operation over time, rinse the water tank with water once a
month to remove accumulated calcium.
3. To clean, fill the water tank with one measure of water, replace the Water Tank Cap and
shake the unit to loosen any calcium deposits. Remove the Water Tank Cap and empty
the water from tank. Replace the Water Tank Cap. Wipe the unit dry.
4. After every use, clean and rinse the accessories and wipe them dry.
5. Place the steamer and its accessories in its carrying bag and the store it in an indoor cool
and dry place.

9
Troubleshooting Guide
Problem Remedy
Unit will not switch on.
¾Ensure the power cord has been
plugged into a power socket and
the outlet is switched on.
¾Ensure that the water tank is filled
correctly.
¾Try another power outlet.
Unit is not producing steam.
¾Ensure that he water tank has been
filled with the correct level of water.
¾Ensure the unit is plugged into a
power outlet.
¾Press the Steam Release Button.
¾Ensure there is no blockage.
¾Try a different accessory.
¾Ensure that the green light is on
and the red light is off.
Unit sprays out water from nozzle.
¾The water tank level may be too
high. Check the water tank level.
Do not overfill.
¾Hold in upright position. Do not turn
the steamer on its side or upside
down.
¾The water is not fully heated. Allow
the unit sufficient time to heat the
water. Wait until the red light is off.
Accessories do not stay attached
¾Check that enough pressure has
been applied to ensure the
accessories are secured.
¾Review the accessory assembly
steps.

10
One Year Limited Warranty
Your Rainbow Steamer® steam cleaner model HC1222 is warranted, to the original purchaser, in
normal household use, in accordance with the Owner’s Manual, against original defects in material
and workmanship for a period of one full year from date of purchase. The warranty start date is the
date which the customer takes title to the Steamer (usually the ship date). This warranty applies to the
original components only. Any part replaced under this warranty will be warranted for the remainder of
the original part's warranty period. Manufacturer, in its sole discretion and option will, repair, replace
with a new or like item, free of charge the defective item. Labour charges are NOT included. The
manufacturer will not refund the purchase and/or shipping or handling charges of the product. This
warranty is subject to certain exclusions that are shown below.
This warranty does not cover (a) damage to the steamer due to low voltage at the steamer, electrical
power supply fluctuations; (b) damage due to use, including the adding of any cleaning solutions,
detergents, scented perfumes, oils, solvents, chemicals or substances to the water used in this
steamer, rust or scale build up; (c) damage resulting from normal wear and tear of the steamer or if
the steamer was used for commercial purposes; (d) damage due to mishandling during shipment; and
(e) damage or malfunctions resulting from misuse, mishandling, tampering, negligence, alterations,
incorrect assembly, accidents, abuse, unauthorized servicing, failure to follow manufacturer's specified
precautions, instructions, operating or maintenance instructions. All out-of-warranty repairs will be
performed at a reasonable flat rate charge plus the shipment charges.
To obtain warranty service you must return the equipment to the Customer Support Center, freight
prepaid (C.O.D. shipments will NOT be accepted), within the warranty period. A Return Authorization
Number (RMA) is required prior to returning the Steamer. Call the Customer Support Center to obtain
the RMA number. we will not be responsible for any item returned without the RMA Number clearly
marked on the returned package. Include the following information in the package before shipment.
Invoice copy, order number, proof of purchase, your name, complete address, phone number along
with a note describing the problem and all other relevant information. When returning the steamer,
carefully pack it to avoid any damage in shipment. It is recommended that you insure the package, as
the loss or damage in shipment is not covered by this warranty and the Manufacturer cannot assume
responsibility for loss or damage during incoming shipment. If we, in our sole discretion, determine the
problem was the result of a manufacturing defect, the equipment will be returned freight prepaid.
Otherwise, it will be returned freight collect.
In no event shall Manufacturer’s liability exceed the purchase price for the product and is limited in
duration to the duration of this warranty. The limited warranty described above shall be exclusive and
shall be in lieu of any other warranty (whether written, oral, express or implied) including but not
limited to any warranty of merchantability or warranty of fitness for a particular purpose, all of which
are herby disclaimed. In no event will the Manufacturer be liable for any loss, damage, direct,
incidental or consequential damages of any kind, based upon warranty, contract, negligence, sale, use
or repair of the products. The Manufacturer cannot be responsible for how buyer chooses to assemble
or use the equipment purchased. While this warranty gives you specific legal rights, you may also
have other rights, which vary from state to state (or province). Some states do not allow limitations or
exclusions of incidental or consequential damages, so the above limitations or exclusions may not
apply to you.
Warranty service can only be obtained by contacting the customer support. Proof of purchase will be
required before service is rendered. If further assistance is needed, or if there are questions
concerning this warranty, write to the Consumer Support Center at Rainbow Steamer Inc., Customer
Support Center, 5696 Stewart Ave., Fremont, CA 94538; or call toll free (800) 955-2388 between the
hours of 9:00 am and 6:00 PM Pacific Standard Time.
* Rainbow Steamer is the trademark or registered trademark of Rainbow Steamer Inc. in the United
States and other countries.

11
Rainbow Steamer Inc.,
5696 Stewart Ave
Fremont, CA 94538
www.rainbowsteamer.com
Toll Free Number: (800) 955-2388
Table of contents