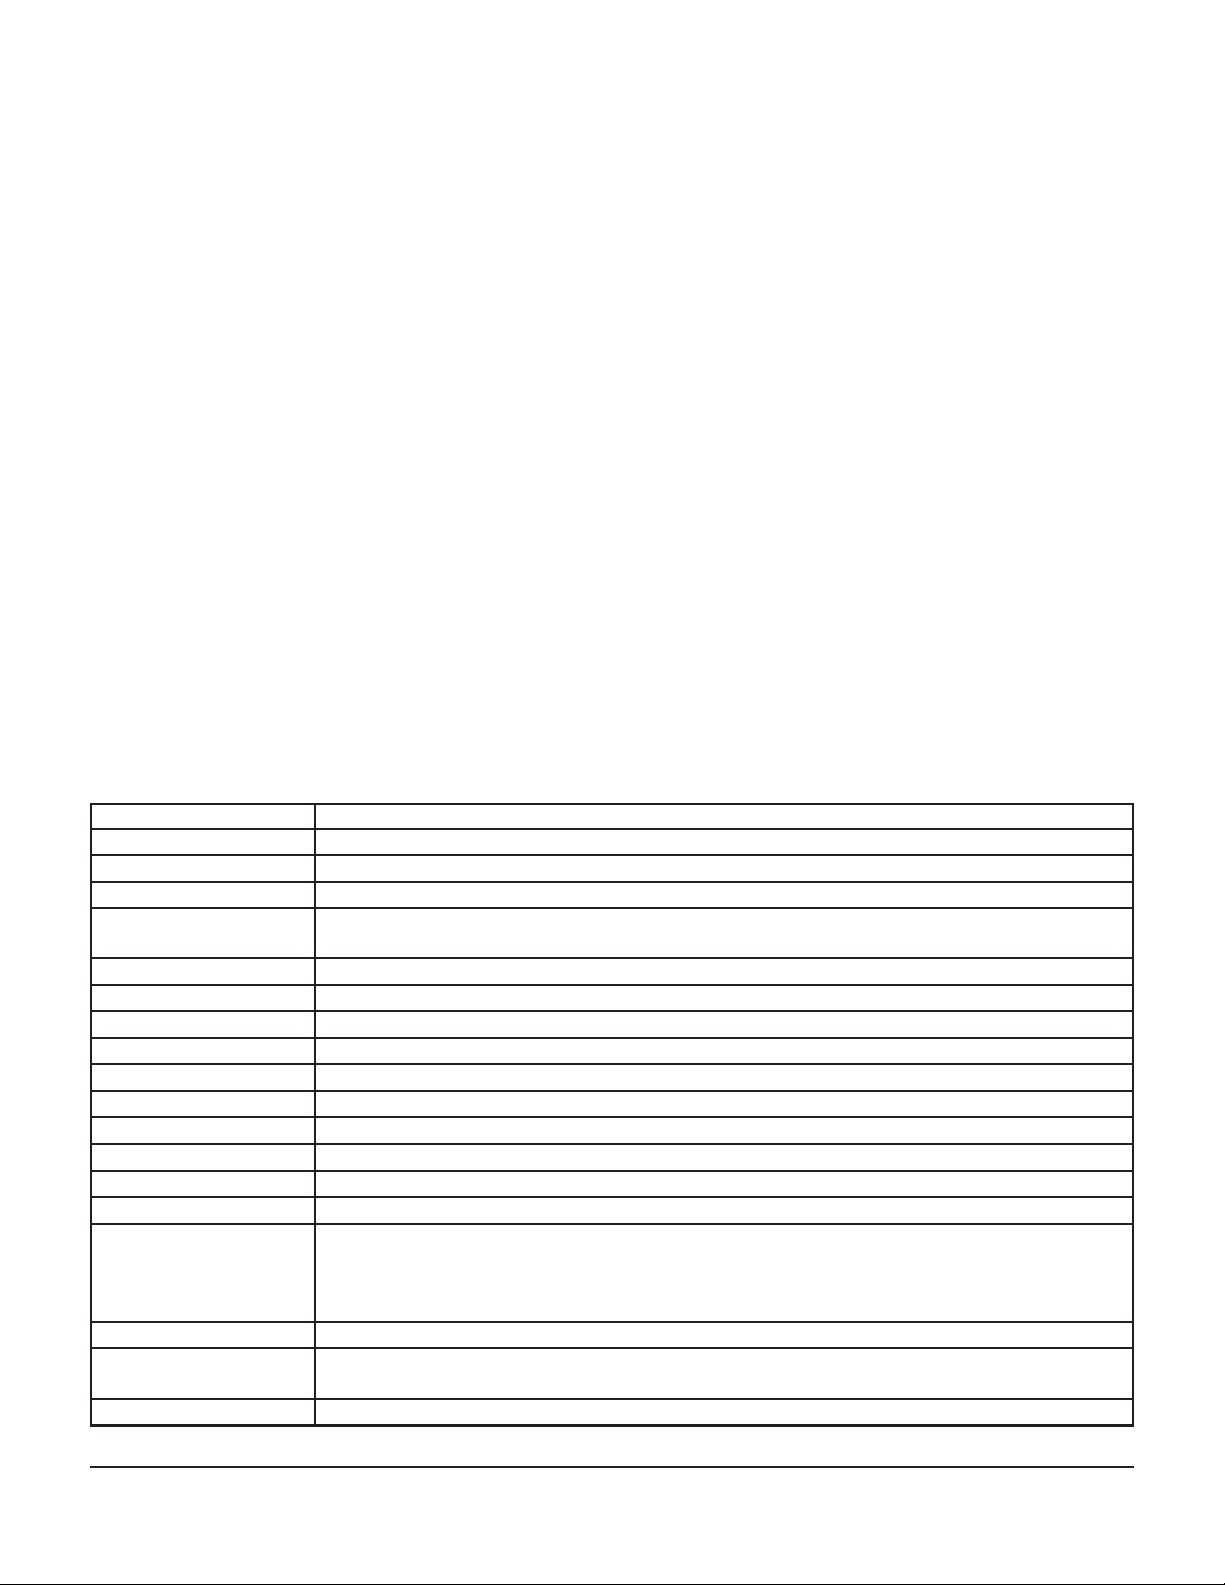
manuals.online logo
Brands
  1. Home
  2. •
  3. Brands
  4. •
  5. Rane
  6. •
  7. Dj Equipment
  8. •
  9. Rane serato SCRATCH LIVE User manual

Rane serato SCRATCH LIVE User manual

Other Rane Dj Equipment manuals

Rane TTM 56S User manual

Rane

Rane TTM 56S User manual

Rane SL 4 User manual

Rane

Rane SL 4 User manual

Rane SL 4 User manual

Rane

Rane SL 4 User manual

Rane SL3 User manual

Rane

Rane SL3 User manual

Rane SEVENTY User manual

Rane

Rane SEVENTY User manual

Rane TWELVE User manual

Rane

Rane TWELVE User manual

Rane ONE User manual

Rane

Rane ONE User manual

Rane RPM 2m User manual

Rane

Rane RPM 2m User manual

Rane SEVENTY User manual

Rane

Rane SEVENTY User manual

Rane Four User manual

Rane

Rane Four User manual

Rane SL 4 User manual

Rane

Rane SL 4 User manual

Rane HC6S User manual

Rane

Rane HC6S User manual

Rane MP 22Z User manual

Rane

Rane MP 22Z User manual

Rane SIXTY-EIGHT User manual

Rane

Rane SIXTY-EIGHT User manual

Rane MS 1B User manual

Rane

Rane MS 1B User manual

Rane MOJO MM 8z User manual

Rane

Rane MOJO MM 8z User manual

Rane Seventy-Two User manual

Rane

Rane Seventy-Two User manual

Rane Z-Trip SIXTY-TWO Z User manual

Rane

Rane Z-Trip SIXTY-TWO Z User manual

Rane TWELWE MK II User manual

Rane

Rane TWELWE MK II User manual

Rane SL2 User manual

Rane

Rane SL2 User manual

Rane SEVENTY User manual

Rane

Rane SEVENTY User manual

Rane XP 2016S User manual

Rane

Rane XP 2016S User manual

Popular Dj Equipment manuals by other brands

MAGMATIC Prisma Wash 25 user manual

MAGMATIC

MAGMATIC Prisma Wash 25 user manual

HERA PROCOLOR 60 RGBW SERIES User manual & installation guide

HERA

HERA PROCOLOR 60 RGBW SERIES User manual & installation guide

EuroLite LED TSL-600 SCAN COB user manual

EuroLite

EuroLite LED TSL-600 SCAN COB user manual

Ledj Slimline 12HEX12 user manual

Ledj

Ledj Slimline 12HEX12 user manual

Laserworld Garden GS-50RG Xmas manual

Laserworld

Laserworld Garden GS-50RG Xmas manual

Chauvet OVATION E-930VW Quick reference guide

Chauvet

Chauvet OVATION E-930VW Quick reference guide

Snow Masters Zig Oscillator user manual

Snow Masters

Snow Masters Zig Oscillator user manual

EuroLite 50530554 user manual

EuroLite

EuroLite 50530554 user manual

Beamz BUV243 user manual

Beamz

Beamz BUV243 user manual

Eagletone 6 Eyes Flower user manual

Eagletone

Eagletone 6 Eyes Flower user manual

EuroLite FLD-1508 user manual

EuroLite

EuroLite FLD-1508 user manual

Technical Pro LG8xSEA user manual

Technical Pro

Technical Pro LG8xSEA user manual

JB Systems Lounge Laser DMX Operation manual

JB Systems

JB Systems Lounge Laser DMX Operation manual

Elation FUZE WASH Z350 user manual

Elation

Elation FUZE WASH Z350 user manual

Maverick MK3 WASH Quick reference guide

Maverick

Maverick MK3 WASH Quick reference guide

Infinity TF-260C7 Fresnel manual

Infinity

Infinity TF-260C7 Fresnel manual

Chauvet EVE E-50Z Quick reference guide

Chauvet

Chauvet EVE E-50Z Quick reference guide

Eliminator Lighting E 138 manual

Eliminator Lighting

Eliminator Lighting E 138 manual

manuals.online logo
manuals.online logoBrands
  • About & Mission
  • Contact us
  • Privacy Policy
  • Terms and Conditions

Copyright 2025 Manuals.Online. All Rights Reserved.

Installation
1) Install the software
Mac
1. Insert the Software Installation CD and double-click the in-
staller icon.
Windows XP
1. Insert the Software Installation CD. If Setup doesn’t start auto-
matically, browse to the CD drive and run setup.exe.
2. Follow the on-screen instructions. Once the installation is
complete, Scratch Live appears in the Start Menu under All
Programs > Serato > Scratch Live.
2) Connect and Install the Hardware
Mac
Mac users need only connect the hardware after installing the
software. No extra hardware installation is required.
Windows XP
1. Connect the Scratch LIVE Interface to your computer using the
supplied USB cable.
2. e Windows New Hardware Wizard appears.
3. Insert the Software Installation CD if it’s not already inserted,
then press Next.
4. Windows may complain that the software driver is not digitally
signed. Choose Continue Anyway.
5. Click Finish once installation is complete.
QUICK START
























  
  

Connections
1. Connect your turntables (or CD players
) to INPUTS 1 and 2 of the Scratch LIVE
hardware.
2. Connect the LINE OUTPUTS of the Scratch
LIVE hardware to the Line Inputs on
your DJ mixer, check that those inputs are
switched to line level.
3. Connect the USB cable from the Scratch
LIVE hardware to your Mac or PC.
Optional extra connections
• If you are using turntables, connect their
ground wires to the ground post of your
mixer.
• Connect the THRU OUTPUTS of the
Scratch LIVE hardware to the mixer’s
phono inputs when using turntables; con-
nect these to the mixer’s line inputs when
using CD players. is allows you to bypass
Scratch LIVE to play normal records or
CDs.
• Connect a dynamic microphone to the MIC
INPUT of the Scratch LIVE hardware to
scratch your own mic recordings as if they
are on vinyl.
• Connect a ¼" to ¼" cable from the MIC
THRU jack on the Scratch LIVE hardware
to the microphone input on your DJ mixer
to allow normal use of the microphone,
independent of Scratch LIVE. (Note: power
is required, either from the USB port or an
external 9VDC power supply. See manual
for details.)
Keyboard shortcuts
Key Action
ctrl -  or shift - Load the highlighted song to the left deck.
ctrl -  or shift - Load the highlighted song to the right deck.
ctrl - / Swap the two currently playing tracks from one deck to the other.
ctrl - L Locate the current track. is will highlight the track you most recently loaded. Pressing ctrl - L again
will alternate between the tracks recently loaded on both decks.
ctrl - r Reveal - e highlighted song is opened in a file browser.
ctrl - f Find - moves the cursor to the search box.
Tab Switch focus to the song list.
ctrl - a Select all.
ctrl - c Copy text in edit mode.
ctrl - e Edit text.
ctrl - v Paste text in edit mode.
ctrl - x Cut text in edit mode.
ctrl - shift - Load the track currently on the right deck onto the left deck as well.
ctrl - shift - Load the track currently on the left deck onto the right deck as well.
shift/ctrl - 
shift/ctrl - 
Move focus up/down through the library or crates. Note that if you have a song highlighted in the
song view, and use shift/ctrl – up/down, you will move up or down through the library/crates. When
you release the shift or ctrl key, the focus will go back to the song view so you can move up and down
through songs using the up and down arrow keys.
- or + Zoom the main waveform display.
ctrl - shift - del and
ctrl - shift - backspace
Delete the file from your library and send to the recycle bin. (note to iTunes users: files in your iTunes
library cannot be deleted this way).
esc Exit Scratch LIVE.
Calibrating the Software
When setting up Scratch LIVE in a new location, calibrate
the software to the background noise picked up by the needles.
1. Place the needles on the records with the motors off and
switch to the
setup
screen.
2. Press and hold the
estimate
button for each side, letting
go when the threshold setting is stable (usually about one
second). In situations with lots of background noise, the
threshold will need to be higher.
3. Start the motors, and adjust the
L/R Balance
and
P/A
Balance
to make the green rings as circular as possible.
Setting up the Music Library
To add tracks to your collection, drag the files from the Explorer
window (Windows) or Finder (Mac) to the song list, or use the
Import
panel. If you use Apple iTunes, your library can be au-
tomatically loaded — go to the
setup
screen and click
read
iTunes library
.
Crates
Organize your music into crates by clicking the new crate but-
ton, then dragging songs from the library into the crate. Double-
click on a crate to rename it.
Playing Music
Load a track to a deck by dragging the track from the song list
to the deck, or use control  (left arrow, left deck) or control 
(right arrow, right deck). Put the needle on the record and start
the turntable or CD player to begin playback.
Modes
Absolute Mode:
tracks the movement of the record and
the position of the needle within the record. Needle dropping
enabled.
Relative Mode:
tracks the movement of the record, but not
the position of the needle within the record. is disables needle
dropping, but allows skip free scratching.
Internal Mode:
playback is controlled entirely by the on-
screen controls.
Mic Recording
Click the
mic rec
button to start recording from the micro-
phone. Enter a name for the recording and click
save
. e
recording is automatically stored in the Recorded crate, and can
be loaded like any other file. To load a recording directly without
saving it, use the control  or control  keys.
Manual
e full manual and this quick start are saved for easy ref-
erence in the Serato folder on your hard drive during software
installation. Reading it requires Adobe Acrobat (free down-
load) from www.adobe.com.
All features & specifications subject to change without notice. P/N 14699
©Rane Corporation 10802 47th Ave. W., Mukilteo WA 98275-5098 USA TEL 425-355-6000 FAX 425-347-7757 WEB www.rane.com