Rane Z-Trip SIXTY-TWO Z User manual

RANE SIXTY-TWO Z MIXER FOR FOR SERATO SCRATCH LIVE • QUICK START 1
SIXTY-TWO Z QUICK START
Windows
It is important that Windows users install
the Sixty-Two drivers as well as the
Scratch Live software. The easiest way
to do this is to allow the Scratch Live
installer to do all the work.
1. Connect your Sixty-Two Z before you
insert your installation CD. When you
rst connect it, Windows will attempt
to install the drivers via the hardware
wizard. Cancel and close this wizard.
2. Insert the Software Installation CD-
ROM. Make sure your Sixty-Two Z is
connected rst. If a window doesn’t
open automatically, browse to the CD
drive. Run setup.exe.
or
Launch the installer you just
downloaded from serato.com.
3. Follow the on-screen instructions. Once
the installation is complete, Scratch
Live appears in the Start Menu under All
Programs > Serato > Scratch Live.
Because the Sixty-Two Z was connected
prior to installing Scratch Live, no extra
hardware installation is required.
Rane Device Drivers
The Scratch Live installer includes drivers
that allow your Rane Sixty-Two Z to work
with other audio applications that support
Core Audio (Mac) and ASIO (PC). Driver
updates are also available to download
from the product’s page at rane.com.
Once installed, you have the option to
select the Sixty-Two’s inputs and outputs
in the audio settings of other applications
when Scratch Live is not open.
When using Serato Scratch Live,
proprietary Serato Audio Research
drivers are used in place of Rane ASIO
(Windows) and Core Audio (Mac) drivers.
The included Rane drivers are used when
Scratch Live is not running, and will not
run the same time as Scratch Live.
See the USB Audio section in the
manual for more information about using
the Sixty-Two as a 12-record 8-playback
sound card at each USB port.
Install Scratch Live
Before using your Sixty-Two Z, at least
read this short booklet for the basics,
even if you are already familiar with
Scratch Live. Read the complete manual
to get the best investment from your new
mixer. This guide will help you get one
computer connected using USB A.
Mac
1. Insert the Software Installation CD-
ROM and double-click the Scratch Live
Installer.mpkg icon.
or
Launch the installer you just
downloaded from serato.com.
2. Follow the on-screen instructions. Once
the installation is complete, Scratch Live
will appear in your applications list. You
may like to drag the Scratch Live icon to
your dock for quick launching.
3. Plug in your Sixty-Two Z. No extra
installation is required to use Scratch
Live.
4. The optional Rane Device Drivers
are required for other software you
may have that uses Core Audio to
communicate with your Rane device. To
install the Core Audio drivers, double-
click the .pkg le inside the appropriate
product folder in the Rane Device
Drivers folder on the software installation
CD.
Z-Trip was one of the rst premier DJs
to embrace the Rane TTM 56 as mixer
of choice. He advanced further with the
TMM 57SL, and now gets his own version
of Rane’s newest and best turntablist
mixer, the Sixty-Two Z.
Z-Trip is a musical pioneer and
revolutionary, seamlessly blending genres
to electrify dance oors around the
globe. His sold out shows have included:
Coachella, Electric Daisy, Big Day Out,
and Bonnarroo to name a few. As a DJ,
artist and producer he continues to push
boundaries. Z-Trip’s produced remixes
for Michael Jackson, Daft Punk, Beastie
Boys, Nirvana, Kasabian, DJ Shadow,
Missy Elliot, and many others. Z-Trip is a
legendary party rocker, producer and DJ
hero. He’s proud to present the new Rane
Sixty-Two Z Mixer.
Z-Trip’s Limited Edition Sixty-Two Z Mixer
is functionally identical to Rane’s Sixty-
Two with added bonuses:
• Face plate design by Shepard Fairey.
• Purple and yellow accents.
• Includes high-quality purple cables.
All references to the Rane Sixty-Two Mixer
at serato.com/forum and the Sixty-Two
Manual will apply to the Sixty-Two Z.

RANE SIXTY-TWO Z MIXER FOR SERATO SCRATCH LIVE • QUICK START
2
Calibrating
Scratch Live
This guide will help you get your decks
connected and music playing. Turn the
power off while connecting your decks
and amplifiers.
Analog Inputs
1. Connect your Left deck’s RCA cables to
AnAlog Input 1.
•If it’s a CD player, select CD with the
switch above the input jacks.
•If it’s a turntable, select pH (Phono)
with the switch above the input jacks.
Secure the ground wire to a Phono
Ground terminal.
2. Set the SouRCE selector for PGM 1.
pH / CD 1 plays directly from your deck.
To play from Scratch Live, choose
A.
3. Connect your Right deck’s RCA cables
to AnAlog Input 3.
•Select CD or pH as in step 1.
4. Set the SouRCE selector for PGM 2.
pH / CD 3 plays directly from your deck.
To play from Scratch Live, choose
A.
Analog Outputs
• Main Out is on a pair of balanced
XLR jacks with pin 2 “hot” per AES
standards.
• Booth Out is on a pair of balanced ¼˝
TRS jacks.
• Session Out is available on a pair of
unbalanced RCA jacks.
• Headphones output is available on both
¼˝ TRS and 3.5 mm jacks.
The Main, Booth and Session outputs
come from the same “Main Mix” signal.
Main, Booth and Session outputs each
have their own Level control. Because
all signals are identical, you may use any
of these outputs as the “Main” output if
a different cable is required for system
connection.
Rane recommends balanced wiring for
the strongest signal and rejection of hum
and noise. If your cable to the destination
is less than 10 feet (3 meters), you can
often get away with an unbalanced
cable. See the RaneNote “Sound System
Interconnection” at rane.com for cable
wiring recommendations.
USB Control Source
The default Inputs for decks performing
Digital Vinyl Simulation (DVS) are Inputs
1 and 3, but you can change this. Analog
Input 1 or 2 may be selected in Scratch
Live software as the DVS signal for the
Left Virtual Deck. Analog Input 3 or 4 may
be selected in software as the DVS signal
for the Right Virtual Deck.
To select the control sources in Scratch
Live, click the SETUP button at the top of
the Scratch Live screen. In the Hardware
> General tab, verify that Control Source >
PGM 1 is set to “1”. This will be your Left
Virtual Deck. verify that Control Source >
PGM 2 is set to “3”. This will be your Right
Virtual Deck.
Since Scratch Live is controlled by an
analog signal, there is no guarantee of
what state that signal will be in by the time
the software gets to interpret it. Therefore,
Scratch Live needs to be able to handle a
wide range of signals, and be congurable
to use them optimally. Calibrating is just
conguring the software to your situation.
Calibration is equally important for both
vinyl and CD users of Scratch Live.
There are two parts to the Scratch Live
control signal: The directional tone, and
the noise map. Listening to the control
vinyl, the directional tone is the 1 kHz
tone. The noise map sounds like random
noise over the top of the tone.
The directional tone provides the
current speed and direction of the record,
while the noise map tells the software
precisely where on the record the needle
is currently.
The Noise Threshold
A threshold is a lower limit, below which
a process will not occur. In the case of
Scratch Live, the noise threshold is the
limit below which the input signal will not
be interpreted as control signal; in other
words if it’s below the threshold, it is
considered noise and ignored.
This setting is necessary because a
stylus is very sensitive, and will inevitably
pick up noise from the environment as
well as the signal on the record, especially
in the noisy environment of a live show.
Connections

RANE SIXTY-TWO Z MIXER FOR FOR SERATO SCRATCH LIVE • QUICK START 3
How to Calibrate Scratch Live
With music playing in the background
(from any source), put your needle on
the record with the turntable stopped.
If you are using CD players, the same
rules apply. Have the CD deck paused or
stopped while calibrating. Ensure the rear
panel p - l - S switches are set correctly.
Click and hold the estimate button
until the slider stops moving. Moving
the threshold slider to the left will make
Scratch Live more sensitive to slow record
movement, but also more sensitive to
background noise.
Repeat the process for each deck.
Things to remember:
• Your needle must be on the record.
• Your turntable (or CD player) must be
stationary.
• The background music playing must be
at a similar level to which you will play
your set at.
• Calibrate Scratch Live every time you
play.
TIP: If the slider jumps to the far right,
then you have a problem with noise
in your turntables/CD players/mixer.
Check all your connections and make
sure your equipment is well earthed.
In some situations you will not be able
to improve the signal quality, and you
will have to play on regardless. In this
situation, stick to REL mode.
The Scopes
The scopes on the Setup screen in
Scratch Live display the input signal as a
phase diagram. The key factors to look at
on the scope display are crisp clean lines,
round shape, and the tracking percentage
in the lower right corner.
Start both turntables or CD players. You
will see green rings appear in the scope
view as shown above.
For optimal performance the inner ring
should be as close to circular as possible.
Use the scope zoom slider (1x to 16x)
to zoom in or out as necessary. Use the
scope L/R Balance and P/A Balance
controls to adjust the inner ring shape.
The number in the top left corner of the
scope view gives the current absolute
position within the control record or CD.
The number in the top right corner is the
current speed in RPM. In the bottom left
is the current threshold setting, and the
number in the bottom right shows the
percentage of readable signal — this
number should be close to 85% when
your system is calibrated properly.
Calibration Troubleshooting
After calibration, the number in the upper
right corner of the scope view should say
0.0 while the needle is on the record and
the turntable is stopped.
If that number is uctuating then
manually move the Estimate slider to the
right until that number is stable at 0.0.
If you’ve moved the slider all the way
to -24 and its still uctuating then you
have a grounding or interference problem
somewhere in the chain.
If so, the rst thing to check is that
the grounding wire coming from your
turntable is connected to a Sixty-Two
grounding post.
Next, make sure that the Sixty-Two
Z isn’t sitting next to a power source
such as a power strip and that the RCA
cables aren’t laying across other power
conducting cables.
If you are still experiencing issues, you
might have to adjust the placement of
your setup. For example, make sure bass
bins aren’t directly under the turntables.
If you have trouble getting the rings
circular, you probably need to clean or
change your needles.
If the image appears as a line, then
you have a missing channel. Check
your RCA connections and needles. For
more calibration troubleshooting help see
“Scope Reading and Fixes” in the manual.

RANE SIXTY-TWO Z MIXER FOR SERATO SCRATCH LIVE • QUICK START
4
Importing
and Playing
Music
Importing Your Music
1. Click the Files button to open the
les panel. The left side of this window
displays locations on your computer
hard drive (and external drives if you
have them). Click these locations to
navigate and nd your music. By default,
your music is usually found in either
“Music” (Mac) or “My Music” (Windows).
2. Once located, drag the folder or les
you want to import onto the purple “
All...” icon, located to the left at the
top of the crates and playlist window.
To import all of your music, drag your
whole music folder onto this icon.
TIP: You can also import by dragging
files and folders directly from Windows
Explorer (PC version) or Finder (Mac
version) into the Scratch Live library.
TIP: Adjust the
size of the Files
window by
clicking and dragging near the three
dots up or down. The vertical crates
window adjusts left and right.
Supported File Types
Scratch Live supports xed and variable
bit rate .MP3, .MP4, Ogg Vorbis,
.AAC*, .ALAC*, .AIFF, .FLAC, .WAV and
Whitelabel (wl.mp3) le types. M3U
playlists are also supported.
*Apple Quicktime is required for AAC and
ALAC.
NOTE: Older iTunes Music Store DRM
files cannot be played back by Scratch
Live. iTunes Plus files are DRM-free.
Playing Music
Click on the “ All...” icon to show all the
tracks in your library. Use the keyboard
shortcut Shift - Left Arrow to load the
highlighted track on to the Left Deck, and
Shift - Right Arrow to load the highlighted
track on to the Right Deck.
TIP: You can also load tracks to Decks
using the mouse. Click and drag a track
from the track list area on to either
Virtual Deck.
To start playing a track, simply put
the needle on the record and start the
turntable. The track will start playing as
soon as it detects the signal from the
control vinyl (or CD).
In ABS mode, the track will play from
the position dictated by the placement of
the needle on the record. If you place the
needle at the beginning of the record, the
track will start playing from the beginning.
You can skip through the track by picking
up the needle and placing it further into
the record, just as with regular records
(known as needle dropping).
How to Analyze Files
Before you play your music in Scratch
Live, it is important to rst analyze your
les. The analyze les function processes
the songs in your library to detect le
corruption, saves the waveform overview
to an ID3 tag*, and calculates auto-gain
and BPM values.
To analyze les, run Scratch Live with
the Sixty-Two disconnected. On the left
side of the main screen, click the Analyze
Files button to build overviews for all the
tracks in your library.
You can drag and drop individual
folders, crates or les onto the Analyze
Files button to force the building of
overviews at any time.
About Corrupt Files
If Scratch Live detects a corrupt
le it will tag it with a corrupt le
icon:
It is very important that you delete ANY
corrupt les from your library as they can
cause Scratch Live to crash regardless
if you play the le or not. See “Status
Icons” and “Corrupt File Descriptions and
Diagnoses” in the manual.

RANE SIXTY-TWO Z MIXER FOR FOR SERATO SCRATCH LIVE • QUICK START 5
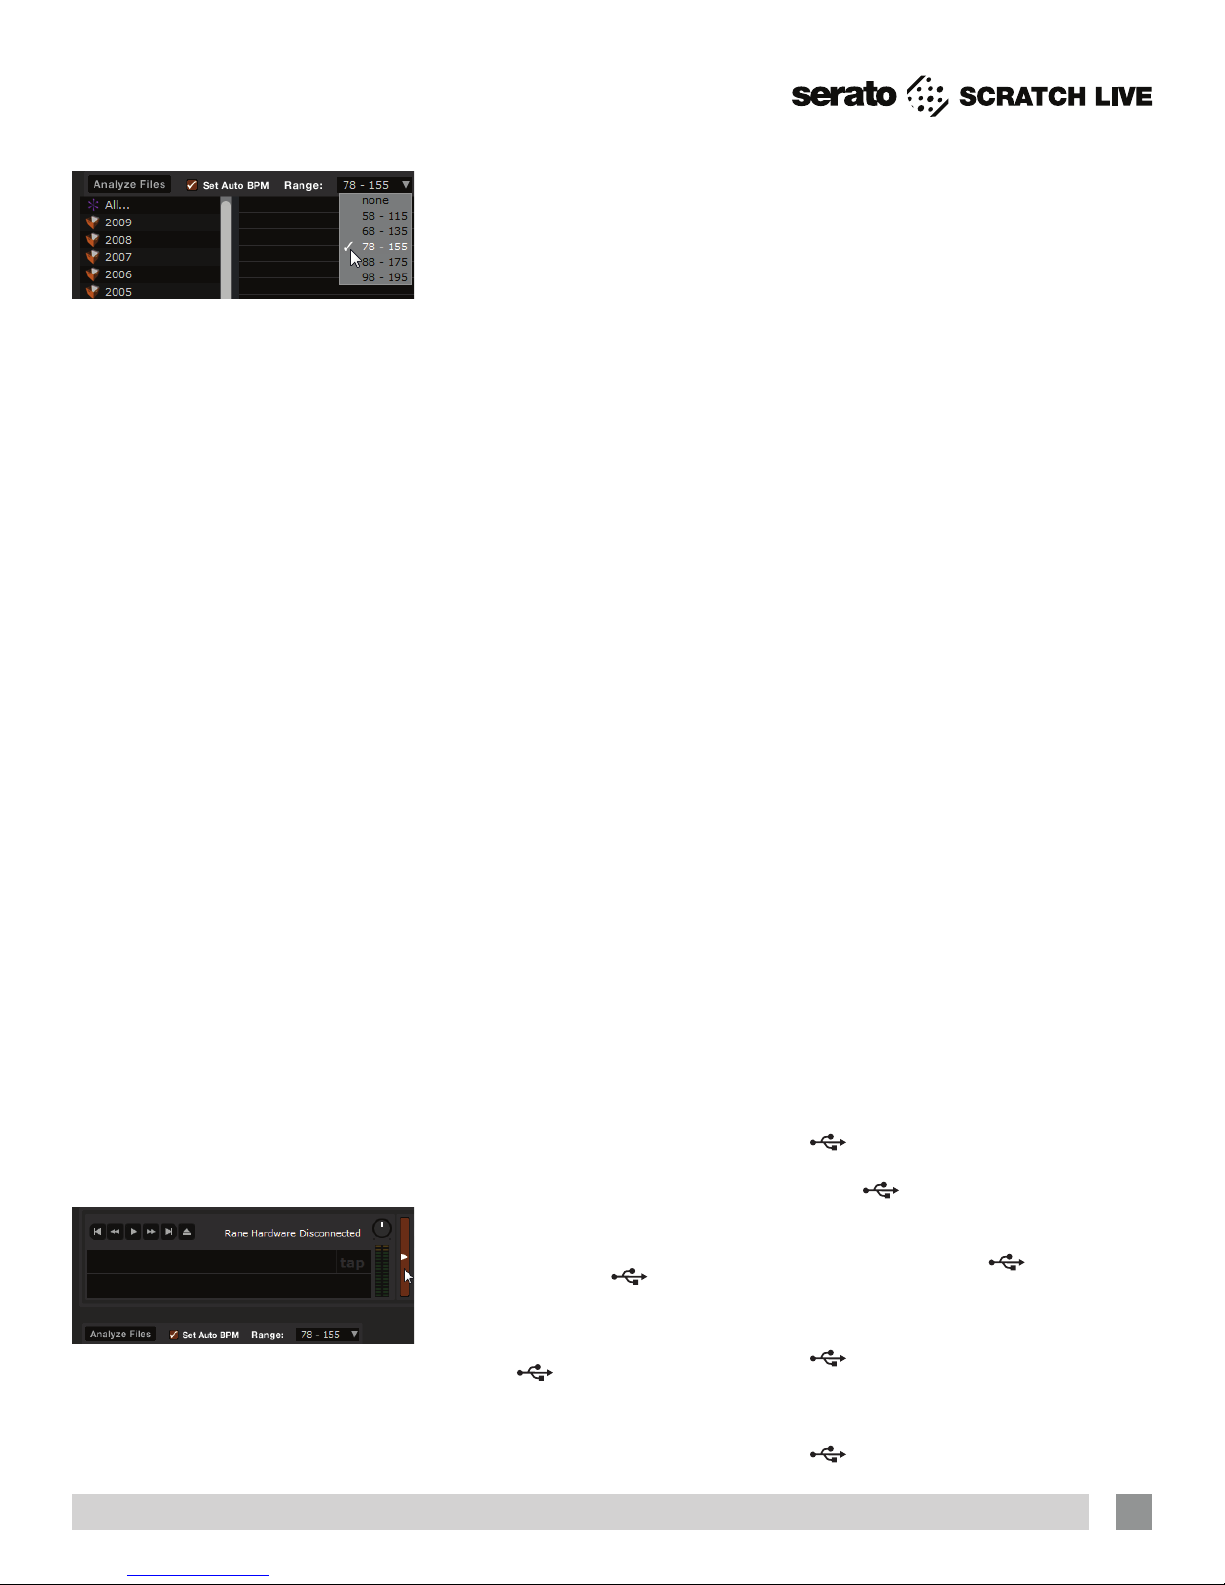
Set Auto BPM
If this option is checked in the Setup
screen while analyzing les, Scratch Live
will calculate the estimated tempos of
your les. If Scratch Live is condent
that the Auto BPM estimate for a le is
accurate, it will be written to an ID3 tag*
in the le. The Auto BPM function will not
be applied if the track already contains
BPM information. To re-analyze these les
and use Auto BPM or auto gain on them,
drag them onto the Analyze Files button.
If you know your le’s BPM will fall within
a certain range, use the range drop down
to avoid double or half value BPMs being
calculated.
*NOTE: ID3 tags contain data about
your tracks and are saved inside the
files themselves. Genre, track name
and artist are examples of common tag
information. See “Editing ID3 tags” in
the manual.
The Offline Player
The ofine player is a useful tool for preparing
crates, auditioning tracks, and setting cue
and loop points. The ofine player is available
when Scratch Live hardware is not connected,
and outputs through the current default audio
device. Load a track to the ofine player by
dragging and dropping onto the Deck, or
pressing shift+left arrow. If the end of the
loaded track is reached, the next track in the
current playlist is played automatically. Click
the Ofine Player Controls button (under the
pointer below) to expand and hide the ofine
player controls.
For more on rescanning, moving, copying,
deleting and backing up your les, see
“File Management” in the manual.
Cues / Samples Control
The CuES / SAMplES button on the Sixty-
Two toggles the ten CuE buttons between
CUES and SAMPLES modes.
In CUE mode, the CuES / SAMplES
button is ORANGE and the Cue buttons
are GREEN. There are ve Cue buttons
dedicated to the Left Virtual Deck and
ve dedicated to the Right Virtual Deck,
numbered above each button. Use cue
points in Scratch Live to mark and trigger
different parts of your tracks. The cue
point markers are saved with the le in
the track’s ID3 tag, so they will be present
each time you load the track. See “Cue
Points” in the manual.
In SAMPLES mode, the CuES / SAMplES
button is RED, the four Bank buttons A, B,
Cand D are ORANGE and the six Sample
buttons are GREEN. The SP-6 Sample
Player allows you to play up to six sources
of audio, in addition to the tracks playing
on the Virtual Decks. Any audio le in your
Scratch Live library can be loaded to any
one of the six slots, allowing playback
of short samples, sound effects, or full
length tracks. The SP-6 is enabled when
the Sixty-Two is plugged in, but not
operational in the ofine player mode. To
enable the SP-6 player, go to Setup >
Plugins > SP-6 Sample Player and click
“Enable SP-6 Sample Player Plugin.”
Sample Player (SP-6) Triggers
In SAMPLES mode, you can trigger six
samples in each of four banks. Select
Bank A, B, C or D. An ORANGE Bank
button is brightly lit if any of the six slots
in that bank have a track loaded, and that
Bank is currently selected. When a bank is
selected, any GREEN Sample button with
a track loaded in its slot is brightly lit. The
button ashes while its sample is playing.
The Play behavior follows the behavior
selected in Scratch Live. Sample playback
can be assigned to the Left Virtual Deck,
Right Virtual Deck or AuX. The Sixty-
Two has a dedicated USB Aux input for
the sample player typically used for SP-6
playback. To assign the SP-6 Sample
Player to AuX, click the SP-6 tab on
the main software screen and select “A”
as the SP-6 output. See “SP-6 Sample
Player” in the manual.
FlexFX
The FlexFX Bus in the Sixty-Two opens up
new possibilities not possible with effect
insert designs found on other mixers.
The FlexFX Bus is more like an auxiliary
bus that can have multiple signals
assigned to it. Signals assigned to the bus
may then have internal effects, external
analog effects and external USB effects
applied in any combination.
When effect on is not engaged, all
effects insert points are bypassed, and
any signal assigned to the FlexFX Loop
is summed into the main mix. This allows
you to CuE the effect in headphones before
it is heard in the Main Mix.
Internal Effects
The six effect buttons both turn on and
sync an internal effect. By keeping this
separate from the effects on button, it is
possible to turn on, sync and cue effects
before you hear the effect in the Main
Mix. Only one internal effect is selected
at a time. Six independent buttons make
it possible to drum in different effects
without interruption.
Scratch Live DJ-FX
The DJ-FX Plugin gives you control of
two FX units, each with three chained
effects slots per unit. The DJ-FX plugin
is not available when your mixer is not
connected.
The DJ-FX Plugin must be enabled in
the Plugins tab in the setup screen. Go to
Setup > Plugins > Enable DJ-FX Plugin.
Once enabled, the DJ-FX panel button
appears.
To enable post-fader DJ-FX using the
InSERt button, go to Setup > Plugins
> Enable Mixer DJ-FX Send.
The InSERt is turned on/off with a
separate button, and can be used with
internal effects, external effects (EXt. InSERt)
or independently. The InSERt uses
USB record pair 9-10 for the Send and
USB playback pair 7-8 for the Return.
If you hear audio delay when using the
InSERt, lower the USB latency setting
in Setup > Hardware > USB Buffer Size.
NOTE: Assign a PGM channel or
signal to FlEXFX before engaging the
InSERt to avoid audible glitches.

RANE SIXTY-TWO Z MIXER FOR SERATO SCRATCH LIVE • QUICK START
6
Virtual
Decks
Track Display
When a track is loaded, the track name,
artist and length are displayed in the track
title bar, and the Virtual Deck shows a
solid black line.
The Virtual Deck
shows everything
about the speed
and position of a
track. As the vinyl
rotates, so does
the line on the
label. The circular progress bar around
the edge is a visual representation of the
position within the song, and can be set to
ash to warn you that the track is nearing
its end. The time and remaining time are
displayed in minutes and seconds. The
pitched BPM (BPM with pitch adjustment
multiplier added) is shown on the left of
the Virtual Deck, and the turntable speed
as a percentage pitch shift is shown on
the right of the Virtual Deck. If the track
has no BPM information, pitched BPM will
not be shown.
If you are playing regular vinyl, notice
the Virtual Deck behaving strangely as
Scratch Live attempts to decode the
incoming signal. This will not cause any
problems, but you may nd it distracting.
You can unload the currently loaded track
using the Virtual Deck eject button.
Scratch Live Modes
Scratch Live has three different modes of
operation. You can switch between these
modes by clicking the mode buttons near
each Virtual Deck.
Absolute Mode
ABS mode is the default mode, and
most closely resembles the properties of
normal vinyl. The beginning of the track
is mapped to the start of the record, and
by picking up the tone arm and moving
the needle to another part of the record
(needle dropping) you can move to a
different position within the track.
ABS mode faithfully reproduces the
movement of vinyl control records,
including stops, starts, scratching, needle
dropping, rubbing and other turntablist
techniques.
When you reach the end of the record
using either REL or ABS modes, Scratch
Live automatically switches to INT mode.
This is known as Emergency Internal
mode, and prevents long tracks from
stopping when you run out of record.
You can switch from Emergency Internal
mode to ABS mode by lifting the needle
and placing it in the lead-in of the control
record. Emergency Internal mode will
activate after 1 second. Use the keyboard
shortcut F1 (left deck) or F6 (right deck) to
switch to ABS mode.
NOTE: Be careful when scratching
near the end of the record not to
accidentally go past this point and
into internal mode, or the track will no
longer respond to record movement!
Relative Mode
REL mode observes the relative forward
and backward movement of the record,
but does not take into account the
position within the record. REL mode
disables needle dropping, but allows skip-
free scratching.
See: “Drop To Absolute Position” in the
manual.
REL mode adds additional speed
controls:
Previous track – Go to the previous
track in the list.
Rewind - The rewind function
speeds up the longer you press the
button.
Fast forward – The fast forward
function speeds up the longer you
hold the button.
Next track – Jump to the next track
in the list.
TIP: Use the keyboard shortcut F2 (left
deck) or F7 (right deck) to switch to
REL mode.

RANE SIXTY-TWO Z MIXER FOR FOR SERATO SCRATCH LIVE • QUICK START 7
Internal Mode
INT mode allows playing tracks without
external vinyl (or CD) control. INT mode
has a start / stop function and a virtual
pitch slider. Holding down the shift key
moves the pitch slider slowly. Holding the
ctrl key and clicking on the pitch slider
resets it to 33 RPM or 45 RPM, depending
on which you are closest to at the time.
Scratch Live automatically switches
to INT mode when the end of the control
record is reached; you can switch back
to ABS mode by placing the needle in
the lead-in of the control record. If you
switch from ABS or REL into INT mode,
Scratch Live automatically adjusts pitch
to maintain playback speed as set by the
turntable. Use the keyboard shortcut F3
(left deck) or F8 (right deck) to switch to
INT mode.
INT mode adds these additional controls:
Play / pause reverse - Press to
play, press again to stop playback.
You can adjust the braking knob in the
setup screen to range from an immediate
stop to a slow turntable-style ‘power
down’. See “Braking” in the manual.
Play / pause forward – Press to
play, press again to stop playback.
Uses the same braking as described
above.
Bend down - Create a temporary
decrease in the playback speed.
Use bend down if the two tracks are in
time, but this track is slightly ahead of the
other track.
Bend up – Create a temporary
increase in the playback speed. Use
bend up if the two tracks are in time, but
this track is slightly behind the other track.
Pitch Slider - Use the pitch
slider to make pitch adjustments
while using INT mode. Drag the
pitch slider with the mouse to
make large pitch movements,
or hold the shift key and drag
the pitch slider to make ne
adjustments.
Clicking the RANGE button
above the slider changes the
slider range to ±8%, ±10%, ±16%, ±50%
or ±100%.
Temporary Cue
There is a temporary cue point that can be
used like the cue button on many DJ CD
players. Press ctrl-I to set this temporary
cue point on the Left Deck, and ctrl-K to
set it on the Right Deck. This temp cue
point is shown in the main waveform as a
white marker. This cue point is not saved
with the track, and by default is set to the
beginning of the track. Press I to jump to
this temporary cue point on the Left Deck,
and K for the Right Deck. If you hold down
the I or K key while the track is stopped, it
will play from the temporary cue point. As
soon as you release the key, it will jump
back to the temporary cue point. Note
that you can use this shortcut to jump to
the beginning of the track if the temporary
cue point has not been set. See “Cue
Points” in the manual.
More Controls
The complete list of keyboard shortcuts is
on the last page of this Quick Start.
Click on the waveform to ‘scrub’ or make
ne adjustments to your position within
the track. This may be useful if you wish
to set cue points in your tracks, and
don’t have your turntables or CD players
connected.
NOTE: If you play a track in INT mode,
and then switch to ABS or REL mode,
the pitch adjustment will be dictated by
the turntable, so there will be a jump in
pitch unless they are already perfectly
matched.
TIP: If you are in ABS or REL mode and
you get a build up of dust on the needle
that is breaking up the audio, hold
down ctrl and press the INT button.
This will take you to INT mode and
reset the pitch to zero.
More Help
This Quick Start just gives the highlights
to get you running. You will want to read
the full manual while using the Sixty-Two
to understand everything it can do. Before
calling the factory for support, rst look
for your question in the manual.
The next place to search online in the
Forum at serato.com/forum, where
thousands of tips are updated daily. You
will denitely want to bookmark this one in
your browser.
The Support Articles are another
valuable resource at serato.com/
scratchlive/support. Over 70 topics
including a Laptop Buying Guide, Your
First Party with Scratch Live, Recording
Your Set, and Moving Your Library and
Crates to a New Computer or Hard Drive.

RANE SIXTY-TWO Z MIXER FOR SERATO SCRATCH LIVE • QUICK START • PART 21319
Keyboard Shortcuts Actions Accessed Directly from the Computer Keyboard
KEY ACTION
ctrl - L Locate the current track. This will highlight the track you most recently loaded.
Pressing ctrl - L again will alternate between the tracks recently loaded on both decks.
ctrl - R Reveal - the highlighted song is opened in a le browser.
ctrl - F Find - moves the cursor to the search box.
ctrl - A Select all.
ctrl - C Copy text in edit mode.
ctrl - E Edit text.
ctrl - V Paste text in edit mode.
ctrl - X Cut text in edit mode.
ctrl - Z Undo last track load.
shift - ctrl -
shift - ctrl -
Move focus up / down through the library or crates. Note that if you have a song highlighted in the song view, and
use shift - ctrl - you will move up or down through the library or crates. When you release the shift or ctrl key,
the focus will go back to the song view so that you can move up and down through songs using .
ctrl - P Add tracks to the prepare window.
ctrl - N Start a new mic recording.
ctrl - O Open the track in your default MP3/WAV/OGG/AIF player.
- or + Zoom the main waveform display.
ctrl - or + Zoom the library text size.
tab Alternate focus between crates or songs.
ctrl - del and
ctrl - backspace Remove track from library., remove track from crate, delete crate (does not delete the le).
alt - del and
alt - backspace Remove track from crate and from library.
ctrl - shift - del and
ctrl - shift - backspace
Delete the le from your library and send to the recycle bin.
(Note to iTunes users: les in your iTunes library cannot be deleted this way).
ctrl - shift - / Toggle the input reverse switch
esc Clear search string if searching, or exit Scratch Live.
SP-6 SAMPLE PLAYER slot 1 slot 2 slot 3 slot 4 slot 5 slot 6
Load to sample slot ctrl - alt - Z ctrl - alt - X ctrl - alt - C ctrl - alt - V ctrl - alt - B ctrl - alt - N
Play sample slot Z X C V B N
LEFT DECK ACTION RIGHT DECK
ctrl - or shift - Load the highlighted song to a deck. ctrl - or shift -
ctrl - shift - Load the track currently on one deck onto the other deck as well (instant doubles). ctrl - shift -
shift - alt - Unload the track from a deck. shift - alt -
ctrl - , (comma) Place a cue point. ctrl - . (period)
ctrl - 1, 2, 3, 4, 5 Place a cue point in a slot. ctrl - 6, 7, 8, 9, 0
1, 2, 3, 4, 5 Jump to cue points slots. (rel and int modes) 6, 7, 8, 9, 0
F1 Switch deck to absolute mode. F6
F2 Switch deck to relative mode. F7
F3 Switch deck to internal mode. F8
F5 Key lock on / off. F10
QPlay / pause reverse. A
WPlay / pause forward. S
EPitch down. D
RPitch up. F
TBend down. (rel and int modes) G
YBend up. (rel and int modes) H
UCensor. (rel and int modes) J
IGo to temporary cue point. (rel and int modes) K
OSet / adjust loop in-point. L
PSet / adjust loop out-point. ;
[Loop on / off. '
ctrl - [ Jump to selected loop. ctrl - '
alt - Q Load previous track. alt - A
alt - W Load next track. alt - S
alt - 1, 2, 3, 4, 5 Auto loop on / off. alt - 6, 7, 8, 9, 0
ctrl - alt - 1, 2, 3, 4, 5 Loop roll. ctrl - alt - 6, 7, 8, 9, 0
alt - E Rewind. (rel and int modes) alt - D
alt - R Fast forward. (rel and int modes) alt - F
alt - O Previous loop. alt - P
alt - L Next loop. alt - ;
alt - space bar Activate the tempo tapper. alt - space bar (x2)
ctrl - I Set temporary cue point. (rel and int modes) ctrl - K
Table of contents
Other Rane Dj Equipment manuals
Popular Dj Equipment manuals by other brands

Traxon
Traxon Washer Allegro AC XB DW installation guide

Chauvet
Chauvet Data Stream 4 user manual

Chauvet Professional
Chauvet Professional COLORdash Par-Quad 18 Quick reference guide

Algam Lighting
Algam Lighting HELIOS user manual

Lightmaxx
Lightmaxx TRICORNO LED LIG0009559-000 user manual

Beamz
Beamz 153.691 V1.1 user manual