Ratio Basic User manual

Ratio
Smart/Solar Charger
MANUAL

Manufacturer
Ratio Electric B.V.
Ambachtsstraat 12
NL – 3861 RH Nijkerk
The Netherlands
Tel. +31-33-2452360
www.ratio.nl
Thank you for choosing
Ratio Smart/Solar Charger
UK English - Original
EV082 - V01 - 11/2022

3www.ratio-electric.com
Preface
About this document
This manual contains technical descriptions and instructions for the following product:
Category of product Charger for Electric Vehicles
Product name Smart/Solar Charger
Art. No. 388xx
Hardware version Charger5
Serial number
Write down the serial number of your product in the table above for future reference.
This manual contains all instructions and safety information for installation, commissioning,
use and maintenance of the product.
This manual is intended for:
•the qualified technician who installs the product;
•the end-user who uses the charger;
•the product owner who maintains the product.
Original instructions
This manual has been translated into multiple languages. The original manual is written in UK
English. All other language versions are translations of the original manual.
Copyright
The content of this manual is protected by copyright and other intellectual property laws.
The content of this manual may only be copied, modified, reproduced, translated with
express written permission from the manufacturer. This manual may only be published,
transmitted, displayed or made available to a third party with express written permission from
the manufacturer.
Disclaimer of liability
Ratio Electric B.V. cannot be held responsible for personal injury, damage to the product
or property damage caused by incorrect use, foreseeable misuse or failure to follow the
instructions in this manual. This also applies to unauthorized modifications of the product and
the use of non-approved spare parts, tools or accessories.
Ratio Electric B.V. reserves the right to modify this manual without notification beforehand.

4Ratio Smart/Solar Charger Manual
1. Safety 5
1.1. Symbols and labels 5
1.2. Intended use 6
1.3. Reasonably foreseeable misuse 6
1.4. Qualification of personnel 6
1.5. Personal protective equipment 7
1.6. Safety precautions 7
2. Description of the product 9
2.1. Charger components 10
2.2. Sensorbox components
(Optional for Smart charger) 11
3. Technical data 12
3.1. Nameplate/Marking 13
4. Transport and storage 13
4.1. Transport 13
4.2. Storage 13
5. Installation 14
5.1. Preparation 14
5.2. Install the power cable in the
consumer unit 16
5.3. Install the Sensorbox in the
consumer unit 16
5.4. Connect the power cable to
the charger 20
5.5. Install the data cable in the
charger 24
5.6. Install a data cable between
two chargers for Power Sharing 26
5.7. Checks before finishing the
installation 30
5.8. Finish the installation 31
6. Commissioning 32
6.1. Note down the unique
passcode of the charger 32
6.2. Download the Ratio EV
Charging App 32
6.3. Initial configuration of the charger 33
6.4. Overview of the Ratio EV
Charging App 34
6.5. Connect the charger to the
Ratio EV Charging App 34
6.6. Testing solar charging functionality 35
6.7. Updating the charger 35
7. Use 36
7.1. Start charging 36
7.2. During charging 36
7.3. Stop charging 37
8. Settings 37
9. Maintenance 38
10. Troubleshooting 39
11. Service 40
12. Data protection 41
13. Warranty 41
14. Disposal 41
EC Declaration of Conformity 42
Table of contents

5www.ratio-electric.com
1. Safety
Please make sure you have fully read and understood the instructions in this manual before
you start installing or using the product. If you fail to follow the instructions from this manual
you can put persons, surroundings, the environment and the product at risk. Store this manual
in an accessible place near the product for future reference.
Always comply with the information, such as labels and the nameplate, attached directly to
the product and keep the information in a legible condition.
Always comply with any applicable laws and regulations that have not been accounted for in
this manual.
1.1. Symbols and labels
1.1.1. Safety warnings
This manual contains safety warnings that may result in injury when ignored. Each safety
warning is indicated with a signal word. The signal word corresponds with the level of risk of
the described hazardous situation, see the table below.
Signal word Risk of injury Result when instruction is ignored or not followed
correctly
6WARNING Medium Could result in death or serious injury
6CAUTION Low Could result in minor or moderate injury
Safety warnings at the start of a section, apply to the entire section.
Safety warnings that refer to a particular sentence or procedure step are embedded in the
running text.
1.1.2. Notices
Messages that are not hazard-related are indicated with the signal word NOTICE. These
messages do not have a safety alert symbol.
Signal word Meaning
NOTICE Could result in damage to the product when instruction is ignored
or not followed correctly
Note Additional information or emphasis on an instruction

6Ratio Smart/Solar Charger Manual
1.2. Intended use
The Ratio Smart/Solar Charger is both a non-restricted and restricted charger intended to
charge electrical vehicles using power from solar panels and household power grid. The
product can be operated indoors and outdoors.
The product must only be operated within its performance limits and under the permitted
ambient conditions, as stated in the technical specifications in chapter 3.
The product can be mounted flush to a wall, or to a separately available pole for pavement
or soil.
Safe use of the product is only guaranteed if it is used as intended.
1.3. Reasonably foreseeable misuse
The following is considered foreseeable misuse:
•Use in an environment that varies from or exceeds the given environmental conditions.
•Use that varies from or exceeds the given operating conditions.
•Failure to comply with the instructions in this manual.
•Failure to eliminate faults, malfunctions or defects of the product that impose safety risks.
•Failure to carry out the inspections and maintenance operations as described in this
manual.
•Unauthorised removal or modification of parts or safety devices of the product.
•Use of spare parts or accessories that have not been approved by the manufacturer.
•Operation in a flammable and/or explosive environment.
•Operation in closed-off or poorly ventilated rooms.
1.4. Qualification of personnel
Only authorised technicians are allowed to perform installation and maintenance of the
product. They must possess the following qualifications:
•are legal of age;
•are familiar and abide by the safety instructions and sections of this manual related to
installation and maintenance of the product;
•are familiar with and abide by the applicable local, national and international laws and
regulations;
•are able to recognise the possible dangers of the product and take the necessary
measures to protect persons and property;
•have received adequate training in the safe installation and maintenance of this product;
•have obtained authorisation to access the product.

7www.ratio-electric.com
1.5. Personal protective equipment
Wear the appropriate personal protective equipment (PPE) according to the manual of any
tools you use during installation of the charger.
Wear insulating gloves when installing wires and touching electrical components to avoid
damaging the product by static discharge.
1.6. Safety precautions
Despite the safe design and construction of the product and the prescribed protective
measures, the product possesses residual risks. This manual provides safety messages to
indicate these risks. The formatting and appearance of safety messages that are dedicated to
a particular section or sentence is explained in chapter 1.1.
Read all the safety warnings and instructions before using the product. Failure to follow the
warnings and the instructions may result in electric shock, fire and/or serious injury.
6WARNING
•This device should be supervised when used around children.
•Do not put fingers into the electric vehicle connector.
•Do not use this product if the flexible power cord or EV cable are frayed, have broken
insulation, or any other signs of damage.
•Do not use this product if the enclosure or EV connector are broken, cracked, open, or
show any other indication of damage.
•Switch off the MCB in your electrical cabinet and immediately contact Customer Support
for service if at any time you think the equipment is unsafe. Do not use your Smart/Solar
Charger until the problem is identified and corrected.
•Improper connection of equipment-grounding conductor can result in a risk of electric
shock. Check with a qualified electrician or serviceman if you doubt whether the product
is properly grounded.
•Do not use this product if it does not function according to the instructions in this manual.
Seek advice from Ratio, your vendor, or a qualified electrician or serviceman.
•Do not remove the charging plug while a charging session is active.
•Children should not be allowed to use this product. Do not allow children to play in or
around the product.

8Ratio Smart/Solar Charger Manual
6CAUTION
•Make certain the supply cable of the product is positioned so it will not be stepped on,
tipped over, or otherwise subjected to damage or stress.
•There are no user serviceable parts inside. Refer to the Customer Support section in this
manual for service information. Do not attempt to repair or service the product yourself.
•Do not operate this product if it or the supply cable or housing is visibly damaged. Switch
off the MCB in the electrical cabinet and contact your Service Representative for service
immediately. Refer to the Customer Support section in the manual for information on the
Service Representative in your area.
•Only use this product to charge electric vehicles equipped with a conductive charge
port. See the vehicle’s owner’s handbook to determinate if the vehicle is equipped with a
conductive charge port.
•Use of any adaptors is not allowed with this product.
•Only use certified type 1 or type 2 charging cables with this product.
•Cord extension sets are not allowed to be used.
NOTICE
•Do not drop the product and avoid bumping.
•Do not store the product in an environment that exceeds the ambient conditions as stated
in this manual.
•Do not expose the internal components product to moisture.
•Do not immerse the product in water or any other liquid.

9www.ratio-electric.com
2. Description of the product
The Smart/Solar Charger is a Mode 3 charger for charging electrical vehicles (EV) that
complies with the IEC61851 standard.
The Smart/Solar Charger is equipped with several features to optimise power consumption
and charging performance.
Dynamic Load balancing
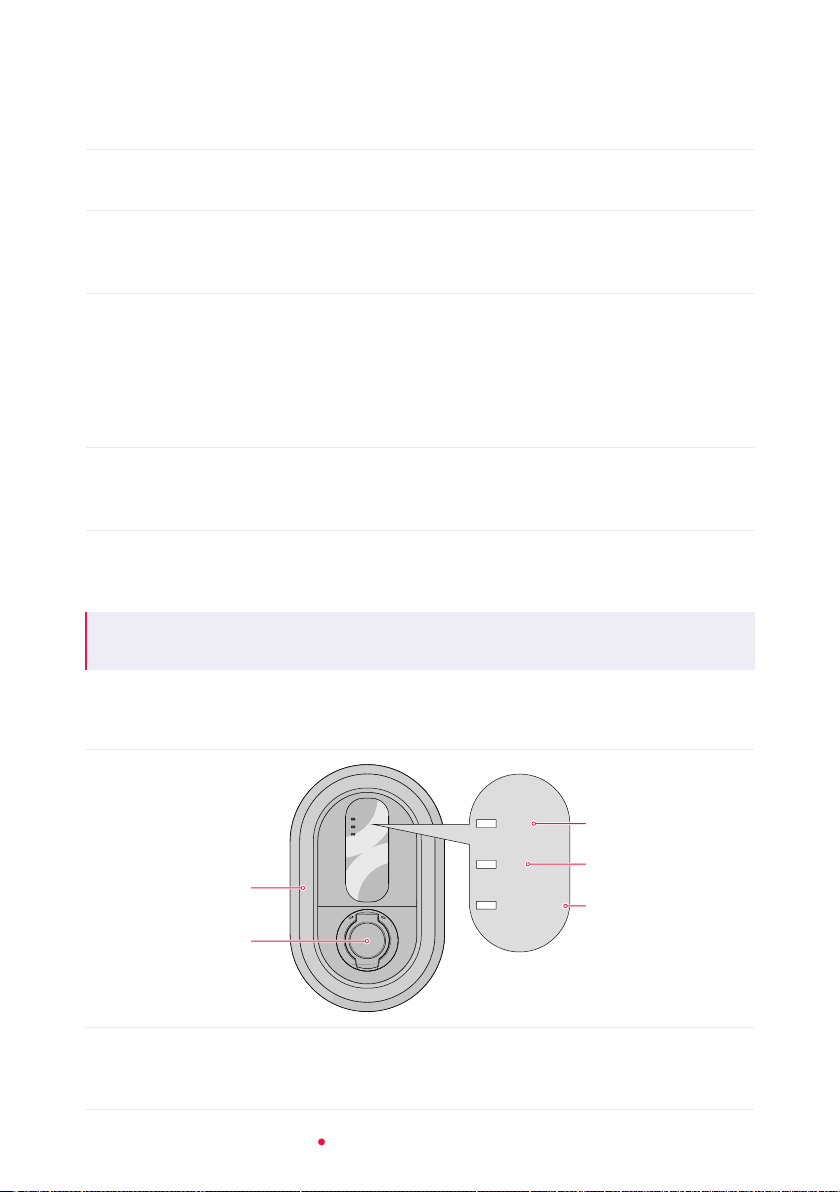
The product uses a Sensorbox with current transformer(s) to measure the live power
consumption of the power grid per phase and uses that information to manage the power
output to your EV. When more electrical appliances are used, the power output to the EV is
reduced to avoid overloading the power grid.
The Sensorbox uses up to three CT clamps, one for each phase of the main grid, to measure
the current flow of the main grid. The Sensorbox is also compatible with solar panel
installations and can measure the direction of the current.
Power Sharing
If you have purchased more than one charger, you can interconnect the chargers with a data
cable and use the integrated Power Sharing feature to equally distribute the available power
across the chargers points using the data from the Sensorbox.
One charger is connected to the Sensorbox with a data cable. This charger acts as the Main
Controller (MAIN), and manages the power for up to three Sub Chargers (SUB1, SUB2 and
SUB3).
It is also possible to use Power Sharing without the Sensorbox. It will function without
Dynamic Load Balancing, the chargers must be connected to each other with a data cable
and set in Basic mode.
Note: PureSolar mode is not compatible with Power Sharing.
Over the air update
Over the air update (OTA) is possible, your charger can receive the available updates over
the internet.
Multiple users and multiple cars
Different users and multiple cars can be added to view the charging sessions of each
individual online. A maximum of five users or cars can be created.
Ratio EV Charging App
The charger can be controlled with the Ratio EV Charging App.
The App is available in the Google Play Store and Apple store, or check our website.
For more information, go to chapter 6.2.

10 Ratio Smart/Solar Charger Manual
Charge modes
The charger has four available charge modes:
Basic The charger charges the EV using a set maximum power in Amps
(Maximum charging current). - no Load Balancing
Smart The charger only charges the EV when the available power is above
the minimum set power in Amps (Minimum charging current) and
below the maximum power that is still available on the main grid. *
SmartSolar The charger only charges the EV when the available power is above
the minimum set power in Amps (SmartSolar minimal charging
current) and below the maximum power that is still available on the
main grid. If the charger is charging the EV and there is still net
power generation, the charger uses this surplus of energy to charge
the car in addition to the minimum set power. *
PureSolar The charger only charges the EV when there is a net power
generation (e.g. from solar panels), that is above the minimum set
power in Amps (PureSolar minimal charging current). *
* Charging at a maximum current while protecting the building from overcurrent loading
with Dynamic Load Balancing. While charging at home or an office building the charging
current adapts to the maximum allowed consumption in the building.
Note: PureSolar mode is not compatible with Power Sharing. If you set the charge mode to
PureSolar, Power Sharing will be disabled.
2.1. Charger components
Power
Fault
Ready/Charge
1
2
3
4
5
1Front cover ring
2Charge socket
3Power LED
4Fault LED
5Ready/Charge LED

11www.ratio-electric.com
2.2. Sensorbox components (Optional for Smart charger)
Note: The Ratio Smart charger does not include the CT clamps and Sensorbox needed for
Dynamic Load Balancing and PV charging. To upgrade your Ratio Smart charger to support
Dynamic Load Balancing, purchase Ratio Sense. This package contains a Ratio Sensorbox
and CT clamps. Follow the instructions in chapter 5.3. of this manual to install Ratio Sense in
your Ratio Smart charger.
93 4 65 7 81 2
1Phase 1 (L1) CT clamp input
2Phase 2 (L2) CT clamp input
3Phase 3 (L3) CT clamp input
4Mains input*
5P1 meter input (inactive)
6Status LED
7Input/Output **
8Data cable connector
9CT clamp (3× for 3-phase installation)
* The mains input does not supply power to the Sensorbox. It is used to determine the
direction of the measured current. The provided mains input cable must be installed on phase
1 (L1) of the main power grid and is orientation sensitive.
** Not for Ethernet connection.

12 Ratio Smart/Solar Charger Manual
3. Technical data
Product name Smart/Solar Charger
Art. no. 388xx
Charging System IEC61851, Mode 3
Cable version car connector IEC 62196, type 1 or type 2
Outlet version IEC 62196, type 2 Outlet
Power input single-phase or 3 phase, 230V-400V AC, 16A-32A
Max Power output 7,4 kW / 230V AC, 22 kW / 400V AC
Frequency 50 Hz ±5%
Protection against electric shock Class I
Residual current detection DC 6mA
Dimensions 400 mm × 250 mm × 105 mm
Housing PC/ABS-VO
Weight 4 kg (incl. cable)
IP Protection rating IP54, rain-tight
Altitude Up to 2000 m.
Ambient temperature -25 °C to +40 °C
External magnetic field Not exceeding five times the earth’s magnetic field in
any direction.
Sinusoidal wave distortion Not exceeding 5%
Relative humidity
(maximum value at 40 °C)
75%
Markings CE
Ventilation Not supported
Required protection device type Type A
Required protection device rating 30 mA
Supported connectivity protocols Bluetooth® wireless technology
Wi-Fi
Ethernet

13www.ratio-electric.com
3.1. Nameplate/Marking
The product is marked in accordance with the applicable legislation requirements. The
nameplate/marking is located on the bottom of the housing, above the cable inlets.
Ratio Electric BV
Ambachtsstraat 12, 3861 RH
Nijkerk NL
PNr: 388xx Solar 11-22kW 5m
IP54 -25ºC .. 40ºC 09/2022
230/3x230/400VAC 32A 50Hz
Prod- SNr : XXXXXXX
Conn-SNr : XXXXXXXXXXXXXX
1
2
3
4
5
7
6
8
9
q
w
1Manufacturer
2Contact details
3Product number
4IP rating
5Ambient temperature range
6Product name
7Production date
8Rated input power
9Barcode serial number
qProduct serial number
wConnectivity serial number
(visible in App)
4. Transport and storage
4.1. Transport
Transport the product in the original packaging, or suitable replacement packaging that
provides adequate protection from vibrations, bumps, moisture, dust, and debris.
Be careful not to drop the product and prevent it from moving or bumping into objects while
transporting.
Excessive vibrations could loosen wire connections and cause the product to malfunction.
4.2. Storage
Always disconnect the product from the power supply when storing the product.
Store the product in environmental conditions within the limits stated in chapter of 3 this
manual.
Store the product in the original packaging or a suitable replacement packaging to protect
the product from moisture, dust, and debris.
Do not store anything on top of the product.

14 Ratio Smart/Solar Charger Manual
5. Installation
5.1. Preparation
6WARNING
•The installation must be done by a qualified and licensed electrician according the local
legislation.
•The electrical installation must be free of power during the entire installation period.
•Since this charger uses circuits that reference to ground, no megging must be done after
connecting to power.
5.1.1. Check the contents
1. Open the box and remove the contents.
2. Place all parts on an empty surface to avoid losing any parts.
3. Check if all parts are present and undamaged using the overview below. In case of any
parts missing or damaged, please contact your local dealer or Ratio Electric B.V.
321 4 5
wq8 9
Ø25 mm
Level
76
re
1Charger
2Front cover ring
3Sensorbox with connector
4Locknut for cable gland
5M25 cable gland (2×)
6Foam insert for data cables
7Drilling template
8Current transformers
(3× for 3-phase installation)
9Mains input cable for Sensorbox
qRubber grommet for data cable
wScrew caps (4×)
eRJ10 connector (4×)
rAdhesive strip
Note: The Ratio Smart charger does not include the CT clamps and Sensorbox needed for
Dynamic Load Balancing and PV charging. To upgrade your Ratio Smart charger to support
Dynamic Load Balancing, purchase Ratio Sense. This package contains a Ratio Sensorbox
and CT clamps. Follow the instructions in chapter 5.3. of this manual to install Ratio Sense in
your Ratio Smart charger.

15www.ratio-electric.com
5.1.2. Required tools
Spirit level Size 3 flathead TX10 Torx Voltage tester
T10
Hammer RJ10 Crimping tool Screws 5×35 mm
(4×)
Appropriate wall
plugs (4×) (if
applicable)
5.1.3. Required wiring and electrical protection
16 A 32 A
Wiring cross section 1-phase* 3 × 2,50 mm
2, solid wire* 3 × 6,00 mm
2, solid wire*
Wiring cross section 3-phase* 5 × 2,50 mm
2, solid wire* 5 × 6,00 mm
2, solid wire*
Mains Circuit Breaker (MCB) 20 A, B/C-characteristic 40 A, B/C-characteristic
Residual Current Device (RCD) 30 mA, Type A
Data cable Shielded UTP cable or 4×0,25 mm
2cable
* max 25 m cable length

16 Ratio Smart/Solar Charger Manual
5.2. Install the power cable in the consumer unit
1. Switch off the Main Circuit Breaker (MCB) in the consumer unit to cut power to the main
grid.
2. Lay down a power cable and data cable between the consumer unit and the installation
location of the charger.
3. It is advised to connect the charger to your internet network with an Ethernet cable
instead of using Wi-Fi. Therefor, lay down an Ethernet cable between your internet
modem and the charger.
4. Install a dedicated 30 mA, Type A Residual Current Device (RCD), or use an available 30
mA, Type RCD.
5. Strip the wires of the power cable.
6. Connect the power cable wires to the dedicated RCD in the consumer unit.
5.3. Install the Sensorbox in the consumer unit
1. Mount the Sensorbox to a free location in the consumer unit.
1
(L)
(N)
MAINS
2
3
2. Plug the mains input cable into the Sensorbox.
3. Plug the other end of the mains input cable into a power outlet connected to the same
phase as L1 of the charger.
Note: The mains input is orientation sensitive. If the mains plug is inserted upside down, the
measurements of the Sensorbox will be inaccurate. Check the markings on the Sensorbox
for the correct orientation, check the correct position of L and N.

17www.ratio-electric.com
1
(L)
(N)
MAINS
2
3
1
(L)
(N)
MAINS
2
3
(N)
1
(L)
(N)
MAINS
2
3
(N)
4. Check on which phase of the main power grid the power outlet is connected.
5. Place a current transformer around the same phase wire of the main power grid, between
the main fuse and the consumer unit.
6. Insert the 3,5 mm jack of the current transformer to the L1 input on the Sensorbox.
Note: For correct functioning of the Sensorbox, you must install this current transformer
around the same phase as the power supply (L).
Note: Make sure the arrow on the current transformer points towards the entry point of
the main power grid. See the image below for more information on the correct mounting
location of the CT clamps.
CT
Clamp
Sensor
Box
Solar
Panels
1
2
3
Data to
Charging Station
Distribution
box
Main
Fuse
Net
L1
L2
L3
N
L1 L2 L3
TVS
KK
L
L
N
User
User
User
User

18 Ratio Smart/Solar Charger Manual
1
(L)
(N)
MAINS
2
3
7. Place the remaining current transformers around the other phase wires of the main power
grid, also between the main fuse and the consumer unit/solar panel connections.
8. Insert the 3,5 mm jacks of the current transformers to the L2 and L3 input on the
Sensorbox.
1
(L)
(N)
MAINS
2
3
40 mm
9. Strip the wires of the data cable (not included).
10. Insert four wires of the data cable into the RJ10 connector.
11. Secure the wires to the RJ10 connector. Use a RJ10 crimping tool.
12. Write down the colours and order of the inserted wires of the data cable.

19www.ratio-electric.com
1
(L)
(N)
MAINS
2
3
13. Insert the RJ10 connector into the Sensorbox.
150 mm
225 mm
80-100 cm
1. Tape the provided drilling template to the wall at the installation location, with the
bottom of the template about 80-100 cm above the ground.
2. Ensure the template is level. Use a spirit level.
Alternatively
1. Hold the charger against the wall at the installation location, with the bottom of the
charger about 80-100 cm above the ground.
2. Ensure the charger is level. Use a spirit level.

20 Ratio Smart/Solar Charger Manual
3. Mark the locations of the holes in the charger housing on the wall.
4. Carefully remove the charger and lay it on a flat, stable and dry surface.
5. Drill the holes in the wall. Use an appropriate drill and drill bit.
6. Insert wall plugs, if applicable.
7. Align the charger with the holes in the wall and secure it with four 5×35 mm screws (not
included).
5.4. Connect the power cable to the charger
TX10
1. Remove the five Torx screws from the housing lid. Use a size TX10 screwdriver.
2. Move the housing lid to the side to access the inner circuitry of the product.
This manual suits for next models
13
Table of contents
Other Ratio Batteries Charger manuals