Raue Steri 3000 User manual

C.B.M. S.r.l. Medical Equipment - Via Castello 10, 26038 Torre dé Picenardi (CR) - Italy
Rev. 10 –18/02/2019 4111_Anleitung.docx pag. 1 di 15
en - USER MANUAL ....................................page 2
de - BEDIENUNGSANLEITUNG .............. Seite 7
Distributed by :
Raue GmbH
Kosmetik- und Fußpflegebedarf
Berkhopstr. 12,
D-30938 Burgwedel
Tel.: +49 (0) 5139 / 9814 0
Fax: +49 (0) 5139 / 9814 20
Mail: info@raue-kosmetik.de

C.B.M. S.r.l. Medical Equipment - Via Castello 10, 26038 Torre dé Picenardi (CR) - Italy
Rev. 10 –18/02/2019 4111_Anleitung.docx pag. 2 di 15
RAUE Kosmetik GmbHRAUERA
DRY STERILIZER- USER MANUAL
REMARKS:
WARNING: Burn hazard: The inner parts of the chamber and the door reach
high temperatures
These operator's instructions have to be carefully kept near the equipment, in order to be
consulted by all users.
Before using the machine for the first time we suggest to perform a sterilization cycle with
no load
The use of this device is limited to qualified staff
Before the start, please check that your load withstands without any damages at the set
temperature (+10% for safety).
The equipment is to be used dry, do not introduce water or other liquids.
In case of black-out the sterilizing cycle is not valid
In case of lack of voltage or lighting of the alarm pilot lamp the equipment stops the
sterilization cycle.
We recommend not to lean any object on the equipment

C.B.M. S.r.l. Medical Equipment - Via Castello 10, 26038 Torre dé Picenardi (CR) - Italy
Rev. 10 –18/02/2019 4111_Anleitung.docx pag. 3 di 15
The material should be placed in such a way that the hot air can flow freely around the
material that is to be sterilised.
We recommend to clean and dry carefully the material to sterilize.
Temperature oscillations of few °C, during the cycle, have to be considered normal.
In case more consecutive cycles the apparatus could achieve elevated external
temperatures.
It is suggested to periodically check the proper operation of the appliance with the
appropriate indicator (chemical and/or biological for dry sterilization) to ensure
correct sterilization.
The equipment is only designed for the sterilisation of metal objects (scissors, stitch-
removers, nail clippers etc), glass or other material capable of withstanding the temperature
of the machine.
It is inadvisable to place gauze, textiles and packaging inside for sterilisation.
Description of the equipment :
Referring to the figure of page 2 the sterilizer components are described here below:
•(A) Master switch
•(B) "Ready machine" yellow pilot lamp
This lamp is on when the sterilizer is ready and is waiting the start of a cycle
•(C) Alarm red lamp
This pilot lamp turns on in order to signal some possible anomalies and it is matched to a
BIP sound.
To set aside the alarm push the START button (see Alarms Table).
•(D) START push button
The function of this push button is to start a cycle, if the pilot lamp (B) is turned on.
The START push button works also as RESET key, if it is pressed during a cycle it is
cancelled. Moreover, if an alarm has intervened, by pressing the START push button,
the alarm is cancelled
•(E) Switch push button
The function of this push button is to alternate, on the display (H), the visualization of
temperature and sterilization time.
•(F) Temperature pilot lamp
When this pilot lamp is turned on it shows that the value read and/or set on the display
(H) is referred to the temperature.
Attention: at temperatures below 140°C the display may show different
temperatures from the real one.
•(G) time pilot lamp
When this pilot lamp is turned on it shows that the value read and/or set on the display
(H) is referred to the sterilization length of time, heating excluded.
If it flashes it means that INFINITE time has been set

C.B.M. S.r.l. Medical Equipment - Via Castello 10, 26038 Torre dé Picenardi (CR) - Italy
Rev. 10 –18/02/2019 4111_Anleitung.docx pag. 4 di 15
•(H)display
Cycle parameters are visualized on the display : temperature inside the chamber,
sterilization time, set temperature.
In order to reset the cycle data, this must be stopped.
•The temperature can be set between 140°C and 200°C,
•Time can be set between 1 minute and 600 minutes or infinite time.
To set the INFINITE time the push button + must be kept pressed up to 600 and then it is
necessary to wait few seconds.
When the writing “INF“ appear on the display wait 3 seconds for automatic storage.
When INFINITE time is selected the Lamp Time (G) flashes.
To remove INFINITE time press the button ―.
ATTENTION: AT INFINITE TIME THE EQUIPMENT CAN BE SWITCHED OFF ONLY
MANUALLY.
•(I) (L) keys
The function of these keys is to modify the temperature setting and the sterilization time,
increasing or decreasing the value. By pressing the key once, with the sterilizer waiting
(B pilot lamp turned on) the set temperature value or the set sterilization time is visualized
on the display.
By pressing the or ―keys it is possible to modify the value.
After reaching the desired value, wait 3 seconds for automatic acquisition.
If one of these keys is pressed during the cycle, the set values of time or temperature can be
read on the display but it is not possible to modify them.
•(M) Heating pilot lamp
This lamp indicates the switching on of the heating elements of the equipment
USER'S INSTRUCTIONS
Before setting sterilization time and temperature it is recommended to check the table of
sterilization cycles below, page 9.;
1. Connect the plug into the 230V outlet. Switch on the master (A).
The display shows a short self test, including the Firmware Version.
The yellow pilot lamp (B) is turned on in order to show that the machine is ready for the
cycle.
2. Place the material to be treated inside the sterilizer and close the door (do not open the
door during the cycle).
3. Set the desired temperature and time of sterilization,
•Set the temperature : with the temperature pilot lamp on, press the +or ―keys, or
keeping the push button pressed, the increase or the decrease of the value becomes
quick. After reaching the desired value, wait 3 seconds for the storing of the set value.
•Set the sterilization time: press the switch push button the timer pilot lamp turns
on . Repeat the previous operations, in order to visualize and modify the time. Wait
3 seconds for the storing of the set value.

C.B.M. S.r.l. Medical Equipment - Via Castello 10, 26038 Torre dé Picenardi (CR) - Italy
Rev. 10 –18/02/2019 4111_Anleitung.docx pag. 5 di 15
4. After the parameters setting, start the sterilization cycle by pressing the "START" push
button. The yellow pilot lamp (B) turns off.
5. After some minute the sterilizer arrives at the set temperature and keeps it for the set
time.
6. The temperature measured inside the sterilization chamber is visualized on the display
(with a + 10°C tolerance) or, by switching the push button, the remaining time to the
end of the cycle.
7. At the end of the set time, the cycle automatically stops and the display shows the writing
END matched to few BIP sounds, informing that the sterilizer has finished the cycle.
IMPORTANT: The cycle is considered valid only if, at the end, the writing END is
appearing.
8. If the equipment is not used, turn the master switch (A) off.
ATTENTION: AT INFINITE TIME THE EQUIPMENT CAN BE SWITCHED OFF ONLY
MANUALLY.
STERILIZATION CYCLES
Temperature
Time in minutes
180°C
*45'
170°C
*75' (1h 15’)
160°C
*120'
* minimum recommended time
Cleaning
To carry out a good cleaning use only neutral detergents and rinse with plenty of water.
The gaskets and all plastic parts can be cleaned with a cotton flock soaked in alcohol.
Do not use sponges or abrasive materials which can damage the surface.
To clean do not use detergents, disinfectants or other liquids containing chlorides as they are
corrosive for stainless steel; in case of contact please rinse immediately.
ALARM TABLE
Display/Defect
Cause
Remedy
AL 1 –Alarm heating element
broken
1)Excessive load
2)Heating element broken
1) Reduce the load and repeat the cycle
2) Replace the faulty heating element
AL 2 –Alarm Low
Temperature
Heating element broken
Replace the faulty heating element
AL 3 –Alarm Overheating
CPU card in Error
1) Open immediately the door
2) Replace the faulty CPU card

C.B.M. S.r.l. Medical Equipment - Via Castello 10, 26038 Torre dé Picenardi (CR) - Italy
Rev. 10 –18/02/2019 4111_Anleitung.docx pag. 6 di 15
AL 4 - Probe broken
CPU card in Error
Replace the faulty CPU card
AL 5 –Black Out
The Black Out
Repeat the cycle
The equipment is completely
stopped
1)Over-temperature, the safety
thermostat is working
2) The fuses is broken
3) CPU card in Error
Open immediately the door
1) Reset the safety thermostat
2) Replace the fuses
3) Replace the faulty CPU card
SAFETY: Should the safety thermostat intervene, all power goes off except
to the green main switch. In order to reset the sterilizer it is necessary to
unscrew the black cap situated on the back side of the machine and push the
button its full course. The overheating cut-off is operating because of an
excess temperature in the chamber. If during the following cycle the
overheating cut-off should work again, call the technical assistance in order to
eliminate the inconvenience causing its intervention.
WARRANTY
This instrument is designed and built according to the Community Directive CEE 93/42
“Medical equipments” and C.B.M. is responsible for safety, reliability and performances
provided that possible modifications or repairs are carried out by authorised people, the
corresponding electric plant complies with IEC regulations and the equipment is used in
compliance with these instruction for use.
C.B.M. guarantees its sterilizer for two (2) years, in case of manufacturing defects or failures
of components, not due, according to C.B.M. evaluation, to the operators’ wrongful use of the
apparatus.
The warranty does not cover parts subject to wear and repairs or replacements carried out by
personnel not authorised by C.B.M.
Details, descriptions and pictures are merely indicative.
C.B.M. S.r.l. reserves the right to carry out ameliorative modifications to its own products
without any previous notice.
Disposal Of Electric And Electronic Refuse
Waste from Electrical and Electronic Equipment - Directive 2012/19/UE (WEEE)
The symbol (shown above) that appears on this product means that it should not be disposed
of together with normal household refuse but should be treated separately.
Electric and electronic equipment may contain substances that are harmful to the environment
and to the health of humans and should therefore be disposed of at special waste disposal
sites.
There are harsh legal penalties in force against persons found disposing of such equipment in
an irresponsible manner.

C.B.M. S.r.l. Medical Equipment - Via Castello 10, 26038 Torre dé Picenardi (CR) - Italy
Rev. 10 –18/02/2019 4111_Anleitung.docx pag. 7 di 15
When the equipment is no longer of any use, it may taken back to the outlet from which you
intend to purchase a replacement.

C.B.M. S.r.l. Medical Equipment - Via Castello 10, 26038 Torre dé Picenardi (CR) - Italy
Rev. 10 –18/02/2019 4111_Anleitung.docx pag. 8 di 15
BEDIENUNGSANLEITUNG
Hinweise:
ACHTUNG: Verbrennungsgefahr; Die Innenteile der Sterilisationskammer bzw.
die Tür erreichen hohe Temperaturen.
Die vorliegende Anleitung muss in der Nähe des Geräts sorgfältig verwahrt werden, so
dass alle Benutzer sie nachschlagen können.
Sicherstellen, dass das zu sterilisierende Material der eingestellten Temperatur
standhalten kann (+10% Sicherheitsfaktor).
Das Gerät läuft im Trockenbetrieb, d.h. es dürfen weder Wasser noch sonstige
Flüssigkeiten eingefüllt werden.
Das Material ist so zu positionieren, dass die Heißluft frei um das Material herum strömen
kann.
Es wird empfohlen, das zu sterilisierende Material sorgfältig zu säubern und zu trocknen.
Bei Spannungsausfall bzw. Aufleuchten der Alarmlampe ist der Sterilisationszyklus als
NICHT wirksam zu betrachten.
Die Benutzung dieses Geräts ist qualifiziertem, unterwiesenem Personal vorbehalten.
Es empfiehlt sich, keinerlei Gegenstände auf dem Gerät abzulegen.
Temperaturschwankungen während des Zyklus, auch in Höhe von einigen Graden
Celsius, sind als normal zu betrachten.
Das Gerät in regelmäßigen Zeitabständen mit Hilfe der (chemischen u/o
biologischen für Heißluftsterilisatoren geeigneten) Indikatoren auf gute Funktion
prüfen, um eine korrekte Sterilisation sicher zu stellen.
Das Gerät wurde für die Sterilisation von Metallgegenständen (Scheren, Fadenmesser,
Nagelzangen etc.), Glas oder andere hitzeresistente Materialien konzipiert.
Es ist nicht empfehlenswert Kompressen, Textilien oder Verpackungen hinein zulegen
um diese zu sterilisieren.
Beschreibung des Apparats:
Mit Bezug auf die Abb. von Seite 2 werden in der Folge die Komponenten des
Sterilisierapparats beschrieben:
•(A) Hauptschalter
•(B) Gelbe Warnlampe für betriebsbereiten Sterilisierapparat
Diese Warnlampe leuchtet auf, sobald der Sterilisierapparat betriebsbereit ist und auf
Zyklusstart wartet
•(C) Rote Warnlampe
Diese Warnlampe leuchtet auf, um evtl. (von Hörsignalen begleitet) Störungen zu
melden. Über den Druckknopf START den Alarm zurück stellen. (siehe auch Tabelle
der Alarme).

C.B.M. S.r.l. Medical Equipment - Via Castello 10, 26038 Torre dé Picenardi (CR) - Italy
Rev. 10 –18/02/2019 4111_Anleitung.docx pag. 9 di 15
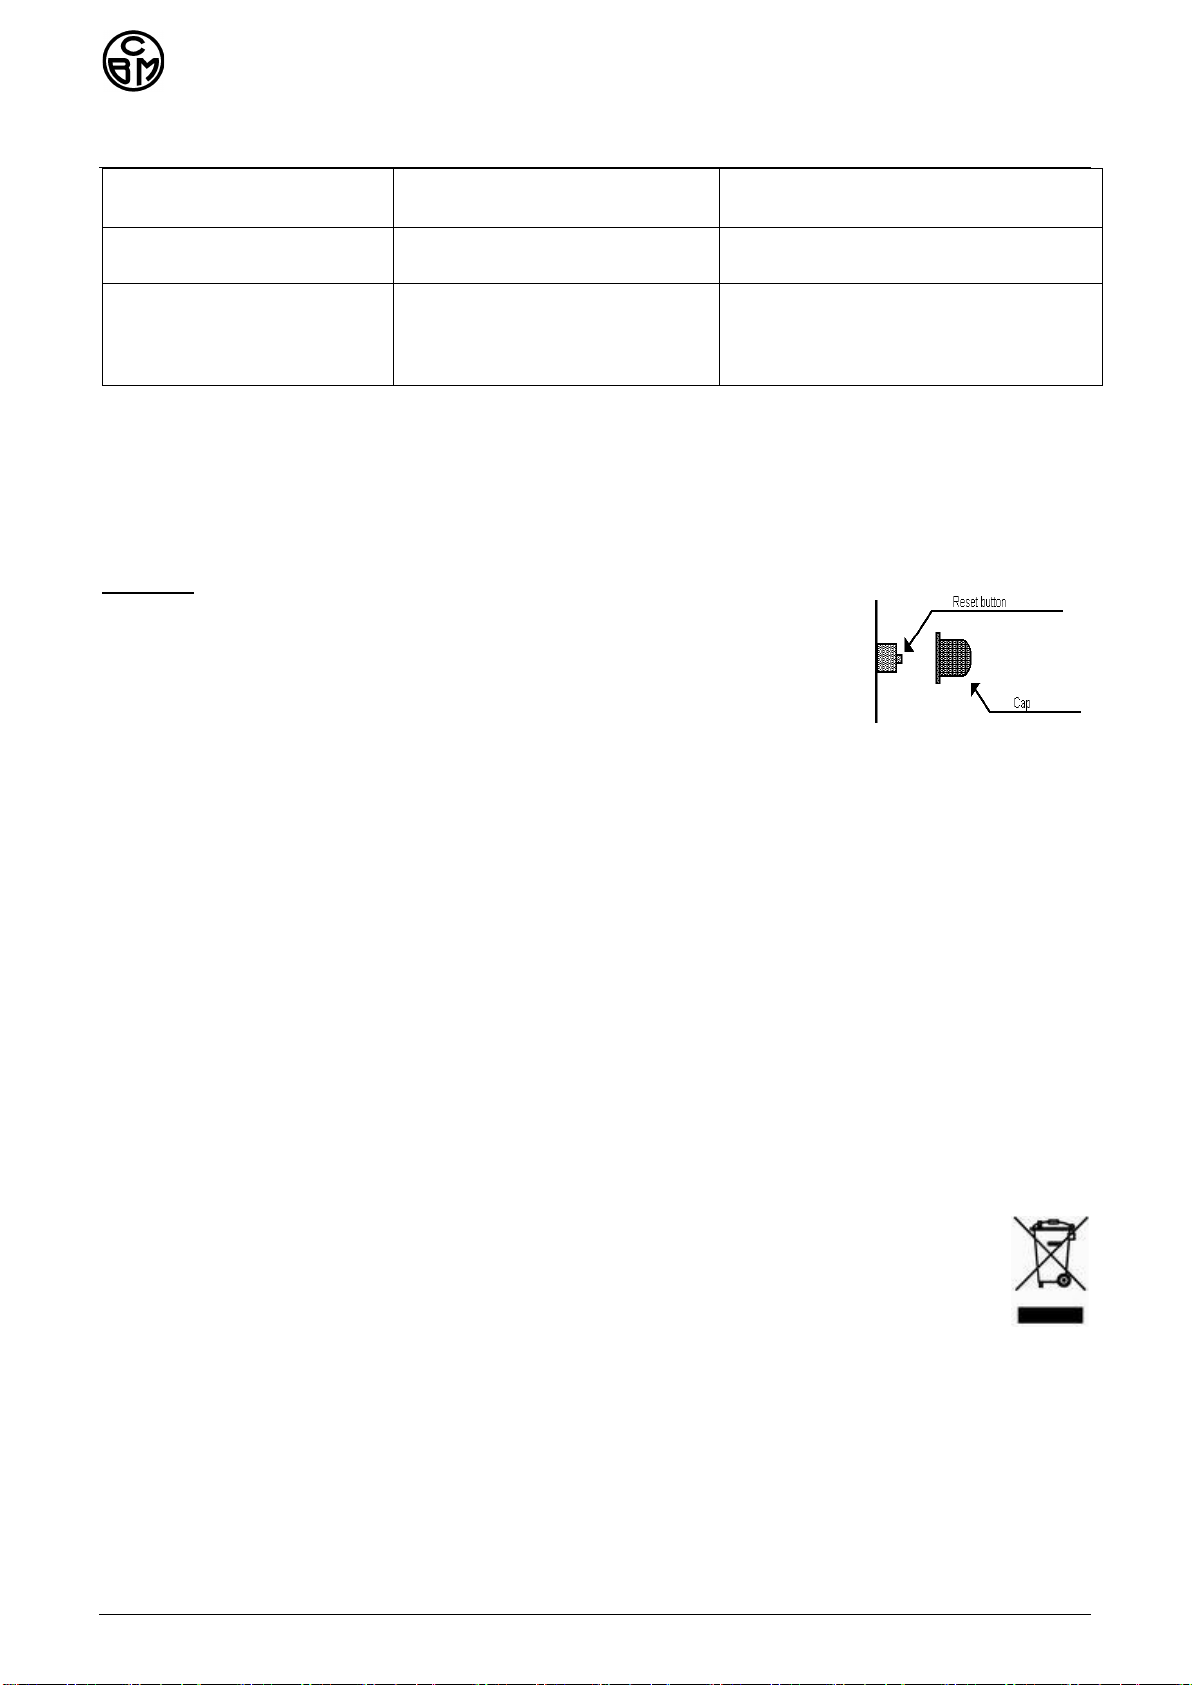
•(D) START Druckknopf
Über diesen Druckknopf erfolgt der Zyklusstart, wenn die Warnlampe (B) eingeschaltet
ist.
Der START Druckknopf dient auch als RESET Druckknopf: Während eines
Sterilisierungszyklus niedergedrückt, bewirkt er die Rückstellung des Zyklus. Bei
Alarmmeldung wird über den START Druckknopf der Alarm zurück gestellt.
•(E) Umschaltdruckknopf
Über diesen Druckknopf werden am Display (H) Temperatur und Sterilisierungszeit
angezeigt.
•(F) Kontrolllampe der Temperatur
Diese Kontrolllampe meldet, dass der am Display (H) abgelesene u/o eingestellte Wert
sich auf die Innentemperatur bezieht.
Achtung! Bei Temperaturen unter 140°C könnten die am Display angezeigten
Temperaturen von der reellen Temperatur abweichen.
•(G) Kontrolllampe der Zyklusdauer
Diese Kontrolllampe meldet, dass der am Display (H) abgelesene u/o eingestellte Wert
sich auf die Dauer der Sterilisierung, ohne Heizungszeit, bezieht.
Die blinkende Kontrolllampe meldet, dass die Zeit auf ENDLOS eingestellt worden ist.
•(H) Display
Am Display werden die Zyklusparameter angezeigt: Innentemperatur der
Sterilisierkammer, Sterilisierungstemperatur, eingestellte Temperatur.
Den Zyklus unterbrechen, um die Zyklusdaten neu einzustellen.
•Die Temperatur kann zwischen 140 °C und 200°C eingestellt werden,
•Die Zeit kann zwischen 1 Minute und 600 Minuten bzw. auf ENDLOS eingestellt
werden.
Um die Zeit auf ENDLOS einzustellen, den Druckknopf +bis auf 600 niedergedrückt
halten, noch einige Sekunden warten. Sobald am Display die Schrift „INF“ angezeigt
wird, 3 Sekunden zwecks automatischer Speicherung warten.
Wird der Modus ENDLOS “INF” gewählt, dann blinkt die Kontrolllampe der Zeit
ununterbrochen.
Um die Zeit ENDLOS rückzustellen, die Taste ― niedergedrückt halten.
ACHTUNG, IST DIE ZYKLUSDAUER AUF ENDLOS EINGESTELLT, SO MUSS DAS
GERÄT VON HAND AUSGESCHALTET WERDEN.
Tasten
•(I) (L) Über diese Tasten wird die Einstellung von Temperatur und Sterilisierungszeit
geändert, deren Wert verringert bzw. gesteigert wird.
Wird die Taste einmal niedergedrückt, wenn der Apparat im Haltezustand
(eingeschaltete Kontrolllampe B) ist, so wird am Display der für Temperatur bzw. für
Sterilisierungsdauer eingestellte Wert angezeigt.
Der Wert kann über die Tasten ―oder geändert werden.
Sobald der gewünschte eingestellte Wert erreicht wird, 3 Sekunden zwecks
automatischer Erfassung warten.

C.B.M. S.r.l. Medical Equipment - Via Castello 10, 26038 Torre dé Picenardi (CR) - Italy
Rev. 10 –18/02/2019 4111_Anleitung.docx pag. 10 di 15
Wird eine dieser Tasten während des Zyklus niedergedrückt, so werden am Display die
eingestellten Werte für Temperatur und Zykluszeit angezeigt, sie können aber nicht
geändert werden.
•(M) Heizkontrolllampe
Diese Kontrolllampe meldet das Einschalten der Heizwiderstände des Apparats.
Gebrauchsanweisungen
ACHTUNG: Vor dem ersten Gebrauch des Heißluftsterilisators einen Sterilisierungszyklus
ohne Ladung durchführen..
Vor dem Einstellen von Sterilisierungstemperatur und –dauer die Tabelle
“Sterilisierungszyklen” auf. S. 17 konsultieren .
1. Den Stecker in die Steckdose zu 230V einstecken und den Hauptschalter (A) betätigen.
Die elektronische Karte führt einen raschen Selbsttest durch und zeigt am Display die
Firmware Version, danach schaltet sich die gelbe Kontrolllampe (B) ein und meldet, dass
das Gerät betriebsbereit ist..
2. Das zu sterilisierende Material in den Heißluftsterilisator legen und die Tür schließen
(während des Zyklus darf die Tür auf keinen Fall geöffnet werden.
3. Die gewünschte Temperatur und Sterilisierungsdauer einstellen,
•Einstellen der Temperatur: Bei eingeschalteter Kontrolllampe der Temperatur die Tasten
―oder +drücken. Wird die Taste gedrückt gehalten, so wird der eingestellte Wert am
schnellsten verringert od. gesteigert..
Sobald der eingestellte Wert erreicht wird, 3 Sekunden warten, damit der Wert gespeichert
wird.
•Einstellen der Sterilisierungsdauer: Auf den Umschaltdruckknopf drücken. Die Timer-
Kontrolllampe schaltet sich ein. Den Vorgang wiederholen, um die Zeit anzuzeigen
und zu ändern , 3 Sekunden warten, damit der Wert gespeichert wird.
4. Nach der Einstellung der Parameter über “START” den Sterilisierungszyklus starten.
5. Die gelbe Kontrolllampe (B) schaltet sich aus und nach einigen Minuten erreicht das
Sterilisierungsgerät den eingestellten Temperaturwert, der für die gewünschte Zeit
unverändert bleibt..
6. Am Display wird die Innentemperatur der Sterilisierungskammer angezeigt bzw. über den
Druckschalter die bis zum Zyklusende nötige Zeit.
7. Am Ende des Zyklus stoppt das Gerät automatisch, am Display wird END angezeigt, was
die erfolgte Durchführung des kompletten Zyklus meldet.
WICHTIG: Der Zyklus gilt nur dann als vollständig durchgeführt, wenn die Schrift END
am Display erscheint.
8. Den Hauptschalter (A) abschalten, wenn der Sterilisierapparat nicht benutzt wird.

C.B.M. S.r.l. Medical Equipment - Via Castello 10, 26038 Torre dé Picenardi (CR) - Italy
Rev. 10 –18/02/2019 4111_Anleitung.docx pag. 11 di 15
ACHTUNG: IST DIE ZYKLUSDAUER AUF ENDLOS EINGESTELLT, SO KANN DER
HEISSLUFTSTERILISATOR NUR VON HAND ABGESCHALTET WERDEN.
STERILISATIONSZYKLEN
Temperatur
Zeit in Minuten
180°C
*45'
170°C
*75' (1h 15’)
160°C
*120'
* Empfohlene Mindestdauer
REINIGUNG
Achtung: Bevor die Reinigung vorgenommen oder ein beliebiges Teil des Geräts
abgeschraubt wird, muss sichergestellt werden, dass das Gerät nicht am Stromnetz
angeschlossen ist.
Die Sterilisationskammer und die Gitter mindestens einmal pro Woche reinigen.
Dazu sind ausschließlich neutrale Reinigungsmittel zu verwenden.
Keine scheuernden Schwämme oder Materialien benutzen, da diese die Oberflächen
schädigen können.
Die Verwendung von Reinigungs- und Desinfektionsmitteln bzw. sonstigen Flüssigkeiten,
die Chloride oder Trichloräthylen („Tri“) enthalten, muss vermieden werden, da sie den
Inoxstahl angreifen. Bei versehentlichem Kontakt empfiehlt sich eine sofortige Reinigung.
TABELLE DER ALARME
Display / Störung
Ursache
Eingriff
AL 1 –Alarm bei Bruch
der Widerstände
1) Übertriebene Ladung
2) Bruch der Widerstände
1) Ladung verringern und Zyklus
wiederholen
2) Den defekten Widerstand
austauschen
AL 2 –Alarm
Temperaturrückgang
Bruch der Widerstände
Den defekten Widerstand
austauschen
AL 3 –Alarm
Übererwärmung
Ablesefehler
Die Tür unverzüglich öffnen
Defekte Karte austauschen
AL 4 –Defekte Sonde
Ablesefehler
Defekte Karte austauschen
AL 5 –Spannungslosigkeit
Spannung fehlt
Zyklus wiederholen

C.B.M. S.r.l. Medical Equipment - Via Castello 10, 26038 Torre dé Picenardi (CR) - Italy
Rev. 10 –18/02/2019 4111_Anleitung.docx pag. 12 di 15
Schaltet sich nicht ein
1) Sicherheitsthermostat
ausgelöst
2) Sicherungen gebrochen
3) Defekte Karte
1)Reset-Druckknopf des
Thermostats drücken
2) Sicherungen austauschen
3) Karte austauschen
SICHERHEIT: Das Sterilisiergerät ist mit einem
Sicherheitsthermostaten ausgerüstet, der anspricht und das Gerät
abschaltet, falls die Temperatur zu hoch ist. Um den Betrieb wieder
aufzunehmen, die Tür offen lassen und einige Minuten abwarten, bis
die Temperatur ausreichend abgesunken ist. Dann die Kappe
abnehmen und die Rückstelltaste des Thermostats betätigen, der sich seitlich am
Sterilisiert gerät befindet.
Garantie
Das vorliegende Gerät wurde in Konformität mit der EG- Richtlinie 93/42/EG „Medizinische
Vorrichtungen“ entwickelt und gebaut und die Fa. C.B.M. S.r.l. betrachtet sich als
verantwortlich für Sicherheit, Zuverlässigkeit und Leistungen, vorausgesetzt, dass eventuelle
Abänderungen oder Reparaturen durch von ihr zugelassenes Personal ausgeführt werden,
dass die Elektroanlage des Raums den IEC- Vorschriften entspricht und das Gerät gemäß
den vorliegenden Betriebsanweisungen eingesetzt wird.
Die Fa. C.B.M. leistet auf ihre Trockensterilisatoren eine Garantie von zwei (2) Jahr für
eventuelle Konstruktionsfehler oder Störungen der Komponenten, vorausgesetzt dass diese
nach Ermessen der Fa.C.B.M. nicht auf falschen Einsatz seitens derBediener zurückzuführen
sind.
Die Garantie gilt nicht für Verschleißteile, sowie für Reparaturen oder Ersatz von Teilen, die
von nicht durch C.B.M. zugelassenes Personal ausgeführt wurden.
Anweisungen Zur Entsorgung von Elektro –und Elektronik-Altgerate
Elektro –und Elektronik-Altgerate –Richtlinie 2012/19/UE
Das (oben dargestellte) Symbol an diesem Produkt weist darauf hin, dass dieses
Produkt nicht als normaler Haushaltsmüll, sondern als Sonderabfall entsorgt
werden soll.
Elektrische und elektronische Apparate können für Umwelt und Menschen
schädliche Stoffe enthalten, die bei Sonderabfalldeponien entsorgt werden sollen.
Das Gesetz bestraft strengstens diejenigen, die solche Abfälle rechtswidrig entsorgen.
Nach abgelaufener Lebensdauer kann der Apparat dem Verkäufer zurückgegeben werden,
wenn man einen neuen bzw. ähnlichen kaufen will.

C.B.M. S.r.l. Medical Equipment - Via Castello 10, 26038 Torre dé Picenardi (CR) - Italy
Rev. 10 –18/02/2019 4111_Anleitung.docx pag. 13 di 15
Electrical data - Elektrische Angaben
2433
2432
power absorbed
Leistungsaufnahme
650 W
350 W
current absorbed
Stromaufnahme
3 A
1,6 A
voltage
Spannung
~ 230 V
frequency
Frequenz
50 / 60 Hz.
fuses
Sicherungen
type F 5x20 250V
6,3 A
3,15 A
A) Main switch –Hauptschalter
B) CPU card - CPU Karte
C) Heating element –Widerstand
D) Fuses - Sicherungen
E) Safety thermostat - Höchststrom-Thermostat

C.B.M. S.r.l. Medical Equipment - Via Castello 10, 26038 Torre dé Picenardi (CR) - Italy
Rev. 10 –18/02/2019 4111_Anleitung.docx pag. 14 di 15
Safety table
Apparatus
Dry sterilizer
Manufacturer
C.B.M. S.r.l.
via Castello n°10
26038 Torre de Picenardi
Cremona - Italy
Model
2432, 2433
Reference norm
CEI EN 61010-1
Data of plate:
Attached documentation
yes
Terminals
Protection ground wire
yes
equipotential
no
Functional ground wire
no
Feeding plug
Nominal current
10A
Disassembled type
no
Security mark
yes
Feeding cable
separable
Fuses
Open to outside
yes
Type
F
Characteristics
Class equipment
I
Installation category
II
Pollution degree
1
Security mark
no
Self-certification
yes
Max. operating altitude
2000 m.
Operative environment temperature
5°C up to 40°C
Max relative humidity in the operative environment
Max 93 %
Storage conditions
0°C ~ + 50°C

C.B.M. S.r.l. Medical Equipment - Via Castello 10, 26038 Torre dé Picenardi (CR) - Italy
Rev. 10 –18/02/2019 4111_Anleitung.docx pag. 15 di 15
DICHIARAZIONE DI CONFORMITÀ
DECLARATION OF
CONFORMITY
La C.B.M. S.r.l., Via Castello 10, 26038
Torre de Picenardi (CR) Italy, nella persona
del suo Legale Rappresentante ed
Amministratore Sig. Carlo Busatti sotto la
propria responsabilità dichiara che la
seguente apparecchiatura:
We: C.B.M. S.r.l., Via Castello 10, 26038
Torre de Picenardi (CR) Italy, in the person of
its Administrator and Legal Representative
Mr. Carlo Busatti declare on our own
responsibility, that the following electrical
equipment:
Sterilizzatore a secco
Dry sterilizer
REF
Articolo
Article
2432
2433
SN
Numero di serie
Serial Number
Costruito in data:
Manufactured on date:
soddisfano le disposizioni applicabili delle
seguenti direttive e loro successive modifiche:
meet the provisions of following Directives which
apply to them and its modifications:
- Norma EN 61010-1:2011 “Sicurezza
elettrica”
-Standard EN 61010-1:2011 “Electrical safety”
- Direttiva 93/42/CE “Dispositivi medici” e
s.m.i., classe IIb.
-Directive 93/42/CE “Medical Devices” and
following amendments, class IIb.
-Direttiva 2014/35/UE “Bassa Tensione”
-Directive 2014/35/UE “Low Tension”
-Direttiva 2014/30/UE “Compatibilità
elettromagnetica”
-Directive 2014/30/UE “Electro-Magnetic
Compatibility”
NOTIFY BODY: ENTE CERTIFICAZIONE MACCHINE
Table of contents
Languages:
Other Raue Laboratory Equipment manuals
Popular Laboratory Equipment manuals by other brands

Live Photonic
Live Photonic Sequencer LPS-200H user manual

Julabo
Julabo 200F Original operating manual

Globe Scientific
Globe Scientific GCC-MP quick start guide

Phcbi
Phcbi MBR-305GR operating instructions

Prior
Prior PureFocus850 user manual

Parker Laboratories
Parker Laboratories Thermasonic Gel Warmer user manual