RCA 23200 User manual

Cell Docking System
with 2.4 GHz Cordless Handset
User’s Guide
Please read this manual
before operating product
for the first time.
Model 23200

2
Equipment Approval Information
Your telephone equipment is approved for connection to the Public Switched Telephone Network and
is in compliance with parts 15 and 68, FCC Rules and Regulations and the Technical Requirements for
Telephone Terminal Equipment published by ACTA.
1 Notification to the Local Telephone Company
On the bottom of this equipment is a label indicating, among other information, the US number and Ringer
Equivalence Number (REN) for the equipment. You must, upon request, provide this information to your
telephone company.
The REN is useful in determining the number of devices you may connect to your telephone line and still
have all of these devices ring when your telephone number is called. In most (but not all) areas, the sum of
the RENs of all devices connected to one line should not exceed 5. To be certain of the number of devices
you may connect to your line as determined by the REN, you should contact your local telephone company.
A plug and jack used to connect this equipment to the premises wiring and telephone network must comply
with the applicable FCC Part 68 rules and requirements adopted by the ACTA. A compliant telephone cord
and modular plug is provided with this product. It is designed to be connected to a compatible modular jack
that is also compliant. See installation instructions for details.
Notes
• This equipment may not be used on coin service provided by the telephone company.
• Party lines are subject to state tariffs, and therefore, you may not be able to use your own telephone
equipment if you are on a party line. Check with your local telephone company.
• Notice must be given to the telephone company upon permanent disconnection of your telephone from
your line.
• If your home has specially wired alarm equipment connected to the telephone line, ensure the installation
of this product does not disable your alarm equipment. If you have questions about what will disable alarm
equipment, consult your telephone company or a qualified installer.
2 Rights of the Telephone Company
Should your equipment cause trouble on your line which may harm the telephone network, the telephone
company shall, where practicable, notify you that temporary discontinuance of service may be required.
Where prior notice is not practicable and the circumstances warrant such action, the telephone company
may temporarily discontinue service immediately. In case of such temporary discontinuance, the telephone
company must: (1) promptly notify you of such temporary discontinuance; (2) afford you the opportunity
to correct the situation; and (3) inform you of your right to bring a complaint to the Commission pursuant
to procedures set forth in Subpart E of Part 68, FCC Rules and Regulations.
The telephone company may make changes in its communications facilities, equipment, operations or
procedures where such action is required in the operation of its business and not inconsistent with FCC
Rules and Regulations. If these changes are expected to affect the use or performance of your telephone
equipment, the telephone company must give you adequate notice, in writing, to allow you to maintain
uninterrupted service.
Important Information

3
Interference Information
This device complies with Part 15 of the FCC Rules. Operation is subject to the following two conditions: (1) This
device may not cause harmful interference; and (2) This device must accept any interference received, including
interference that may cause undesired operation.
This equipment has been tested and found to comply with the limits for a Class B digital device, pursuant to Part
15 of the FCC Rules. These limits are designed to provide reasonable protection against harmful interference in a
residential installation.
This equipment generates, uses, and can radiate radio frequency energy and, if not installed and used in
accordance with the instructions, may cause harmful interference to radio communications. However, there is
no guarantee that interference will not occur in a particular installation.
If this equipment does cause harmful interference to radio or television reception, which can be determined by
turning the equipment off and on, the user is encouraged to try to correct the interference by one or more of the
following measures:
• Reorient or relocate the receiving antenna (that is, the antenna for radio or television that is “receiving”
the interference).
• Reorient or relocate and increase the separation between the telecommunications equipment and receiving
antenna.
• Connect the telecommunications equipment into an outlet on a circuit different from that to which the
receiving antenna is connected.
If these measures do not eliminate the interference, please consult your dealer or an experienced radio/television
technician for additional suggestions. Also, the Federal Communications Commission has prepared a helpful booklet,
“How To Identify and Resolve Radio/TV Interference Problems.” This booklet is available from the U.S. Government
Printing Office, Washington, D.C. 20402. Please specify stock number 004-000-00345-4 when ordering copies.
Licensing
Licensed under US Patent 6,427,009
Hearing Aid Compatibility (HAC)
This telephone system meets FCC standards for Hearing Aid Compatibility.
US NUMBER IS LOCATED ON THE CABINET BOTTOM
REN NUMBER IS LOCATED ON THE CABINET BOTTOM
FCC RF Radiation Exposure Statement
This equipment complies with FCC RF radiation exposure limits set forth for an uncontrolled
environment. This equipment should be installed and operated with a minimum distance of 20
centimeters between the radiator and your body. This transmitter must not be co-located or operated
in conjunction with any other antenna or transmitter.
For body worn operation, this phone has been tested and meets the FCC RF exposure guidelines
when used with the belt clip supplied with this product. Use of other accessories may not ensure
compliance with FCC RF exposure guidelines.
Important Information

4
Table of Contents
EQUIPMENT APPROVAL INFORMATION .....................2
INTERFERENCE INFORMATION .................................3
HEARING AID COMPATIBILITY (HAC) ....................3
FCC RF RADIATION EXPOSURE STATEMENT ............3
INTRODUCTION ...................................................6
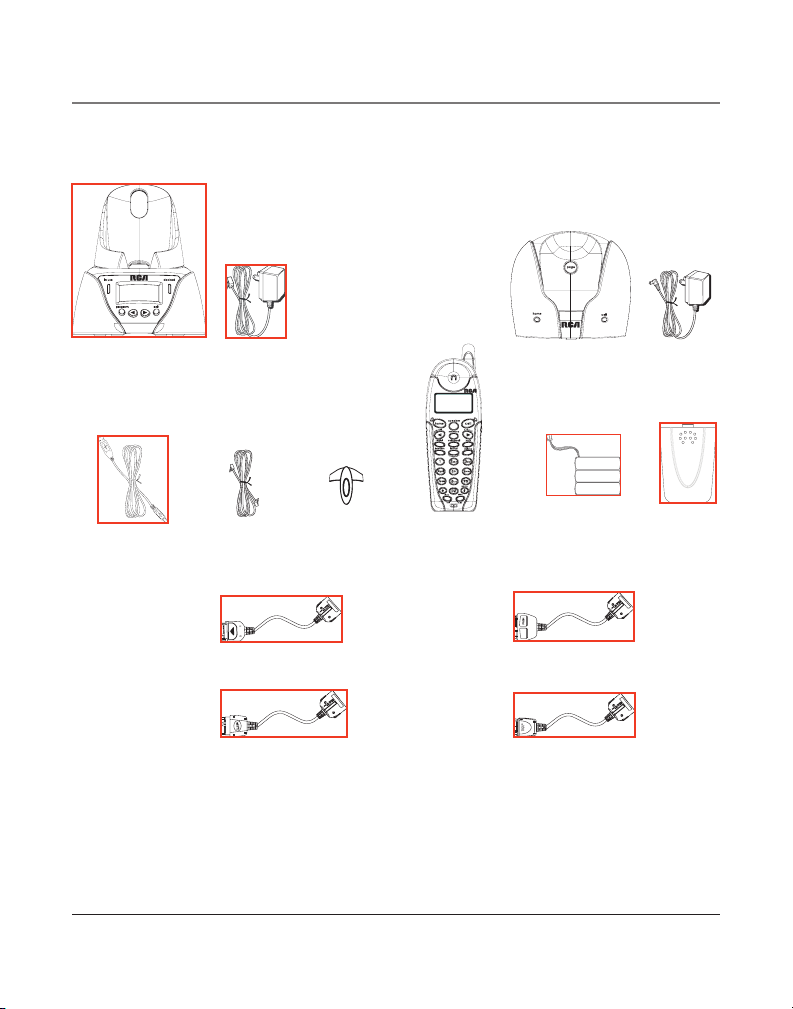
PARTS CHECKLIST ...............................................7
TELEPHONE JACK REQUIREMENTS ...........................8
INSTALLATION ....................................................8
INSTALLATION GUIDELINES ...................................8
INSTALLING THE BASE UNIT ................................9
CONNECTING THE AC (ELECTRICAL) POWER ..........9
CONNECTING THE TELEPHONE LINE .......................9
INSTALLING THE HANDSET BATTERY ................... 10
INSTALLING THE DOCKING STATION ....................11
CONNECTING YOUR CELL PHONE .........................11
DOCKING STATION LAYOUT .................................11
HANDSET LAYOUT ........................................... 12
BASE LAYOUT ................................................. 12
PROGRAMMING THE DOCKING STATION ................ 13
PROGRAMMING FUNCTIONS ..................................13
SET LANGUAGE .................................................... 13
RESET TIMER (CELL DOCKING STATION CALL TIMER) 14
REGISTER DOCKING STATION ................................. 14
PROGRAMMING THE HANDSET ........................... 15
STANDBY SCREEN ................................................. 15
PROGRAMMING FUNCTIONS ..................................15
ROOM MONITOR .................................................. 15
HANDSET SETUP ................................................... 16
Set Language .....................................................16
Handset Name ..................................................16
Ringer Volume ..................................................17
Ringer Tone ........................................................17
Set Voicemail .....................................................18
Set Cell (Ringer) Tone .....................................18
Set Cell (Ringer) Volume ................................19
VIP MELODY ................................................. 19
Storing VIP Melody ................................. 19
Changing a Stored VIP Melody Record 20
Reviewing And Deleting Stored VIP
Melody Record ........................................ 20
Area Code ........................................................... 21
Key Tone ..............................................................21
Handset Registration ......................................21
De-Registration ....................................... 22
Global De-registration ........................... 23
Default Setting .................................................23
DOCKING STATION OPERATION ........................... 24
INDICATORS .......................................................... 24
CALL TIMER ......................................................... 24
CHARGING THE CELL PHONE ................................. 24
UPGRADING THE SYSTEM SOFTWARE ..................... 24
TELEPHONE OPERATION .................................... 25
INDICATORS .......................................................... 25
MAKING CALLS .................................................... 25
ANSWERING CALLS .............................................. 26
CALL TIMER ......................................................... 26
PRE-DIALING .......................................................26
AUTO STANDBY .................................................... 26
RINGER HI/LOW/OFF ....................................... 26
FLASH/CALL WAITING .......................................... 27
LAST NUMBER REDIAL .......................................... 27
EXIT ....................................................................27
PAGE ................................................................... 27
PAGING FROM THE BASE/GROUP PAGE ................. 28
HOLD .................................................................. 28
MUTE .................................................................. 28
RECEIVER VOLUME CONTROL ................................ 28
SPEAKERPHONE OPERATION ............................... 28
Answering a Call with the Handset ...........28
Making a Call with the Handset .................28
Making a Call with the Handset through
the Cell Network ..............................................29

5
Table of Contents
SEE MARKING ON BOTTOM / BACK OF PRODUCT
RISK OF ELECTRIC SHOCK
DO NOT OPEN
WARNING: TO
PREVENT FIRE OR
ELECTRICAL SHOCK
HAZARD, DO NOT
EXPOSE THIS
PRODUCT TO RAIN
OR MOISTURE.
THE LIGHTNING
FLASH AND ARROW
HEAD WITHIN THE
TRIANGLE IS A
WARNING SIGN
ALERTING YOU OF
“DANGEROUS
VOLTAGE” INSIDE
THE PRODUCT.
CAUTION: TO REDUCE THE
RISK OF ELECTRIC SHOCK, DO
NOT REMOVE COVER (OR
BACK). NO USER
SERVICEABLE PARTS INSIDE.
REFER SERVICING TO
QUALIFIED SERVICE
PERSONNEL.
THE EXCLAMATION
POINT WITHIN THE
TRIANGLE IS A
WARNING SIGN
ALERTING YOU OF
IMPORTANT
INSTRUCTIONS
ACCOMPANYING
THE PRODUCT.
CAUTION:
INTERCOM OPERATION ...................................... 29
Making an Intercom Call ...............................29
Receiving an Intercom Call ...........................30
ADVANCED INTERCOM FEATURES ........................... 30
Receiving an Incoming Call During an
Intercom Call .....................................................30
Using Intercom with External Telephone
Calls ......................................................................30
Two-Way Calling ..............................................30
Three-Way Calling ...........................................31
TRANSFERRING EXTERNAL CALLS TO
OTHER HANDSETS .........................................31
MEMORY ...................................................... 32
STORING A NAME AND NUMBER IN MEMORY ....... 32
STORING THE LAST NUMBER DIALED ..................... 32
INSERTING A PAUSE IN THE DIALING SEQUENCE (OF A
STORED NUMBER) ...........................................33
REVIEWING RECORDS STORED IN MEMORY ........... 33
CHANGING RECORDS STORED IN MEMORY ............ 33
DELETING RECORDS STORED IN MEMORY .............. 33
DIALING A NUMBER FROM MEMORY .................... 33
CHAIN DIALING FROM MEMORY ........................... 34
CALLER ID (CID) .......................................... 34
CID ERROR CODES .............................................. 35
RECEIVING CID RECORDS .................................... 35
STORING CID RECORDS (IN CALLER ID MEMORY) 35
REVIEWING CID RECORDS ................................... 35
STORING CID RECORDS IN INTERNAL MEMORY ..... 36
DIALING A CID NUMBER ..................................... 36
DELETING A CID RECORD .................................... 37
DELETING ALL CID RECORDS ............................... 37
CHANGING THE BATTERY ................................... 37
BATTERY SAFETY PRECAUTIONS ............................. 38
BELT CLIP AND OPTIONAL HEADSET .................... 38
CONNECTING THE BELT CLIP .................................38
CONNECTING OPTIONAL HEADSET TO THE HANDSET 38
DISPLAY MESSAGES ........................................ 39
HANDSET SOUND SIGNALS ................................ 40
TROUBLESHOOTING GUIDE ................................. 40
TELEPHONE SOLUTIONS .........................................40
CALLER ID SOLUTIONS ..................................... 42
BATTERY ....................................................... 42
GENERAL PRODUCT CARE ................................. 42
CAUSES OF POOR RECEPTION ............................ 43
SERVICE ........................................................ 43
LIMITED WARRANTY ........................................ 46

6
Introduction
Introduction
CAUTION: When using telephone equipment, there are basic safety instructions that should
always be followed. Refer to the IMPORTANT SAFETY INSTRUCTIONS provided with this product
and save them for future reference.
Congratulations on purchasing the RCA Cordless Phone Docking System. This system operates in the 2.4
GHz frequency range, and is unique to conventional cordless telephones. When the base is connected to
electrical power and a telephone line, you can place a fully-featured cordless handset anywhere electrical
power is available.
Features:
• Cell Phone Docking—which features upgradable software, connection cables to support a variety
of cell phone models, cell docking station charger and call timer
• 2.4 GHz digital spread spectrum technology
• Handset to Handset Intercom (with purchase of optional Model 23210A Handset with recharge cradle)
• 3-way Conference/Call Transfer
• Call Waiting and Caller ID Compatible
• VIP Melody (different ring tones available for cell and home—or land line—calls)
• Up to 50 Name and Number Memory Dialing
• Room Monitor Between Handset and Handset (with purchase of optional Model 23210A Handset
with recharge cradle)
• Expandable up to 3 handsets (with purchase of optional Model 23210A Handset with recharge cradle)
This telephone has been designed to be simple to use, however, you can reach its full potential more
quickly by taking a few minutes to read this Instruction Book. This telephone is a multifunction product
for use with Call Waiting and Caller ID services available from your local telephone company.
Your Caller ID Call Waiting phone allows you to:
• View the name and telephone number of a caller (Call Waiting Caller ID) while you are on the phone.
• Identify callers before you answer the phone.
• View the time and date of each incoming call.
• Record up to 40 Caller ID messages sequentially.
• Know who called while you are on the other line or when you were away.
• Screen unwanted calls, eliminate harassment from annoying calls, or to get prepared before
answering a call.
IMPORTANT: Because cordless phones operate on electricity, you should have at least one
phone in your home that isn’t cordless, in case the power in your home goes out.
IMPORTANT: In order to use all of the features of this telephone, you must subscribe to two
separate services available from your local telephone company: the standard Name/Number
Caller ID Service to know who is calling when the phone rings and Call Waiting Caller ID Service
to know who is calling while you are on the phone.

7
Connections & Setup
Parts Checklist
Make sure your package includes the items shown here.
Docking Station
Handset
Belt clip
(5-2661)
Line cord
Base AC power
adapter
(5-2648)
Base
Docking Station
AC power
adapter
(5-2674)
Handset Battery
(5-2670)
USB cable
(5-2675)
Battery
compartment
cover
cable for Motorola cell phones (5-2666)
cable for Nokia 14-pin cell phones (5-2664)
cable for Sony Ericsson cell phones (5-2662)
cable for Nokia 9-pin cell phones (5-2663)

8
Connections & Setup
Telephone Jack Requirements
To use this phone, you need an RJ11C type modular phone telephone jack,
which might look like the one pictured here, installed in your home. If you
don’t have a modular jack, call your local phone company to find out how to
get one installed.
Installation
INSTALLATION NOTE: Some cordless telephones operate at frequencies that may cause or
receive interference with nearby TVs, microwave ovens, and VCRs. To minimize or prevent such
interference, the base of the cordless telephone should not be placed near or on top of a TV,
microwave ovens, or VCR. If such interference continues, move the cordless telephone farther
away from these appliances. Certain other communications devices may also use the 2.4 GHz
frequency for communication, and, if not properly set, these devices may interfere with each
other and/or your new telephone. Typical devices that may use the 2.4 GHz frequency for
communication include wireless audio/video senders, wireless computer networks, multi-
handset cordless telephone systems, and some long-range cordless telephone systems.
• Never install telephone wiring during a lightning storm.
• Never install telephone jacks in wet locations unless the jack is specifically designed for
wet locations.
• Never touch non-insulated telephone wires or terminals, unless the telephone line has been
disconnected at the network interface.
• Use caution when installing or modifying telephone lines.
• Temporarily disconnect any equipment connected to the phone such as faxes, other phones,
or modems.
Installation Guidelines
• Install telephone near both a telephone (modular) jack and an electrical power outlet.
• Avoid sources of noise, such as a window by a busy street, and electrical noise, such as motors,
microwave ovens, and fluorescent lighting.
• Avoid heat sources, such as heating air ducts, heating appliances, radiators, and direct sunlight.
• Avoid areas of excessive moisture or extremely low temperature.
• Avoid dusty locations.
• Avoid other cordless telephones or personal computers.
Modular
telephone
line jack
Wall plate

9
Connections & Setup
Installing the Base Unit
Choose the best location to install the base, it should be placed on a level surface such as a desk or
table top.
Connecting the AC (Electrical) Power
Plug one end of the base power adapter cord into the power jack on the bottom of the base and the
other end into an electrical outlet.
CAUTION: Use only the ATLINKS USA, Inc. AC power adapter 5-2648 that came with this unit.
Using other power supplies may damage the unit.
NOTE: When the handset is placed in the cradle, the HOME indicator on the base illuminates to
indicate the handset battery is charging.
Connecting the Telephone Line
On the base, plug one end of the telephone line cord into the jack on the bottom of the base and the
other end into a modular wall phone jack.

10
Installing the Handset Battery
NOTE: You must connect the handset battery before use.
1. Push down on the top of the battery compartment cover (located on the back of each handset)
and remove the cover.
2. Plug the battery pack cord into the jack inside the battery compartment.
NOTE: It is important to maintain the polarity (black and red wires) to the jack inside the
compartment. To ensure proper battery installation, the connector is keyed and can be inserted
only one way.
3. Insert the battery pack.
4. Close the battery compartment by pushing the door up until it snaps into place.
5. Place the handset in the charging cradle.
Allow handset to charge for 16 hours prior to first use. If you don’t properly charge the
handset, battery performance is compromised.
NOTE: If the battery is not properly installed in the handset, or if the battery pack is not properly
connected to the jack inside the battery compartment. “NO BATTERY” shows in the display when
the handset is placed in the charging cradle.
Installing the Docking Station
NOTE: Prior to installing the docking station, make sure the base unit has been installed.
Choose the best location to install the docking station, it should be placed on a level surface such as
a desk or table top.
1. Plug one end of the docking station power adapter cord into the power jack on the back of the
docking station and the other end into an electrical outlet. Docking station display will show
DOCKING STATION REGISTERED after a few seconds.
BLACK WIRE
RED WIRE
BATTERY
PRESS DOWN
FIRMLY
Connections & Setup

11
CAUTION: Use only the ATLINKS USA, Inc. AC power adapter 5-2674 that came with this unit.
Using other power supplies may damage the unit.
Connecting Your Cell Phone
1. Turn on your cell phone.
2. Select the correct connection cable for the cell phone model to be docked to system.
3. Tip back the cradle to access the cable compartment on top of docking station.
4. Plug one end of the cable to the to the connector inside the compartment and the other end to
your cell phone.
5. The docking station system features automatic cell phone registration. The docked indicator will
illuminate after the cell phone has been successfully connected and registered. READY shows on
the display and the unit is ready to use.
NOTE: For a list of cell phones compatible with the docking station, please refer to the model number
compatibility information printed on the back of the gift box or visit the website: www.rca.com
Docking Station Layout
in use
(indicator)
exit
(button)
docked
(indicator)
display
program
(button)
cell phone
cradle
Connections & Setup

12
format/conference
(button)
delete
(button)
intercom
(button)
redial
(button)
home
(button)
hold
(button)
CID/vol
(button)
cell
(button)
voicemail
(button)
CID/vol
(button)
memory
(button)
speaker
(button)
#pause
(button)
prog/mute
(button)
flash/exit
(button)
display
Connections & Setup
cell
(indicator)
home
(indicator)
page
(button)
Handset Layout
Base Layout

13
Programming the Docking Station
Programming Functions
The docking station uses a menu structure to give you access to all of the built-in features. You may
program the following items in main menu: Set Language, Reset Timer, and Register Docking Station.
NOTE: You may press the exit button at any time to exit the features menu.
Set Language
1. Press the program button on the docking station to go to main menu.
2. Use the or buttons to scroll to SET LANGUAGE.
3. Press the program button to enter the SET LANGUAGE menu, SET LANGUAGE ENG FRA ESP
shows in the display.
4. Use the or buttons to scroll to your selection.
5. Press the program button to save your selection. SET LANGUAGE OK! will show in the display.
SET LANGUAGE
�ENG FRA ESP

14
Programming the Docking Station
REG DOC STATION
YES �NO
Timer (Displaying and Resetting the Cell Docking Station Call Timer)
1. Use the or buttons to scroll to TIMER.
2. Press the program button to enter the TIMER menu, RESET YES NO shows in the display.
3. Use the or buttons to scroll to your selection.
4. Press the program button to save your selection. If you choose to reset timer, OK! will show in
the display.
Register Docking Station
1. Use the or buttons to scroll to REG DOC STAT’N
2. Press the program button to enter the REG DOC STAT’N menu, REG DOC STATION YES NO
shows in the display.
RESET YES �NO
99 59:59
3. Use the or buttons to scroll to your selection.
4. Press the program button to save your selection. If you choose to register, PRESS AND HOLD
BASE PAGE KEY will show in the display.
5. Press and hold page button on base until DOCKING STATION REGISTERED shows in the display.

15
Programming the Handset
Standby Screen
The handset displays the user name (if entered) and handset number.
USER NAME
HANDSET X
Programming Functions
The system uses a menu structure to give you access to all of the built-in features. You may program
the following items in main menu: Room Monitor, Handset Setup.
Room Monitor
1. Make sure the cordless handset is OFF (not in talk mode).
2. Press the prog/mute button to go to the main menu.
�ROOM MONITOR
HANDSET SETUP
3. Press the CID/vol orbuttons to scroll to ROOM MONITOR.
4. Press prog/mute button to enter ROOM MONITOR menu, ROOM MONITOR EXTENSION ? shows in
the display.
5. Use the touch tone pad to enter the handset number to be monitored, either 1, 2, or 3.
6. The receiving handset will turn on the microphone and the originating handset will turn on the
earpiece to monitor sound from the receiving handset.
NOTE: For room monitoring mode to work, the originating handset must NOT be on the cradle.
NOTE: While in room monitoring mode, the handsets will emit an alert tone approximately every
5 seconds if there is an incoming call. You may press the home button to quit room monitor and
answer the call.
NOTE: While in room monitoring mode, the originating handset can be switched to monitor by
speaker mode by pressing the speaker button once. Switch back to earpiece by pressing the home
button once.
NOTE: Press the flash/exit button on the handset to exit room monitor mode.
Programming the Handset

16
Programming the Handset
Handset Setup
You may program the following items:
Language, Handset Name, Ringer Volume, Ringer Tone, Voicemail, Cell Ringer Tone, Cell Ringer
Volume, VIP Melody, Key Tone, Area Code, Registration, Deregistration and Default Setting.
During programming, you may press the flash/exit button at any time to exit the menu and return
to the sub-menu.
Set Language
1. Make sure the cordless handset is OFF (not in talk mode).
2. Press the prog/mute button to go to the main menu.
3. Press CID/vol orbuttons to scroll to HANDSET SETUP.
4. Press prog/mute button to confirm.
5. Press the CID/vol orbuttons to scroll to the SET LANGUAGE menu.
6. Press prog/mute button to enter the menu. SET LANGUAGE 1ENG 2FRA 3ESP shows in
the display.
7. Use the touch tone pad on the handset to select 1ENG, 2FRA, 3ESP, or use the CID/vol
orbuttons to scroll to the desired language. “1ENG” is the default setting.
8. Press the prog/mute button to save your selection. You will hear a confirmation tone and the
selected language shows in the display.
Handset Name
1. Make sure the cordless handset is OFF (not in talk mode).
2. Press the prog/mute button to go to the main menu.
3. Press CID/vol orbuttons to scroll to HANDSET SETUP.
4. Press prog/mute button to confirm.
5. Press the CID/vol orbuttons button to scroll to the HANDSET NAME menu.
6. Press prog/mute button to enter the menu. HANDSET NAME shows in the display.
7. Use the touch-tone pad to enter a name (up to 15 characters). More than one letter is stored in
each of the number keys. For example, to enter Bill Smith, press the 2 key twice for the letter
B. Press the 4 key 3 times for the letter I. Press the 5 key 3 times for the letter L. Press the 5 key
3 times for the second letter L, and press the 1 key to insert a space between the first and last
name. Press the 7 key 4 times for the letter S; press the 6 key once for the letter M; press the 4
key 3 times for the letter I; press the 8 key for the letter T; press the 4 key twice for the letter H.
NOTE: If you make a mistake, use the delete button to backspace and delete one character
at a time.
8. Press the prog/mute button to save your name. You will hear a confirmation tone and the
handset name shows in the display.

17
Programming the Handset
Ringer Volume
There are two ways to adjust the ringer volume.
Method 1:
1. Make sure the cordless handset is OFF (not in talk mode).
2. Press the #PAUSE button to display SET RINGER 1HI 2LOW 3OFF.
3. Use the touch tone pad on the handset to select 1, 2 or 3, or use the CID/vol orbuttons to
scroll to your selection. “1HI” is the default setting.
4. Press #PAUSE button again to save and display the new selection for a few seconds.
Method 2:
1. Make sure the cordless handset is OFF (not in talk mode).
2. Press the prog/mute button to go to the main menu.
3. Press CID/vol orbuttons to scroll to HANDSET SETUP.
4. Press prog/mute button to confirm.
5. Press the CID/vol orbuttons to scroll to the RINGER VOLUME menu.
6. Press prog/mute button to enter the menu. SET RINGER 1HI 2LOW 3OFF shows in the display.
7. Use the touch tone pad on the handset to select 1, 2 or 3, or use the CID/volorbuttons
button to scroll to your selection. “1HI” is the default setting.
8. Press the prog/mute button to save your selection. You will hear a confirmation tone and the
new volume setting shows in the display.
NOTE: If you turn the ringer OFF, the ringer off icon shows in the display.
Ringer Tone
You may choose from ten different ringer tones and ten different melodies.
1. Make sure the cordless handset is OFF (not in talk mode).
2. Press the prog/mute button to go to the main menu.
3. Press CID/vol orbuttons to scroll to HANDSET SETUP.
4. Press prog/mute button to confirm.
5. Make sure the ringer is turned on. See Ringer Volume section, or On/Off section.
6. Press the CID/volorbuttons to scroll to the RINGER TONE menu.
7. Press prog/mute button to enter the menu. SET RINGER TONE 01 shows in the display. “01” is
default setting.
8. Use the CID/vol orbuttons to scroll to the desired setting (1 through 20). You will hear a
sample of the ringer tone/melody you select.
9. Press the prog/mute button to save your selection. You will hear a confirmation tone and the
selected ringer tone shows in the display.

18
Programming the Handset
Set Voicemail
This feature enables you to access your cell phone voicemail service with the touch of a button using
the cordless handset.
1. Make sure the cordless handset is OFF (not in talk mode).
2. Press the prog/mute button to go to the main menu.
3. Press CID/vol orbuttons to scroll to HANDSET SETUP.
4. Press prog/mute button to confirm.
5. Press the CID/vol orbuttons to scroll to the SET VOICEMAIL menu.
6. Press prog/mute button to enter the menu. ENTER TEL NUMBER shows in the display.
7. Use the touch tone pad on the handset to enter the number you would normally dial to reach
your cell phone voicemail service provider.
8. Press the prog/mute button to save your number. You will hear a confirmation tone and it
returns to Handset Setting menu.
After programming is complete simply press the Voicemail button on the handset and it will
automatically dial the number you have entered.
Set Cell Tone
You may choose from ten different ringer tones and ten different melodies.
1. Make sure the cordless handset is OFF (not in talk mode).
2. Press the prog/mute button to go to the main menu.
3. Press CID/vol orbuttons to scroll to HANDSET SETUP.
4. Press prog/mute button to confirm.
5. Press the CID/volorbuttons to scroll to the CELL RING TONE menu.
6. Press prog/mute button to enter the menu. SET CELL TONE 11 shows in the display. 11 is default
setting.
SET CELL TONE
11
7. Use the CID/vol orbuttons to scroll to the desired setting (1 through 20). You will hear a
sample of the ringer tone/melody you select.
8. Press the prog/mute button to save your selection. You will hear a confirmation tone and the
selected ringer tone shows in the display.

19
Programming the Handset
SET CELL VOLUME
�1HI 2LOW 3OFF
7. Use the touch tone pad on the handset to select 1, 2 or 3, or use the CID/volorbuttons
button to scroll to your selection. “1HI” is the default setting.
8. Press the prog/mute button to save your selection. You will hear a confirmation tone and the
new volume setting shows in the display.
VIP MELODY
This features allow you to assign a specific melody to someone you want to get your attention
when the person calls. When a VIP melody is assigned and that person calls, the unit rings the
normal ring for the first ring and then follows with VIP melody ring. You may choose from ten
different polyphonic melodies and may store up to 10 VIP records.
NOTE: This feature ONLY works when the following conditions are met.
1. You have subscribed to Caller ID.
2. You have your Caller ID record transferred to the memory. (Refer to Storing CID Records in Internal
Memory). NO USER MEMORY will show in display to remind the user to do CID transfer first.
Storing VIP Melody
1. Make sure the cordless handset is OFF (not in talk mode).
2. Press the prog/mute button to go to the main menu.
3. Press CID/vol orbuttons to scroll to HANDSET SETUP.
4. Press prog/mute button to confirm.
5. Press the CID/vol or buttons to scroll to VIP MELODY menu.
6. Press prog/mute button to enter menu. VIP 1 **EMPTY** shows in the display.
NOTE: If the memory location is occupied, the memory location and stored melody and number
appear in the display. If the memory location is not being used, then “EMPTY” shows in the display.
Set Cell Volume
1. Make sure the cordless handset is OFF (not in talk mode).
2. Press the prog/mute button to go to the main menu.
3. Press CID/vol orbuttons to scroll to HANDSET SETUP.
4. Press prog/mute button to confirm.
5. Press the CID/vol orbuttons to scroll to the CELL RING VOL menu.
6. Press prog/mute button to enter the menu. SET CELL VOLUME 1HI 2LOW 3OFF shows in the display.

20
Programming the Handset
7. Press CID/vol or buttons to select a VIP melody memory location (10 VIP locations) that does
not currently contain a record.
8. Press prog/mute button to display SELECT MEMORY.
NOTE: If the memory location does not contain any CID memory records and you are trying to
mark a specific record as VIP MELODY, then “NO USER MEMORY” will be displayed to alert the
user to do CID transfer first.
9. Press CID/vol or buttons to view the records from memory to be selected as VIP entry.
10. Press prog/mute button to display VIP MELODY 01.
11. Press CID/vol or buttons to select from melody 01 to melody 10 (a testing tone is
generated while making melody selection)
12. Press prog/mute button to confirm.
NOTE: If the desired number/record was previously stored in any one of the ten VIP melody
records, “DUPLICATE NUMBER” shows in the display.
Changing a Stored VIP Melody Record
Use the Storing VIP Melody procedure to change the number of a selected record and replace the old
phone number with new phone number.
When REPLACE VIP# ? shows in the display, you must press prog/mute button on the handset to
confirm replacement.
Reviewing And Deleting Stored VIP Melody Record
1. Make sure the cordless handset is OFF (not in talk mode).
2. Press the prog/mute button to go to the main menu.
3. Press CID/vol orbuttons to scroll to HANDSET SETUP.
4. Press prog/mute button to confirm.
5. Press the CID/vol or buttons to scroll to VIP MELODY menu.
6. Use the CID/vol orbuttons to scroll to the desired VIP Melody Record.
7. If you want to delete the information, press the delete button on the handset while the entry
displays. The display show DELETE VIP# ?.
8. Press the delete button again to confirm. You will hear a confirmation tone and VIP# DELETED
shows in the display.
Table of contents
Other RCA Docking Station manuals

RCA
RCA RC180i Instruction Manual

RCA
RCA RC180i User manual

RCA
RCA RP5512i User manual

RCA
RCA RC170i User manual

RCA
RCA RI503 - iPod Speaker Dock System User manual

RCA
RCA RP5512i User manual

RCA
RCA RC170i Instruction Manual

RCA
RCA Ri383 User manual

RCA
RCA RC130iBL User manual

RCA
RCA RC180i Instruction Manual