RCA 3-DVD Changer User manual

Owner’s Manual
Please read before using this equipment.
Complete 7-Piece 600-Watt Home
Theater Audio System
with 3-DVD Changer

2Read this First
ˆ
Read this First
This audio system is made and tested to meet exacting safety stan-
dards. It meets both UL and FCC requirements.
Warnings:
• This system employs a laser light beam. Only a qualified service
person should remove the cover or attempt to service this
device, due to possible eye injury.
• The use of controls, adjustments, or procedures other than those
specified herein might result in hazardous radiation exposure.
THE FCC WANTS YOU TO KNOW
This equipment has been tested and found to comply with the limits
for a Class B digital device, pursuant to Part 15 of the
FCC Rules
.
These limits are designed to provide reasonable protection against
harmful interference in a residential installation. This equipment gen-
erates, uses and can radiate radio frequency energy and, if not in-
stalled and used in accordance with the instructions, may cause
harmful interference to radio communications.
However, there is no guarantee that interference will not occur in a
particular installation. If this equipment does cause harmful interfer-
ence to radio or television reception, which can be determined by
turning the equipment off and on, the user is encouraged to try to cor-
rect the interference by one or more of the following measures:
• Reorient or relocate the receiving antenna.
• Increase the separation between the equipment and receiver.
• Connect the equipment into an outlet on a circuit different from
that to which the receiver is connected.
• Consult your local RadioShack store or an experienced radio/TV
technician for help.
• If you cannot eliminate the interference, the FCC requires that
you stop using your system.
Changes or modifications not expressly approved by RadioShack
may cause interference and void the user’s authority to operate the
equipment.
REGION MANAGEMENT INFORMATION
Region Management Information: This DVD Player is designed and
manufactured to respond to the Region Management Information that
is recorded on a DVD disc. If the Region number described on the
DVD disc does not correspond to the Region number of this DVD
player, this DVD player cannot play that disc.
The Region number of this DVD player is 1 (USA/CANADA).
Notes on Unauthorized Discs
You may not be able to play back some DVD video discs on this play-
er if they were purchased from outside your geographic area or made
for business purposes. When you try to play back an unauthorized
disc, “Check Regional Code” appears on the TV screen.
NOTES ON COPYRIGHT
It is forbidden by law to copy, broadcast, show, broadcast on cable,
play in public, and rent copyrighted material without permission.
DVD video discs are copy protected, and any recordings made from
these discs will be distorted.
This product incorporates copyright protection technology that is pro-
tected by method claims of certain U.S. patents and other intellectual
property rights owned by Macrovision Corporation and other rights
owners. Use of this copyright protection technology must be autho-
rized by Macrovision Corporation, and is intended for home and other
limited viewing uses only, unless otherwise authorized by Macrovi-
sion Corporation. Reverse engineering or disassembly is prohibited.
PLACING THE RECEIVER
Do not place objects directly on top of the receiver as it could prevent
proper heat dispersal.
When installing in a rack or shelf, be sure to leave more than 8 inches
of space above and behind the receiver.
WARNING: To reduce the risk of fire or shock hazard, do
not expose this product to rain or moisture.
CAUTION
RISK OF ELECTRIC SHOCK. DO NOT
OPEN.
CAUTION: TO REDUCE THE RISK OF ELECTRIC
SHOCK, DO NOT REMOVE COVER OR BACK. NO
USER-SERVICEABLE PARTS INSIDE. REFER SERVIC-
ING TO QUALIFIED PERSONNEL.
This symbol is intended to alert you to the
presence of uninsulated dangerous voltage
within the product’s enclosure that might be
of sufficient magnitude to constitute a risk of
electric shock. Do not open the product’s
case.
This symbol is intended to inform you that
important operating and maintenance
instructions are included in the literature
accompanying this product.
!
!
©2001 RadioShack Corporation.
All Rights Reserved.
RadioShack is a trademark used by RadioShack Corporation.
©1996 Digital Theater System, Inc.
DTS and DTS Digital Surround are trademarks of Digital Theater System, Inc.
All Rights Reserved.
©1992-1997 Dolby Laboratories, Inc.
Dolby, ProLogic, and the double-D symbol are trademarks of Dolby Laboratories, Inc.
All Rights Reserved.
Spatializer(R) 3-D Stereo, Spatializer N-2-2 (TM) and the circle-in-square device are trademarks owned by Desper Products, Inc,.
All Rights Reserved.

3
Read this First
MAKING CABLE CONNECTIONS
Be careful not to bend cables over the top of the receiver.
If cables are placed on top of the receiver, the magnetic field prod-
cued by the receiver’s transformers can cause the speakers to pro-
duce a humming noise.
USING DISCS
When using discs, you must always take the following precautions:
• Do not touch the playback side of the disc.
• Do not attach paper or tape to discs.
• Do not store discs in a place subject to direct sunlight or near
heat sources.
• Do not store discs in places subject to moisture and dust such as
a bathroom or near a humidifier.
• Store discs vertically in a case. Stacking or placing objects on
discs outside of their case may cause warping.
Cleaning Discs
Fingerprints and dust on the disc cause picture and sound deteriora-
tion. Wipe the disc from the center outward with a soft cloth. Always
keep the disc clean.
If you cannot wipe off the dust with a soft cloth, wipe the disc lightly
with a slightly moistened soft cloth and finish with a dry cloth.
Do not use any type of solvents such as thinner, benzene, commer-
cially available cleaners or anti-static spray for vinyl LPs. They might
damage the disc.
IMPORTANT SAFETY INSTRUCTIONS
Careful attention is devoted to quality standards in the manufacture of
your system, and safety is a major factor in its design. However, safe-
ty is also your responsibility.
This section lists important information that will help you properly use
and enjoy your system. Read all the included safety and operating in-
structions before using your system. Follow them closely, and retain
them for future reference.
1. Heed Warnings — Follow all warnings on the product and in the
operating instructions.
2. Cleaning — Unplug this product from the wall outlet before
cleaning. Use only a damp cloth for cleaning. Do not use liquid or
aerosol cleaners.
3. Attachments — Do not use attachments/accessories not recom-
mended by the product manufacturer, as they might create a
hazard.
4. Water and Moisture — Do not use this product near water (for
example, near a bathtub, washbowl, kitchen sink, or laundry tub;
in a wet basement; or near a swimming pool).
5. Accessories — Do not place this product on an unstable cart,
stand, tripod, bracket, or table. The product may fall, causing
serious injury to a child or adult, and serious damage to the prod-
uct. Use only with a cart, stand, tripod, bracket, or table recom-
mended by the manufacturer or sold with the product. Follow the
manufacturer's instructions for mounting, and use a recom-
mended mounting accessory.
• Carts — Move the product on a cart carefully. Quick stops,
excessive force, and uneven surfaces may cause the product/
cart to overturn.
6. Disc Tray — Keep your fingers well clear of the disc tray as it is
closing. It may cause serious personal injury.
7. Burden — Do not place a heavy object on or step on the product.
The object may fall, causing serious personal injury and serious
damage to the product.
8. Connecting — When you connect the product to other equip-
ment, turn off the power and unplug all the equipment from the
wall outlet. Failure to do so may cause an electric shock and
serious personal injury. Read the owner’s manual of the other
equipment carefully and follow the instructions when making any
connections.
9. Sound Volume — Reduce the volume to the minimum level
before you turn on the product. Otherwise, sudden high volume
sound may cause hearing or speaker damage.
10. Sound Distortion — Do not allow the product to output distorted
sound for a longtime. It may cause speaker overheating and fire.
11. Headphones — When you use the headphones, keep the
volume at a moderate level. If you use the headphones continu-
ously with high volume sound, it may cause hearing damage.
12. Laser Beam — Do not look into the opening of the disc tray or
ventilation opening of the product to see the source of the laser
beam. It may cause sight damage.
13. Disc — Do not use a cracked, deformed, or repaired disc. These
discs are easily broken and may cause serious personal injury
and product malfunction.
14. Ventilation — Slots and openings in the cabinet provide ventila-
tion, ensure reliable operation, and protect from overheating. Do
not block or cover these openings, and do not place the product
on a bed, sofa, rug, or other similar surface. Do not place the
product in a built-in installation such as a bookcase or rack
unless it provides proper ventilation as specified by the manufac-
turer.
15. Power Sources — Operate this product using only the power
source indicated on its marking label. If you are not sure of your
home's power type, consult your product dealer or local power
company.
16. Polarization — This product is equipped with a polarized AC line
plug (a plug having one blade wider than the other). This plug will
fit in the power outlet only one way. This is a safety feature. If
you cannot insert the plug fully into the outlet, try reversing the
plug. If the plug still doesn't fit, contact your electrician to replace
your obsolete outlet. Do not defeat the safety purpose of the
polarized plug. If you need an extension, use a polarized cord.
17. Power-Cord Protection — Route power-supply cords so they are
not likely to be walked on or pinched by items placed on or
against them, paying particular attention to cords at plugs, con-
venience receptacles, and the point where they exit from the
product.

4Read this First
18. Lightning — For added protection for this product during a light-
ning storm, or when it is left unattended and unused for long peri-
ods of time, unplug it from the wall outlet and disconnect the
antenna or cable system. This will prevent damage to the prod-
uct due to lightning and power-line surges.
19. Overloading — Do not overload wall outlets, extension cords, or
integral convenience receptacles, as this can result in a risk of
fire or electric shock.
20. Objects and Liquids — Never push objects of any kind into this
product through openings, as they may touch dangerous voltage
points or short out parts that could result in a fire or electric
shock. Never spill liquid of any kind on the product.
21. Servicing — Do not attempt to service this product yourself, as
opening or removing covers may expose you to dangerous volt-
age or other hazards. Refer all servicing to qualified service per-
sonnel.
22. Damage Requiring Service — Unplug this product from the wall
outlet and refer servicing to qualified service personnel under the
following conditions:
• When the power-supply cord or plug is damaged.
• If liquid has been spilled or objects have fallen into the prod-
uct.
• If the product has been exposed to rain or water.
• If the product does not operate normally by following the oper-
ating instructions. Adjust only those controls that are covered
by the operating instructions, as an improper adjustment of
other controls may result in damage and will often require
extensive work by a qualified technician to restore the product
to normal operation.
• If the product has been dropped or damaged in any way.
• When the product exhibits a distinct change in performance.
23. Replacement Parts — When replacement parts are required, be
sure the service technician uses replacement parts specified by
the manufacturer or having the same characteristics as the origi-
nal part. Unauthorized substitutions may result in fire, electric
shock, or other hazards.
24. Safety Check — Upon completion of service or repairs to this
product, ask the service technician to perform safety checks to
determine that the product is in proper operating condition.
25. Wall or Ceiling Mount — The product should be mounted to a
wall or ceiling only as recommended by the manufacturer.
26. Heat — The product should be situated away from heat sources
such as radiators, heat registers, stoves, or other products
(including amplifiers) that produce heat.
27. Non-use Periods — Unplug the system’s power cord when you
will not use it for extended periods.
28. Outdoor Antenna Grounding — If an outside antenna or cable
system is connected to the product, be sure the antenna or cable
system is grounded so as to provide some protection against
voltage surges and built-up static charges. Article 810 of the
National Electrical Code, ANSI/NFPA 70, provides information
with regard to proper grounding of the mast and supporting
structure, grounding of the lead-in wire to an antenna discharge
unit, size of grounding conductors, location of antenna-discharge
unit, connection to grounding electrodes, and requirements for
the grounding electrode.
Note to CATV System Installer
This reminder is provided to call the CATV system installer’s attention
to Section 820-40 of the NEC which provides guidelines for proper
grounding and, in particular, specifies that the cable ground shall be
connected to the grounding system of the building, as close to the
point of cable entry as practical.
Power Lines — An outside antenna system should not be located in
the vicinity of overhead power lines or other electric light or power cir-
cuits, or where it can fall into such power lines or circuits. When in-
stalling an outside antenna system, extreme care should be taken to
keep from touching such power lines or circuits as contact with them
might be fatal.

5
Contents
ˆ
Contents
Features .......................................................................................... 6
Preparation ..................................................................................... 7
Connecting Components ............................................................. 7
Connecting a TV ..................................................................... 7
Connecting a Cassette Deck .................................................. 7
Connecting a VCR .................................................................. 7
Connecting a Satellite Receiver or Cable Box ........................ 7
Connecting a Digital Optical Audio Devices ............................ 7
Connecting an Auxiliary Audio Device .................................... 7
Connecting a Second Sub Woofer .......................................... 7
Connecting Antennas .................................................................. 7
FM Indoor Antenna ................................................................. 7
FM Outdoor Antenna .............................................................. 7
AM Indoor Loop Antenna ........................................................ 7
AM Outdoor Antenna .............................................................. 8
Connecting the Speakers ............................................................ 8
Placing the Speakers .................................................................. 8
Installing Batteries in the Remote Control ................................... 8
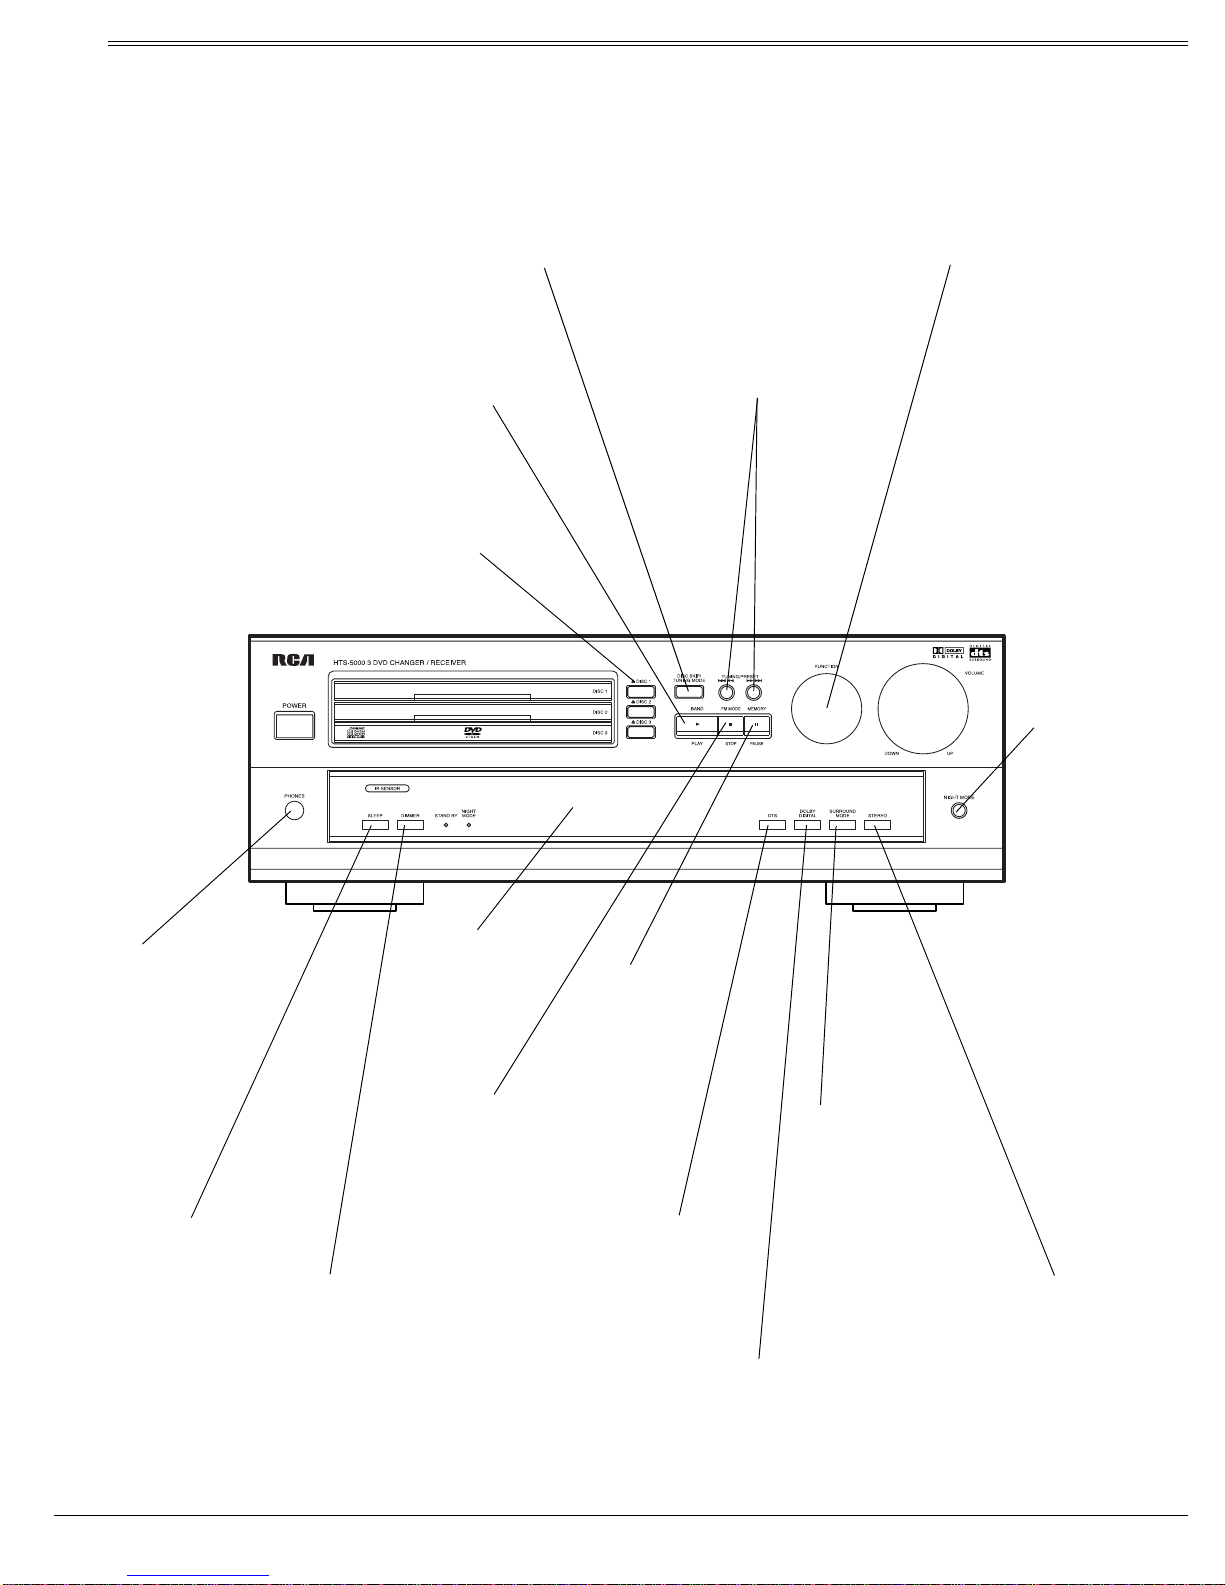
Receiver Operation ........................................................................ 9
A Quick Look at the Receiver’s Controls ..................................... 9
Using the Tuner ......................................................................... 10
Listening To FM Stereo Broadcasts ...................................... 10
Presetting Radio Stations ..................................................... 10
Manual Preset ....................................................................... 10
Auto Preset ........................................................................... 10
Listening to Preset Stations .................................................. 10
Switching Between Preset Stations and Manual Tuning ....... 10
Using the CD Player .................................................................. 10
Continuous Play .................................................................... 11
Changing the Sound Mode ................................................... 11
Using Night Mode ...................................................................... 11
Using the Sleep TImer ............................................................... 11
Using the Dimmer ...................................................................... 11
Remote Control Operation .......................................................... 12
A Quick Look at the Remote Control ......................................... 12
Operating Range of the Remote Control ................................... 12
Setting up the Surround Sound System .................................... 13
Changing the Speaker Size .................................................. 13
Changing the Channel Level ................................................. 13
Changing the Speaker Distance ........................................... 13
Surround Effects ................................................................... 14
Changing System Settings - Special Circumstances ............ 14
Using the Remote Control Unit to Control Additional
Components .............................................................................. 14
Controlling the Tuner ................................................................. 14
Listening To FM Stereo Broadcasts ...................................... 14
Presetting Radio Stations ..................................................... 14
Manual Preset ....................................................................... 14
Auto Preset ........................................................................... 15
Listening to Preset Stations .................................................. 15
Switching Between Preset Stations and Manual Tuning ....... 15
Controlling the CD Player .......................................................... 15
Changing the Sound Mode ................................................... 15
Using GUI Menu Icons .......................................................... 15
Repeat Play .......................................................................... 15
Programming Tracks ............................................................. 16
Modifying the Program and Adding a Track .......................... 16
Random Play ........................................................................ 16
Controlling the Sleep TImer ....................................................... 16
DVD Player Operation ................................................................. 17
Basic Playback .......................................................................... 17
Stopping Play ........................................................................ 17
Pausing Play ......................................................................... 17
Advancing by Frames ........................................................... 17
Playing in Slow-Motion .......................................................... 17
Skipping Chapters ................................................................. 18
Scanning ............................................................................... 18
Advanced Features ................................................................... 18
Using GUI Menu Icons .......................................................... 18
Using a Title Menu ................................................................ 18
Using a DVD Menu ............................................................... 18
Changing Subtitle Language ................................................. 19
Changing Soundtrack Language .......................................... 19
Viewing from Another Angle ................................................. 19
Using Repeat Play ................................................................ 19
Zooming In ............................................................................ 19
Setting rating level and password ............................................. 19
Selecting a Rating Level ....................................................... 19
Setting a Password ............................................................... 20
Clearing Your Password ........................................................ 20
Selecting TV Aspect .................................................................. 20
Selecting Digital Audio Out ........................................................ 20
Troubleshooting .......................................................................... 21
Care ........................................................................................... 22
Manuracturer’s Codes ................................................................. 23
TV Codes .............................................................................. 23
VCR Codes ........................................................................... 24
Cable Codes ......................................................................... 25
SAT Codes ............................................................................ 26
Specifications .............................................................................. 27
Amplifier Section ................................................................... 27
Tuner Section ........................................................................ 27
Video Section ........................................................................ 27
Speaker Section .................................................................... 28
Miscellaneous ....................................................................... 28

6Features
ˆ
Features
Your Complete 7-Piece 600-Watt Home Theater Audio System is a
great system that incorporates some of the best features in home the-
ater technology. The Home Theater Audio System comes complete
with a shielded center-channel speaker, a band pass-type subwoofer,
two shielded front-channel speakers, two rear surround speakers, a
remote control, and a receiver equipped with a tuner and a 3-disc
DVD player.
Its other features include:
Dolby Digital, Dolby ProLogic, and DTS Sound Settings — let you
use the Home Theater Audio System for a movie-theater surround
sound experience
Adjustable Speaker Size, Channel Level, and Distance — lets you
customize your setup for a true surround sound experience
Additional Component Connections — let you connect other audio
and audio/visual components to the receiver so that you can use the
system’s surround sound speakers
Night Mode — lets you compress the dynamic range, reducing the
difference in loudness between different sounds
Parental Lock (Rating Level) — lets you set a ratings level so that
your children cannot watch a DVD that has a rating higher than you
set
Sleep Timer — lets you program the receiver to turn off after a set
time period

7
Preparation
ˆ
Preparation
CONNECTING COMPONENTS
You must connect a TV to the receiver in order to use the receiver’s
DVD player. You can connect other audio and audio/visual compo-
nents to the receiver in order to use the Home Theater Audio Sys-
tem’s surround sound capabilities.
Connecting a TV
Use audio/video cords (not supplied) to connect a TV to the receiver.
Connect red plugs to the red AUDIO jacks and white plugs to the
white AUDIO jacks.
If your TV has an S-Video jack, use an S-Video cable to connect your
TV to the receiver’s S-VIDEO OUT. If your TV does not have an S-Vid-
eo jack, use audio/video cord to connect your TV to the receiver’s
MONITOR OUT.
Connecting a Cassette Deck
Use audio/video cords (not supplied) to connect a cassette deck to
the receiver. Connect red plugs to the red AUDIO jacks and white
plugs to the white AUDIO jacks. Make sure you connect the VCR to
both the TAPE IN and TAPE OUT sets of jacks.
Note: If the cassette deck is placed too close to the receiver, noise
might occur during cassette playback. If this happens, move the cas-
sette deck farther away from the receiver.
Connecting a VCR
Use audio/video cords (not supplied) to connect a VCR to the receiv-
er. Connect red plugs to the red AUDIO jacks and white plugs to the
white AUDIO jacks.
Connect yellow plugs to the yellow VIDEO jacks.
Note: Make sure you connect the VCR to both the IN and OUT sets of
jacks.
Connecting a Satellite Receiver or Cable Box
Use audio/video cords (not supplied) to connect a satellite receiver or
cable box to the receiver. Connect red plugs to the red AUDIO jacks
and white plugs to the white AUDIO jacks.
Note: Your cable box or satellite receiver must use audio/video cords
or Toslink optical cable to connect to the receiver. If your equipment
only uses coaxial cable, you cannot connect it to the receiver.
If your satellite receiver or cable box has digital output, use an optical
cable to connect the satellite receiver to the home theater receiver’s
SAT IN optical jack. If your satellite receiver or cable box does not
have digital output, use analog cable to connect it to the home theater
receiver’s SAT IN video jack.
Connecting a Digital Optical Audio Devices
You can connect a digital audio device such as an DAT (Digital Au-
dioTape) or MD (Mini Disc) recorder to the receiver’s DIGITAL OUT to
record audio from the receiver. Use Toslink optical cable to connect
the DAT or MD recorder to the receiver’s DIGITAL OUT optical jack.
You can also connect a satellite receiver, MD or DAT recorder, CD
player, or anything else with digital output to the receiver’s SAT IN op-
tical jack. Use Toslink optical cable to connect the desired device to
the receiver.
Connecting an Auxiliary Audio Device
You can also connect an audio device that does not require Toslink
(such as an MP3 player, playback cassette deck, or portable CD
player) to the Home Theater Audio System. Use audio cords to con-
nect the desired device to the receiver’s AUX jacks. Connect red
plugs to the red AUDIO jacks and white plugs to the white AUDIO
jacks.
Connecting a Second Sub Woofer
You can connect a second or larger powered subwoofer to the sys-
tem. Connect the sub woofer to the receiver’s SUB WOOFER PRE-OUT
jack using shielded audio cable (not supplied).
CONNECTING ANTENNAS
When connecting equipment, always make sure the power is
switched off and the power cord is disconnected from the wall outlet.
FM Indoor Antenna
In an area with strong FM signals, the T-type FM antenna (supplied)
is sufficient.
1. Use a flat or Phillips screwdriver to loosen the screws on the
supplied transformer.
2. Place the metal connectors on the end of theT-type antenna’s
base on the transformer’s metal contacts (underneath the screw
heads) then tighten the screws.
3. Plug the transformer into ANTENNA FM 75 Ω.
4. Extend the T-antenna’s other two wires and attach them to a wall
or window frame for the best possible reception.
If you have a cable FM antenna, use a coaxial cable to connect it to
ANTENNA FM 75 Ω.
FM Outdoor Antenna
In an area where FM signals are weak, you must use a 75-ohm un-
balanced-type outdoor FM antenna (not supplied). Generally, a 3-ele-
ment antenna will be sufficient. If you live in an area where the FM
signals are particularly weak, it may be necessary to use one with 5
or more elements.
Connect the antenna’s coaxial cable to the supplied transformer.
Plug the transformer into ANTENNA FM 75 Ω.
AM Indoor Loop Antenna
The supplied high-performance AM loop antenna is sufficient for
good reception in most areas.

8Preparation
Connect the loop antenna’s wires to AM and GND. Place the antenna
in a location (for example, on a shelf or window frame) that gives the
best reception.
Keep the antenna as far away as possible from the entire system,
speaker cords and the power cord to prevent unwanted noise.
AM Outdoor Antenna
If the supplied AM loop antenna does not deliver sufficient reception,
use an outdoor AM antenna (not supplied).
Note: Even when using an outdoor AM antenna, do not disconnect
the AM indoor loop antenna.
Use an insulated wire more than 15 ft (5 m) long. Strip one end, and
connect that end to AM.
The antenna wire should be strung outdoors or indoors near a win-
dow. For better reception, connect the GND terminal to a reliable
ground.
CONNECTING THE SPEAKERS
When connecting equipment, always make sure the power is
switched off and the power cord is disconnected from the wall outlet.
Note: Use speakers with a normal impedance of 6 Ohms.
Follow these steps to connect the speakers.
1. Remove the plastic end pieces from the wires.
2. Twist the exposed ends of the bare wire strands.
3. Press up (or down) the speaker’s terminal and insert the appro-
priate wire ends. The color of the speaker wire’s plastic coating is
the same as the color of the matching terminal.
Note: Be sure to connect each speaker to the appropriate
speaker terminal, connecting positive to positive (+ to +) and
negative to negative (– to –).
4. Connect the front speaker’s wire to the receiver’s SPEAKERS
FRONT L and Rterminals (Red/Black).
Connect the rear speaker’s wire to the receiver’s SPEAKERS
REAR L and Rterminals (Gray/Black).
Connect the center speaker’s wire to the receiver’s SPEAKERS
CENTER terminal (Blue/Black).
Connect the subwoofer’s wire to the receiver’s SPEAKERS
WOOFER terminal (Brown/Black).
5. Release the speaker terminal.
6. Plug the AC power cord into an AC wall socket.
PLACING THE SPEAKERS
1. Place the front left and right speakers at equal distances from
the TV.
2. Install the center speaker above or below the TV so that the
sound of the center channel is localized at the TV screen.
Caution: If you choose to install the center speaker on top of the
TV, be sure to secure it, to reduce the risk of damage or injury
resulting from the speaker falling from the TV in the event of
external shocks (for example, earthquakes).
3. If possible, install the surround speakers slightly above ear level.
Note: Try not to install the surround speakers farther away from
the listening position than the front and center speakers. Doing
so can weaken the surround effect.
To achieve the best possible surround sound, install your speakers
as shown below. Be sure all speakers are installed securely to pre-
vent accidents and improve sound quality.
Overhead view of speaker set up
(Illus of speaker set up, please use the illus of 31-5011 if necessary)
INSTALLING BATTERIES IN THE REMOTE
CONTROL
Your remote control requires two AAA batteries (not supplied) for
power. For the best performance and longest life, we recommend
RadioShack alkaline batteries.
Cautions:
• Use only fresh batteries of the required size and recommended
type.
• Do not mix old and new batteries or different types of batteries.
Follow these steps to install batteries.
1. Slide the battery compartment cover in the direction of the arrow
to remove it.
2. Place the batteries in the compartment as indicated by the polar-
ity symbols (+ and –) marked inside.
3. Replace the cover.
When the remote control stops operating properly, replace the batter-
ies.
Warning: Dispose of old batteries promptly and properly. Do not burn
or bury them.
Caution: If you do not plan to use the remote control for a month or
longer, remove the batteries. Batteries can leak chemicals that can
destroy electronic parts.

9
Receiver Operation
ˆ
Receiver Operation
A QUICK LOOK AT THE RECEIVER’S CONTROLS
DISC 1, 2, 3 – Press to open or
close the disc trays.
Note: You cannot use these but-
tons in tuner mode.
DISC SKIP/TUNING MODE – Press to skip discs in DVD/CD
mode.
In tuner mode, press to switch between presets and manual tuning
(see “Switching Between Preset Stations and Manual Tuning” on
Page 10).
TUNING/PRESET – Repeatedly
press to tune to AM or FM stations
and select preset stations in tuner
mode.
BAND/PLAY – Press to select AM or FM
band in tuner mode.
Press to plays back the disc in DVD/CD mode.
FM MODE/STOP– In tuner
mode, press to select stereo
or monaural mode for FM in
tuner mode.
In DVD/CD mode, press to
stop the disc.
MEMORY/
PAUSE –
stores a station
in memory in
tuner mode;
pauses the disc
in DVD/CD
mode.
FUNCTION – Rotate to select the desired audio
oraudio/videosource.Theselectedsource name
appears on the display panel.
PHONES – This
jack is compatible
with wide range of
conventional dy-
namic headphone
types.
When you connect
headphones, the
unit automatically
selects stereo
mode.
DTS – Press to switch
to 5.1 Channel DTS
from stereo mode.
STEREO – Press to switch
from surround mode to ste-
reo mode.
InDolby Digital mode, press
to change the mode to ste-
reo. IJ
IJIJ
IJ appears.
NIGHT MODE – When
the sound source is Dol-
by Digital or stereo
mode, press to com-
press large dynamic
range (see XXXX on
page XX)..
SLEEP– Repeatedly press
to set the sleep timer.
SURROUND MODE –
Presstoswitchsurround
modes between PRO
LOGIC,THEATER,HALL,
and STADIUM for analog
equipment (not for SAT-
OPT function).
DIMMER – Press
once to dim the
display panel.
Press one more to
return to normal
status. DOLBY DIGITAL – Press to
switch to 5.1 Channel Dolby
Digital from stereo mode.
Display Panel

10 Receiver Operation
USING THE TUNER
1. Press POWER. The receiver defaults to the last selected function.
2. Rotate FUNCTION to the tuner function.
3. Press BAND to select the desired band.
4. Repeatedly press TUNING/PRESET )ý
)ý)ý
)ý#
##
#or ,ý-
,ý-,ý-
,ý- to tune in the
desired station. When you reach a station, Jkd[Z
Jkd[ZJkd[Z
Jkd[Z appears above
the station number.
To change the frequency by one step,
press TUNING/PRESET )
))
)
#
##
#or ,-
,-,-
,- quickly (less than half a second).
To tune to the next clear frequency
,
hold down TUNING/PRESET
)ý#
)ý#)ý#
)ý# or ,-
,-,-
,-, then release the button. The system automati-
cally tunes to the next strong station.
Listening To FM Stereo Broadcasts
In FM mode, press FM MODE to select stereo or mono. When you se-
lect the stereo mode, IJ
IJIJ
IJ appears to the right of Jkd[Z
Jkd[ZJkd[Z
Jkd[Z. It goes off
when you select mono.
When you listen to very weak FM stereo stations, you might hear
higher-than-normal background hiss. Switch to mono to eliminate the
hiss.
Presetting Radio Stations
You can preset 30 AM and 30 FM stations regardless of the recep-
tion. Tune in the desired stations using auto or manual tuning.
Manual Preset
1. Press BAND to select the desired band.
2. Repeatedly press TUNING/PRESET )ý#
)ý#)ý#
)ý# or ,-
,-,-
,- to tune in the
desired station.
To change the frequency by one step,
press TUNING/PRESET )
))
)
#
##
#or ,-
,-,-
,- quickly (less than half a second).
To tune to the next clear frequency,
hold down TUNING/PRE-
SET )ý#
)ý#)ý#
)ý# or ,-
,-,-
,-, then release the button. The system auto-
matically tunes to the next strong station.
3. Press MEMORY. C;CE
C;CEC;CE
C;CE flashes for 5 seconds. When C;CE
C;CEC;CE
C;CE goes
off, press the button again (C;CE
C;CEC;CE
C;CE flashes again).
4. Select the preset number with TUNING/PRESET )ý#
)ý#)ý#
)ý# or ,-
,-,-
,-.
5. Press MEMORY again.
6. Repeat Steps 1–5 to memorize other stations (up to 30 stations
for each band). If you store a new station on a memory number
in which a station is stored, the old station is cleared.
To store stations on the other band, repeat Steps 1–6, substituting
the other band in Step 1.
Note: If you want to store more stations later, you might find that
pressing TUNING/PRESET )ý#
)ý#)ý#
)ý# or ,-
,-,-
,- only moves the tuner to the
next preset station (instead of moving the frequency one step). If this
happens, press TUNING MODE to return to manual tuning (see
“Switching Between Preset Stations and Manual Tuning”).
Auto Preset
1. Press BAND to select the desired band.
2. Hold down MEMORY for about 3 seconds.
3. The tuner automatically begins scanning, and stores the first 30
strong signals it receives.
4. Scanning stops automatically after radio stations have been
stored in the auto preset memory.
Note: Press MEMO again to stop auto scanning earlier.
To store stations on the other band, repeat Steps 1–4, substituting
the other band in Step 1.
Listening to Preset Stations
To listen to a radio station stored in the station memory, press TUN-
ING MODE then TUNING/PRESET )ý#
)ý#)ý#
)ý# or ,-
,-,-
,-.
Switching Between Preset Stations and Manual
Tuning
If you store preset stations, pressing TUNING/PRESET )ý#
)ý#)ý#
)ý# or ,-
,-,-
,-
scrolls through the preset stations, rather than changing the frequen-
cy station by station.
To switch to scrolling by individual stations
, press TUNING MODE,
then repeatedly press TUNING/PRESET )ý#
)ý#)ý#
)ý# or ,-
,-,-
,- quickly to
change the frequency by one step. Or hold down TUNING/PRESET )
))
)
#
##
#or ,-
,-,-
,- to tune to the next clear station.
To switch back to scrolling through the preset stations
, press TUNING
MODE, then repeatedly press TUNING/PRESET )ý#
)ý#)ý#
)ý# or ,-
,-,-
,- until
you reach the desired station.
USING THE CD PLAYER
You can use the receiver’s 3-DVD changer to listen to audio CDs.
Important: You can only use audio CDs and some CD-Rs with the
reciever. CD-ROM, CD-G, photo CD, and CD-i discs can not be
played on this player.
1. Press POWER.
2. Rotate FUNCTION until :L:%9:
:L:%9::L:%9:
:L:%9: appears.
3. Press DISC 1, DISC 2, or DISC 3 to open the desired drawer.
4. Place the desired CDs in the tray, then press the appropriate
DISC button again to close the drawer.
Note: If you want to load more than one CD, you can press
another DISC button. The receiver closes the open drawer and
opens the drawer of the DISC button you pressed.
5. To select a CD, repeatedly press DISC SKIP until the desired
CD’s number blinks.
6. Press PLAY. The disc icon (at the far left) begins to rotate.
To pause playback
, press PAUSE. The disc icon flashes rapidly.
To resume playback, press PAUSE again or press PLAY.

11
Receiver Operation
To move forward through a track
, hold down TUNING/PRESET
,-
,-,-
,- for about 2 seconds. Repeat up to two times to increase
the fast-forward speed. To resume playback, press PLAY.
Note: At the beginning or end of a track on an audio CD, the
scan speed returns to normal.
To move backward through a track
, hold down TUNING/PRESET
)ý#
)ý#)ý#
)ý# for about 2 seconds. Repeat up to two times to increase
the rewind speed. To resume playback, press PLAY.
To skip to the next track on the CD
, press TUNING/PRESET ,-
,-,-
,-
once.
To return to the beginning of the current track
, press TUNING/
PRESET )ý#
)ý#)ý#
)ý#.
To return to the previous track
, press TUNING/PRESET )ý#
)ý#)ý#
)ý#
twice.
To stop playback
, press STOP. The disc icon stops rotating, and
H;IKC;
H;IKC;H;IKC;
H;IKC; appears. To resume playback, press PLAY. To stop play-
back completely, press STOP again.
Continuous Play
When the receiver finishes playing an audio CD, it automatically
plays the disc on the next tray.
Changing the Sound Mode
You can listen to your CDs using Stereo or Surround modes.
For stereo only
, press STEREO once.
For a surround mode
, repeatedly press SURROUND MODE until the
desired mode (J>;7J;H
J>;7J;HJ>;7J;H
J>;7J;H, >7BB
>7BB>7BB
>7BB, IJ7:?KC
IJ7:?KCIJ7:?KC
IJ7:?KC, or FHEýBE=?9
FHEýBE=?9FHEýBE=?9
FHEýBE=?9) appears.
Note: Dolby Digital and DTS modes do not work with CDs.
USING NIGHT MODE
You can use Night Mode to compress large dynamic ranges, result-
ing in “quieter” explosions and other loud sounds in movies. The
Night Mode feature adjusts the dynamic range so that there is less
disparity in the noise level of all sounds in a movie (explosions, mu-
sic, dialogue, and so on).
While in Dolby Digital or Stereo mode, press NIGHT MODE to turn
Night Mode on. Press NIGHT MODE again to turn it off.
Note: Night Mode is not available for movies using DTS mode.
USING THE SLEEP TIMER
You can set the sleep timer to turn off the receiver after a set period
of time.
Repeatedly press SLEEP to set the sleep timer to the desired time ('&
'&'&
'&,
(&
(&(&
(&, )&
)&)&
)&, *&
*&*&
*&, +&
+&+&
+&, ,&
,&,&
,&, -&
-&-&
-&, .&
.&.&
.&, or /&
/&/&
/& minutes). The receiver turns off when
the selected time has expired.
USING THE DIMMER
Press DIMMER to make the display dimmer. Press again to return the
display to its original brightness.

12 Remote Control Operation
ˆ
Remote Control Operation
A QUICK LOOK AT THE REMOTE CONTROL
OPERATING RANGE OF THE REMOTE
CONTROL
The remote control may not work properly if:
• There are obstacles between the remote control and the
receiver’s remote sensor.
• Direct sunlight or fluorescent light is shining onto the remote sen-
sor.
• The receiver is located near a device that is emitting infrared
rays.
• The receiver is operated simultaneously with another infrared
remote control.
BAND – selects AM or FM band while listening to the
tuner function.
FM MODE (FM MONO/STEREO) – selects FM
mono or stereo mode. MEMORY– Press tomemorize thedesiredstation
frequency.
TUNING MODE – selects and deselects preset mode.
PRESET – / + –- During AM or FM reception, you can
scan through other frequencies or select the preset
numbers.
MUTE – Press to immediately decrease the sound lev-
el. CKJ;
CKJ;CKJ;
CKJ; appears on the display panel. To restore the
sound, press again.
SLEEP–Pressto set the sleep time.The
sleep time changes to '&
'&'&
'&, (&
(&(&
(&, )&
)&)&
)&, ... /&
/&/&
/&
(minutes), and E<<
E<<E<<
E<< (former display).
TONE – Lets you adjust the low frequency
level (BASS) with (left arrow icon) or (right ar-
row icon) and also you can adjust high fre-
quency level (TREBLE) with (left arrow icon)
or (right arrow icon) according to your taste
and room acoustics.
TEST TONE– Turns on or off the test tone function in
DTS, DOLBY DIGITAL, or PRO LOGIC mode. The test
tone is output from Front L speaker, Center speaker,
Front R speaker, Surround R speaker, Surround L
speaker, (Subwoofer speaker: when Subwoofer on).
SURROUND – When you select an analog
source (TUNER, AUX, TAPE, TV, VCR, or
SAT), as you press SURROUND, the sur-
round mode changes.

13
Remote Control Operation
SETTING UP THE SURROUND SOUND
SYSTEM
You can use your Home Theater Audio System as soon as you take it
out of the packaging. If you wish to fine-tune the system (for example,
substitute different speakers or alter the sound distribution), follow the
directions below.
Changing the Speaker Size
Note: If you are using the speakers provided in your Home Theater
Audio System, the speaker size defaults are correct. If you are using
other speakers, follow these steps.
1. Press POWER.
2. Press SETUP. IFýI?P;
IFýI?P;IFýI?P;
IFýI?P; appears.
3. Press 7
77
7. <HEDJ
<HEDJ<HEDJ
<HEDJ appears.
4. Press 7
77
7again. <#IC7BB
<#IC7BB<#IC7BB
<#IC7BB appears. To change to <#B7H=;
<#B7H=;<#B7H=;
<#B7H=;, press
8
88
8or 9
99
9.
Note: If the cone size (diameter) of the speaker is larger than 5
inches, change to <#B7H=;
<#B7H=;<#B7H=;
<#B7H=;.
5. Press ENTER. 9;DJ;H
9;DJ;H9;DJ;H
9;DJ;H appears.
6. Press 7
77
7. 9#IC7BB
9#IC7BB9#IC7BB
9#IC7BB appears. To change to 9#B7H=;
9#B7H=;9#B7H=;
9#B7H=;, press 8
88
8or
9
99
9. To change to 9#DED;
9#DED;9#DED;
9#DED;, press 8
88
8or 9
99
9again.
Note: If the cone size (diameter) of the speaker is larger than 5
inches, set the item to 9#B7H=;
9#B7H=;9#B7H=;
9#B7H=;.
7. Press ENTER. IKHH
IKHHIKHH
IKHH appears.
8. Press 7
77
7. I#IC7BB
I#IC7BBI#IC7BB
I#IC7BB appears. To change to I#ýB7H=;
I#ýB7H=;I#ýB7H=;
I#ýB7H=;, press 8
88
8or
9
99
9. To change to I#DED;
I#DED;I#DED;
I#DED;, press 8
88
8or 9
99
9again.
Note: If the cone size (diameter) of the speaker is larger than 5
inches, set the item to I#B7H=;
I#B7H=;I#B7H=;
I#B7H=;.
9. Press ENTER. IK8#M<
IK8#M<IK8#M<
IK8#M< appears.
10. Press 7
77
7. IM#O;I
IM#O;IIM#O;I
IM#O;I appears. If you aren’t using a subwoofer,
change to IM#DE
IM#DEIM#DE
IM#DE by pressing 8
88
8or 9
99
9.
11. Press ENTER. <HEDJ
<HEDJ<HEDJ
<HEDJ appears. Press SETUP again to exit.
Changing the Channel Level
The default channel level settings are 0 dB for each speaker. You can
change the speakers’ sound distribution to suit your surround sound
needs. For example, if you are closer to the left front speaker than the
right front speaker, the left front speaker might seem “louder” than the
right one. To adjust it, you must change the channel level for one or
both speakers until the sound evens out.
Follow these steps to change the channel level.
1. Press SETUP, then 8
88
8. 9>ýB;L;B
9>ýB;L;B9>ýB;L;B
9>ýB;L;B appears.
2. Press 7
77
7. <BýB;L;Bý
<BýB;L;Bý<BýB;L;Bý
<BýB;L;Býappears.
3. Press 7
77
7again. <ý &Z8
<ý &Z8<ý &Z8
<ý &Z8 appears. To change the front left
speaker’s level, repeatedly press 8
88
8or 9
99
9until you reach the
desired level (¶'&
¶'&¶'&
¶'& to !'&ýZ8
!'&ýZ8!'&ýZ8
!'&ýZ8).
4. Press ENTER. 9ýB;L;B
9ýB;L;B9ýB;L;B
9ýB;L;B appears.
5. Press 7
77
7. 9ý&Z8ý
9ý&Z8ý9ý&Z8ý
9ý&Z8ýappears. To change the center speaker’s level,
repeatedly press 8
88
8or 9
99
9until you reach the desired level (¶'&
¶'&¶'&
¶'&
to !'&ýZ8
!'&ýZ8!'&ýZ8
!'&ýZ8).
6. Press ENTER. <HýB;L;B
<HýB;L;B<HýB;L;B
<HýB;L;B appears.
7. Press 7
77
7. <Hý &Z8ý
<Hý &Z8ý<Hý &Z8ý
<Hý &Z8ý appears. To change the front right speaker’s
level, repeatedly press 8
88
8or 9
99
9until you reach the desired level
(¶'&
¶'&¶'&
¶'& to !'&ýZ8
!'&ýZ8!'&ýZ8
!'&ýZ8).
8. Press ENTER. IHýB;L;B
IHýB;L;BIHýB;L;B
IHýB;L;B appears.
9. Press 7
77
7. IHý &Z8ý
IHý &Z8ýIHý &Z8ý
IHý &Z8ý appears. To change the rear right speaker’s
level, repeatedly press 8
88
8or 9
99
9until you reach the desired level
(¶'&
¶'&¶'&
¶'& to !'&ýZ8
!'&ýZ8!'&ýZ8
!'&ýZ8).
10. Press ENTER. IBýB;L;B
IBýB;L;BIBýB;L;B
IBýB;L;B appears.
11. Press 7
77
7. IBý &Z8ý
IBý &Z8ýIBý &Z8ý
IBý &Z8ý appears. To change the rear left speaker’s
level, repeatedly press 8
88
8or 9
99
9until you reach the desired level
(¶'&
¶'&¶'&
¶'& to !'&ýZ8
!'&ýZ8!'&ýZ8
!'&ýZ8).
12. Press ENTER. IMýB;L;B
IMýB;L;BIMýB;L;B
IMýB;L;B appears.
13. Press 7
77
7. IMý &Z8ý
IMý &Z8ýIMý &Z8ý
IMý &Z8ý appears. To change the sub woofer’s level,
repeatedly press 8
88
8or 9
99
9until you reach the desired level (¶'&
¶'&¶'&
¶'&
to !'&ýZ8
!'&ýZ8!'&ýZ8
!'&ýZ8).
14. Press ENTER. <BýB;L;B
<BýB;L;B<BýB;L;B
<BýB;L;B appears.
15. Press SETUP to exit.
Changing the Speaker Distance
When you have your home theater arrangement the way you want it
(speakers, receiver, and any components), you can change the
speaker distance entered in the receiver’s memory. The default set-
tings are 10 ft.
1. Imagine there is a straight line running from the front left speaker
to the front right speaker.
2. Measure the distance in a perpendicular line from your listening
position (for example, your couch) to the imaginary line.
Note: Do not meaure the distance to the speakers, just the line.
3. Repeat Steps 1–2 for the rear (surround) speakers.
4. Measure the distance in a perpendicular line from your listening
position (for example, your couch) to the center speaker.
5. Press SETUP, then press 8
88
8twice. IFý:?IJ
IFý:?IJIFý:?IJ
IFý:?IJ appears.
6. Press 7
77
7. <HEDJ
<HEDJ<HEDJ
<HEDJ appears.
7. Press 7
77
7again. <ý'&<J
<ý'&<J<ý'&<J
<ý'&<J appears. To change the distance between
the listening position and the front speakers, repeatedly press
8
88
8or 9
99
9until you reach the desired level (&ý
&ý&ý
&ýto )&ý<J
)&ý<J)&ý<J
)&ý<J).
8. Press ENTER. 9;DJ;H
9;DJ;H9;DJ;H
9;DJ;H appears.
9. Press 7
77
7. 9ý'&<J
9ý'&<J9ý'&<J
9ý'&<J appears. To change the distance between the
listening position and the center speaker, repeatedly press 8
88
8or
9
99
9until you reach the desired level (&ý
&ý&ý
&ýto )&ý<J
)&ý<J)&ý<J
)&ý<J).
10. Press ENTER. IKHH$
IKHH$IKHH$
IKHH$ appears.

14 Remote Control Operation
11. Press 7
77
7. Iý'&<J
Iý'&<JIý'&<J
Iý'&<J appears. To change the distance between the
listening position and the rear (surround) speakers, repeatedly
press 8
88
8or 9
99
9until you reach the desired level (&ý
&ý&ý
&ýto )&ý<J
)&ý<J)&ý<J
)&ý<J).
12. Press ENTER. <HEDJ
<HEDJ<HEDJ
<HEDJ appears.
13. Press SETUP to exit.
Surround Effects
Important: The center and rear speakers only operate when the unit
is set to a surround sound mode and the source material being
played is recorded or broadcast in Dolby Digital, DTS or Dolby Pro
Logic surround sound.
Stereo broadcasts or recordings will produce some rear channel ef-
fects when played in a surround mode. However, mono sources will
not produce any sound from the rear speakers.
Changing System Settings - Special Circumstances
When you make a copy of DVD/CD via TAPE output, set the front
speaker size to <#B7H=;
<#B7H=;<#B7H=;
<#B7H=;. Set the surround mode to IJ;H;E
IJ;H;EIJ;H;E
IJ;H;E.
USING THE REMOTE CONTROL UNIT TO
CONTROL ADDITIONAL COMPONENTS
You can set your remote control to control other components such as
a VCR, TV, satellite receiver or cable box.
1. Turn on the component to be programmed.
2. Look up the brand and corresponding code(s) in the code list
(see “Manuracturer’s Codes” on Page 23).
3. While holding down the appropriate source button (VCR, TV, or
SAT) on the remote control, use the number keys enter the first
code from the code list.
4. Release the component button, then press POWER.
If you have entered the correct code, the component turns off.
If the component does not turn off, repeat Steps 3 and 4 and
subustitute use the next code (if available) listed for the brand of
your component until the component responds to the remote
command.
Note: To turn on or off the receiver when you select the VCR, SAT, or
TV function, press POWER twice.
Cautions:
• This remote control unit may not operate on all models of the
brands shown.
• If batteries are removed from the battery compartment of the
remote unit, replace the batteries within 30 minutes or the codes
are lost. You must then re-enter all previously programmed
codes.
• The buttons on the remote control unit may not work correspond-
ingly with those on the components brands.
• Experiment with the remote control and your components to see
which buttons work. If only a few functions operate, repeat Step
4 to see if another code operates more buttons.
CONTROLLING THE TUNER
1. Press POWER. The last selected function appears.
2. Press TUNER.
3. Press BAND to select the desired band.
4. Repeatedly press TUNING/PRESET )
))
)or -
--
-to tune in the
desired station.
To change the frequency by one step,
press TUNING/PRESET )
))
)
or -
--
-quickly (less than half a second).
To tune to the next clear frequency,
hold down TUNING/PRE-
SET )
))
)or -
--
-, then release the button. The system automatically
tunes to the next strong station.
Listening To FM Stereo Broadcasts
In FM mode, press FM MODE to select stereo or mono. When you se-
lect the stereo mode, IJ
IJIJ
IJ appears to the right of Jkd[Z
Jkd[ZJkd[Z
Jkd[Z. It goes off
when you select mono.
When you listen to very weak FM stereo stations, you might hear
higher-than-normal background hiss. Switch to mono to eliminate the
hiss.
Presetting Radio Stations
You can preset 30 AM and 30 FM stations regardless of the recep-
tion. Tune in the desired stations using auto or manual tuning.
Manual Preset
1. Press BAND to select the desired band.
2. Repeatedly press TUNING/PRESET )
))
)or -
--
-to tune in the
desired station.
To change the frequency by one step,
press TUNING/PRESET )
))
)
or -
--
-quickly (less than half a second).
To tune to the next clear frequency,
hold down TUNING/PRESET
)
))
)or -
--
-, then release the button. The system automatically
tunes to the next strong station.
3. Press MEMORY. C;CE
C;CEC;CE
C;CE flashes for 5 seconds. When C;CE
C;CEC;CE
C;CE goes
off, press the button again (C;CE
C;CEC;CE
C;CE flashes again).
4. Select the preset number with TUNING/PRESET )
))
)or -
--
-.
5. Press MEMORY again.
6. Repeat Steps 1–5 to memorize other stations (up to 30 stations
for each band). If you store a new station on a memory number
in which a station is stored, the old station is cleared.
To store stations on the other band, repeat Steps 1–6, substituting
the other band in Step 1.
Note: If you want to store more stations later, you might find that
pressing TUNING/PRESET )
))
)or -
--
-only moves the tuner to the next
preset station (instead of moving the frequency one step). If this hap-
pens, press TUNING MODE to return to manual tuning (see “Switching
Between Preset Stations and Manual Tuning”).

15
Remote Control Operation
Auto Preset
1. Press BAND to select the desired band.
2. Hold down MEMORY for about 3 seconds.
3. The tuner automatically begins scanning, and stores the first 30
strong signals it receives.
4. Scanning stops automatically after radio stations have been
stored in the auto preset memory.
Note: Press MEMO again to stop auto scanning earlier.
To store stations on the other band, repeat Steps 1–4, substituting
the other band in Step 1.
Listening to Preset Stations
To listen to a radio station stored in the station memory, press TUN-
ING MODE then TUNING/PRESET )
))
)or -
--
-.
Switching Between Preset Stations and Manual
Tuning
If you store preset stations, pressing TUNING/PRESET )
))
)or -
--
-
scrolls through the preset stations, rather than changing the frequen-
cy station by station.
To switch to scrolling by individual stations
, press TUNING MODE,
then repeatedly press TUNING/PRESET )
))
)or -
--
-quickly to change
the frequency by one step. Or hold down TUNING/PRESET :
::
:or ;
;;
;
to tune to the next clear station.
To switch back to scrolling through the preset stations
, press TUNING
MODE, then repeatedly press TUNING/PRESET )
))
)or -
--
-until you
reach the desired station.
CONTROLLING THE CD PLAYER
You can use the receiver’s 3-DVD changer to listen to audio CDs.
Important: You can only use audio CDs and some CD-Rs with the
reciever. CD-ROM, CD-G, photo CD, and CD-i discs can not be
played on this player.
1. Press POWER.
2. Press DVD.
3. On the receiver, press DISC 1, DISC 2, or DISC 3 to open the
desired drawer.
4. Place the desired CDs in the tray, then press the appropriate
DISC button again to close the drawer.
Note: If you want to load more than one CD, you can press
another DISC button. The receiver closes the open drawer and
opens the drawer of the DISC button you pressed.
5. To select a CD, repeatedly press DISC SKIP until the desired
CD’s number blinks.
6. To play, press BAND/7
77
7.
To pause playback
, press (pause icon). To resume playback,
press
(pause icon) again or press BAND/7
77
7.
To move forward through a track
, hold down TUNING/PRESET -
--
-
for about 2 seconds. Repeat up to two times to increase the fast-
forward speed. To resume playback, press BAND/7
77
7.
To move backward through a track
, hold down TUNING/PRESET
)
))
)for about 2 seconds. Repeat up to two times to increase the
rewind speed. To resume playback, press BAND/7
77
7.
Note: At the beginning or end of a track on an audio CD, the
scan speed returns to normal.
To skip to the next track on the CD
, press TUNING/PRESET -
--
-
once.
To return to the beginning of the current track
, press TUNING/
PRESET )
))
).
To return to the previous track
, press TUNING/PRESET )
))
)twice.
To stop playback
, press FM MODE/ '. The disc icon stops rotat-
ing, and H;IKC;
H;IKC;H;IKC;
H;IKC; appears. To resume playback, press BAND/7
77
7.
To stop playback completely, press FM MODE/ 'again.
Changing the Sound Mode
For a surround mode
, repeatedly press SURROUND until the desired
mode (J>;7J;H
J>;7J;HJ>;7J;H
J>;7J;H, >7BB
>7BB>7BB
>7BB, IJ7:?KC
IJ7:?KCIJ7:?KC
IJ7:?KC, IJ;H;E
IJ;H;EIJ;H;E
IJ;H;E, or FHEýBE=?9
FHEýBE=?9FHEýBE=?9
FHEýBE=?9) appears.
Note: Dolby Digital and DTS modes do not work with CDs.
Using GUI Menu Icons
GUI menu icons show the current track number and elapsed time of a
CD. Some icons only show the indicated information. Other icons al-
low the settings to be changed.
Important: You must turn on your television to view the GUI menu
icons.
Follow these steps to view or change GUI information.
1. Press GUI during playback. Icons of the current track number
and the elapsed time appear.
2. Press the remote’s 6
66
6or 7
77
7to select the desired item. The cur-
rently selected item is highlighted.
The first icon is the track icon
. If you select it, you can jump to the
desired track number by pressing the number keys and ENTER,
or by pressing )or -.
The second icon is the time icon
. It shows the elapsed time. You
cannot change it. It is only for viewing.
Repeat Play
Press REPEAT during playback. Each time you press this button, the
TV screen displays the repeat mode setting and the disc will repeat a
track.
The repeat mode changes between H;F;7JýED;
H;F;7JýED;H;F;7JýED;
H;F;7JýED;, H;F;7Jý 7BB
H;F;7Jý7BBH;F;7Jý7BB
H;F;7Jý7BB, H;F;7J
H;F;7JH;F;7J
H;F;7J
7BBý:?I9I
7BBý:?I9I7BBý:?I9I
7BBý:?I9I, and H;F;7JýE<<
H;F;7JýE<<H;F;7JýE<<
H;F;7JýE<< as you press the button.
To return to normal play, press REPEAT several times until H;F;7JýE<<
H;F;7JýE<<H;F;7JýE<<
H;F;7JýE<<
appears.
Note: Repeat play works only with discs for which the elapsed play-
ing time appears in the display window during playback.

16 Remote Control Operation
Programming Tracks
This function allows you to program up to 32 tracks for playback in
any desired order. This function only operates with audio CDs (not
DVDs).
Note: The disc must be recognized by the receiver, so play the disc
for a little while after loading, then program it.
1. Press FM MODE/ 'to stop the CD.
2. Press PROGRAM. &'ý¶ý
&'ý¶ý¶&'ý¶ý
&'ý¶ý¶ appears.
3. Repeatedly press DISC SKIP to select the desired CD (if neces-
sary). The CD number appears to the far right of the display.
4. Press the appropriate numeric buttons, then press ENTER to pro-
gram the first desired track.
5. Repeat Steps 2–4 to program more tracks.
To check the programmed order,
press STOP twice. Repeatedly
press
8
88
8or 9
99
9to view the programmed order.
To clear the programming
, press STOP twice, then press CLEAR.
Notes:
• If you try to select more than 32 tracks, FULL appears and you
cannot program any more tracks.
• If you press PROGRAM twice successively while programming,
the programming stops and F#E<<
F#E<<F#E<<
F#E<< appears.
• Press BAND/7
77
7to start program playback.
Modifying the Program and Adding a Track
1. Press STOP twice. You cannot modify the programming in
Resume Mode.
2. Repeatedly press 8
88
8or 9
99
9to select the desired programmed
track.
To clear the track
, press CLEAR.
To change the track to another track
, press the numeric buttons,
then ENTER.
To change the track to a track on another disc
, press DISC SKIP,
the numeric buttons, then ENTER.
To add a track
, repeatedly press 8
88
8or 9
99
9until you reach the
last programmed track. Press 8
88
8or 9
99
9again. Enter the appro-
priate numeric buttons, then press ENTER to program the desired
track.
3. To start program playback again, press PROGRAM, then BAND/
7
77
7.
Note: The programmed contents are lost if you turn off the unit or
change the function.
Random Play
Press RANDOM. The unit randomly selects trucks.
Note: Pressing RANDOM also clears any programming.
CONTROLLING THE SLEEP TIMER
You can set the sleep timer to turn off the receiver after a set period
of time.
Repeatedly press SLEEP to set the sleep timer to the desired time ('&
'&'&
'&,
(&
(&(&
(&, )&
)&)&
)&, *&
*&*&
*&, +&
+&+&
+&, ,&
,&,&
,&, -&
-&-&
-&, .&
.&.&
.&, or /&
/&/&
/& minutes). The receiver turns off when
the selected time has expired.

17
DVD Player Operation
ˆ
DVD Player Operation
BASIC PLAYBACK
1. Press POWER. The last selected function appears.
2. If necessary, press the remote’s DVD or rotate the receiver’s
FUNCTION until DVD appears.
3. Press DISC 1, DISC 2, or DISC 3 to open the desired disc tray.
EF;D
EF;DEF;D
EF;D appears and the corresponding disc indicator (1, 2, or 3)
flashes.
Note: The disc indicator 1, 2, or 3 lights even the disc is not in
the tray until the unit check the tray after the receiver’s PLAY or
the remote’s BAND/7
77
7is pressed.
4. Place a disc on the disc tray with the playback side down. Place
the disc in the correct guide on the disc tray. If the disc is out of
the guide, it may damage the disc and cause the DVD player to
malfunction.
Notes:
• If you leave the disc tray open for more than 8 minutes, the
disc tray automatically closes.
• If you leave the disc tray open, the disc tray automatically
closes when the function mode is changed.
5. Press the receiver’s PLAY or the remote’s BAND/7
77
7. FB7O
FB7OFB7O
FB7O
appears. The disc tray automatically closes and the receiver
loads the disc. After loading the disc, the receiver enters menu
mode.
Note: If you close the tray by pressing DISC 1, DISC 2, or DISC 3,
the receiver does not load the disc. Press PLAY to load the disc.
6. To select another disc, repeatedly press DISC SKIP on the remote
or the receiver until the desired disc loads.
Note: After playing back all of the chapters in the title, the DVD
player automatically stops and returns to the menu screen.
7. When the menu screen appears on your television screen, press
the remote’s 6
66
6, 7
77
7, 8
88
8, or 9
99
9to select the Play Movie option,
then press the remote’s BAND/7
77
7or the receiver’s PLAY. The
receiver begins playback.
Cautions:
• Do not move the DVD player during playback. Doing so may
damage the disc and the unit.
• Use DISC 1, DISC 2, or DISC 3 on the main unit to open or close
the disc trays. Do not push the disc tray while it is moving. Doing
so may cause the DVD player to malfunction.
• Do not push on the disc tray or put any objects other than discs
on the disc tray. Doing so may cause the DVD player to malfunc-
tion.
• Keep your fingers well clear of the disc tray as it is closing. Keep
children’s fingers away from the closing disc tray as there is a
risk of personal injury.
• When the inhibit icon appears on the TV screen while a button is
pressed, it means that the function is not available on the disc
you are playing.
• .Depending on the DVD disc, some operations may be different
or restricted. Refer to the jacket or case of the disc you are play-
ing.
Stopping Play
Press the receiver’s STOP or the remote’s FM MODE/'. When play is
stopped, the receiver remains at the point where the receiver’s STOP
or the remote’s FM MODE/'was pressed, and H;IKC;
H;IKC;H;IKC;
H;IKC; appears.
Press the receiver’s STOP or the remote’s FM MODE/'again to stop.
The resume option is cleared when the receiver’s STOP or the re-
mote’s FM MODE/'is pressed the second time. Note: The resume op-
tion is also cleared when the power is turned off and then on.
Press the receiver’s PLAY or the remote’s BAND/7
77
7to resume the
playback from this point.
Notes:
• The resume option works only with discs for which the elapsed
playing time appears on the window display during playback.
• Opening the disc tray cancels the resume option.
• The resume option may not be available on some DVD discs.
Pausing Play
Press the receiver’s for the remote’s MEMORY/ f.
To resume normal playback, press the receiver’s PLAY or the re-
mote’s BAND/7
77
7.
Advancing by Frames
Press the receiver’s for the remote’s MEMORY/ fwhile the DVD is
paused. Each time you press the receiver’s for the remote’s MEMO-
RY/ f, the picture advances one frame.
To resume normal playback, press the receiver’s PLAY or the re-
mote’s BAND/7
77
7.
Playing in Slow-Motion
Press the remote’s SLOW – /+ during playback. During slow playback,
the playback speed and direction can be selected with SLOW – /+.
To decrease the playback speed, repeatedly press SLOW – .
To reverse the playback direction, press SLOW + to the playback di-
rection. As you press the button the playback speed changes 1/2, 1/
4, 1/8.
To return to normal playback, press the receiver’s PLAY or the re-
mote’s BAND/7
77
7.

18 DVD Player Operation
Skipping Chapters
To skip forward, press TUNING/PRESET -
--
-. The receiver skips for-
ward one chapter each time the button is pressed.
To skip backward, press TUNING/PRESET )
))
). If you press TUNING/
PRESET )
))
)once midway through a chapter, the receiver returns to
the beginning of that chapter. The receiver then skips backward one
chapter each subsequent time you press TUNING/PRESET )
))
).
Scanning
To scan forward through a DVD
, hold down the remote’s TUNING/
PRESET -ý
-ý-ý
-ýor the receiver’s TUNING/PRESET ,-ý
,-ý,-ý
,-ýfor more than 1
second. Repeat up to three times to increase the fast-forward speed
(2X, 4X, 16X, or 100X). To resume playback, press the receiver’s
PLAY or the remote’s BAND/7
77
7.
To scan backward through a DVD
, hold down the remote’s TUNING/
PRESET )
))
)or the receiver’s TUNING/PRESET )ý#
)ý#)ý#
)ý# for more than 1
second. Repeat up to three times to increase the fast-reverse speed
(2X, 4X, 16X, or 100X). To resume playback, press the receiver’s
PLAY or the remote’s BAND/7
77
7.
Notes:
• The DVD player does not play back sound during slow-motion,
high-speed-reverse, or high-speed-forward playback of DVDs.
• Subtitles do not appear on the screen during slow motion or scan
playback.
• The DVD player provides four scan speeds in each direction for
DVD movie play.
• The DVD player does not play back in slow-motion in case of
audio CD.
• In some equipment connected to digital output for DTS sound, a
noise can be heard during fast-forward or fast-reverse playback
of DTS DVDs.
ADVANCED FEATURES
Note: For the advanced features, the receiver’s display screen does
not change. The displays appear on your television screen.
Using GUI Menu Icons
GUI menu icons show disc information (for example, title or chapter
number, elapsed playing time, audio/subtitle language, angle) and
player information (for example, repeat play, play mode).
Some icons only show the indicated information. Other icons allow
the settings to be changed.
Follow these steps to view or change GUI information.
1. Press GUI during playback.
Note: Title function can also be accessed from the stop mode.
Icons of the current title number, current chapter number,
elapsed time, the current audio soundtrack language, current
subtitle language, and current angle number appear.
Below each icon is the current information for that menu (for
example, (
((
(appears under the chapter icon when you are watch-
ing the movie’s second chapter).
Note: Some DVDs might not provide all of the above GUI menu
icons.
2. Press the remote’s 6
66
6or 7
77
7to select the desired item. The cur-
rently selected item is highlighted.
The first icon is the title icon
. When you select it , you can jump
to the desired title number by pressing the remote’s number
keys, then ENTER.
The second icon is the chapter icon
. When you select it, you can
jump to the desired chapter number by pressing the remote’s
number keys, then ENTER, or by pressing 6
66
6or 7
77
7.
The third icon is the time icon
. When you select it, you can move
to a desired time in the movie by pressing the number keys, then
ENTER.
The fourth icon is the audio icon
. When you select it, you can
change the soundtrack language by repeatedly pressing AUDIO
until the desired language appears. To select the current setting,
press ENTER.
The fifth icon is the subtitle icon
. When you select it, you can
change the subtitle language by repeatedly pressing SUB TITLE
until the desired language appears. To select the current setting,
press ENTER.
The last icon is the angle icon
. When you select it, you can
change the angle by repeatedly pressing ANGLE until the desired
number appears. To select the current setting, press ENTER.
Using a Title Menu
Some DVDs may contain two or more titles. If the disc has a title
menu recorded on it, you can use TITLE to select the movie title.
Notes:
• The details of operation differ depending on the DVD.
• Selecting a title may not be possible on certain DVD discs.
Follow these steps to select a movie title.
1. Press TITLE. A list of the DVD’s titles appears.
2. Press BAND/7
77
7or ENTER to resume play from the scene when
TITLE was first pressed.
3. Press the remote’s 8
88
8, 9
99
9, 6
66
6, or 7
77
7, then ENTER or BAND/7
77
7.
Or press the numeric button(s), to select the desired title. The
selected title now starts playing.
Using a DVD Menu
Some DVDs have unique menus called DVD menus. For example,
DVDs programmed with complex contents provide guide menus, and
those recorded with various languages provide menus for audio and
subtitle language.
The DVD menu’s contents and operation differ from disc to disc. The
following procedure explains the basic operation when this feature is
used.

19
DVD Player Operation
Press MENU during play. The DVD menu available on the disc now
appears. Pressing RETURN resumes play from the scene when MENU
was first pressed.
Note: The resume play option might not be possible on certain discs.
Press the remote’s 8
88
8, 9
99
9, 6
66
6, or 7
77
7, then ENTER. Or press the nu-
meric button(s) to select the desired item. The selected item is now
executed.
Changing Subtitle Language
Note: This operation works only with DVDs on which multiple subtitle
languages are recorded.
Press SUB TITLE during playback. When no subtitles are recorded,
E<<
E<<E<<
E<< appears instead of the language number. Repeatedly press SUB
TITLE until the desired language is selected.
To eliminate subtitles, repeatedly press SUB TITLE and select E<<
E<<E<<
E<<.
Notes:
• When the desired language is not selected even after pressing
the button several times, it means that the language is not avail-
able on the disc.
• When the power is turned off or the DVD player is stopped, the
subtitle language selected at the initial settings appears.
Changing Soundtrack Language
Note: This operation works only with DVDs on which multiple
soundtrack languages are recorded.
Press AUDIO during play. The currently selected soundtrack lan-
guage appears. Repeatedly press AUDIO until the desired language
is selected.
Notes:
• When the desired language is not selected even after pressing
the button several times, it means that the language is not avail-
able on the disc.
• When the power is turned off or the DVD player is stopped, the
language heard is the one selected at the initial settings.
Viewing from Another Angle
Some DVDs may contain scenes which have been shot simulta-
neously from a number of different angles. For these discs, the same
scene can be viewed from each of these different angles using AN-
GLE. The recorded angles differ depending on the disc.
Press ANGLE during playback. The currently selected angle appears.
Repeatedly press ANGLE until the desired angle is selected.
Note: This function only works for discs having scenes recorded at
different angles.
Using Repeat Play
Press REPEAT during playback. Each time you press this button, the
TV screen displays the repeat mode setting and the disc will repeat a
chapter or title.
The repeat mode changes between 9>7FJ;Hý H;F;7J
9>7FJ;Hý H;F;7J9>7FJ;Hý H;F;7J
9>7FJ;Hý H;F;7J, J?JB;ý H;F;7J
J?JB;ý H;F;7JJ?JB;ý H;F;7J
J?JB;ý H;F;7J,
and H;F;7JýE<<
H;F;7JýE<<H;F;7JýE<<
H;F;7JýE<< as you press the button.
To return to normal play, press REPEAT several times until OFF ap-
pears.
Notes:
• .Repeat Play works only with discs for which the elapsed playing
time appears in the DVD display window during playback.
• Repeat Play may not work correctly with some DVDs.
Zooming In
The Zoom feature allows you to zoom in and enlarge the picture on
the screen to either 4 times (X4) or 16 times (X16) its normal size.
Press ZOOM during normal playback or still playback.
To resume normal size, press ZOOM to cancel the zoom feature and
resume normal playback or still playback.
Notes:
• Some DVDs may not respond to the zoom feature.
• The zoom feature does not work on subtitles or menus included
on DVD video discs.
SETTING RATING LEVEL AND PASSWORD
This is to prohibit the playing of specified DVDs which are unsuitable
for children. Some DVD discs contain a restriction level which en-
ables parents to remove scenes or prevent playback of discs by chil-
dren. The DVD player is equipped with a password device designed
to prevent children from changing the level.
Selecting a Rating Level
1. Press DVD SET UP.
2. At the setup screen, press 8
88
8or 9
99
9to select H7J?D=
H7J?D=H7J?D=
H7J?D=, then press
ENTER.
Note: The password is set to 1,2,3,4 as a default. The rating is
set to unlock as a default.
3. Enter a password and press ENTER.
4. Repeatedly press ENTER to select the desired level.
You cannot play DVD video discs rated higher than the level you
selected unless you cancel the parental lock function. For exam-
ple, when you select level 7, discs rated higher than level 7 are
blocked and cannot be played.
The parent lock level is equivalent to the following USA movie
ratings.
Level Movie Rating
7NC-17
6R
4PG-13
3PG
1G

20 DVD Player Operation
5. Press DVD SET UP to exit.
Notes:
• Some titles do not match with the rating level described as
above.
• If you change the level and enter a password, playback of all
DVDs with ratings higher than your selection will be blocked,
unless you enter the correct password again. For example: if you
change the level to 5, the DVD player will not play discs with rat-
ings of 6, 7, or 8 unless the correct password is entered from the
remote control.
Setting a Password
If you change the rating level to 7 or lower, you must enter a 4-digit
password to access playback of discs with higher ratings.
To set this password, follow these steps.
1. Press DVD SET UP.
2. At the setup screen, press 9
99
9to select F7IIMEH:
F7IIMEH:F7IIMEH:
F7IIMEH:, then press
ENTER.
3. Type a 4-digit password into EB:
EB:EB:
EB:. (For example, 1234).
Important: Do not forget your password.
4. Type same the 4-digit password into D;M
D;MD;M
D;M, then press ENTER.
Clearing Your Password
If you forget your password, you can clear the current password.
At the SETUP screen, press 9
99
9to select F7IIMEH:
F7IIMEH:F7IIMEH:
F7IIMEH:, then press EN-
TER.
Enter 4-digit number (for example, 2850), then press ENTER. The 4-
digit password is cleared.
SELECTING TV ASPECT
Select the appropriate screen type according to your TV set. Conven-
tional size screens use a 4:3 aspect ratio, and wide-screens use a
16:9 ratio.
1. Press DVD SET UP.
2. At the setup screen, press 8
88
8or 9
99
9to select JLý :?IFB7O
JLý:?IFB7OJLý:?IFB7O
JLý:?IFB7O
, then
press ENTER.
3. Repeatedly press ENTER to select the desired aspect, then press
DVD SET UP. You must select the type of TV picture (aspect ratio)
that corresponds to the type of TV you are connecting to the
DVD unit.
*0)ýFI
*0)ýFI*0)ý FI
*0)ýFI (Pan & Scan) — If you have a conventional TV set and
your DVD is not formatted for widescreen viewing, use this set-
ting.
*0)ýB8
*0)ýB8*0)ýB8
*0)ýB8 (Letterbox)
—
If you have a conventional TV set and your
DVD is formatted for widescreen viewing, use this setting. All
video material not formatted in the Pan & Scan style is played
back in the letterbox style. Black bands appear at top and bottom
of screen.
',0/ýM?:;
',0/ýM?:;',0/ýM?:;
',0/ýM?:; (Widescreen) — If you have a wide-screen TV set, use
this setting. The DVD plays in full size. (You must also set your
widescreen TV to “full size”).
SELECTING DIGITAL AUDIO OUT
Each DVD has a variety of audio output options. If you connected a
device to the receiver’s digital optical jacks (see “Connecting a Digital
Optical Audio Devices” on Page 7), you might have to change the
digital audio output setting. Set the player’s Digital Audio Output ac-
cording to the type of audio system you use.
1. Press DVD SET UP.
2. At the setup screen, press 8
88
8or 9
99
9to select :?=?J7BýEKJ
:?=?J7BýEKJ:?=?J7BýEKJ
:?=?J7BýEKJ.
3. Repeatedly press ENTER to select the desired output (F9C
F9CF9C
F9C or
8?JIJH;7C
8?JIJH;7C8?JIJH;7C
8?JIJH;7C) , then press ENTER.
8?JIJH;7C
8?JIJH;7C8?JIJH;7C
8?JIJH;7C — Select 8?JIJH;7C
8?JIJH;7C8?JIJH;7C
8?JIJH;7C if you have an amplifier or other
equipment with DTS decoder or Dolby Digital decoder connected
to the receiver.
F9C
F9CF9C
F9C — Select F9C
F9CF9C
F9C if you have an amplifier or other equipment
with linear PCM only (or a MD recorder or a DAT deck) con-
nected to the receiver.
Caution: If an active digital audio output signal is supplied to an re-
ceiver or other equipment without a corresponding digital decoding
capability, a very loud noise may be produced which could perma-
nently damage the speakers.
Note: When you make a digital recording from CD to your house au-
dio CD recorder entire CD tracks are recorded as 1 track. This is be-
cause there is no track information.
This manual suits for next models
1
Table of contents
Other RCA Home Theater System manuals

RCA
RCA Home Theater Audio System User manual

RCA
RCA RT2906 User manual

RCA
RCA RTB1023 Quick start guide

RCA
RCA RT1511 User manual

RCA
RCA RTD980 User manual

RCA
RCA RT2770 User manual

RCA
RCA RT2760 User manual

RCA
RCA RTD615I - DVD Home Theater System User manual

RCA
RCA RTB1013 User manual

RCA
RCA RTB1023 User manual

RCA
RCA RTD215 - Home Theatre System User manual

RCA
RCA RT2870 User manual

RCA
RCA RTD315 User manual

RCA
RCA RTD3133H User manual

RCA
RCA RTB1100 Specification sheet

RCA
RCA RT2770 User manual

RCA
RCA RTD205 User manual

RCA
RCA Home Theater Audio System User manual

RCA
RCA RTD615I Quick start guide

RCA
RCA RT2870R User manual