RCA RCA RS43F1-EU User manual

User Manual
RCA RS43F1-EU

2
Introduction
Installation .........................................................3
Safety ................................................................. 3
Warning/Caution ................................................... 4
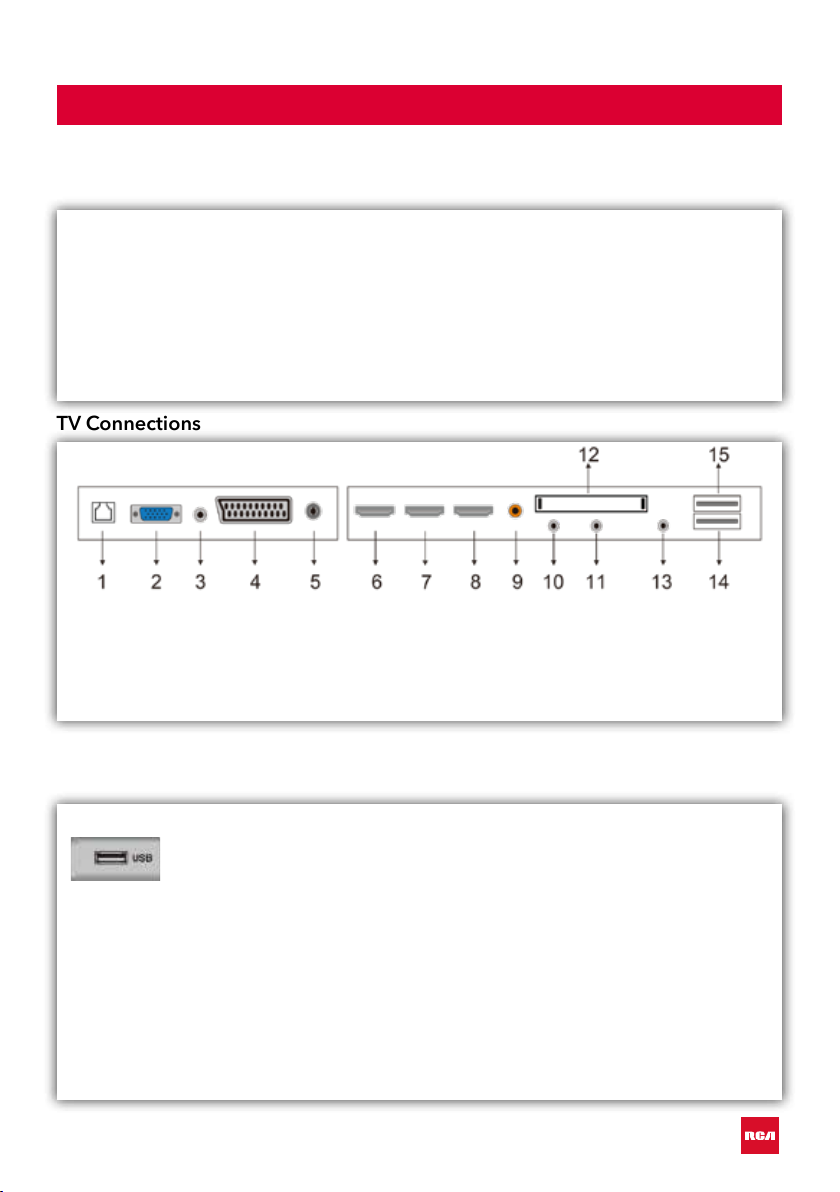
Main unit description ............................................ 7
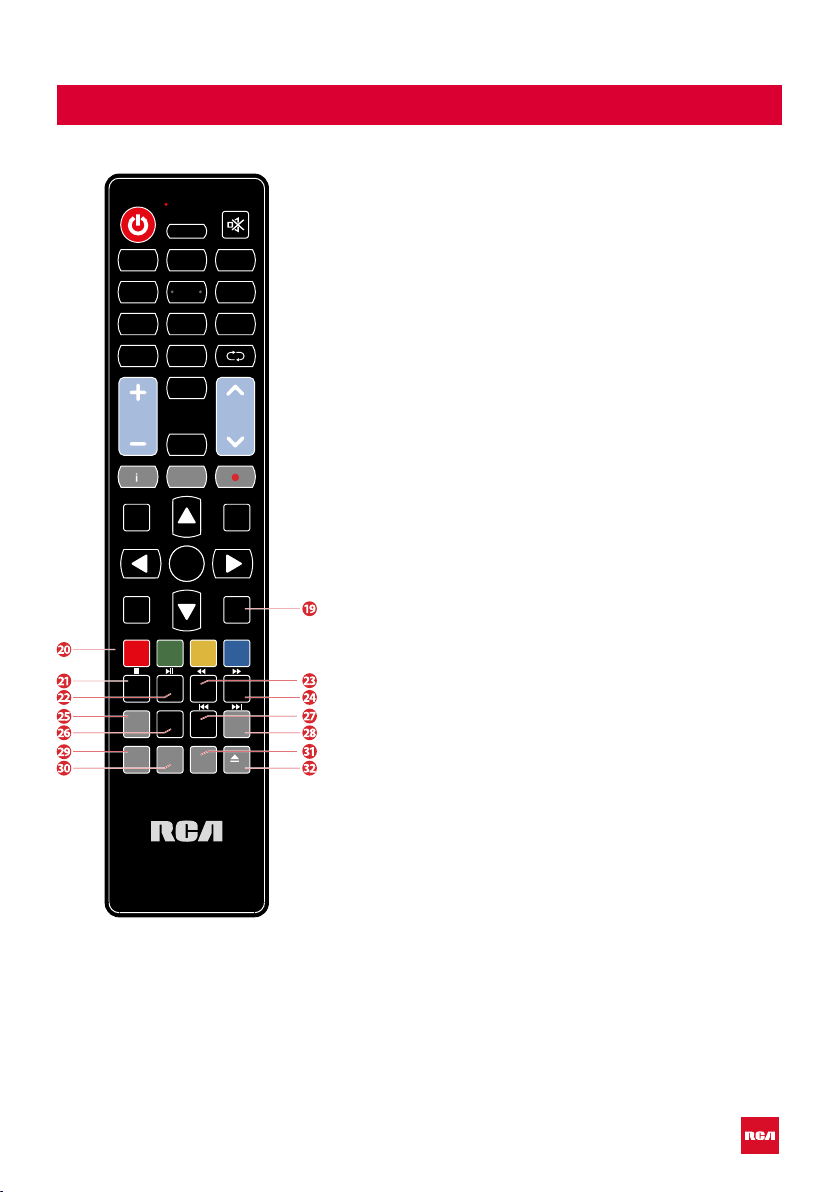
Remote Control .................................................... 8
OSD (On Screen Display) basic adjustment. 10
Connect ......................................................... 10
Select language............................................ 10
Time zone ..................................................... 11
Wired/Wireless network ............................ 11
TV viewing guide ......................................... 12
Source............................................................. 12
Picture ............................................................. 13
Sound.............................................................. 13
PC adjust ........................................................ 14
Channel ......................................................... 15
System lock ................................................... 16
Common ....................................................... 17
Smart TV................................................................. 18
Apps/Like Apps ........................................... 18
Browser .......................................................... 18
Settings ................................................................. 19
Network settings ......................................... 19
Time settings ................................................ 19
Common ............................................................... 20
Language Setting......................................... 20
System Recovery ......................................... 20
USB Features ....................................................... 21
Multi Media ................................................... 21
Video .............................................................. 21
Music .............................................................. 21
Photo ............................................................. 21
Folder ............................................................. 21
Specications ....................................................... 22
Troubleshooting .................................................. 23
Useful Information and Licences..................... 25
Index

3
Introduction
Thank you very much for purchasing your LED TV. It serves as a normal colour
TV and a PC monitor. To enjoy your set fully from the very beginning, read this
manual carefully and keep it handy for future reference.
INSTALLATION
1. Locate the TV in the room where direct light does not strike the screen. Total darkness
or a reection on the picture screen can cause eyestrain. Soft and indirect lighting is
recommended for comfortable viewing.
2. Allow enough space between the TV and the wall to permit ventilation.
3. Avoid excessively warm locations to prevent possible damage to the TV or premature
component failure.
4. This TV can be connected to AC 100-240V~ 50/60Hz.
5. Do not install the TV in a location near heat sources such as radiators, air ducts, direct
sunlight, or in closed compartments and closed areas. Do not cover the ventilation
openings when using the TV.
6. The indicator light will last for about 30 seconds after the power has been tumed off.
Wait until the indicator light goes out before repowering the TV.
SAFETY
1. DO NOT expose the television to extremely high temperatures (below 5 ° C and
above 35 ° C) or extreme humidity (less than 10% and more than 75%).
2. DO NOT expose the television to direct sunlight.
3. Prevent the television from coming into contact with liquids.
4. Make sure that no objects get into the television and do not place vases of water on
the television.
5. Unplug the power cord and remove the antenna cable during a lightning storm
(especially during lightning).
6. Do not walk on the cable and ensure that the cable is fully unrolled.
7. Do not overload outlets or extension cords, as this may result in the risk of re or
electric shock.
8. Use a soft, dry cloth (without volatile substances) to clean the television.
9. Do not attempt to repair the television yourself if it is defective. Contact us by sending

4
Warning
CAUTION: TO AVOID THE RISK OF ELECTRIC SHOCK. DO NOT
REMOVE COVER (OR BACK).
NO USER- SERVICEABLE PARTS INSIDE.
REFER SERVICING TO QUALIFIED SERVICE PERSONNEL.
This symbol is intended to alert the user to avoid the risk
of electric shock, do not disassemble this equipment by anyone
except a qualied service personnel.
This symbol is intended to alert the user to the presence of
important operating and maintenance instructions in
the literature accompanying the equipment.
CAUTION
RISK OF ELECTRIC SHOCK
DO NOT OPEN

5
Caution
Caution
High voltages are used in the operation of this
product.
Do not open the product’s casing. Refer
servicing to qualied service personnel.
Caution
To prevent re or electrical shock hazard, do
not expose the main unit to moisture. Do not
place objects lled with liquids, such as vases,
on the TV.
Caution
Do not drop or push objects into the television
cabinet slots or openings. Never spill any kind
of liquid on the television receiver.
Caution
Avoid exposing the main unit to direct sunlight
and other sources of heat. Do not stand the
television receiver directly on other products
which give off heat: e. g. video cassette
players and audio ampliers. Do not block the
ventilation holes in the back cover. Ventilation
is essential to prevent failure of electrical
components. Do not squash power supply
cord under the main unit or other heavy
objects.
-
-
-
-

6
Caution
Caution
Never stand on, lean on or suddenly push the
product or its stand. You should pay special
attention to children.
Caution
Do not place the main unit on an unstable
cart stand, shelf or table. Serious injury to an
individual, and damage to the television, may
result if it should fall.
Caution
When the product is not used for an extended
period of time, it is advisable to disconnect the
AC power cord from the AC outlet.
Caution
The LED panel used in this product is made of
glass and is therefore breakable. This product
must not be dropped or banged. If the LED
Panel breaks be careful ofbeing injured by
broken glass.

7
tekst
Control Panel Button Function
TV Connections
Optional Conguration as below:
Connect the USB to the USB jack on the set.
Main unit description
VOL+ : Volume up.
VOL- : Volume down
CH+: TV channel up.
CH- : TV channel down.
MENU : Press to select the main menu.
SOURCE : Select the input signal.
POWER : Switch on when in standby mode or to enter the standby mode.
1. RJ45
2. VGA
3. PC audio
4. Scart
5. LNB antenna
6. HDMI-1
7. HDMI-2
8. HDMI-3
9. COAXIALE
10. Mini YPBPR
11. Mini AV & AUDIO
12. CI-slot
13. Earphone
14. USB-1
15. USB-2
NOTE
• It is only 500 mA MAX of DC current output when you connect
with USB jack.
• To ensure the mobile HD works well, you should use other
power supply for the mobile HD and don’t use the USB jack in
the same time.
• It supports mobile HD by connecting with USB jack (must be
more than 2 Gb). The partitions of the mobile HD can’t be
more than 4 partitions. The max partition is 2 Tb. It supports
FAT/FAT32 les. The max FAT le is 4Gb and the max FAT32
le is 2Tb.

8
tekstRemote Control
1Indicator light.
The red indicator light ashes red to show that the remote is
working and sending a signal.
2Switch the TV between on and standby mode.
3Watch the screen in various formats: Auto/4:3/16:9/Zoom/
Subtitels/Smart-zoom.
4Mute and restore your TV sound.
50-9 numbers.
Press to select a programme.
Select numbered items in a menu (DVD mode).
6List. Display the channel list (ATV/DTV mode).
7Return. Return to the previous viewing channel (ATV/DTV
mode) or return to menu (DVD-modus).
Repeat. Select between different repeat modes (DVD
mode).
8Display subtitles which are broadcast with the programme
(DTV mode).
Display subtitles on the DVD (DVD mode).
9Adjust the volume (+ higher, - lower).
10 Select a channel (up/down).
11 Audio
Turn on/off the Audio Description (AD) function (DTV mode).
Select different Audio Mode on DVD mode.
Select sterio/dual sound reception (ATV mode)
12 Display the present channel information such as current
time and channel name (ATV/DTV mode).
Display the present disc information (DVD mode)
13 Displays the EPG (Electronic Programme Guide) (DTV
mode).
14 No function.
15 Displays the OSD menu (On Screen Display).
16 Select among the different input signal sources: DTV / ATV /
AV / SCART / YPbPr / HDMI1 / HDMI2 / HDMI3 / PC / USB.
17 Allows you to navigate trough the OSD menus and adjust
the system settings to your preference.
OK conrm the selection in the OSD menus.
18 Return to the previous menu in the OSD menus.
2
13
4 6
5
78 9
0
OK
MENU
INPUT
BACK
PROG
INDEX HOLD SIZE
REVEAL
FAV
MENU ANGLE
TITLE SLOW ZOOM
TEXT
CANCEL
TV.RD
MIX
S.PAGE
STEP GOTO A-B
EXIT
DVD SETUP
GUIDE
ASPECT
LIST
S
AUDIO
REPEAT
VOL CH

9
tekstRemote Control
2
13
4 6
5
78 9
0
OK
MENU
INPUT
BACK
PROG
INDEX HOLD SIZE
REVEAL
FAV
MENU ANGLE
TITLE SLOW ZOOM
TEXT
CANCEL
TV.RD
MIX
S.PAGE
STEP GOTO A-B
EXIT
DVD SETUP
GUIDE
ASPECT
LIST
S
AUDIO
REPEAT
VOL CH
19 • Exit the OSD menu.
• Display and exit the DVD setup menu (DVD mode).
20 • Access the Teletext items (ATV/DTV mode).
• Access menu options.
PROG (RED)
• Display th channel menu (ATV/DTV mode).
• Access menu options.
• Programme the DVD (DVD mode).
STEP (GREEN)
• Play the playback forward frame by frame (DVD mode).
GO TO (YELLOW)
• Skip to a specic location on a DVD (DVD mode).
A-B (BLUE)
• Repeat a segment between A and B (DVD mode).
21 • To select the page number of the index in teletext
(TV Teletex mode).
• Stop the playback or recording (USB/DTV/DVD mode).
22 • Freeze a multi-page passage on screen in Teletekst
(TV teletekst mode).
• To start the timeshift playback (DTV mode).
• To start playback or pause (DTV/USB/DVD mode).
23 • To show hidden information if existing (TV teletext mode).
• Reverse playback rapidly (USB/DVD mode).
24 • To enlarge the picture on the TV in teletext
(TV teletex mode).
• Advance playback rapidly (USB/DVD mode).
25 • Display the favourite channel list (ATV/DTV mode).
• Display the DVD menu (DVD mode)
26 • A short cut to switch input source tot TV/Digital radio
channels.
• Select different angles for the video (DVD mode).
27 • TV and TXT pictures are mixed together
(TV teletext mode).
• To skip to the beginning of the previous chapter/track/
photo (USB/DVD mode).
28 • To open a subpage if existing in teletext
(TV teletext mode).
• Skip to the beginning of the next chapter/track/photo
(USB/DVD mode).
29 Display the DVD title content (DVD mode).
30 Play video slowly (DVD mode).
31 • Turn on and off the teletext function (TV mode).
• Zoom in on the displayed frame (DVD mode)
32 • Eject the disc (DVD mode)
• Cancel

10
tekst
Connect
Connect an RF cable from the TV’s input called “RF-In” and to your TV Aerial
socket
Press OK
EXIT MENU
button to select ‘Start the setup’.
Select language
Press buttons to select the language.
Press OK
EXIT MENU
button to conrm the preferred language.
OSD (On Screen Display) basic adjustment

11
tekstOSD (On Screen Display) basic adjustment
Time zone
Press to go to the next setting ‘Time zone’.
Press buttons to select the preferred time zone.
Press OK
EXIT MENU
button to conrm the preferred time zone.
Wired/Wireless network
Press to go to the next setting ‘Network’.
If you didn’t connect with a wire the TV automatic select the possibility ‘Use a
wireless network’.
Press OK
EXIT MENU
button to conrm to use a wireless network.

12
TV viewing guide
Press to go to the next setting ‘TV viewing guide’.
Press buttons to select the way you want to watch TV or the source.
Press OK
EXIT MENU
button to conrm the selection.
Source
You can select the source you need.
Press the ‘MENU’ button (15) to enter the OSD menu. Then press button
to select the ‘SOURCE’ menu and press the button to select the preferred
source.
OSD (On Screen Display) basic adjustment

13
Picture
You can select the type of picture, which best corresponds to your viewing.
Press the ‘MENU’ button (15) to enter the OSD menu. Then press button
to select the ‘PICTURE’ menu. Press OK
EXIT MENU
button to conrm the selection.
Select the type you want to change. Press the buttons to adjust.
You can adjust the picture mode, contrast, brightness, color, backlight, noise
reduction, color temperature and more.
Press the ‘MENU’ button (15) to return to upper-menu.
Sound
You can select the type of sound which best corresponds to your listening.
Press the ‘MENU’ button (15) to enter the OSD menu. Then press button
to select the ‘SOUND’ menu. Press OK
EXIT MENU
button to conrm the selection.
Select the type you want to change. Press the buttons to adjust.
You can adjust the sound mode, bass, treble, balance, AVC, more settings,
SPDIF, surround and audio only.
Press the ‘MENU’ button (15) to return to upper-menu.
OSD (On Screen Display) basic adjustment

14
tekstOSD (On Screen Display) basic adjustment
PC adjust
You can make the desired adjustment in the PC mode.
Press the ‘MENU’ button (15) to enter the OSD menu. Then press button
to select the ‘PC ADJUST’ menu. Press OK
EXIT MENU
button to conrm the selection.
Press the button to select the preferred adjustment. Press OK
EXIT MENU
button to
conrm the selection.
Select the type you want to change. Press the buttons to adjust.
You can adjust the auto adjust, horizontal position, vertical position, clock phase
and sampling clock.
Press the ‘MENU’ button (15) to return to upper-menu.
NOTE:
Only available when inputting PC signal.

15
tekstOSD (On Screen Display) basic adjustment
Channel
You can make the desired adjustment in the TV mode.
Press the ‘MENU’ button (15) to enter the OSD menu. Then press button
to select the ‘CHANNEL’ menu. Press OK
EXIT MENU
button to conrm the selection. Press
the button to select the preferred adjustment. Press OK
EXIT MENU
button to conrm
the selection.
First you select the type of antenna you use.
By auto scan the tv search for TV programs automaticaly.
You can also search for available programs manualy.
After scanning you get the channellist.
Press the ‘MENU’ button (15) to return to upper-menu.
NOTE:
Searching for platform will take a long time. Please be patient!

16
tekstOSD (On Screen Display) basic adjustment
System lock
Press the ‘MENU’ button (15) to enter the OSD menu. Then press button
to select the ‘SYSTEM LOCK’ menu. Press OK
EXIT MENU
button to conrm the selection.
The default password is 0000
NOTE:
The administrator password is 8899.
Press the button to select the preferred adjustment. Press OK
EXIT MENU
button to
conrm the selection.
You can change password and set your new password.
You can put on or off the system lock, key lock and hotel mode.
Press the ‘MENU’ button (15) to return to upper-menu.

17
tekstOSD (On Screen Display) basic adjustment
Common
Press the ‘MENU’ button (15) to enter the OSD menu. Then press button
to select the ‘COMMON’ menu. Press OK
EXIT MENU
button to conrm the selection.
Press the button to select the preferred adjustment. Press OK
EXIT MENU
button to
conrm the selection. Press the buttons to adjust.
You can adjust the OSD timer, sleep timer, auto standby timer, blue screen,
HDMI CEC and menu reset.
Press the ‘MENU’ button (15) to return to upper-menu.

18
tekstSmart TV
Smart TV
SMART TV brings you the latest in android technology.
In television, press the HOME button, according to the prompt to enter the
SMART TV channel. Smart TV mode if the remote controller can not realize the
function, use the wireless mouse and related operations.
Apps/Like Apps
Press the button to select Application/Like Apps and Add App.
Browser
You may want to browse the Web through a browser!
Exit: Return to the interface or previous page.
, You can use these keys to navigate to operate.

19
tekstSettings
Settings
Select setting icon, then you can do some settings.
Network settings
Press the button to select ‘Net mode’ and press button to select
wired or wireless. Press OK
EXIT MENU
button to conrm the selection.
Time settings
Press the button to select ‘Auto Attach’ and press button to select
on or off to get the current time automatically. Press the button to select
‘Time zone’ to select the local time zone. You can also put on or of the daylight
saving and 24 hours preview.

20
tekstSettings
Language Setting
Here you can adjust ‘Language Setting’ to select current display language, the
‘Input Mode’ and ‘Permission Manage’.
System Recovery
To put your TV back to original state you select ‘System Recovery’.
‘Account Manage’ shows you the TV information.
Table of contents
Other RCA LED TV manuals

RCA
RCA LED55C55R120Q User manual

RCA
RCA PROSCAN PLED6515-C-UHD User manual

RCA
RCA RLED5536-UHD User manual

RCA
RCA RLED2845A-E User manual

RCA
RCA RTDVD1900-C User manual

RCA
RCA LED55C55R120Q User manual

RCA
RCA RNSM2403 User manual

RCA
RCA LED46A55R120Q User manual

RCA
RCA LED55B55R120Q User manual

RCA
RCA LED32A30RQ User manual

RCA
RCA RLDED4215A-C User manual

RCA
RCA Scenium SRC5565-UHD User manual

RCA
RCA RLDEDV3255-A-B User manual

RCA
RCA RLLDV3282A-B User manual

RCA
RCA RCA R43F6FHD-EU User manual

RCA
RCA RLDED3258A-B User manual

RCA
RCA RTU6549-B User manual

RCA
RCA LED42C45RQ User manual

RCA
RCA 55AN3D User manual

RCA
RCA RLED2445A-B User manual