RCA 25250 User manual

2-Line Intercom Speakerphone
DECT6.0 Cordless Handset
Telephone Answering System
User’s Guide
Please read this manual
before operating product
for the first time.
Model 25250

2
Important Information
NOTICE: This product meets the applicable Industry Canada technical
specifications.
Operation is subject to the following two conditions: (1) This device may
not cause interference, and (2) This device must accept any interference,
including interference that may cause undesired operation of the device.
The equipment must be installed using an acceptable method of
connection. The customer should be aware that compliance with the above
conditions may not prevent degradation of service in some situations.
Repairs to certified equipment should be made by an authorized Canadian
maintenance facility designated by the supplier. Any repairs or alterations
made by the user to this equipment, or equipment malfunctions, may give
the telecommunications company cause to request the user to disconnect
the equipment.
Users should ensure for their own protection that the electrical ground
connections of the power utility, telephone lines and internal metallic
water pipe systems, if present, are connected together. This precaution may
be particularly important in rural areas.
CAUTION: Users should not attempt to make such connections themselves,
but should contact the appropriate electric inspection authority, or
electrician, as appropriate.
NOTES: This equipment may not be used on coin service provided by the
telephone company.
Interference Information
This equipment generates and uses radio frequency energy which may
interfere with residential radio and television reception if not properly
installed and used in accordance with instructions contained in this
manual. Reasonable protection against such interference is ensured,
although there is no guarantee this will not occur in a given installation.
If interference is suspected and verified by switching this equipment on
and off, the user is encouraged to try to correct the interference by one
or more of the following measures: Reorient the radio/television receiver’s
antenna, relocate the equipment with respect to the receiver, plug the
equipment and receiver into separate circuit outlets. The user may also wish
to consult a qualified radio/television technician for additional suggestions.
This equipment has been fully tested and complies with all limits for Class B
computing devices pursuant to part 15 FCC Rules and Regulations.
Important Information

3
Important Information
Telephone Network Information
Should your equipment cause trouble on your line which may harm the
telephone network, the telephone company, where practicable, may notify
you that temporary discontinuance of service may be required. Where prior
notice is not practicable and the circumstances warrant such action, the
telephone company may temporarily discontinue service immediately.
The telephone company may make changes in its communications facilities,
equipment, operations or procedures where such action is required in the
operation of its business. If these changes are expected to affect the use
or performance of your telephone equipment, the telephone company will
likely give you adequate notice to allow you to maintain uninterrupted
service.
Notice must be given to the telephone company upon termination of your
telephone from your line.
Licensing
Licensed under US Patent 6,427,009.
Hearing Aid Compatibility
This telephone system meets FCC standards for Hearing Aid Compatibility.
FCC RF Radiation Exposure Statement
This equipment complies with FCC RF radiation exposure limits set forth for
an uncontrolled environment. This equipment should be installed and
operated with a minimum distance of 20 centimeters between the
radiator and your body. This transmitter must not be co-located or
operated in conjunction with any other antenna or transmitter.
For body worn operation, this phone has been tested and meets the FCC
RF exposure guidelines when used with the belt clip supplied with this
product. Use of other accessories may not ensure compliance with FCC RF
exposure guidelines.
Information for DECT Product
This telephone is compliant with the DECT 6.0 standard which
operates in the 1.92GHz to 1.93GHz frequency range.
Installation of this equipment is subject to notification and
coordination with UTAM. Any relocation of this equipment must
be coordinated through and approved by UTAM. UTAM may be contacted at
1-800-429-8826.

4
Important InformatIon ............................2
Interference InformatIon.........................2
telephone network InformatIon ..............3
lIcensIng ................................................3
hearIng aId compatIbIlIty .......................3
fcc rf radIatIon exposure statement ....3
InformatIon for dect product ...............3
IntroductIon ...........................................6
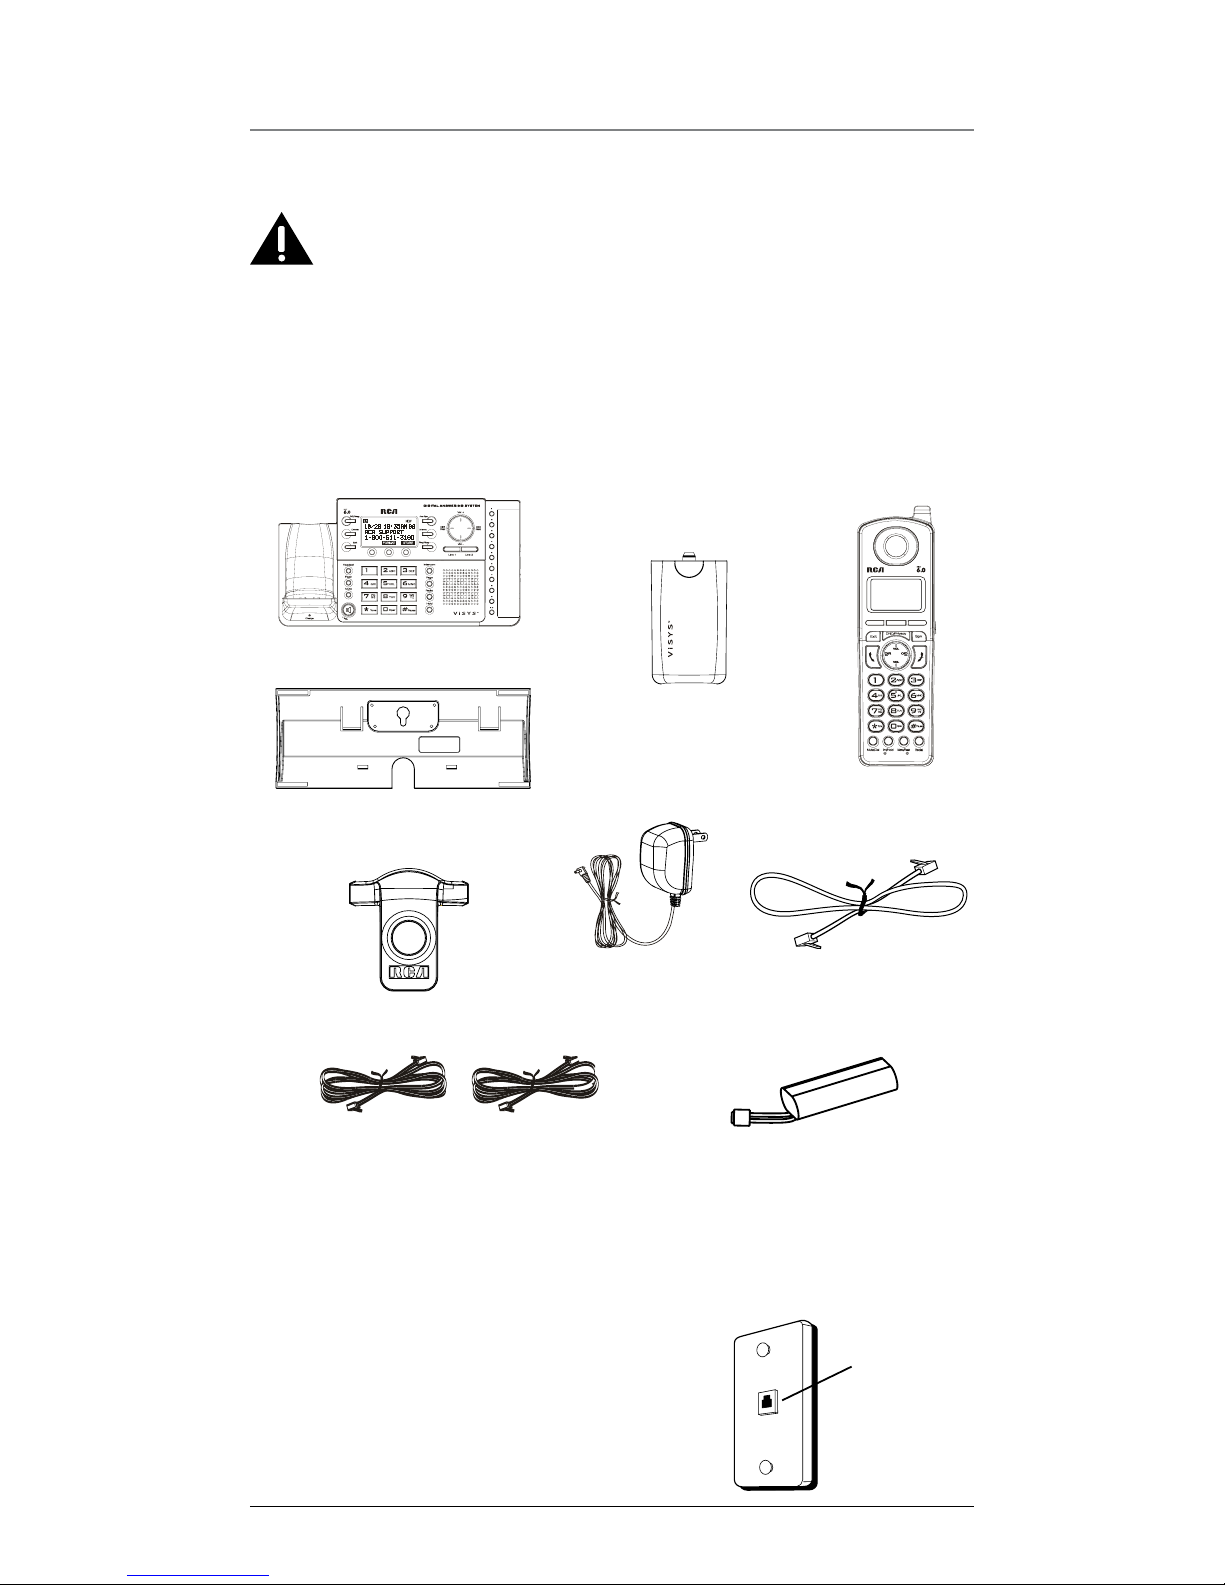
parts checklIst.......................................6
telephone Jack requIrements...................6
InstallatIon ............................................7
Digital Security SyStem ............................7
Important InstallatIon guIdelInes ............7
handset layout ......................................8
base layout............................................9
InstallIng the phone .............................10
inStalling the hanDSet Battery..............10
BaSe Station............................................ 11
programmIng the phone....................... 13
StanDBy Screen .......................................13
Programming FunctionS.........................13
Phone Setting..........................................14
Date/time.................................................14
auto anSwer...........................................15
auto anSwer intercom...........................15
Dial moDe ...............................................15
area coDe ...............................................15
regiStration.............................................16
regiSter .................................................16
remove hanDSet......................................16
De-regiSter.............................................17
2nD call alert .....................................17
hanDSet name.........................................17
uPDate hanDSet liSt ...............................18
DiSPlay Setting ........................................18
contraSt..................................................18
Backlight.................................................18
SounD Setting .........................................19
ring volume............................................19
key tone ..................................................19
anSwering SyStem ..................................20
on/oFF StatuS.........................................20
oga PlayBack.........................................20
Set oga..................................................21
Set oFFice time........................................21
Set work hourS.....................................21
Set aFter hourS......................................22
ring Delay...............................................22
meSSage length ......................................23
call Screening........................................23
meSSage alert ........................................23
remote PaSSworD....................................23
reStore Setting .......................................24
telephone operatIon ............................ 24
making callS with the corDleSS
hanDSet..............................................24
making callS in the SPeakerPhone
moDe ...................................................24
making call in the SPeakerPhone
moDe ...................................................24
making callS with the oPtional
heaDSet ..............................................25
Pre-Dialing..............................................25
anSwering acall ...................................25
Switching Between the SPeakerPhone,
hanDSet, anD heaDSet moDe ............26
BaSe ..................................................26
corDleSS hanDSet .............................26
mute ........................................................26
Donot DiSturB.......................................27
FlaSh........................................................27
inSerting aPauSe in the Dialing
Sequence ............................................27
reDial.......................................................27
reviewing the reDial numBerS...............28
Storing areDial recorD in Phone
Book...................................................28
tranSFerring acall to another
extenSion............................................28
receiving atranSFerreD call From another
extenSion............................................28
ringer on/oFF anD ringer volume.......29
SPeakerPhone, hanDSet, anD heaDSet
volume ...............................................29
holD.........................................................29
conFerence callS....................................29
Join acall in ProgreSS .....................29
3-way conFerence call By an intercom
call ....................................................29
3-way conFerence call with two
lineS ...................................................29
4-way conFerence call (line 1 +
line 2 + 2 extenSion).......................30
Intercom calls .................................... 30
one-touch intercom ..............................30
anSwering an intercom call.................30
Page .........................................................31
auto StanDBy ..........................................31
Table of Contents

5
Table of Contents
caller Id (cId) ..................................31
receiving anD Storing ciD recorDS......31
reviewing ciD recorDS..........................32
Saving aciD recorD to Phone Book
memory..............................................32
Deleting aciD recorD...........................32
Deleting all call recorDS.....................32
Dialing Back ...........................................33
iFyou ProgrammeD your local area
coDe...................................................33
iFyou DiD not Program your local
area coDe .........................................33
call waiting caller iD..........................33
memory log and phone book (dIrectory)
memory ........................................... 34
aDDing Phone Book entrieS...................34
storIng record In one-touch dIalIng .. 34
reviewing Phone Book recorDS ............35
eDiting aPhone Book recorD................35
coPying aPhoneBook recorD ................35
Deleting aPhone Book recorD .............36
Dialing aPhone Book recorD ...............36
Dial aPhone Book recorD while in
talk moDe ..........................................36
Dial aPhone Book recorD while
reviewing it........................................36
answerIng system operatIon................ 37
anSwering SyStem on/oFF.....................37
recorDing incoming meSSageS ..............37
monitoring incoming callS ...................37
memo recorD..........................................38
memo recorDing ....................................38
icm/memo PlayBack..............................38
eraSing meSSageS ..................................39
toeraSe ameSSage while it iS
Playing ..............................................39
toeraSe ameSSage aFter it Playing..39
toeraSe all PreviouSly PlayeD
meSSageS in amailBox.......................39
remote acceSS From remote Party.......39
memory Full...........................................40
changIng the battery............................41
battery safety precautIons ...................41
dIsplay messages ................................ 42
handset sound sIgnals........................ 42
troubleshootIng guIde ......................... 43
telePhone SolutionS................................43
caller iD SolutionS................................44
Battery.....................................................44
general product care ......................... 45
causes of poor receptIon .................... 46
warranty............................................ 47
accessory InformatIon......................... 47
Index................................................... 48

6
Introduction
CAUTION: When using telephone equipment, there are basic safety
instructions that should always be followed. Refer to the IMPORTANT
SAFETY INSTRUCTIONS provided with this product and save them for
future reference.
IMPORTANT: Because cordless phones operate on electricity, you should
have at least one phone in your home that isn’t cordless, in case the power
in your home goes out.
Connections & Setup
Parts Checklist
Make sure your package includes the following items:
Base
Handset
Handset battery
pack
Telephone
2- Line cords
AC power
adaptor
Battery
Compartment
Cover
Desk Stand
For Model 25250RE2 there will be ONE additional handset, belt clip, AC
power adaptor, battery pack, cover and charge cradle than shown above.
Telephone Jack Requirements
To use this phone, you will need an RJ11C (for
a single line) or a RJ14C (for two lines) type
modular phone jack, which might look like the
one pictured here, installed in your home or
office. If you don’t have either modular jack,
call your local phone company to find out how
to get one installed.
Modular
telephone line
jack
Wall plate
Short Line Cord
Belt Clip

7
Connections & Setup
Installation
Digital Security System
Your cordless phone uses a digital security system to protect against false
ringing, unauthorized access, and charges to your phone line.
INSTALLATION NOTE: Some cordless telephones operate at frequencies that
may cause or receive interference with nearby TVs, microwave ovens, and
VCRs. To minimize or prevent such interference, the base of the cordless
telephone should not be placed near or on top of a TV, microwave ovens,
or VCR. If such interference continues, move the cordless telephone farther
away from these appliances.
Certain other communications devices may also use the 1.9 GHz frequency
for communication, and, if not properly set, these devices may interfere
with each other and/or your new telephone. If you are concerned with
interference, please refer to the owner’s manual for these devices on how to
properly set channels to avoid interference. Typical devices that may use the
1.9 GHz frequency for communication include wireless audio/video senders,
wireless computer networks, multi-handset cordless telephone systems, and
some long-range cordless telephone systems.
Important Installation Guidelines
• Avoid sources of noise and heat, such as motors, fluorescent lighting,
microwave ovens, heating appliances and direct sunlight.
• Avoid areas of excessive dust, moisture and low temperature.
• Avoid other cordless telephones or personal computers.
• Never install telephone wiring during a lightning storm.
• Never install telephone jacks in wet locations unless the jack is
specifically designed for wet locations.
• Never touch non-insulated telephone wires or terminals, unless the
telephone line has been disconnected at the network interface.
• Use caution when installing or modifying telephone lines.

8
Connections & Setup
Handset Layout
display
DND/Privacy
(button) Spk
(Speaker button)
DIR
(button)
CID
(button)
3 Soft keys
VOL +/-
(buttons)
Talk
(button)
Off
(button)
Redial
(button)
Menu/Flash
(button)
Exit
(button)
Int/Hold
(button)
Mute/Del
(button)
Visual Indicator
* Tone
(button)
#Pause
(button)

9
Base Layout
Connections & Setup
DND/Privacy
(button)
Delete
(button)
Exit
(button) 3 Soft Keys
Play/Stop
(button)
Memo
(button)
Ans Sys
(button)
DIR
(button)
CID
(button)
Vol +/-
(buttons)
Line 1 & 2
(buttons)
Intercom
(button)
Page
(button)
Redial
(button)
Hold
(button)
Headset
(button)
Flash
(button)
Mute
(button) Speaker
(button)
Charge
LED
One Touch
(1-10)
buttons
#Pause
(button)

10
Connections & Setup
Installing the Phone
Installing the Handset Battery
NOTE: You must connect the handset battery before use.
CAUTION: To reduce the risk of fire or personal injury, use only the
Thomson Inc. approved Nickel-metal Hydride (Ni-MH) battery model
5-2734, which is compatible with this unit.
1. Locate battery which is packaged inside a plastic bag and is separate
from the handset.
2. Locate the battery compartment on the back of the handset.
3. Plug the battery pack cord into the jack inside the compartment.
NOTE: To ensure proper battery installation, the connector is keyed and can
be inserted only one way.
4. Insert the battery pack.
5. Close the battery compartment by placing the handset back cover
slightly higher than the handset and then sliding the cover down into
position.
BATTERY
BLACK WIRE
RED WIRE
PRESS DOWN FIRMLY

11
Base Station
The phone may be connected to two line (RJ14C) wall jacks to
accommodate all two lines.
1. Choose an area near an electrical outlet and a telephone wall jack
(RJ11C), and place your cordless telephone on a level surface, such as a
desktop or tabletop, or you may mount it on the wall.
2. Plug the power supply cord into the power jack on the back of the base
and the other end into an electrical outlet.
CAUTION: To reduce risk of personal injury, fire, or damage use only
the 5-2757 (base) power adaptor listed in the user’s guide. This power
adaptor is intended to be correctly orientated in a vertical or floor
mount position.
3. Connect the telephone line cords:
If you have 2 single-line wall jacks installed in your home or office, you
can use adaptors/couplers (not included) to combine the 2 single
telephone lines into 1 dual lines. The adaptor/coupler may look similar
to the one pictured here and can be purchased from your local
telephone products retailer.
Connections & Setup
Line 1
Line 2
Line 1
Line 2
Line 1 + 2
Or, you can use the 2 single telephone lines plug into the 2 jacks on
the back of the telephone.
If you have Line 1 and Line 2 wired into one wall jack in your home or
office, you can use one of the supplied telephone line cords to connect
from the wall jack to the Line 1 + 2 jack on the back of the phone as
shown below.

12
4. If you want to mount the telephone on the wall, you can plug the 2
lines such as the below drawing;
Connections & Setup
-OR-
-OR-
Line 1
Line 2
Line 1
Line 2
Line 1 + 2

13
5. Place the handset in the base cradle. The charge indicator illuminates,
verifying the battery is charging.
6. Allow the phone to charge for 14 hours prior to first use. If you don’t
properly charge the phone, battery performance is compromised.
NOTE: If the model you bought is a RE2 version, there is one additional
charger. Plug the power supply cord into the power jack on the back of the
charger and the other end into an electrical outlet. Place handset in the
charger, the charge indicator illuminates, verifying the battery is charging.
CAUTION: To reduce risk of personal injury, fire, or damage use only
the 5-2828 (charger) power adaptor listed in the user’s guide. This
power adaptor is intended to be correctly orientated in a vertical or
floor mount position.
Programming the Phone
Standby Screen
The handset displays the handset name and number, date, time, and battery
status and the three soft keys.
The base displays the current date, time and the soft keys.
NOTE: The soft keys will change according to the status of the unit.
NOTE: The base LCD has a dedicated “SET CLOCK” icon flashing when the
clock is not set. Please go to menu “Phone Setting- Date /Time” to set the
clock.
Programming Functions
The system uses a menu structure to give you access to all of the built-in
features. You may program the following items in main menu: Phone
Setting, Display Setting, Sound Setting, Answering System and Restore
Setting.
NOTE: During programming, you may press the BACK Soft key (left) at any
time to exit the sub-menu and return to the main menu, or press Exit key to
exit programming and return to standby screen.
NOTE: If no key is pressed for 30 seconds, the handset will automatically exit
programming and return to standby screen.
Programming the Telephone

14
Phone Setting
1. Make sure your phone is OFF (not in Talk mode).
2. Press the Menu button on HS or the MENU soft key (left) on BS to go
to the main menu.
3. Press VOL (- or +) button to scroll to Phone Setting.
4. Press SELECT soft key (right) to confirm and you may program the
following items:
Date/Time (base only),
Auto Answer (handset only),
Auto Answer Intercom (both base and handset),
Dial Mode (base only),
Area Code (base only),
Registration (handset only),
De-Registration (base only),
2nd Call Alert (both base and handset),
Handset Name (handset only),
Update HS List (base only).
Date/Time
From the Phone Setting Menu:
1. Press the VOL (- or +) button to scroll to Date/Time.
2. Press SELECT soft key. “Year 2007” shows in the display.
3. Use the touch-tone pad to enter the last two digits of the current year
(range: 00 to 99).
4. Press SAVE soft key to save the year setting and proceed to date
setting.
5. Date “01/01” shows in the display. Use the touch-tone pad to enter two
digits for current month and day respectively (format: mm:dd).
6. Press SAVE soft key to save the month/date setting and proceed to time
setting.
7. Time “12:00A” shows in the display. Use the touch-tone pad to enter
four digits for current time and use soft key AM/PM to toggle between
“P” (pm) and “A” (am).
8. Press SAVE soft key to save the setting. “Saved” shows in the display.
NOTE: If you subscribe to Caller ID service, the current Date/Time is set
automatically when you receive your first CID record and will override
manually set Date/Time.
NOTE: The Date/Time setting item only exists in base menu, handset Date/
Time should update automatically after it is set in the base.
Programming the Telephone

15
Auto Answer (only applicable for handset)
This option allows you to pick up the handset from base to answer an
incoming call without pressing the Talk/Spk/L 1/L2 button.
When it is set to off, this function is disabled in this handset.
From the Phone Setting Menu:
1. Press the VOL (- or +) button to scroll to the Auto Answer.
2. Press SELECT soft key. Use the VOL (- or +) button to scroll to your
selection. The default setting is Off.
3. Press SELECT soft key to save your selection and “Saved” shows in the
display.
Auto Answer Intercom (applicable for base and handset)
If it is set to on, this handset or base will auto answer the intercom call
when it receives an intercom call.
From the Phone Setting Menu:
1. Press the VOL (- or +) button to scroll to Auto Answer Int.
2. Press SELECT soft key. Use the VOL (- or +) button to scroll to your
selection. The default setting is Off.
3. Press SELECT soft key to save your selection and “Saved” shows in the
display.
Dial Mode (only applicable for base)
The Dial Mode of Line 1 and Line 2 can be set separately.
From the Phone Setting Menu:
1. Press the VOL (- or +) button to scroll to the Dial mode.
2. Press SELECT soft key.
3. Use the VOL (- or +) button to select Tone or Pulse and use the DIR or
CID button to select L1 or L2.
4. Press SELECT soft key to save your selection and “Saved” shows in the
display.
NOTE: The Dial mode only can be set in the base menu.
Area Code (only applicable for base)
The telephone uses the pre-programmed area code to determine the
number format to display when a valid Caller ID record is received. The
pre-programmed area code is also used for the Dialback feature.
From the Phone setting Menu:
1. Press the VOL (- or +) button to scroll to the Area code.
2. Press SELECT soft key.
3. Use the touch-tone pad to enter your 3-digit area code.
4. Press SAVE soft key to save your selection and “Saved” shows in the
display.
Programming the Telephone

16
Registration (only applicable to handset)
A cordless handset will not operate until it is registered to the base. During
the registration process, keep the handset near the base. Up to 10 cordless
handsets can be registered to one base.
NOTE: If a handset has not been registered to the base, then the display will
show “PRESS “REG” TO INITIATE REGISTRATION” once the handset has been
activated. Press the REG soft key to start the registration.
From the Phone Setting Menu:
1. Press the VOL (- or +) button to scroll to Registration.
2. Press SELECT soft key and you may program the following items:
Register and Remove handset.
Register
From the Phone Setting Menu:
1. Press the VOL (- or +) button to scroll to Register.
2. Press SELECT soft key. “Press base unit page button until beep” shows
in the display.
3. Press and hold the Page button on base for 5 seconds.
4. “Registration” displays to indicate the base is now in registration mode.
5. If the registration is successful, the handset shows “Registration
complete” for 2 seconds and emits a confirmation tone.
6. If the registration is failed (i.e. timeout), the handset shows
“REGISTRATION FAILED!” for 2 seconds and emits an error tone.
Remove Handset
De-registration cancels registration. During the de-registration process,
keep the handset near the base.
WARNING: It is not recommended that a handset be deregistered
unless absolutely necessary because once a handset is deregistered,
that handset’s telephone features cannot be used until the handset is
re-registered.
From the Phone Setting Menu:
1. Press the VOL (- or +) button to scroll to the Remove handset.
2. Press SELECT soft key button. “Remove handset?” shows on the display.
3. Press the YES soft key to confirm de-registration. “Saved” shows in the
display and then shows “Press “REG” to initiate registration” in the
handset.
NOTE: You can press the REG soft key to enter the registation mode again.
Programming the Telephone

17
De-Register (Only applicable for base)
From the Phone Setting Menu:
1. Press the VOL (- or +) button to scroll to the Deregistration.
2. Press SELECT soft key. The list of all registered handsets will be shown,
and use the VOL (- or +) button to scroll to your selection.
3. Press the SELECT soft key. “Remove handset?” shows on the display.
4. Press YES soft key to confirm de-registration. “Saved” shows in the
display and then shows “Press “REG” to initiate registration” in the
handset.
2nd Call Alert
If it is set to On, you will hear the alert tone when you are in conversation
and there is an incoming call from another line.
From the Phone Setting Menu:
1. Press the VOL (- or +) button to scroll to 2ND Call Alert.
2. Press SELECT soft key. Use the VOL (- or +) button to scroll to your
selection. The default setting is On.
3. Press SELECT soft key to save your selection and “Saved” shows in the
display.
Handset Name (only applicable for handset)
From the Phone Setting Menu:
1. Press the VOL (- or +) button to scroll to the Handset name.
2. Press SELECT soft key. The default name is Handset.
3. Use the touch-tone pad to enter a name (up to 13 characters). More
than one letter is stored in each of the number keys. For example, to
enter Bill Smith, press the 2 key twice for the letter B. Press the 4 key 3
times for the letter I. Press the 5 key 3 times for the letter L. Press the 5
key 3 times for the second letter L, and press the 1 key to insert a space
between the first and last name. Press the 7 key 4 times for the letter
S; press the 6 key once for the letter M; press the 4 key 3 times for the
letter I; press the 8 key for the letter T; press the 4 key twice for the
letter H.
NOTE: If you make a mistake, press DIR/CID button to move the cursor
forward or backward, and then use the Mute/Del button to backspace and
delete one character at a time.
4. Press the SAVE soft key button to save your name. You will hear a
confirmation tone and the display shows “Saved”.
Programming the Telephone

18
Update Handset List (only applicable for base)
This function is used to update all registered handsets from the current
handset name list.
From the Phone Setting Menu:
1. Press the VOL (- or +) button to scroll to the Update HS List.
2. Press SELECT soft key.
3. The latest handset name list stored in the base will be sent to all
registered handsets.
Display Setting
1. Make sure your phone is OFF (not in Talk mode).
2. Press the Menu button on HS or the MENU soft key on BS to go to the
main menu.
3. Press VOL (- or +) button to scroll to Display Setting.
4. Press SELECT soft key to confirm and you may program the following
items: Language, Contrast and Backlight (base only).
Language
From the Display Setting Menu:
1. Press the VOL (- or +) button to scroll to the Language.
2. Press SELECT soft key.
3. Use the VOL (- or +) button to select English, Francais or Espanol. The
default setting is English.
4. Press SELECT soft key to save your selection.
Contrast
From the Display Setting Menu:
1. Press the VOL (- or +) button to scroll to the Contrast.
2. Press SELECT soft key. The “MIN and MAX” contrast scale shows on the
display.
3. Use the VOL (- or +) button to adjust the contrast. The display instantly
adjusts with each press of the VOL (- or +) button.
4. Press SELECT soft key to save the desired contrast level.
Backlight (Only applicable for base)
From the Display Setting Menu:
1. Press the VOL (- or +) button to scroll to the Backlight.
2. Press SELECT soft key and use the VOL (- or +) button to select Always
On or Automatic.
3. Press SELECT soft key to save your selection.
Programming the Telephone

19
Sound Setting
1. Make sure your phone is OFF (not in Talk mode).
2. Press the Menu button on HS or the MENU soft key on BS to go to the
main menu.
3. Press VOL (- or +) button to scroll to Sound Setting.
4. Press SELECT soft key to confirm and you may program the following
items in base and handset: Ring Tone, Ring Volume and Key Tone.
Ring Tone
There are 8 tone levels for your selection. They are Melody 1 to 8 for line 1
and line 2 respectively.
From the Sound Setting Menu:
1. Press the VOL (- or +) button to scroll to the Ring Tone.
2. Press SELECT soft key.
3. Use the VOL (- or +) button to scroll to your selection and use the DIR
or CID button to toggle between L 1 and L 2. The default setting is
Melody 1 for both lines.
4. Press SELECT soft key to save your selection and “Saved” shows in the
display.
Ring Volume
There are 5 volume levels and OFF for your selection. The Ring volume can
be set individually for each line.
From the Sound Settings Menu:
1. Press the VOL (- or +) button to scroll to the Ring Volume.
2. Press SELECT soft key.
3. Use the VOL (- or +) button to scroll to your selection and use the DIR
or CID button to toggle between L 1 and L 2. The default setting is
VOL 3.
4. Press SELECT soft key to save your selection and “Saved” shows in the
display.
Key Tone
From the Sound Settings Menu:
1. Press the VOL (- or +) button to scroll to the Key Tone.
2. Press SELECT soft key. Use the VOL (- or +) button to select On or Off.
3. Press SELECT soft key to save your selection and “Saved” shows in the
display.
Programming the Telephone

20
Answering System (only applicable for base)
1. Make sure your phone is OFF (not in Talk mode).
2. Press the MENU soft key on BS to go to the main menu.
3. Press VOL (- or +) button to scroll to “Answer Sys.”.
4. Press SELECT soft key to confirm. You may program the following items
in base: On/Off Status, OGA Playback, OGA Record, Set OGA, Set
Office Time, Ring Delay, Message Length, Call Screening, Message Alert,
Remote Password.
On/Off Status
This is used to set the answering system On or Off for each telephone line
individually.
From the Answering System Menu:
1. Press the VOL (- or +) button to scroll to the On/Off Status.
2. Press SELECT soft key.
3. Use the VOL (- or +) button to select On or Off and use the DIR or CID
button to toggle between L1 and L2.
4. Press the SELECT soft key to save your selection and the status shows in
the display.
OGA Playback
From the Answering System Menu:
1. Press the VOL (- or +) button to scroll to the OGA Playback.
2. Press SELECT soft key.
3. Use left and right button to toggle between Line 1 and Line 2 and use
VOL (- or +) button to scroll to your selection.
4. Press SELECT soft key to play the selected OGA, if the selected OGA is
empty, “EMPTY” shows in the display.
OGA Record
From the Answering System Menu:
1. Press the VOL (- or +) button to scroll to the OGA Record.
2. Press SELECT soft key.
3. Use left and right button to toggle between Line 1 and Line 2 and use
VOL (- or +) button to scroll to the selection you want to record.
4. Press the SELECT soft key and begin recording.
5. Press the FINISH soft key to end the recording.
6. After recorded, the unit will automatically play the OGA once.
Programming the Telephone
Other manuals for 25250
2
Table of contents
Languages:
Other RCA Telephone manuals