RCA J25400TX52AJ9 User manual

Tel mm mm
ion
User's G ade
Changing Entertainment. iin.

l p@rtant mnf@r ati@n
WARNING
To reduce the risk of fire or
electric shock, do not expose
this product to rain or moisture.
_ Caution: To reduce the risk of electric shock, do
not remove cover (or back). No user serviceable
parts inside. Refer servicing to qualified service
personnel.
_K This symbol indicates
"dangerous voltage" inside
the product that presents a
risk of electric shock or
_This symbol indicates
important instructions
accompanying the product.
personal injury.
Refer to the identification/rating label located on the back panel of your
product for its proper operating voltage.
FCCRegulations state that unauthorized changes or modifications to this
equipment may void the user's authority to operate it.
Caution: Using video games or any external accessory with fixed
images for extended periods of time can cause them to be
permanently imprinted on the picture tube (or projection TV
picture tubes). ALSO, some network/program Iogos, phone
numbers, etc. may cause similar damage. This damage is not
covered by your warranty.
Cable TV Installer: This reminder is provided to call your attention to
Article 820-40 of the National Electrical Code (Section 54 of the Canadian
Electrical Code, Part 1) which provides guidelines for proper grounding
and, in particular, specifies that the cable ground shall be connected to the
grounding system of the building as close to the point of cable entry as
practical.
Product Registration
Please fill out the product registration card (packed separately) and return it immediately. Returning the card
allows us to contact you if needed.
Product Information
Keep your sales receipt to obtain warranty parts and service and for proof of purchase. Attach it here and record
the serial and model numbers in case you need them. These numbers are located on the product.
Model No. Serial No. Purchase Date:
Dealer/Address/Phone:

Table of Contents
Chapter 1: Getting Started
Things to Consider Before You Connect .......................... 2
Protect Against Power Surges........................................................2
Protect Components from Overheating ......................................2
Position Cables Properly to Avoid Audio Interference ............2
Important Stand and Base Safety Information .........................2
Use Indirect Light ..............................................................................2
Things Needed Before You Connect .............................................2
rv + VCR ............................................................................. 3
Back of TV ...........................................................................4
The Front of Your TV ......................................................... 5
Start-up .............................................................................. 6
Put Batteries in the Remote ...........................................................6
Turn on theTV ....................................................................................6
Place All Available Channels Into Memory ................................6
Set the Time ........................................................................................6
The ClonePRO TM ................................................................... 6
Understanding the Menus ................................................. 6
Using Master and Basic Menus ......................................... 6
Setting Limits in Master Menus ....................................... 7
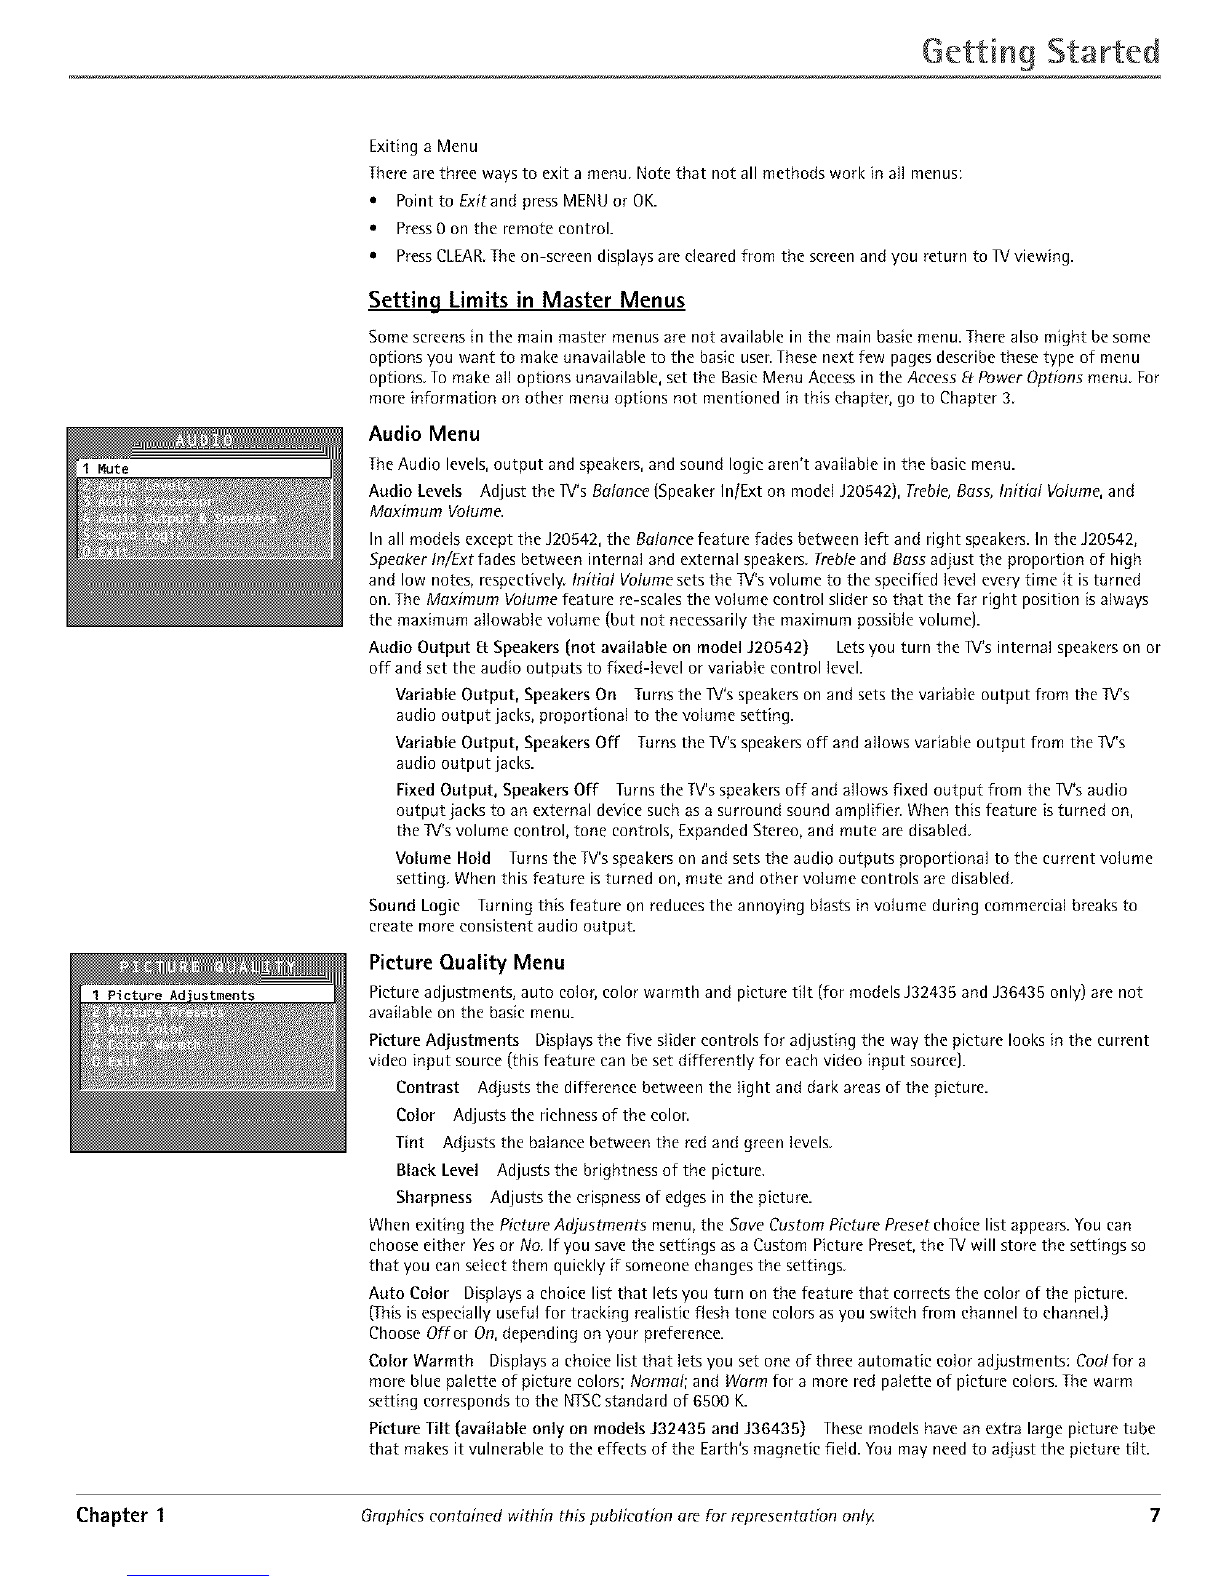
Audio Menu .........................................................................................7
Picture Quality Menu .......................................................................7
Channel Menu ....................................................................................B
Access _ Power Options Menu ......................................................B
Time and Timers Menu .....................................................................9
Parental Controls .............................................................................10
Chapter 2: Using the Remote Control
Types of Remote Controls ............................................... 11
Master (CRKI 7TDI) or Basic (CRKI 7TCI ) Remote
Buttons .............................................................................. 11
Universal Remote Buttons (CRK76TK1) ........................ 12
ClonePROTM Remote Buttons .......................................... 13
Using the WHO,INPUT or INPUT Button ...................... 14
Using the SYSTEM Button .............................................. 14
Programming the Remote to Operate Other
Components ................................................................... 14
FindOut If You Needto Programthe Remote........................14
How to Use the Remote After You've Programmed It. 14
Remote Codes .................................................................. 15
Chapter 3: Using the TV's Menu System
How to UseYour TV's Menu System ............................. 16
Menus .................................................................................................16
Audio Menu ..................................................................... 16
Picture Quality Menu ..................................................... 17
Channel Menu ................................................................. 17
Access [_ Power Options Menu ...................................... 1 7
Closed Captioning Menu ................................................ 17
Time and Timers Menu ................................................... 18
Parental Controls and V-Chip ........................................ 18
How V-Chip Works ..........................................................................18
Lock/Unlock Parental Controls .....................................................19
Parental Controls Access ...............................................................19
V-Chip Movie Rating Limit ...........................................................19
V-Chip TV Rating Limit ..................................................................19
Blocking Specific Content Themes .............................................20
Viewing Specific Content Themes...............................................21
V-Chip Unrated Program Block ...................................................21
Channel Block ...................................................................................21
Password ............................................................................................21
Menu Language ............................................................... 21
Chapter 4: Other Information
Using the ClonePROTM. ..................................................... 22
Modesof operation.........................................................................22
DSCImode.........................................................................................22
IRmode ..............................................................................................23
CloningaTV......................................................................................24
Channel Banner ............................................................... 25
Why You Should Use the Auto Tuning Feature ........... 25
How to SetUpthe Auto Tuning Feature...................................25
Troubleshooting ............................................................... 26
Care and Cleaning ........................................................... 28
Limited Warranty ............................................................ 29

Things to Consider Before You Connect
Protect Against Power Surges
•Connect all components before you plug any of their power cords into the wall outlet
•Turn off the TV and/or component before you connect or disconnect any cables.
•Make sure all antennas and cables are properly grounded. Refer to the Important Safeguards sheet packed
with your IV.
Protect Components from Overheating
•Don't block ventilation holes on any of the components Arrange the components so that air can circulate
freely.
•Don't stack components.
•When you place components in a stand, make sure you allow adequate ventilation.
•If you connect an audio receiver or amplifier, place it on the top shelf so the heated air from it won't flow
around other components.
Position Cables Properly to Avoid Audio Interference
•Insert each cable firmly into the designated jack
•If you place components above the IV, route all cables down the side of the back of the I1/instead of
straight down the middle of the back of the IV.
•If your antenna uses 300-ohm twin lead cables, do not coil the cables. Also, keep the twin lead cables away
from audio/video cables.
Important Stand and Base Safety Information
Choose the location for your I1/carefully Place the IV on a stand or base that is of adequate size and strength
to prevent the I1/from being accidentally tipped over, pushed off, or pulled off. This could cause personal injury
and/or damage the IV. Refer to the Important Safeguards sheet packed with your IV.
Use Indirect Light
Don't place the IV where sunlight or room lighting will be directed toward the screen Usesoft or indirect
lighting.
Things Needed Before You Connect
You will need a Master remote or ClonePRO '_ to set up the IV Contact your RCA commercial distributor to
purchase one of these.
2Graphics contained within this publication are for representation ontV Chapter 1

Getting Started
/k
BSCIpORT
TV + VCR
From Cable
o_Antenna
Note Thebeckof your71!mightvary from the abovegraphic Go to
thenextpage f_r infurrnation onthe beckpanel.
1. Connect your TV to your VCR
A. Connect a coaxial cable to the CABLEIANTENNA jack on your R/and to the Output Jack on your VCR
(sometimes labeled OUT TOIV),
B. Connect the audio/video cables. Connect audio cables (white and red) to the AUDIO Rand LIMONO jacks
on the back of the IV and to the Audio Output Jacks on the VCR (sometimes labeled OUT R L).
C. Connectthe video cable (yellow}to the VIDEOjack on the back of the TVand to the Video Output Jack
on the VCR.
2. Connect cable or antenna to your VCR
Connect the coaxial cable from your cable outlet or antenna to the Input Jack on your VCR (sometimes
labeled IN FROM ANTENNA or IN FROM ANT)
Chapter 1 Graphics conteined within this pubticetion are for representation onl}4 3

Getting Started
Back of TV
This manualcoversTVmodelsthat have different back panels.Match the back panel of your TVto oneof the
backpanelsshown below.
1 2 3
vIL 6
I
I
AX
BSC_RT
CABLE/
_ @ A.T....
S-VIOEO
Models J25435, J27435, J32435, J36435 and J27433
15
A,, /t,,
BSCI PORT
r_BL_2
_ANTENNA
Model J20542
1VIDEOand AUDIO R and L[MONO IN Jacks
Usedto connect video devices,such asVCRs,camcorders,laserdiseplayers,or video game consoleswith audio/
video outputs.
2AUDIORand LOUTJacks
AHowsconnection of external audio amplifiers, poweredspeakers,or other deviceswith line-level audio inputs.
Note that these outputs cannot drive standard speakersdirectly.
3 S-VIDEOIN
Usedto connect deviceswith S-Video capability (anS-Video cable is required).Rememberto connect audio
cablesaswell, becausethe S-Videocable carries only video.
4 CABLE!ANTENNAJack
Usedto attach either a home antenna or cable system to your TV.
5 PATIENTREMOTEPENDANT
Usedto connect to pillow speaker,nurse-call system,or other device to supply speaker-level audio or accept
remote control. The connector isa stereo (3-wire) phone jack. For moreinformation on its connection and
operation, pleasecontact your RCAdistributor or the supplier of the nurse-call system.
6 DSCIPORT
Also known as"Smartplug," this port [s usedto transfer information between a TVand other devices,suchasa
clone box or interactive system.Thisport isan eight-pin telephone-type port. For more information on its
connection and operation, pleasecontact your distributor or the supplier of the interactive system.
4Graphics contained within this publication are for representation ont}4 Chapter 1

Getting Started
VIDEO L/MONO R
Remote sensor
The Front of Your TV
If you cannot locate your remote you can use the front panel of your 1!/to operate basic user features.
Note that front panel access may be blocked by master menu settings Go to Access _t Power Options menu for
more information.
MENU Brings up the basic Main menu. When in the menu system, it selects highlighted items.
CH v Scans down through the channel list. When in the menu system, it points down to items and adjusts
menu controls
CH ^ Scans up through the channel list. When in the menu system, it points up to items and adjusts menu
controls.
VOL - Decreases the volume. When in the menu system, VOL - is used to point left to items and adjusts menu
controls.
VOL + Increases the volume. When in the menu system, VOL + is used to point right to items and adjusts menu
controls.
POWER Turns the TV on and off.
Front Panel Jacks
Only available on models J25435, J27433, J27435, J32435, and J36435
You can access the component you connected to the front of the IV by pressing the WHOelNPUT or INPUT
button on your remote until VlD appears on the screen The jacks are ideal for using a video game console or a
camcorden A component connected to the front panel jacks will override a component that is connected to the
back panel jacks
VIDEO {in) Receives video from another component such as a VCR, eameorder or video game console.
L/MONOand R AUDIO Receives audio from another component such as a VCR, camcorder or video game
console.
Chapter 1 Graphics contained within this publication are For representation only 5

Getting Started
Start-up
The steps below get your TV connected and ready to watch.
Put Batteries in the Remote
1 Pull off the cover of the battery compartment.
2 Place the two AAA batteries into the remote, matching the + and - end of each battery in the compartment
3. Replace the cover.
Turn on the TV
Press POWER on the TV or remote.
Place All Available Channels Into Memory
1 PressMENUontheremotecontrol, thenselectChannel, thenAutoChannelSearch
2. Select which channel list you'd like to find channels for (List A is the default).
No_e:lnpu_,(VID,SVID,etc.)must headded to the active channelfist separatelybeforethey canbe_cccssedRefertopagesat the
endof thisehoptarfor more infarinadon on _heCharmel menu andListElLabels
Set the Time
To set the time, select automatic setting of the time, or to prevent viewers from accessing the Current Time and
Schedule options, go to page 9.
If the control panel is not set to the current time, use the arrow and digit buttons on the remote control to
make changes. You can also enter numbers by using the up and down arrows on the remote.
The CIonePRO TM
If several lVs need to be programmed with the same menu settings, an optional ClonePRO remote can be used to
copy all of the menu settings from one TV into another TV to reduce installation time. Information can be both
downloaded to and uploaded from the ClonePRO using the DSCl port on the ]V's back panel or using the IR
sensor. A CIonePRO can be obtained from your RCA commercial distributor. To use the ClonePRO now, go to
page 22 for information. If you want to set other menu options before using the ClonePRO go to the next pages
of this chapter. Note you can use the CIonePRO at any time.
The master Main menu.
Understanding the Menus
This television displays two levels of menus: master and basic.
The master menus are accessible by pressing MENU on the master remote (CRKI 7TDI ). The master Main
menu will always display eight choices.
The basic menus are accessible by pressing MENU on a basic remote (CRKI 7TCI or other remote] or the front
panel. The choices available on the basic menus and control panels will vary depending on limits set by the
master user and the input selected. You can turn off the basic menu completely through the Access PcPower
Options menu. For more information on the effects of master user choices on the basic menu and basic user
functionality, go to the next pages of this chapter.
Noze: Options set in the master menu are stored m non vain tile memor}< If an yop tions are changed in the basic menu, and
then the 7Vis turned off, the IV defdult_ to the master menu settings once it's turned back on.
The basic Main menu. The choices
available in this menu change
according to limits set by the master
/lseh
Using Master and Basic Menus
Menus and choice lists use the point and select rule to navigate, but control panels use a variety of methods
to adjust features on your TV. The following pages detail how to use these controls to customize the
functions of your R/.
The first menu is called the Main menu PressMENU on the remote (master remote for master menu; basic or
universal remote for basic menu) or on the front panel (basic menu) to bring up the Main menu.
Menu choices take you to another menu or a control panel There are two ways to select a menu item:
i Point with the arrows and then select with MENU or OK
• Press a digit button on the remote. For example, in the master Main menu, press 3 to go straight to the
Channel menu.
6Graphics contained within this publication are for representation ont}4 Chapter 1

Getting Started
Exiting a Menu
There are three ways to exit a menu. Note that not all methods work in all menus:
• Point to Exitand press MENU or OK.
• Press0 on the remote control.
• Press CLEAR.The on-screen displays are cleared from the screen and you return to I1/viewing.
Setting Limits in Master Menus
Some screens in the main master menus are not available in the main basic menu. There also might be some
options you want to make unavailable to the basic user. These next few pages describe these type of menu
options. To make aHoptions unavailable, set the Basic Menu Access in the Access _Power Options menu. For
more information on other menu options not mentioned in this chapter, go to Chapter 3.
Audio Menu
The Audio levels, output and speakers, and sound logic aren't available in the basic menu.
Audio Levels Adjust the I1/'s Balance (Speaker IniExt on model J20542), Treble, Bass, Initial Volume, and
Maximum Volume.
In all models except the J20542, the Balance feature fades between left and right speakers. In the J20542,
Speaker In/Ext fades between internal and external speakers. Treble and Bass adjust the proportion of high
and low notes, respectively. Initial Volume sets the IV's volume to the specified level every time it is turned
on. The Maximum Volume feature re-scales the volume control slider so that the far right position is always
the maximum allowable volume (but not necessarily the maximum possible volume).
Audio Output _ Speakers (not available on model J20542} Lets you turn the IV's internal speakers on or
off and set the audio outputs to fixed-level or variable control level.
Variable Output, Speakers On Turns the IV's speakers on and sets the variable output from the TV's
audio output jacks, proportional to the volume setting.
Variable Output, Speakers Off Turns the ]V's speakers off and allows variable output from the TV's
audio output jacks.
Fixed Output, Speakers Off Turns the TV'sspeakers off and allows fixed output from the R/'s audio
output jacks to an external device such as a surround sound amplifier. When this feature is turned on,
the IV's volume control, tone controls, Expanded Stereo, and mute are disabled.
Volume Hold Turns the TV's speakers on and sets the audio outputs proportional to the current volume
setting. When this feature is turned on, mute and other volume controls are disabled.
Sound Logic Turning this feature on reduces the annoying blasts in volume during commercial breaks to
create more consistent audio output.
Picture Quality Menu
Pictureadjustments, auto color, color warmth and picture tilt (for modelsJ32435 and J36435 only) are not
available on the basicmenu.
Picture Adjustments Displays the five slider controls for adjusting the way the picture looks in the current
video input source (this feature can be set differently for each video input source}.
Contrast Adjusts the difference between the light and dark areas of the picture.
Color Adjusts the richness of the color.
Tint Adjusts the balance between the red and green levels.
Black Level Adjusts the brightness of the picture.
Sharpness Adjusts the crispness of edges in the picture.
When exiting the Picture Adjustments menu, the Save Custom Picture Preset choice list appears. You can
choose either Yes or No. If you save the settings as a Custom Picture Preset, the I1/will store the settings so
that you can select them quickly if someone changes the settings.
Auto Color Displays a choice list that lets you turn on the feature that corrects the color of the picture.
(This is especially useful for tracking realistic flesh tone colors as you switch from channel to channel.)
Choose Offor On, depending on your preference.
Color Warmth Displays a choice list that lets you set one of three automatic color adjustments: Cool for a
more blue palette of picture colors; Normal; and Warm for a more red palette of picture colors. The warm
setting corresponds to the NTSCstandard of 6500 K.
Pidure Tilt (available only on models J32435 and J36435) These models have an extra large picture tube
that makes it vulnerable to the effects of the Earth's magnetic field. You may need to adjust the picture tilt.
Chapter 1 Graphics contained within this publication are for representation only 7

Getting Started
IChanne! Guide
Channel Menu
There isn't a Channel menu in the basic menu, rather a Channel Guide. Most of the Channel menu options
are more advanced and you might not feel you need to customize any of the options.
Channel Selection Allows the master user to set the initial channel and to select which of the three
channel lists will be active (accessible to the basic user). If no initial channel is selected, the IX/tunes to the
last channel when turned on. If Hold is selected, the user will not be able to select any channel other than
the initial channel.
Signal Source Displays a choice list that lets you select the current signal source and turn muting and
blanking on or off for weak signals.
UHF/VHF Choose this if you are currently using an off-air antenna for IX! signals.
Cable W Choose this if you are currently using cable or a cable box for IV signals.
Auto Channel Search Tells the IV to search for all the channels available through the antenna input. When
the IV finds an active channel, it places it in the selected channel list; inactive channels (weak stations or
channels with no signal at all) are removed from that channel list.
List and Labels Displays a control panel that lets you edit the three channel lists and choose an eight-
character label for each channel. Follow the on-screen directions to customize channel lists and labels. Note
that pressing RESETor SKIP in the Lists and Labels menu returns the highlighted field to its default status.
Channel Use the up and down arrows to scroll up and down through the channels available via your
antenna. You can enter the channel number directly using the digit buttons.
Lists A, B, and C Use the up and down arrows to indicate whether you want the channel number to be
included in the highlighted channel list. Channels included in a list will be available to users when that
list is active. Channels not included in the active list will not be accessible to users.
Channel Label Use the up and down arrows to enter a label of up to eight characters for each channel.
Hold an arrow button down to scroll quickly through the characters. Press RESETor SKIP to clear the
currently highlighted label. To prevent a channel number from displaying on the screen, select "#" as the
eighth label character.
Auto Tuning Displays a choice list that lets you set up the IV to tune to the correct input channel when you
press its component button (VCRI, DVD, VCR2, or SAT) on a universal remote. Go to Chapter 4 for details on
the Auto Tuning feature.
Access 8t Power Options Menu
This control panel allows the master user to specify which features and functions basic users will be able to
access. Yellow and green color coding shows each item's status:
• Yellow default setting
• Green change from default setting
Remote Config. (Configuration} This feature tells the IV under what circumstances to respond to remote
control commands:
W1 This IV will only respond to a remote in IVI mode.
IV1 or IV2 This IV will respond if the remote is in either mode.
TV2 This IV will only respond to a remote in IV2 mode.
Disabled This IV will not respond to a remote at all, except MENU from the master remote.
Once you have assigned IVI or IV2 status to your IVs, you will need to tell the remote control which IV you
want to operate. On a master or basic remote:
1. Point the remote at the first IV (IVI).
2. Simultaneously press and hold the SYSTEM and I buttons.
3. After three seconds, release the buttons. The IV should now respond to the remote.
4. To control the second IV (IV2), simply repeat the process using the SYSTEMand 2 buttons.
On a universal remote:
1. Point the remote at the first IV (IVI).
2. Pressthe IVI button to put the remote in IV1 mode.
3. To control the second IV (IV2), simply repeat the process using the IV2 button and the second IV.
8Graphics contained within this puSlication are for representation ontKChapter 1

Getting Started
Basic Menu Access This feature tells the IV to either enable or disable the basic menu. When the basic
menu is disabled, users cannot access menus through the basic remote or the front panel.
TV Power Config. (Configuration} This feature determines whether the R/can be turned on and off with
the POWERbutton on the remote or the front panel. You can toggle between:
Switched The IV can be turned on or off; the Energy Saver can be enabled.
Always The R/is always on and cannot be turned off; all Energy Saver settings are ignored.
Front Panel This feature determines whether the front panel buttons are active (able to be used to control
the TVJ or not.
Energy Saver Setting When enabled, this feature turns the IV off after a specified period of disuse {no
remote or front panel button presses). You can toggle between Disabled, 2-hour, l-hour, and 30-minute
settings. When disabled, the R/won't turn itself off. If TVPower Config. is set to Always, Energy Saver
Settings are ignored.
Parental Controls This feature determines the amount of access basic users have to Parental Controls.
Blocking age-based rating and content themes is described in Chapter 3. You can toggle between:
Basic_Pwd Basic users are able to enter the Parental Control menu and change the password. Basic
users can watch blocked programming by entering the system password.
Basic Basic users are able to enter the Parental Control menu but cannot change the password. Basic
users can watch blocked programming by entering the system password.
NoBasic Parental Control does not appear on the basic Main menu. Basic users can watch blocked
programming by entering the system password.
If Parental Controls is set to NoBasiq Movie Rating Access, I1/Rating Access, Unrated Program Block, and
Channel Block will not be available to basic users, regardless of what those items have been set to
individually in the Parental Controls menu.
Note that the master user is always able to enter Parental Controls and change the password.
Time and Timers Menu
The Current Time and Schedule options might not be available to the basic user, depending on how they've
been set by the master. Time Configuration isn't available in the basic menu.
Current Time Enter the current time. The on-screen directions guide you through the steps needed to set
the time. This feature is accessible by basic users only if Set Time Access is set to Basic {unless an invalid time
is received).
Schedule Set up a schedule for the IV to turn itself on and off. The on-screen directions guide you through
the steps needed to set the schedule. (If the current time has not been set, you will be required to set it.) This
feature isn't available to basic users if Schedule Recurrence is set to Disabled. If TVPower Config. is set to
Always, Schedule will not work.
Note that pressing the RESETbutton while in the Schedule control panel clears both the start and stop times
and selects Inactive in the Schedule Status field.
Time Configuration This control panel lets you control several time-related functions. Scroll to the feature
you want to set in the Item field. Then, highlight the Setting field and scroll to select the setting you want
for that item. Your choice should be reflected in the table at the bottom of the control panel.
Schedule Recurrence Select what sort of access you want users to have to the scheduling function:
Disabled Prevents the basic user from viewing or changing the Schedule menu item.
Recurring This schedule is in effect indefinitely; both the master and basic user can view and
change the Schedule menu item.
One-time This schedule is only active once unless reset; both the master and basic user can view
and change the Schedule menu item.
Set Time Access Select who is able to change the current time:
Disabled Prevents the basic user from viewing or changing the Current Time menu item unless an
invalid time is received. The basic user will still be able to view the current time in the Status Display
if a time has been set.
Automatic TV sets the time using a time-set channel. Basic users can view the Current Time menu
item, but cannot change it.
Basic Both the master and basic user can view and change the Current Time menu item.
Chapter 1 Graphics contained within this publication are for representation only 9

Getting Started
Daylight Savings When on, the TV adjusts for daylight savings time.
Time Offset Set an offset (from +12 to -12 hours) from Universal Time (UTC}. Common US offsets from
UTC are:
Eastern -5:00
Central -6:00
Mountain -7:00
Pacific -8:00
Alaska -9:00
Hawaii -10:00
Parental Controls
If basic users are able to access the Parental Controls menu, the master user can still set limited access within
the menu through the Parental Controls Access menu. Setting movie and W ratings, content themes, etc. are
explained in Chapter 3.
Parental Controls Access You can choose which of the following Parental Controls menu items basic users
have access to (Setting toggles between Basic and NoBasic}:
Movie Rating Access This feature determines whether the Movie Bating Limit screen is accessible
through the basic menus.
]V Rating Access This feature determines whether the TV Bating Limit screen is accessible through the
basic menus.
Unrated Prog. Block This feature determines whether the Unrated Program Block feature is accessible
through the basic menus.
Channel Block This feature determines whether the Channel Block feature is accessible through the
basic menus.
10 Graphics contained within this publication are for representation ont}4 Chapter 1

Types of Remote Controls
All of the remote controls mentioned here, in addition to other remotes and accessories, are available from your RCA distributor. Descriptions of the
remote buttons and how they work are on the next pages. Except as otherwise specified, the master remote is the remote described throughout the
manual for operating the TV and setting up the TV's features.
Master Remotes
The master remote control (CRK17TD1) allows access to all of the TV's menus. It is used to customize the TV'sfunctionality for specific users or specific
situations.
Basic Remotes
The basic remote control (CRK17TCI] is used by the viewer for basic operating functions. It is designed so that the viewer cannot alter certain master
remote-specified features. The Sleep, Closed Captioning, and Channel Guide features can be accessed directly with remote buttons.
Universal Remotes
These remote controls offer basic control of the television within the limits specified through the master remote (i.e. with the same limitations as the
CRKI7TC1). In addition, they can be programmed to control other components (such as VCRs].
ClonePro
The CIonePro has main operating buttons that function the same as a master remote.
Hospital-Type Remotes
These specialized remote controls are Uk-reeognized for use {n patient beds. Some offer simple, single-button operation of the TV; others have
enhanced capability for greater control. Specific models and requirements depend upon what other devices might also be in the room, such as nurse-
call systems. See your distributor for more information.
Master (CRK17TD1) or Basic (CRK17TC1) Remote Buttons
POWER Turns the 1Von or off.
SYSTEM This button allows the remote to change
between TVl and TV2 mode. It also allows accessto
system-defined functionality, when available. See the
description later in this chapter for more details.
CC (ClosedCaptioning) Disp{ays the
Closed-Caption Displa_
VOL (Volume up or down) Decrease or
increase the I_'s vo[ume (unless Volume Hold
is on). Go to Chapter 1 for more information
on Volume Hold.
MUTE Lowers the volume to its minimum
level. Pressagain to restore volume.
GUIDE Displays the Channel Guide.
OK PressOK to select a menu item that is
highlighted.
MENU Displays the W's master Main menu
if using a master remote. Displays the basic
Main menu if using a basic remote.
Digit Buttons (0-9) Selects an available
channel number or numbered menu option.
Two digits must be pressed for each channel.
PressO then 6 for channel 6. For three-digit
channel numbers, press and hold 1 until "I--"
appears on the screen.Then press the other
two digits.
INPUT Switches between 1V (channels01-
125) and other available inputs. Seethe
description later in this chapter for more
details.
SLEEP On first press, displays the Sleep Timer
control panel, which allows the user to set a time for
the TV to turn itself off. Subsequent presses increase
the Sleep Timer's setting by 15-minute increments.
CHAN (Channel up or down) Scans up and down
through channels in the I_/'s memory.
GO BACK Tunes to the last selected channel or
video input.
INPO Displays channel information.
Arrow buttons (up, down, left, right) Use to move
through the on-screen menus.
CLEAR Removes any menu or display from the
screen and returns you to TVviewing.
RESET(CRK17TD1) Returns the picture to the
original settings and displays the Picture Presets
choice list.
,. SKIP (Commercial Skip- CRK17TC1) If you press
this button before you change the channel, the W
waits 30 seconds then takes you back to the original
channek Each subsequent pressadds 30 seconds to
the skip time. PressCLEARto cancel. Also Functions
as RESETin some menus.
Chapter 2 Graphics contained within this publication are for representation only. 11

Using the Remote Contro
Universal Remote Buttons (CRK76TK1)
ON,OFF Turns thelVon and off. When the remote is
in another mode and the remote is programmed to
operate that component, pressON,OFF to turn that
component on and off.
VCR1 Puts the remote in VCRmode. If
you set up Auto Tuning, pressing VCR1
tunes the TV to the correct channel.
VCR2 Puts the remote in VCRmode to control
a second VCR.If you set up Auto Tuning, pressing
VCR2 tunes the I_ to the correct channel.
DVD Puts the remote in DVD mode. If you set up
Auto Tuning, pressing DVD tunes the TVto the
correct channel.
MUTE Lowers the volume to its minimum leveh
Pressagain to restore volume.
VOL (up and down) buttons Decreaseor
increase the TV'svolume, unless Volume Hold
is enabled. Go to Chapter I for more
information on Volume Hold.
CC Displays the Closed-Caption Dispta_
GUIDE Displays the Channel Guide.
Arrow buttons (up, down, left, right) Use to
move through the on-screen menus. AJso moves
PIP window to different areas on the screen.
MENU Displays the TV's Main menu.
0-9 (Number buttons) Use to enter channel
numbers and time settings. To enter a two-digit
channel, press the two digits. To enter a three-
digit channel, pressand hold the first digit for
two seconds until two dashes appear to the
right of the number, then add the second two.
WHO*INPUT In IV mode, press to toggle
through the available Video Input channels. In
SATmode, press to select available channel lists.
REVERSE PressREVERSEto go backwards on a
videotape or disc.
RECORD If the remote is in VCR mode, press
to start recording.
PlAY
CLEAR
ANTENNA
L.E.D. Lights when you are programming the
remote.
]Vl Furnson the IMand putsthe remote inD/1
mode. Go to Chapter 1 for more information on
W1 mode.
TV2 Turns on the TV and puts the remote in ]V2
mode. Go to Chapter I for more information on
I_2 mode.
SAT'CABLE Puts the remote in SAF,CABLE
mode. If you set up Auto Tuning, pressing
SAToCABEEtunes the IV to the correct channel.
SKIP If you press SKIPbefore you change the
channel, the W waits 30 seconds and then goes
back to the original channel. Eachsubsequent
pressadds 30 seconds to the skip time. Press
CLEARto cancel.
CH (up and down) buttons Scan up or down
through the current channel list.
GO BACK Tunes to the last selected channel or
video input.
SYSTEM This button allows the remote to
change between W1 and 1_2 mode. It also
allows access to system-defined functionality,
when available. See the description later in this
chapter for more details.
INFO Displays channel information.
OK PressOK to select a menu item that is
highlighted.
CLEAR Removes any menu or display From the
screen and returns you to I_/viewing.
ANTENNA Functions as D!/VCRbutton in VCR
mode and I_/receiver button in SAF,CABLE
mode.
FORWARD Pressto advance a videotape or disc.
PLAY Plays avideotape or disc.
PAUSE Pressto pause playback.
STOP Stops playing a videotape or disc.
RESET Returns the picture to the original
settings and displays the Picture Presets choice
list.
PIP,SWAP and CH CTRL do not have a function
for these models
12 Graphics contained within this publication are for representation only. Chapter 2

Using the Remote Contro
ClonePRO TM Remote Buttons
The CIonePRO can be used as a master remote. Some of the buttons only apply when using the ClonePRO to download
or upload information to or from a ]V. Those buttons are described in Chapter 4
RESET Returns the picture to the original
settings and displays the Picture Presets
choice list.
INFO Displays channel information.
Arrow buttons (up, down, left, right} Use
to move through the on-screen menus. When
a menu isn't displayed, the up and down
arrows scan the channel list. The left and
right arrows decrease or increase the ]V's
volume, unless Volume Hold is enabled. Go to
Chapter I for more information on Volume
Hold.
MENU Displays the [V's Main menu.
OK PressOKto select a menu item that is
highlighted.
CLEAR Removes any menu or display from
the screen and returns you to W viewing.
Chapter 2Graphics contained within this publication are for representation onl}4 13

Using the Remote Contro
Using the WHO=INPUT or INPUT Button
Use the WHOelNPUT or INPUT button to toggle through the available input sources and view the content from the component you have connected to
the IV.
1. PressIV to place the remote in IV mode. Make sure the component you want to view is turned ON.
2. PressWHOelNPUT or INPUT to tune to the available input source and view the component.
3. PressWHOelNPUT or INPUT again to tune back to the channel you were previously watching.
Using the SYSTEM Button
When the television is connected to an interactive system or similar device, the SYSTEMbutton allows you to access system programming or other
special functionality through the DSCIjack (also known as "Smartplug"}.
On a master or basic remote, the SYSTEM button can also allow independent remote control of two ]Vs. Once you have specified I1/1 or TV2 status for
the Ivs (Access 8: Power Options menu in Chapter 1), follow these steps to tell the remote which IV you want to operate:
1. On the remote control, simultaneously press and hold the SYSTEM button and I (for IVI} or 2 (for 11/2).
2. After three seconds, release the buttons. The specified IV should now respond to that remote.
3. To control the other IV, simply repeat the process using the other (1 or 2} button.
Programming the Remote to Operate Other Components
The universal remote control can be programmed to operate most brands of remote controllable VCRs, DVD players, audio receivers, satellite receivers
and cable boxes. The remote is already programmed to operate most RCA, GE and Proscan VCRs, DVD players, audio receivers and satellite receivers.
Note:TbeDVDbutton cannot beprogrammed
Find Out If You Need to Program the Remote
To determine whether the remote needs to be programmed, turn a component ON, point the remote at the component, and press the component
button. Then press ONeOFF or channel up or channel down to see if the component responds to the remote commands. If not, the remote needs to be
programmed.
1. Turn on the component you want the remote to operate.
2. Look up the brand and code number(s) for the component on the code list at the end of the chapten
3. Pressand hold the component button that corresponds to the component you want the remote to operate [VCR,etc.}
4. Enter the code from the code list.
5. Release the component button.
6. Press ONeOFF to see if the component responds to the remote commands. If it doesn't, try pressing the component button and then ON.OFF
again.
7. If you get no response, repeat these steps using the next code listed for your brand until the component responds to the remote commands.
How to Use the Remote After You've Programmed It
Once the remote has been programmed successfully, you are ready to use it to control your components To operate the component:
1. Pressthe component button [VCRI, VCR2, DVD, or SAT_CABLE} to set the remote to operate the component.
2. Press ONeOFFto turn the component ON or OFE
3. Use the remote buttons that apply to that component.
No_c:If you keeppressingbuttons undno_binghoppens,_be_cmo_cisproboblyin tbewrong mode Youmust pressthecomponent button _batma_ches_becomponentyou
want tooperate[i e, if you want tooperatethe VCR,pressVCR1on theremotecontrolto put theremotein VCRmode)
14 Graphics contained within this publication ore for representation ont}4 Chapter 2

Using the Remote Contro
Remote Codes
'i'li'
Admiral ................................................................................................2131
Adventura ............................................................................................2026
Aiko ......................................................................................................2027
Aiwa ........................................................................................... 2002, 2026
Akai ........................... 2003, 2004, 2005, 2007, 2008, 21 I 1,2112, 2113
American High ................................................................................... 202 I
Asha ...................................................................................................... 2013
Audio Dynamics ..................................................................... 2009, 2010
Audiovox ............................................................................................. 2014
Bell & Flowell ...................................................................................... 201 I
Beaumark ............................................................................................ 2013
Broksonic ................................................................................. 2012, 2025
Calix ..................................................................................................... 2014
CandJe ................................ 2013,2014,2015,2016,2017,2010,2019
Canon ............................................................................. 2021, 2022, 2114
Capehart ................................................................................... 2020, 21 I0
Carver .................................................................................................. 2062
CCE ........................................................................................... 2027, 206 I
Citizen ..................... 2013,2014,2015, 2016, 2017, 2018,2019,2027
Colortyme .......................................................................................... 2009
Colt ....................................................................................................... 206 I
Craig .................................................................... 2013, 2014, 2023, 2061
Montgomery Ward ...................................................... 2075, 213 I
Motorola ....................................................................... 2021,2131
MTC .................................................................... 2002, 2013, 2026
Multitech ........................... 2002, 2013, 2016, 2026, 2053,206 I
NEC .............................................. 2009,2010,2011,2016,2018,
................................. 2058, 2064, 2076, 2078, 2079, 21 I I, 2123
Nikko ......................................................................................... 2014
Noblex ...................................................................................... 2013
Olympus ...................................................................................202I
Opdmus .........................................................................2014,2131
Optonica ...................................................................................2096
Orion .......................................................................................2035
Panasonic...........................202 I, 2022, 2109, 2125, 2126, 2127
Pentax ...........................................2016,2055,2056,2107,2120
Pentex Research .....................................................................20 I8
Philco ........................................................202I, 2022, 2062, 2063
Philips .......................................................202I, 2062, 2096, 2124
Pilot ...........................................................................................2014
Pioneer ..........................................2010, 2055, 2080, 208I, 2123
Portland ...................................................2016,2017,2019,2110
PROSCAN ....................................................................2000, 200I
Protec .......................................................................................206I
Pulsar.........................................................................................2104
Quarter ....................................................................................201I
Quartz .......................................................................................201I
Quasar ................................................................202I, 202Z 2125
RCA ..............................................2000,200 I, 2003, 2013,202 I,
Cuetis-Mathes .................................................. 2000, 2002, 2009, 2013......................... 2055, 2056, 2082, 2083, 2084,2085, 2086,2087,
........................................................ 2016,2018,2021,2022,2024,2II5 ....................... 2088, 2089, 2090, 209 I, 2107, 2115, 2120, 2125
Cybernex ............................................................................................. 2013 Radioshack/Raalisdc .............................. 2002,2011,2013,2014
Daewoo ................... 2015, 2017, 2019,2025, 2026, 2027, 2028, 21 I 0
D_ytron ................................................................................................21 I0
Dbx ............................................................................................ 2009, 2010
Dimensia .............................................................................................. 2000
Dynatech .................................................................................. 2002, 2026
Electrohome ............................................................................ 2014, 2029
Electrophonic ..................................................................................... 2014
Emerson ....................................................................... 2002, 2012,2014,
................................... 2015,202 I, 2024, 2025,2026,2029, 2030, 2032,
...................... 2033, 2034, 2035, 2036, 2037, 2038, 2039, 2040, 2041,
........... 202 I, 2022, 2023, 2026, 2029, 2049, 2050, 2096, 213 I
Radix .......................................................................................... 2014
Randex ...................................................................................... 2014
Ricoh ......................................................................................... 2120
Runco ....................................................................................... 2104
Samsung ............................. 2005,2013,2015,2033,2053,2112
Sanky .............................................................................. 2131,2104
Sansui ....................................................... 2010,2092,21 I1,2123
Sanyo ................................................................... 201 I, 2013, 2023
Scott .. 2012, 2015, 2025, 2032, 2035, 2030, 2065, 2093, 2116
............ 2042,2044,2045, 2047, 2065, 2105,2113, 2116, 2117, 2130 Sears ............................................. 2011, 2014, 2021,2023,2048,
Fisher ........................ 2011, 2023, 2048, 2049,2050,2051,2052,2110 .................................. 2049, 2050, 2051,2055,2056, 2107, 2118
Fuji ............................................................................................. 2021,2119 Sharp ....................... 2002, 2017, 2029, 2094, 2095,2096, 2131
Funai .......................................................................................... 2002,2026
Garrard ................................................................................................ 2026
GE ............................ 2000,2001,2013,2021,2022,2053,2115,2120
Goldstar ................................................... 2009,2014,2018,2054,2121
Gradiente ............................................................................................ 2026
Harley Davidson ................................................................................ 2026
Harman Kardon ................................................................................. 2009
Harwood ............................................................................................. 206 I
Headquarter ....................................................................................... 201 I
Hitachi ..................... 2002, 2055, 2056, 2057, 2107, 21 I I, 2120, 2122
HI-Q ..................................................................................................... 2023
Instant Replay ..................................................................................... 2021
]CL ........................................................................................................ 2021
]C Penney .................................... 2009,2010,2011,2013,2014,2021,
................................. 2022,2055,2056,2058,2059,2060,2107,2118
]ensen ............................................................................. 2055,2056,2111
]VC ...................................... 2009,2010,2011,2018,2058,2111,2123
Kenwood ................. 2009,2010,2011,2016,2018,2058,2111,2123
KLH ...................................................................................................... 2061
Kodak ........................................................................................ 2014,2021
Uoyd .......................................................................................... 2002,2026
Logik ..................................................................................................... 2061
LXI ........................................................................................................ 2014
Magnavox ........................... 202 I, 2022, 2062, 2063, 2104, 2108, 2124
Magnin .................................................................................................. 2013
Marantz ......................................................................... 2009, 2010, 201 I,
......................................................... 2016,2010,2021,2050,2062,2064
Marta .................................................................................................... 2014
Masushita ............................................................................................. 2021
MEI ........................................................................................................ 2021
Memorex ...................................................................... 2002,2011,2013,
....................................................... 2014,2021,2023,2026,2104,2131
MGA ............................................................................... 2029,2065,2113
MGNTechnology ............................................................................... 2013
Midland ................................................................................................ 2053
Minolta ........................................................................... 2055,2056,2107
Mitsubishi ......................... 2029,2055,2056,2065,2066,2067,2069,
................................. 2070,2071,2072,2073,2074,2106,2113,2123
Shintom .................................................... 2004,2056,2061,2098
Shogun ...................................................................................... 2013
Signature ...................................................................... 2002, 2131
Singer ................................................................... 2021,2061,2128
Sony .................................... 2002,2004,2098,2099,2119,2128
STS .................................................................................. 2021,2107
Sylvania....... 2002,2021,2022,2026, 2062, 2063, 2065, 2124
S7mphonic ..................................................................... 2002,2026
Tandy .............................................................................. 2002,2011
Tashiko ...................................................................................... 2014
Tatung ............................................................................. 2058, 21 I I
TEAC ............................................. 200Z 2026, 2050, 2085, 21 II
Technics ......................................................................... 2021,2109
Teknika ............................... 2002,2014,2021,2026,2100_2129
TMK ................................................................... 2013,2024,79047
Toshiba .................... 2015, 2049, 2051, 2055, 2065,2093, 2116
ToteVision ..................................................................... 2013,2014
Unitech .................................................................................... 2013
Vector Research .................................... 2009,2010,2015,2016
Victor ....................................................................................... 2010
Video Concepts .......................... 2009,2010,2015,2016,2113
Videosonic .............................................................................. 2013
Wards ......... 2002,2013, 2014, 2015,2021,2023, 2026,2029,
.2055,2056,2061,2096,2101,2102,2103,2107,2II6,2131
XR-1000 ............................................................. 2021,2026,2061
Yamaha ............................... 2009,2010,2011,2018,2058,2111
Zenith ............................................ 2004,2098,2104,2119,2128
ABC .........................5002, 5003, 5004, 5005, 5006, 5007, 5053
Antronix ........................................................................5008, 5009
Archer ......................................................SO00,S009, SOI0, SOI I
Cabletenna ..............................................................................5008
Cableview .................................................................................5008
Century ....................................................................................501I
Ci_zen .......................................................................................501I
Colour Voice .................................................................5012, 5013
Comtronics .................................................................. 5014,5015
Contec ..................................................................................... 5016
Jasco ......................................................................................... 50II
Jerrold .......... 5003,5005,5007,5010, 5023,5024, 5046,5053
M_gnavox ................................................................................. 5025
Memorex ................................................................................. 5026
Movie Time ....................................................... 5002, 5027, 5028
NSC .................................................................... 5002,5027,5028
Oak ...................................................................... 5002,5016,5029
Panasonic ...................................................................... 5040, 5052
Paragon .................................................................................... 5026
Philips ...........5011,5012,5013, 5019,5025, 5030, 5031,5032
Pioneer .......................................................................... 5033,5034
Pulsar ........................................................................................ 5026
RCA .................................................................... 5047,5049,5052
Realistic ......................................................................... 5009,5049
Regal .............................................................................. 5022,5035
Regency ................................................................................... 5017
Rembrandt .............................................................................. 5003
Runco ....................................................................................... 5026
Samsung ........................................................................ 5014,5034
Scien_ficAtlanta ....................................5006,5036,5037,5038
Signal .............................................................................. 5014,5010
Signature .................................................................................. 5003
SLMarx ....................................................................................5014
Sprucer .................................................................................... 5052
Starcom ..............................................................5007,5018,5053
Stargate .........................................................................5014,5010
Starquest ..................................................................................5018
Tandy ........................................................................................5040
Teleview ...................................................................................5014
Tocom ................................................................5004, S023, S041
Toshiba .....................................................................................5026
Tusa...........................................................................................5018
TV86 .........................................................................................5027
Unika .................................................................. 5000, 5009, 501 I
United Artists .........................................................................5002
United Cable .......................................................................... 5053
Universal ................................................. 5008,5009,5010,5011
Videowa 7 ................................................................................. 5044
Viewstar .................................................. 5015,5025,5027,5040
Zenith ................................................................. 5026,5050,505I
Chapparal ..................................................................... 5056,5057
Drake ............................................................................ 5058,5059
GE ............................................................................................. 5000
Generallnstruments ....................................... S060, S061,S062
Panasonic ................................................................................. 5075
Primescar ................................................................................. 5076
PROSCAN .............................................................................. 5000
RCA .......................................................................................... 5000
Realistic .................................................................................... 5063
Sony .......................................................................................... 5072
ST51 .......................................................................................... 5064
STS2 .......................................................................................... 5065
STS3 .......................................................................................... 5066
STS4 .......................................................................................... 5067
Toshiba ..................................................................................... 5068
Toshiba ..................................................................................... 5073
Uniden ...................................................................................... 5069
(for RCAand Dimensia brands only)
AM/FM ..................................................................................... 4003
Aux ........................................................................................... 4004
Phono ....................................................................................... 4005
CD ............................................................................................ 4007
Tape .......................................................................................... 4006
Chapter 2 Graphics contained within this publication are for representation only 15

How to Use Your TV's Menu System
Use the buttons on the remote or the front of your IV to access the menu system and make changes to the settings
Models other than J20542 will feature
these options under Audio Processor.
Menus
Press MENU on the remote or on the front panel to bring up the Main menu.
There are two ways to select a choice in a menu:
*Use your arrow buttons on your remote control to highlight your choice, and press OK.
*Pressa number button on the remote. For example, in the Main menu press 3 to go straight to the
Screen menu.
Exiting a menu
Thereare three ways to exit a menu:
" Highlight Exitand pressOK
*PressOon the remote.
*PressCLEAR.
J20542 Audio Processor menu
Audio Menu
Mute Switches audio muting on or off.
Audio Levels Allows you to adjust the IV's Balance,Treble,Bass,Initial Volumeand Maximum Volume.
Theseoptions aren't available to the basicuser.Goto Chapter I for more information
Audio Processor Controls the available audio modes, which control the way the sound comes through
your speakers.
Expanded Stereo* Electronically "widens" sound from stereo broadcasts, stereo VCRs, digital satellite
systems, DVD players, and laserdise players for a fuller, more spacious sound This choice will not be
present if Fixed Output, Speakers Off is selected from Audio Output 8rSpeakers.
Stereo* Splits the incoming stereo audio signal into left and right channels. Most IV programs and
recorded materials have stereo audio The IV displays the word STEREOwhen you tune to a program that
is broadcast in stereo
Mona Plays the sound in mona only (same signal sent to all speakers]. Use this setting when receiving
broadcasts with weak stereo signals
Second Audio Program (SAP) Plays the program's audio in a second language, if one is available. The
IV displays the word SAPwhen you tune to a program that is broadcast with SAP information SAP audio
is broadcast in mona. SAP is also used to broadcast a program's audio with descriptions of the video for
the visually impaired
Volume Hold (for model J20542) This menu item is available for all models, but is listed under the Audio
Output _t Speakers option. Lets you turn Volume Hold on or off.
Audio Output [t Speakers* Lets you turn the IV's internal speakers on or off and set the audio outputs to
fixed-level or variable control level. This option isn't available to the basic user. Go to Chapter I for more
information.
Sound Logic This option isn't available to the basic user. Go to Chapter 1 for more information.
*This feature is not available on model J20542.
Graphics contained within this publication are for representation onlg
16 Chapter 3

Using the W°s Menu System
Picture Quality Menu
The Picture Quality menu items allow you to adjust the appearance of on-screen images. Pressing RESETon
the remote control returns all Picture Quality menu settings to their factory defaults.
Picture Adjustments Displays the five slider controls for adjusting the way the picture looks. This option
isn't available to the basic user. Go to Chapter I for more information.
Picture Presets Displays a choice list that lets you select one of four preset picture settings: Bright Lighting,
Normal Lighting, Soft Lighting, or Custom Picture Preset. Custom Picture Preset is the default and will be
selected if the RESETbutton is pressed while in this menu.
Auto Color, Color Warmth and Picture Tilt These options aren't available to the basic user. Go to Chapter
I for more information.
ModelsJ32435 and J36435 will have a
fifth option in the Picture Q_ality menu-
Pict_reTilt.
Channel Menu
Channel Guide Displays the list of channels and their labels {if labelled) in the active channel list Press
GUIDE on the remote to display the Channel Guide menu. This is the only channel option available to basic
users.
Channel Selection Allows the master user to set the initial channel and to select which of the three
channel lists will be active (accessible to the basic user]. Go to Chapter I for more information.
Signal Source Displays a choice list that lets you select the current signal source. Go to Chapter I for
more information.
Auto Channel Search Tells the IV to search for all the channels available through the antenna input. Go to
Chapter I for more information.
List and Labels and Auto Tuning Go to Chapter 1 for more information.
Access _ Power Options Menu
This control panel allows the master user to specify which features and functions basic users might be able
to access, depending on how you set it up in Chapter I. Go to that chapter for more information.
Closed Captioning Menu
Many programs are encoded with closed captioning information, which lets you display the audio portion of
a program as text on the IV screen. CIosed-C@tion Display allows you to choose when closed-captioning is
displayed. Ctosed-C@tion Mode allow you to choose how closed captioning is displayed.
Closed captioning is not available on all channels at all times. It only appears on specific programs encoded
with closed captioning information. When a program is closed captioned, the letters CCare displayed in the
Channel Banner. Go to Chapter 4 for more information about the Channel banner.
Closed-Caption Display
TheClosed-Caption Displaylets you choosewhen you want to have ClosedCaptioning on.
Closed-Caption Mode
Your IV offers eight closed-captioned modes, including four text modes. To set the Closed-Captioning
Mode:
I. Select Closed Coptioningfrom the Main menu.
2. Highlight Closed-Coption Modeand press OK. A choice list will appear.
3. Point to your choice and press OK to select it and return to the Closed Captioning menu.
Chapter 3Grophiescontained within this publication ore for representation ont_ 17

Using the W°s Menu System
Time and Timers Menu
Current Time The on-screen directions guide you through the steps needed to set the time. This feature is
usable by basic users only if Time Configuration is set to Basic (unless an invalid time is received). Also, if the
master user hasn't set the time, the feature is unavailable.
Sleep Timer Select the amount of time you want to give the W before it shuts itself off (up to four hours).
The volume starts to decrease as a warning before the TV turns off. Pressany remote or front panel button to
turn the Sleep Timer off. This feature will not work if TVPower Config. is set to Always.
TheSleepTimer can alsobe accesseddirectly using the SLEEPbutton on the remote.
Schedule Set up a schedule for turning the IV on and off automatically. The on-screen directions guide you
through the steps needed to set the schedule. (If the current time has not been set, you will be required to
set it.) This feature isn't available to basic users if Schedule Recurrence is set to Disabled. If TVPower Config.
is set to Always, Schedule will not work.
Note that pressingthe RESETbutton while in the Schedulecontrol panel dears both the start and stop times
and selectsInactive in the Schedule Status field.
Time Configuration Go to Chapter I for more information.
Parental Controls and V-Chip
The first three choices in the Parental Controls menu involve software inside your IV (referred to as V-Chip)
which allows you to block IV programs and movies based on violence, sex, or other content you may believe
children should not view.
Once you block programs, you can unblock programs by entering a password.
By default, the software inside your IV is turned "off."
How V-Chip Works
V-Chip readsthe program's age-basedrating (IV-MA, IV-14, etc.) and content themes [(Violence (V),Adult
Language(k), ete.)].If you haveblocked the rating andtor content themes that the program contains, you
will receivethe messageThischannel is not approved for viewing.
Broadcasters are not required to provide content themes, so programs received with no content themes will
only be blocked if you block their age-based rating. You can also block out programs that have been given a
rating of "Not Rated," and programs that are considered "unrated." The TV age-based ratings and content
themes you can block are listed below.
TV-MA Mature Audienee Only. Specifically designed to be viewed by adults and may be unsuitable for children under
17. It contains one ot mote of the following content themes: crude indecent language (L), explicit sexual activity (S), or
graphie violence (V).
TV-t 4 - Parents Strongly Cautioned. Contains some material that many parents would find unsuitable for children under
14. Parents are strongly urged to exercise greater care in monitoring this program and are eautioned against letting
children under the age of t4 watch unattended. This program contains one or more of the lollowing eontent themes:
intensely suggestive dialogue (D), strong coarse language (L), intense sexual situations (S), or intense violence (V).
TV-PG - Parental Guidance Suggested. Contains material that parents may find unsuitable for younger children. Many
patents may want to watch it with theh younger children. The program contains one or mote of the following content
themes: some suggestive dialogue (D), infrequent coarse language (L), some sexual situations (S), or moderate violence (V).
TV-G - General Audience. Most parents would find this program suitable for all ages. It contains little or no sexual
dialogue (D)or situations (S),no strong language (L),and little or no violence (V).
TV-Y7 - Directed to Children 7 years and older. Designed for children ages 7 and above. It may be more appropriate for
children who have acquired the developmental skills needed to distinguish between make-believe and realit% Themes and
elements in this program may inelude mild fantasy violence (FV) or eomedic violence, or may frighten children under the
age of 7.
TV-Y - All Children. Themes and elements in this program are designed for a young audience, including children from
ages 2 6. It is not expected to frighten younger children.
18Graphics contained within this publication are For representation only Chapter 3
This manual suits for next models
12
Table of contents
Other RCA TV manuals