RCA P46721 User manual

\
USER'S
C UIDE
'PSc.qf..o
1%'z.qz_
/

WARNING
To reduce the risk of fire or shock
hazard, do not expose this TV to
rain or moisture. DO NOT OPEN
TO REDUCE THE RISK OF ELECTRIC SHOCK, DO
NOT REMOVE COVER (OR BACK). NO USER
SERVICEABLE PARTS INSIDE. REFER SERVICING
TO QUALIFIED SERVICE PERSONNEL.
This symbol indicates
"dangerous voltage" inside
the product that presents a
risk of electric shock or
personal injury.
This gymbol indicates
important instructions
accompanying the
product.
CAUTION: To prevent electric shock, match wide blade of
plug to wide slot, fully insert.
ATTENTION: Pour _viter les chocs _lectriques, introduire la
lame 1a plus large de la fiche dans la borne correspondante de
la prise et pousser jusqfiau fond.
Do not defeat the safety feature of the plug. The wide blade fits into the
wall socket only one way. If you need an extension cord, make sure it
matches the plug of the TV.
Operate TV only on 120 volts, 60 Hz AC power (normal house power).
For safetyreasons, make sure any equipment or accessories connected to
this product bears the ULlisting mark or the CSA certification mark. If in
doubt, contact qualified service personnel.
FCC Regulations state that unauthorized changes or modifications to this
equipment may void the user's authority to operate it.
Note To Cable TV Installer This reminder is provided to call your attentiori to Article 820-40 of the
National Electrical Code (Section 54 of the Canadian Electrical Code,
Part 1) which provides guidelines for proper grounding and, in particular,
specifies that the cable ground shall be connected to the grounding system
of the building as close to the point of cable entry as practical.
Product
Registration
Please fill out the product registration card and return it immediatel3a
Returning this card allows us to contact you if needed.
Keep your sales receipt to obtainwarranty parts and service and-for proof
of purchase. Attach it here and record the serial and modelnumbers in
case you ever need them. The numbers are located on the back of the TV.
-Model No.
Serial No.
Purchase Date:
Dealer/Address/Phone:
i

Thank youfor choosingRCA
Congratulations on your purchase of
an RCA TV. You ha'_e selected a
high-quality, precision-engineered
instrument designed to give you
years of enjoyment.
Table of Contents
Safety Precautions ................................................. Inside Front Cover
Product Registration ............................................. Inside Front Cover
First-Time Operation ..................................................................... 2-6
Operating Instructions
Front Panel Controls ................................................................................... 7
Remote Control
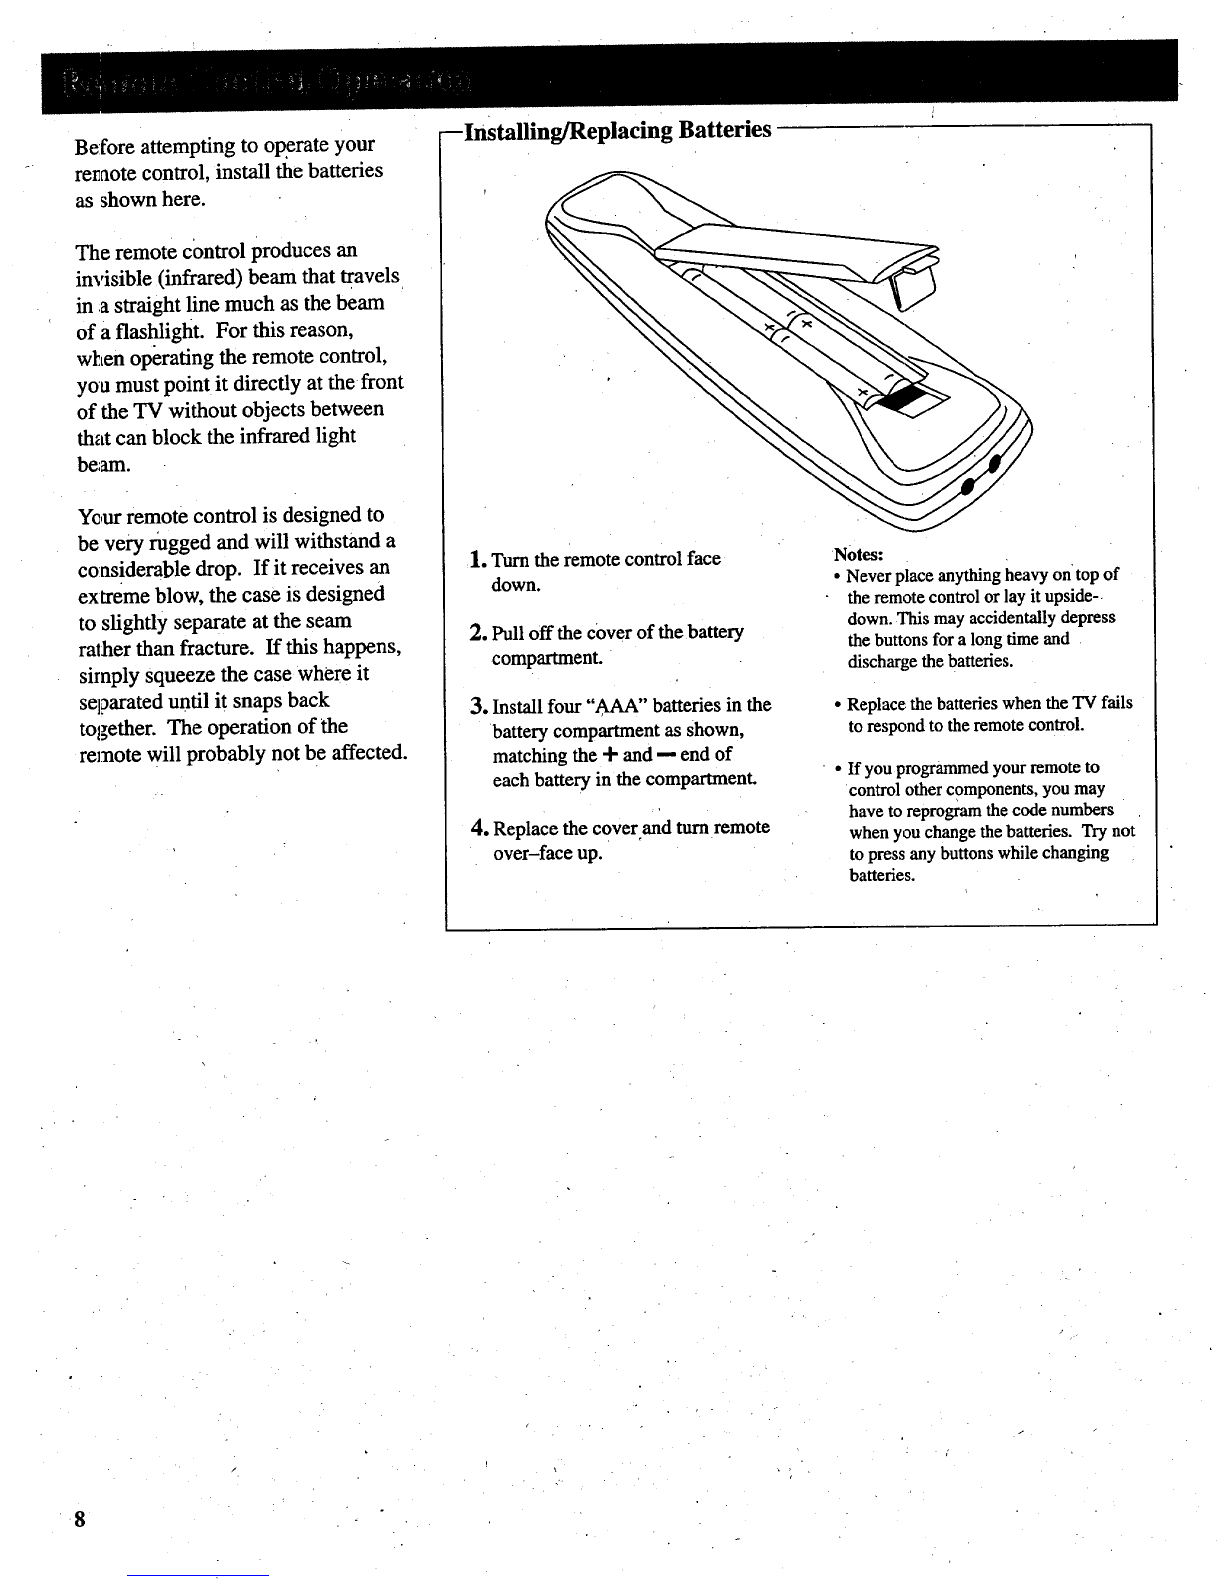
• Installing Batteries .................................................................................... 8
• Basic Operation Theory ............................................................................. 9
• TV Fun&ions... .................................................................................. 10-11
TV On-Screen Status Displays .................................................................. 12
VIDEO Menu- General Instructions ........ ................................................. 13
• Color Convergence Adjustnients ............................................................ 14
AUDIO Menu- General Instructions ........................................................ 15
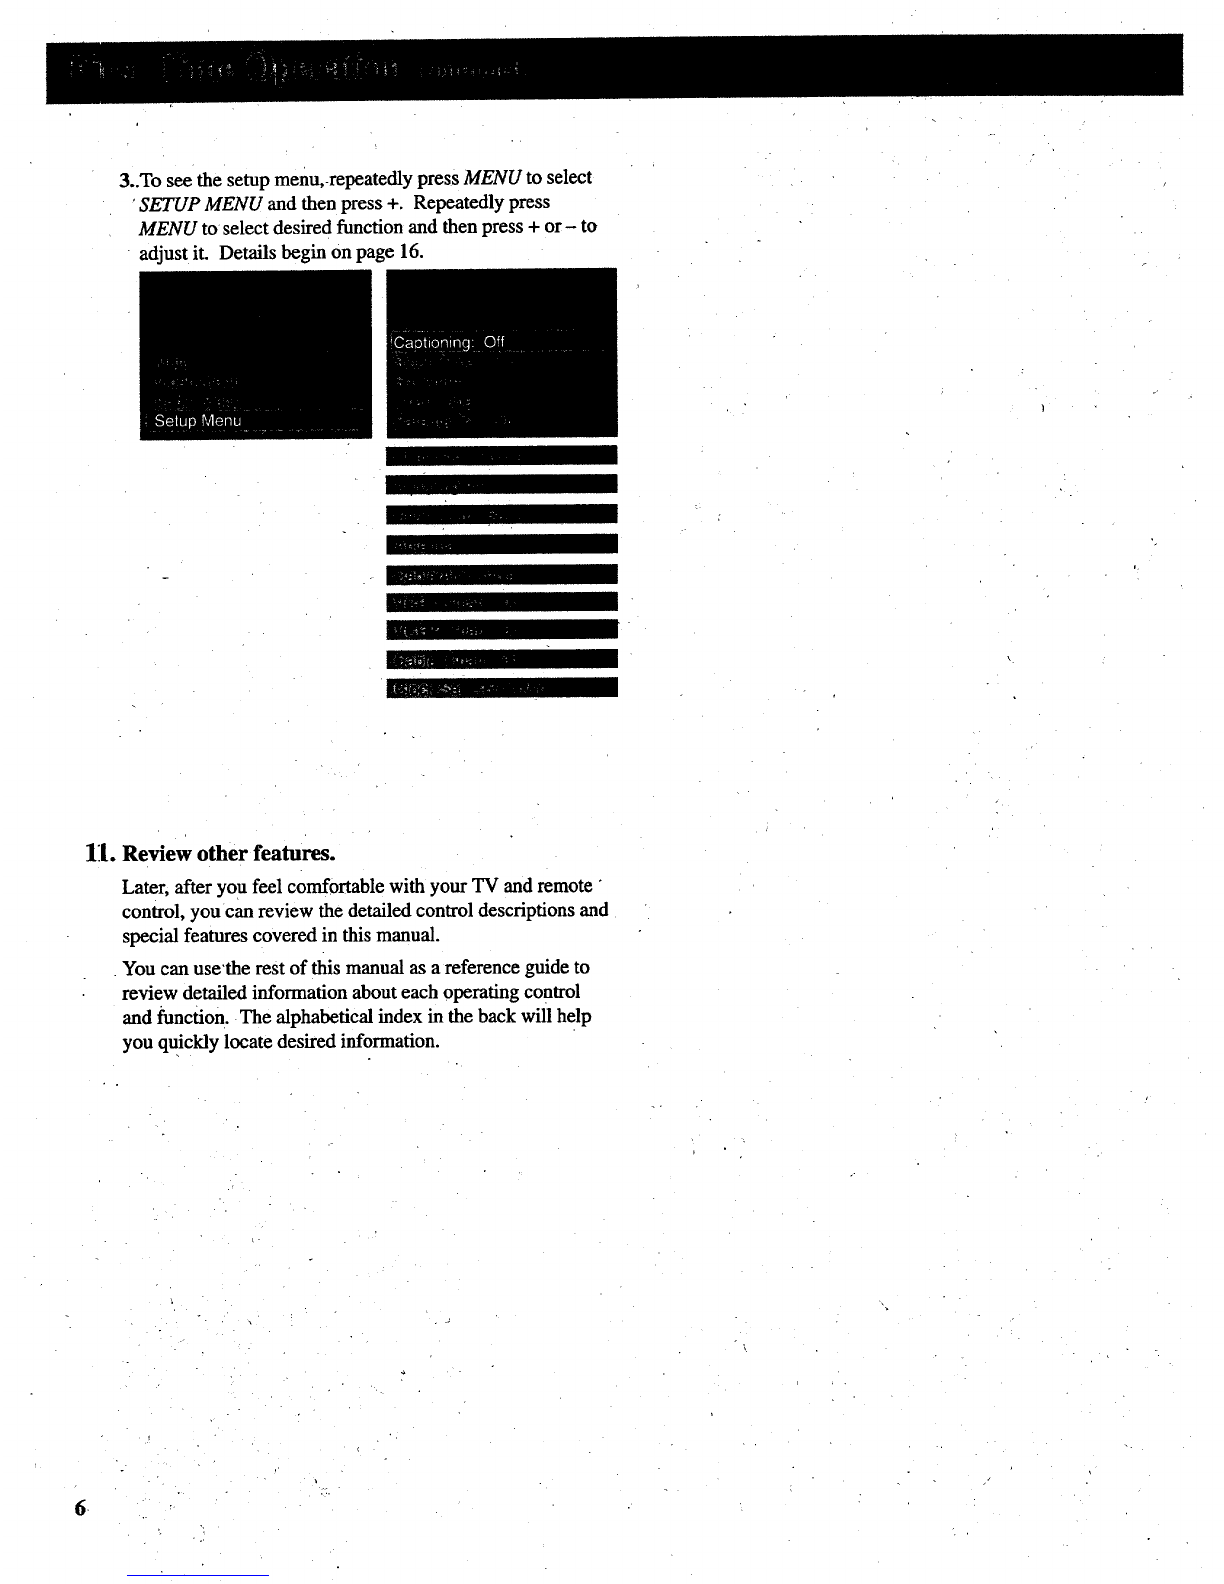
SETUP Menu- General Instructions .......................................................... 16
• Setting Closed Captioning ...................................................................... 17
• Setting the Sleep Timer ........................................................................... 18
• Setting the Alarm .................................................................................... 19
•Labeling Channels .................................................................................. 20
• Parental Control ....................................................................................... 21
• Channel Memory (Autoprogramming Channels) ................................... 22
• Channel Memory (Erasing/Adding Channels) ...,..................... .............. 22
• Changing Antenna Input ........................................................................ 23
•Setting up VCR Channels ........................................ .............................. 24
• Setting up Cable Box Channel..,. ........................................................... 25
Picture-in-Picture (PIP) ....................................................................... 26-27
Detailed Connections
Tips to Read Before Connecting Components ........................................... 28
Monitor Panel ............................................................................................ 29
Antenna and Cable Connections
• Home Antenna Connections .................. i................................................ 30
• Cable-TV Connections ...................................................................... 31-32
• Programming Remote to Control Cable Box .......................................... 33
• Cable-TV Operation .......................................................................... :....34
Component Connections
•Standard VCR................................................. i.................................. 35-36
• S-VHS (Super VHS) VCR................................................................. _....36
• Remote Buttons That Control RCA VCRs ............................................. 37
• Controlling Other Brands of VCRs ......................................................... 38
• Camcorder ........................................... ].................................................... 39
•Computers and Other Equipment ........................................................... 40
• Audio Amplifier ................... ................................................................... 41
• Programming Remote to Control Audio Equipment .............................. 42
• Speaker Connections .............................................................................. 43
Reference Section
Optional Accessories and Order Form................................ .................44246
Trouble Checks .................................................................. _................ '.48-49
Cleaning and Care............ .................................... ........................... ...........49
Index "(Alphabetical. Subject Reference) ........................................ :.....50-51
Limited Warranty ....... _................................. :.......... _........:......... Back Cover

The steps below will help you get your TV connected and
wo,rking quickly. The page numbers on which you can find
delailed instructions for each of these steps are also listed
for your convenience.
1. Unpack 'IV and accessories.
Shown here arethe accessories that came packed with your TV.
Remote Control
'1+ -U(+-U
(:.._.t._(-+_
Four AAA Batteries for
Remote
Power Cord
2. Install batteries in remote control.
Details are on page 8.
3. Position TV in room.
Amajor benefit of a Pf'ojection Color Television is its large
viewing screen. To receive full benefit of the expanded screen
size, placement of the TV in the viewing room is important.
The illustrations suggest the "best viewing areas" relating to
the TV's screen.
You will see the best picture if you sit directly in front of the
TV about 10-18 feet from the screen. Picture brightness will
decrease if you sit to the extreme left or right of the TV.
Your Projection TV is designed to provide a watchable picture
when viewed within the full 160°horizontal viewing area.
During daylight hours, you may also see some reflection on
the screen from exterior light sources. If so, you may wish to
use drapes or screens to reduce reflection or consider a
different placement of the TV.
2
CAUTION: Inadequate or poor ventilation may
cause overheating, damage, or therisk of fire
hazard.
This projection TV is equipped with ventilation openings in
the cabinet back and bottom to allow heat generated during
operation to be released. Inadequate air flow to these openings
may result in failures due to overheating, damage to your "IV,
and the risk of f-ire-hazard.
When !ocating and installing your projection television
receiver, readand carefully follow the instructions contained
in the "Installation" section in the enclosed safety pamphlet.
Side View
i
o
+10 o
Centerof Screen
!
5' I
15'
Top View

4. Connect antennaor cable-TV system.
Most antenna orcable-TV systems can be connected as
show here.
Incoming Cable from Antenna or
Cablo-TV System
Back
of TV
_A
_J
•Details for connecting ahome antenna to your "IV are on
page 30."
•Details for Connecting a cable-TV system to your TV
are on pages 31-32.
• l')etails for connecting a VCR to your TV are on
1:ages 35-36.
5. Attach power cord.
FLrstattach the flat end of the power cord completely _nto the
connector on the back of your TV, and then plug the other
end into a wall outlet.
6. "I_arnon TV, adjust the volume, and select a
channel.
•Press the TVbutton on the remote _turn on the TV.
When using the remote, remember to point it at the front
of the TV.
•Press'the VOL up or down button to adjust the volume to a
desired level. '
•Press the CHAN up or down button to select the next
channel in memory. You can also press two number
buttons to select a channel. To select a 3-digit cable
channel (up to channel 128), press and hold numberbutton
1until 1-- appears on the screen. Then press the othertwo
numbers. Channels 2-13 were programmed into the
channel memory for you at the factory, so pressing CHAN
up or down stops at these channels only. When you start
theAutoProgramming feature (described in"step 8), your
set will automatically scan through all channels and place
only the active channels for YOurarea into its channel
memory.
,.Details about using the remote are on page 8-11.
CHANButton
VOL Button
Number
Buttons
TV
VOL(Volume)
Down Button
CHAN (Channel) Down
Button

7. Converge Colors if Necessary.
If you notice colored rings or halos argund objects in the
picture, you may need to converge the colors. Over aperiod
of time, the picture tubes can drift out of alignment due to
normal bumps and vibrations or moving the 'IV. Details for
converging the colors are on page 14.
8. AutoProgram the TV's channel memory.
To start the TV autoprogramming itself, press the MENU
button repeatedly to select SETUP MENU and then press + to
display the setup functions. Repeatedly press MENU again
to select the AUTOPROGRAM function, and then press +.
Details are on page 22.
You can also add and erase channels from memory as desired.
Press MENU repeatedly to select the SETUP MENU, then
press + to display the setup functions.
Press MENU repeatedly to select (highlight) the CHAIE.MEM
function. Select the desired channel number by pressing the
CHAN up or down button or by pressing the two
corresponding number buttons.
MENU
Button
Then press+ to add a channel, or press -to erase a channel.
Details are on page 22.
4

9. Set the clock.
1. Repeatedly press the MENU button to select the SETUP
MENU and then press +; Press MENU repeatedly again
to select the CLOCK SET display.
2, Press and hold the- button to select the correct hour
(including AM orPM). Press and hold the +button m
select the correct minute. The correct time will now
appear on the screen whenever you change channels or
press the TV or DISPLAY button.
Note: If power is interrupted for an extended time, you will
need to reset the clock.
10. Review menus.
1. To see the video menu, repeatedly press MENU button to
select VIDEO MENU and then press +. Repeatedly press.
MENU to select desired function and then press + or - to
adjust it. Details are on page 13.
2. To see the audio menu repeatedly press MENU to select
the AUDIO MENU and then press + or - to adjust it.
Details begin on page 15:
Button

3..To see the setup menu,-repeatedly press MENU to select
SETUP MENU and then press +. Repeatedly press
MENU to select desired function and then press + or- to
adjust it. Details begin on page 16.
111. Review other features.
Later, after you feel comfortable with your TV and remote
control, you can review the detailed control descriptions and
special features covered in this manual.
You can use'the rest of this manual as a reference guide to
review detailed information about each operating control
and function. The alphabetical index in the back will help
you quickly locate desired information.
6

Shownherearethefrontpanelcontrolsfor
your'IV. You Can use either the front panel
controls or the remote control to operate the
TV. When using the remote control, point it
toward the screen.
I-- +
ee
i
MENU CH vCH/_
e
• (
VOL vVOL/', POWER
l
(_ POWER Button
•Press once to turn on TV.
•Press again to turn off TV.
• If your model has an indicator light inside the POWER
button, it will light whenever the TV is turned on.
QVOL (Volume) Buttons
•Press VOL up to increase volume, or press VOL down to
decrease volume.
•The volume display will automaticafiy appear on the
screen when you press the VOL buttons.
(_)CH (Channel) Buttons
,, Press CH up to see the next higher channel in memory.
,, Press CH down to see the next lowerchannel in memory.
,, You can add or erase channels in memory as desired.
Details are on page 22.
QMENU Button
•Press repeatedly until the menu you want to display is
selected, then press +or-. Next press MENU repeatedly to
select the function you want to adjust and then press + or-
to adjust the setting.
•Details about using each function begin on page 13.
- and + Buttons
Use these buttons after you have pressed the MENU button
to enter or adjust functions.
7

Beforeattemptingtooperateyour
remotecontrol,installthebatteries
asshownhere.
Theremotecontrolproducesan
invisible(infrared)beamthattravels
in astraightlinemuchasthebeam
ofaflas.hlight.Forthisreason,
whenoperatingtheremotecontrol,
youmustpointit directlyatthefront
oftheTVwithoutobjectsbetween
thatcanblocktheinfraredlight
beam.
Yourremotecontrolisdesignedto
beveryruggedandwill withstanda
considerabledrop.If it receivesan
extremeblow,thecaseisdesigned
toslightlyseparateattheseam
ratherthanfracture.If thishappens,
sirnplysqueezethecasewhereit
separateduntilit snapsback
together.Theoperationofthe
remotewill probablynotbeaffected.
--Installing/Replacing Batteries
1. Turntheremote control face
down.
2. Pull off the cover of the battery
compartment.
Notes:
•Never place anything heavy on top of
the remote control or lay it upside-
down. This may accidentally depress
the buttons for a long time and
discharge the batteries.
3. Install four "AAA" batteries in the
battery compartment as shown,
matching the -I-and m end of
each battery in the compartment.
4. Replace the cover and turn remote
over-face up.
Replace the batteries when the TV fails
to respond to the remote control.
If you programmed your remote to
control other components, you may
have to reprogram the code numbers
when you change the batteries. Try not
to press any buttons while changing
batteries.
8

Basic Operation Theory
Step 1
First press one of these five
component buttons to tell remote
which component you want to
control. You can program each of
these buttons to control your brand of
equipment.*
Step 2
Then press POWER button to turn on
that c_omp0nent.
Note: The TV and some Othercomponents
will automatically turn on When you press the
component button in step 1.
Step3
These function buttons can now be
used to control the basic functions of
the component you selected in step 1.
To control a different component, first
press its component button(VCR,
VCR2, CABLE, AUDIO, or TV), and
then press the desired function button.
__Note: Not all components have functions
that can be controlled by these buttons, but
you can experiment with your particillar
models to discover exactly which buttons will
control it.
Function Buttons
*The TV button automatically controls your TV -no additional
programming is required. Details for programming the VCR1 and
VCR2 buttons to control other brands of VCRs are on page 38.
Details for programming the AUDIO button to control audio
equipmen(are on page 41. Details for progi'amming the CABLE
button to control cable boxes are on page 33.
9

Only the buttons that are used to control the TV are
described here. The rest of the buttons are used to
operate VCRs (pages 37-38), Cable-TV boxes
(pal;e 33), and audio equipment (page 42).
.
.
\
\
®
®
(9
.@
@
@
®
®
@
q)TV Button
• Turns on TV and puts remote in "TV Mode" so that the other
remote buttons will control the TV.
• Displays time (if clock has been set) and channel number on the
TV screen.
Important Note: Some buttons on the remote control will not
control the TV unless the remote is in the "TV Mode". If another
component button (such as VCR2) is pressed, the remote will go into
the "VCR Mode" and will control a compatible VCR. To get back
into the '"rv Mode", simply press the button labeled TV. The remote
will go back into the "TV Mode" and will control the TV again.
®SKIP (Commercial Skip) Button
•Use this button when you want to scan othe_ channels during a
program break.
• When a break occurs, press SKIP once before changing channels.
The TV will count down 30 seconds on the screen and then
automatically switch channels back to the original channel.
• Press SKIP twice if you want the TV to count down 60 seconds.
Each additional .press will add another 30 seconds to the
countdown time (up to five minutes) and then each additional
press will add another 60 seconds to the countdown time. (up to
60 minutes).
• To cancel, press CLEAR. The countdown clock will disappear
from the screen, and the TV will stay tuned to the present
channel.
• When CLOSED CAPTIONING is turned on, the counter will only
displays for two seconds.
ltlr

:1
f--_
L_-Y VOL (Volume) Buttons
•Press VOL up to increase volume.
•Press VOL down to decrease volume.
(4_ -PREV CH (Previous Channel) Button
•Pressing the PREV CH button causes the TV to change back
to the last tuned channel. This is useful should youwant to
monitor two channels.
• To operate, select the first channel you wish to watch. Then
select the other channel by pressing two number buttons (for
example, press 0 then 6 for channel 6). The TV will now
"change back and_forth between the two channels each time
you press the PREVCH button.
Number Buttons (0-9)
•These buttons let you directly access any channel
number-even if the channel is not in the channel memory.
•To select a channel, press two number buttons (first one, then
the other). For example, press 0 then 6 for channel 6. Press 1
then 3 for channel 13.
• To select a 3-digit cable channel (like 127), press and hold
number button 1 until 1-- appears on the screen. Then press
the other x-wonumbers.
Note: Your TV will tune up to channel 128. Check with your
cable company to determine which channels are available in
your area.
MENU Button and _r+ Buttons
• Press MENU repeatedly until the menu you want to display is
selected, then press + or-. Next press MENU repeatedly to
select the function you want to adjust and then press +or - to
adjust the setting. Details about using each function begin on
page 13.
®Picture-in-Picture Buttons
• Press PIP to activate the picture-in-picture feature.
•Press PIP again to deactivate the picture-in-picture feature.
• Press FREEZE to freeze the small picture.
• Press MOVE PIP to move the small picture to the next corner.
• Press SWAP to switch the small picture with the large picture.
• Details are on pages 26-27.
®
®
CLEAR Button
•Pressing CLEAR clears the screen of all on-screen display
messages except MUTE and PARENTAL CONTROL.
1@
®
@
@
INPUT Button
• Lets you quickly view signals from the INPUT jacks. Pressing
this button switches the TV from its current channel directly to
channel 90, then channel 91, then channel 92.
• Channel 90 lets you see the signals coming from a device that is
connected to the S-VIDEO connector. Channel 91 accesses the
INPUT 1jacks and channel 92 accesses the INPUT2 jacks.
MUTE Button
•Press MUTE to quickly reduce sound to minimum level without
affecting the picture. This is especially useful during telephone
calls or other interruptions.
• Except when CAPTIONING is on, the word MUTE will be
displayed on the screen when the sound is muted.
• To restore sound, press MtFFE again or press VOL up_
CHAN (Channel) Buttons
• Press CHAN up to select the next higher channel in channel
memory.
• Press CHAN down to select the next lower channel in channel
memory.
• You can add or erase channels in memory as desired. Details
are on page 22.
DISPLAY Button
•Displays time (if clock has been set) and channel number on the
TV screen.
• Quickly removes menus and displays from the screen.
POWER Button •
Press POWERtoturnoff "IV.
11

Sleep Timer
Parental Control
Channel
(blue forANTA
and yellow for ANT B)
Channel Label
Captioning
MUTE
Commercial Skip
(13Time Display
This display appears (after the clock is set) whenever you
change Channels or press the remote's TV or DISPLAY
button.
Sleep Timer (SLEEP)
This display appearswhen the SLEEP TIMER function has
been activated. Details are on page 18.
PARENTAL CONTROL
This display appears to let you know the channel you
have tuned is locked-out andnot viewable because the
PARENTAL CONTROL function is activated. Details
are on page 21.
MUTE
This display appears when the TV's sound is mutedl It is
not displayed when closed captioning is turned on. Details
are on pa_e 11.
Commercial Skip
This display is a count-down timer that appears whenever
the commercial skip function is activated. Details are on
page 10.
Captioning
This display appears if Closed Captioning is available for
the TV program being watched. Details are on page 17.
®
®
Channel Label
This display appears when you label a channel. Details are
on page 20.
Channel
This display shows the TV's channel numberwhenever you
change channels or press the remote's TV or DISPLAY
button.
When the channel numbers are blue, you are watching the
signals from the ANTA antenna input. If yon change the
ANTENNA: A/B function to B, the color of the channel
numbers will change to yellow•to let you know you. are
watching the signals from the ANT B input.
The word STEREO appears next to the channel number if
the STEREO/SAP function is set to STEREO and the channel
you've tuned is broadcasting stereo. An asterisk will appear
behind the word stereo (STEREO*) if that stereo channel is
also broadcasting SAP (Second Audio Program). Details
about stereo and SAP are on page 15.
Channels 90, 91, and 92 are used to see the signals coming
from other devices like VCRs orcamcorders that are
connected to the INPUT jacks on the back of the TV....
•When you select channel 91, the words !NPUT7 appear to
let you _knowyou are now watching whatever signal is
coming in thro_Ighthe TV's INPUT 1jacks.
•When you select channel 92, the.words INPUT2 apI_earto
let you knowyou are now watching whatever signal is
coming in through the TV's INPUT 2 jacks.
• When you select channel 90, the _wordS-VIDEO appears to
let you know you are now watching whatever, signal is
coming in through the TV's S=VIDEO connector.
12

1. Repeatedly press MENU to select vIDEO MENU and
then press + or - to display the video menu. The COLOR function adjusts the amount of color in the picture.
Press + to increase color or press - to decrease color.
The TINT function adjusts the color of flesh tones. Press + to add
more red tint, or press - to add more green tint.
The CONTRAST function adjusts the overall brightness and contrast
of the picture. Press + to increase contrast, or press -_to decrease
contrast.
2, Repeatedly
press
MENU to
select
function,
then press
q-or- to
adjust it.
The BRIGHTNESSfunction adjusts the brightness of the dark
portions of the picture. Press + to increase brightness, Orpress -.to
decrease brightness.
The SHARPNESS function adjusts picture sharpness. Press + to
increase sharpness, or press - to decrease sharpness.
The PICTURE RESET function lets you quickly change all the
video functions (shown above) back to the factory settings. Press
either + or - to reset the video functions.
The CONVERGENCE function allows you to precisely align the
beams of the three projection picture tubes (red, green, blue) for
- _ optimum picture detail. Press the + button to display the pattern and
_ql VOL up or down to align the colors. See next page for details.
The video menu will automatically disappear from the screen if
you do no t press + or - within a few seconds.
Via remote control, your TV will "remember" which function
you displayed last--even after the menu has disappeared from
the screen. So, if you want to adjust the Same function again,
slimply press the + or - button on the remote control. The last
• thnction you adjusted will reappear on the "IV screen.
Adjusting for a Color Picture that Pleases You
1. Decrease color to minimum. This will leave a black=and-white
image on the screen.
2. Adjust contrast until the picture pleases you.
3. Adjust brightness until the black parts of thepicture appear
black. You may need to wait until the picture shows something
you're sure is black to.make this adjustment. Be careful not to
lose the detailsin darkly shaded areas.
4. Increase color until you reach a pleasing level of intens)ty.
5. Adjust tint until flesh tones or other color objects appear natural.
6. Adjust sharpness for a pleasing level of picture sharpness. (For
weak signals, the picture may be more pleasing with sharpness
decreased.)
Custom Picture Memory for Input Channels
The channel numbers you select to see signals from components
(like a VCR) that are connected tOthe iNPUT jacks oh the back of
the TV are called input channels. Selecting channel 90 lets you see
the signal coming from whatever component is attached to the
S-VIDEO connector, channel 91 lets you see the signal from the
INPUT 1jacks, and channel 92 lets you see the signal from the
INPUT 2 jacks. Your TV is equipped with a custom picture
memory for these input channels. When the TV is tuned to one of
these channels (90, 91, 92), you can change the picture settings for
that component's signal as desired without changing the settings of
any other channel. This is very useful because you'll be able to
adjust for the best picture from each of your components and tile
TV will remember those settings automatically the next time you
tune that input channel. 13

Your projection TV has three color
projection tubes--one for red, one for
g_een,and one for blue. When mixed
together in the proper proportion, the
output of these three color tubes can
produce many colors. To produce
these colors, however, the beams
must be precisely aligned over each
other so that the colors can be mixed.
"[he process of aligning these picture
beams is called setting the
6t "
convergence .
Over a period of time, the picture
tubes can drift out of alignment due
to normal bumps and vibrations or
moving the TV. If you move your
I_¢ or if, after a time, you notice
colored rings or halos around objects
in the picture, you may want to
conyerge (align) the colors.
Ib simplify convergence, an on-
screen menu is provided that allows
ou to display a test pattern of four
hnes on the screen. Properly
converged, the lines appear
white-which is actually a
combination of the outputs of the
l_hree color tubes. The position of the
green lines is stationary. The
positions of the red and blue lines are
adjustable. When properly adjusted,
the red and blue lines should lie
directly over the green lines to
produce single white lines.
Converging (Aligning) the Colors
--(with remote only)
1. Turn on the TV and select achannel
that is active in your area. Allow the
TV to operate at least ten minutes
before converging.
2. Repeatedly press the VIDEO button
until the CONVERGENCE function is
selected.
3. Then press the + button to display the
pattern.
i§iUSE VOL
TV TO EXIT
o
4. When properly converged, all three
colors in the pattern (red, blue, and
green) should align to form white
lines. If you see any red or blue lines
in the pattern, you can move them to
align with the green lines by pressing
the VOL up or down button.
5. Press the +button to select the arrow
color and direction, then press the
VOL up or down button to move the
lines.
Pressing
VOL up or
down when
these blue
alTOWS
appear,
moves the
blue lines
left or right
Pressing
VOL up or
down when
these blue
arrows
appear,
moves the
blue lines up
or down.
Press +tO
select arrow
color and
direction.
... III --
III USE VOL
TV TO EXIT
1
mU SE VOL
TV TO EXIT
1
Pressing
VOL up or
down when
these red _H
arrows
appear, USE VOL
moves ,the
red lines left TVTOEXIT
or right. 1
..J|!
BUSE VOL
TV TO EXIT
I
Pressing
VOL up or
down when
these red ",<.
arrows
appear,
moves the
red lines up
or down.
Note: You can also press the -button.to
return to a previous screen. Pressing -
displays the arrows in reverse order than
shown above.
6. When finished, press the TV button
to remove the pattern from the
screen.
14

1•.Repeatedly press MENU to selectAUDIO MENU
a_adthen press + or - to display the audio menu.
oRepeatedly
press
MENU to
select
function,
then press
+or-to
adjust it.
The audio menu will automatically
disappear from the screen if you do not
press + or - within a few seconds.
Via remote control, your TV will "remember"
which function you displayed last-even after
the menu has disappeared from the screen. So,
if you want to adjust the same function again,
.,;imply press the + or - button on the remote
control. The last function you adjusted will
reappear on the TV screen.
The TREBLE function adjusts the high frequency audio. Press +to
increase treble or press - to decrease treble.
The BASS function adjusts the low frequency audio. Press + to increase
bass, or press - to decrease bass.
The BALANCE function adjusts the left/right balance of sound from the
speakers. When adjusting the BALANCE function, sit in your normal
viewing seat while pressing the + and - buttons until the sound seems to
originate from a point halfway between the speakers. Press + to increase
sound from the fight speaker, or press - to increase sound from the left
speaker.
The STEREO/SAP function lets you choose either MONO (monaural),
STEREO, or SAP audio (if available) by pressing + or-. When a station is
broadcasting stereo and the STEREO/SAP function is set to STEREO, the
stereo indicator (STEREO) will appear on the screen before the channel"
number. Normally you can leave the STEREOISAP function set to
STEREO and your TV will then automatically reproduce either monaural or
stereo audio-whichever is broadcast. Some TV stations that broadcast
stereo also broadcast another sound channel called SAP (Second Audio
Program) which is sometimes used to offer the program in another
language: Your TV lets you know when SAP audio is available by
displaying an asterisk (*) on the screen .after the stereo indicator like this
(STEREO*). If you want to listen to the SAP channel when the asterisk
appears, change the STEREO/SAP function to its SAP setting. The SAP
setting will only appear in the function when SAP is available. Your TV
will thenreproduce the SAP audio until you change Channels or return the
STEREO/SAP function back to STEREO.
Note: Some TV stations transmit a "pilot" signal that makes your TV
think it's receiving stereo, even though the broadcast signal is monaural.
The pilot signal will make the stereo indicator (STEREO) appear on the
screen next to the channel number, however, you will not be able to hear
stereo sound. If this happens, check with the TV station to inquire whether
the programbeing broadcast is in true stereo or monaural audio.
The EXPAND STEREO function lets you add greater depth and dimension
to stereo.broadcasts. You can turn this function on and off as desired by
pressing + or- to change the setting between ON and OFF. Yon may
prefer to leave this function set to ON. Your TV will then automatically
process the stereo signals whenever a stereo broadcast is received (or
whenever a stereo tape is played through a stereo VCR thatis connected to
the TV's audio/video jacks labeled INPUT).
The SPEAKERS function lets you turn off the TV's internal speakers by
pressing + or- to change the setting between ON and OFF. You will
probably want to •leave the TV's speakers turned on unless you connect an
amplifier (with its own set of speakers) to the appropriate jacks on the back
of the TV a's described on page 27.
15

1°RepeatedlypressMENU to select SETUP MENU
and then press + or - to display the setup menu.
2. Rer eatedly
press
MENU to
select
function,
then press
+or-to
adjust it.
The se.tup menu will automatically disappear
from the screen if you do not press + or -
within a few seconds.
Via remote control, your TV will "remember"
which function you displayed last-even after the
menu has disappeared from the screen. So, if you
want: to adjust the same function again, simply
press the + or- button on the remote control.
The last function you adjusted will appear on the
TV ,;creen.
16
The CAPTIONING feature lets you display as text on the screen the audio
portion of certain programs encoded with Closed Captioning (CC)
information. Four types of closed captioning are available. Select
CAPTIONS 1 for full translation of the primary, language in your area.
CAPTIONS 2 is used for secondary language translation, simplified English,
or whatever is being transmitted in your area. Two Text modes are also
supported.
By setting the SLEEP TIMER, youcan program your TV to turn iiself off
after a certain period of time. This is useful whenever you want to watch TV
for an hour or so before going to sleep. Press the + or - button to select the
length of time you want the TV to stay on.
You can program your TV to turn on and/or off.at the times yo,uchoose by
Setting the ALARM ]_unction.
CHAN LABEL lets you program names (or labels) for the channel numbers.
The names you select will then appear on the screen whenever the channel
number is displayed.
The PARENTAL CONTROL feature lets you lock out any channels between 1
and 99 that you don't want your children to watch. Pressing + or- switches
this function from OFF to ON. When this function is set to ON, channels
that have been locked out with the CHAN CTRL function cannot be viewed.
When this function is set to OFF, all channels,can be viewed.
The CHAN CTRL (Channel Control) function works hand-in-hand with the ,
PARENTAL CONTROL function. It lets you select the channels you want to
lock out. First select the channel number you want to lock out and then
press + to change this function from NORMAL to LOCKED. When the
PARENTAL CONTROL function is set to ON, the channels you locked with
this function cannot be viewed
When you press + or- to start the A UTOPRO6RAM function, the TV will
automatically cycle through all channels and place the active channels for
your area in its channel memory. Pressing the CHAN up or down buttons
will then allow you to scan only active channels.
The CHANMEM function allows you to erase'and add channels to channel
memory as desired.
Because your TV has two separate antenna inputs on the back labeled
ANTA and ANTB, yoUcan connect two different signal sources, if desired.
By pressing + to change theANTENNA function, you can switch back and
forth between.the two signal sources. Each time you press +, the antenna
input will change.
The CABLE/AIR function tells your TV whether you have a cable-TV system,
or a home antenna connected to the TV. Your TV is so automatic that you
will probably never need to change this function. When your TV
autoprograms, it automatically adjusts the CABLE/AIR setting for you. If
you should ever need to override the automatic setting, press + or - to
change it,
The V.CR 1 CHAN function lets you program to which channel the TV will
automatically tune when you press the VCR button on the remote.
The VCR 2 CHAN function lets you program to which channel the TV will
automatically tune when you press the VCR 2 button on the remote.
The CABLE CHAN function lets you program t9 which channel the TV will
,'iutomatically tune when you press the CABLE button on the remote.
After you set the clock, you will be ab.le to see the on-screen time display
whenever you change channels or press the DISPLAY or TV button on the
remote control. To set the clock when this function is selected, first press
and hold - to set the correct hour (including AM and PM). Then press and
hold + to set the correct minutes.

The CAPTIONING feature lets
you ctisplay the audio portion of a
prog_:am as text on the TV screen.
This is useful to the hearing
impaired or anyone who wants to
watch a program without the
sound.
There are four types of closed
captioning transmissions
available. CAPTIONS 1 displays
the full translation of the primary
language in your area.
CAPTIONS 2 may be used as a
second source for secondary
lanl_:uages, simplified English, Or
othex translations Ixansmitted in
yottr area.
The closed captioning feature in
this TV also supports a Text
Mode. Text mode is used to
display text sent directly from the
TV or cablestation. Typically, this
information consists of program
information, weather bulletins,
local activities, etc. The two
inputs for Text Mode are TEXT 1
and TEXT 2.
Not,e: Closed Captioning is hot available on
all channels or at all times. Only specific
pro_Tamsencoded with Closed Captioning
information (CC) are applicable.
When Closed Captioning is available, the
_votd "Captioned" appears on the screen
when you change channels or press the TV or
DIYPLAY button on the remote.
-Setting Closed Captioning
1oRepeatedly press MENU to select
SETUP MENU, and then press + or - to
display setup functions.
CAPTIONING will be highlighted since
it is the first function in the setup menu.
(with or without remote)
4. The screen will begin to display the
TV program's audio portion as text
if the program has captioning.
2. Press the + or - button to select the
type of closed captioning: OFF,
CAPTIONS 1, CAPTIONS 2, TEXT 1
or TEXT 2.
3. When finished, the display will
automatically disappear from the screen
in a few seconds. To make it disappear
more quickly, press the CLEAR button.
-Turning Captioning ,Off
To turn off the closed captioning
feature, enter the CAPTIONING
functiori and press the + or - button
until the screen shows "Off."
17

By setting the Sleep Timer, you
can program your TV to turn itself
off after a certain period of time
(up to four hours).
This is useful whenever you want
to watch TV for an hour or so
before going to sleep.
-Setting Sleep Timer (with or without remote)
/
1. Repeatedly press MENU to select
SETUP MENU, and then press + or -
to display setup functions. Press
MENU to select SLEEP TIMER.
/
4. The sleep timer will begin to count
down to zero. The word "SLEEP"
will appear onthe screen whenever
you change channels or press the
remote's TV or DISPLAY button to
let you know the sleep timer is
activated.
2. Press the + or- button to select the
length of time (up to four hours) you
want the TV to stay on.
• Each time you press the + or -
button, the time will increase 30
minutes (up to 4 hours). Then the
time display will start over.
The amount of time remaining
before the TV shuts itself off will
appear in the sleep timer menu
whenever you display the SLEEP
TIMER function.
1hour
and
23 minutes
remaining
3. When finished, the display will
automatically disappear from the
screen in a few seconds. To make it
disappear more quickly, press the
CLEAR button.
5. When the sleep timer counts down
to 0:00, the sleep timer display will
appear on the screen for a few
seconds. Then the TV will turn
itself off.
you want the TV to stay on when
this display appears, press the +
button on the remote to add more
time to the SLEEP TIMER display.
-Clearing Sleep Timer
To cancel the sleep timer, enter the
SLEEP TIMER function and then press
the + or- button until the screen shows
0:00.
18
This manual suits for next models
4
Table of contents
Other RCA TV manuals