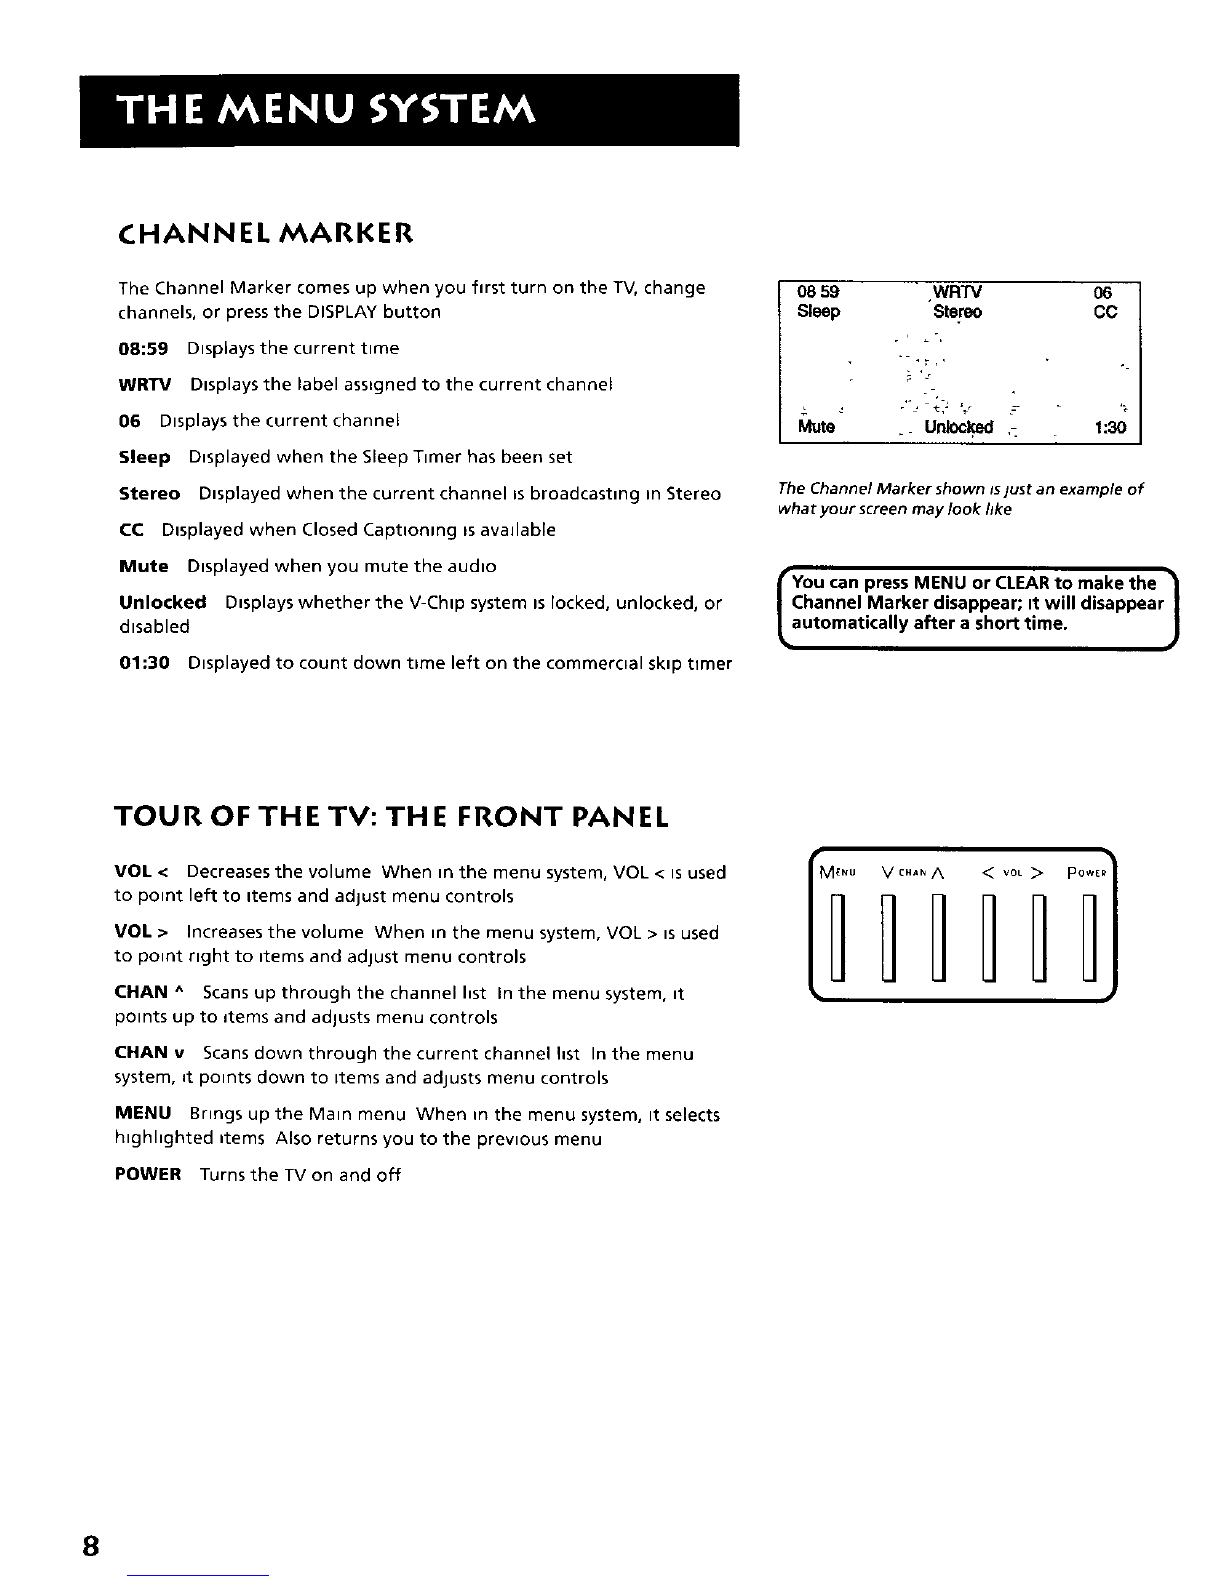
RCA MR27300 User manual

i "
It Si_il
colortelevisioncolortelevisionco
Iortelevisioncolorte|evisionco!o
rtelevisioncolortelevisioncolort
elevisioncolortelevisioncolortel
evisioncolortelevisioncolortelev
isioncolortelevisioncolo rtelevisi
oncolortelevisioncolortelevision
colortelevisioncolorte|evisionco
Iortelevisioncolortelevisioncolo
rtelevisioncolortelevisioncolort
elevisioncolortelevisionco|ortel
evisioncolortelevisioncolortelev
isioncolortelevisioncolortelevisi
oncolortelevisioncolortelevision
colortelevisioncolortelevisionco
IortelevisioncolortelevisioncoJo
rtelevisioncolortelevisior_co|ort
elevisioncolortelevisioncolortel
evisloncolortelevisionco|orte|ev
isioncolortelevisionco|ortelevisi
oncolortelevisioncolortelevision
colortelevisioncolortelevisionco
Iortelevisi_-
rtelevi._ _"
elevis'
eVISI_
oncoloL
colort_
Iortel
rte I
"elevisioncolo
_sioncoiort
Joncolortel
---lorte|ev
e_levisi
_sion
_OnCO
_colo
_|ort
_el¢-v

WARNING
To reduce the risk of fire or
shock hazard, do not expose
this TV to rain or moisture.
_o°::d(UCrebahc__.iSNk°fu:_ e_tr_ciSchea°b_e dp:r_°_red°ve
Refer servicing to qualified service personnel.
_IL This symbol indicates
"dangerous voltage" inside
the product that presents a
risk of electric shock or
_i This symbol indicates
important instructions
accompanying the product.
personal injury.
Caution: To reduce the risk of electric shock, match wide blade of
plug to wide slot, fully insert.
POWER CONSUMPTION: 120V ~ 60 Hz A.C.
105 Watts (Models MR19011, F19261, and MR19035)
135 Watts (Models MR25035 and MR27035)
If fixed (non-moving) images are left on the screen for long periods, they
may be permanently imprinted on the screen. Such images include
network Iogos, phone numbers, and video games. Extended viewing
of channels displaying these images should be avoided.
Cable TV Installer: This reminder is provided to call your attention to
Article 820-40 of the National Electrical Code which provides guidelines for proper
grounding and, in particular, specifies that the cable ground shall be connected
to the grounding system of the building as close to the point of cable entry
as practical.

TABLE OF CONTENTS .................................................... 1
SETUP AND CONNECTIONS ....................................... 2
THE MENU SYSTEM ..................................................... 3
TV Main Menu .................................................................................. 3
Point and Select Method ................................................................. 3
Picture Quality Menu ....................................................................... 4
Screen Menu ..................................................................................... 5
Channel Menu .................................................................................. 6
The Time menu ................................................................................. 7
V-Chip and Parental Controls .......................................................... 7
Tour of the TV: the Front Panel ....................................................... 8
Channel Marker ................................................................................ 8
USING THE REMOTE .................................................... 9
Tour of the Remote .......................................................................... 9
TROUBLESHOOTING ................................................. 10
INDEX ........................................................................... 11
1

SETUP AND CONNECTIONS
Step 1:
Unpack the TV and remote control.
Caution: If you choose to use a stand with i
your TV, take precautions that the stand
or other furniture the TV is placed on is
properly located and of adequate size and
strength to prevent the TV from
accidentally being pushed off, pulled off,
or tipped over. This could cause damage
to the TV and/or personal injury.
Step 2:
Connect your TV. Connect the cable from your cable system or off-air
antenna to the cable in-jack on the back of the TV, as shown.
ANTENNA, CABLE, CABLE BOX OR VCR
Step 3:
Plug in the TV. Plug the end of the power cord into the wall outlet,
matching the wide blade of the plug with the wide slot in the outlet. Be
sure to insert the plug completely.
Step 4:
Put batteries in the remote.
1, Remove the battery compartment cover from the back of the remote,
2. Insert batteries as shown, matching the + and - ends of each battery
in the compartment.
3. Replace the cover.
Step 5:
Turn on the TV.
Press the POWER button on the remote or front panel.
Read the next section, The Menu System, which is a brief overview of the
basic rules for getting around in the menus using the remote or the TV's
front control panel.
Step 6:
Auto Channel Search.
Perform an Auto Channel Search (described in the Channel menu section).
2

THE POINT AND SELECT METHOD
You only need to know one rule to use the on-screen menus and control
panels point and select
1. Point to a menu item using the VOL +/- to move left or right, and
the CH ^Iv buttons to move up or down
2. Select a menu item by pressing the MENU button
Selecting an item tells the TV's menu system to go ahead and make the
change or go to a place you have indicated You can also select menu
items using the number buttons on your remote
TV MAIN MENU
The Main menu usyour gateway to controlhng the TV. It lets you adjust
the TV's picture quahty, screen, channel settmgs, parental controls, and
time functions
To select a menu ntem
1 Press MENU to bring up the TV's Main menu
2 Use the Point and Select method to make chonces
3 To exit any menu screen, point to Exit and press MENU, or press
CLEAR
TV Main Menu
1 Picture Qualuty
2 Screen -_
3 ChanneT ':"
4V-Chip Parenta_ Controls I'_
5 Time _.
0 Exit
The TV Maln Menu
3

THE PICTURE QUALITY MENU
The P_cture Quality menu contains five slider controls that adjust the TV's
picture Use the VOL +/- and CH ^Iv buttons to adjust the controls
Contrast AdJusts the difference between hght and dark areas of the
picture.
Color Adjusts the richness of the color
Tint AdJusts the balance between the red and green levels
Black Level Adjusts the brightness of the picture
Sharpness Adjusts the crispness of edges in the picture.
Auto Color Displays a choice list that lets you turn on the feature
that automatically corrects the color of the picture. (This is especially
useful for tracking realistic flesh tone colors as you switch from
channel to channel.) Choose On or Off, as preferred.
Reset Picture Controls Resets the picture controls to their original
settings
Picture Quahty
1Contrast
2Color
3Tint
4 Bl_.k Level
,_5 S_ness
6Aul_ Color:
<.... I ..... >
<...... { ....... >
•::....... .[ .......... >
ON
•7 P,e_etPictureControls
The Picture Quality Menu
ITip }
You can also use the RESETbutton on the
remote at any time to reset the picture
controls to thmr original settings.
4

THE SCREEN MENU
The Screen menu contains the controls that let you adjust the Closed-
Caption display, Closed-Caption mode and Menu Language
Closed-Caption Display Lets you choose the way closed captioning
informatlon isshown on the screen Use the MENU button to toggle
between the following
Off No captioning information displayed
On Captioning information shown always, when available
On When Muted Displays captioning information, when available,
whenever you press the MUTE button The capttonlng reformation is
not displayed when the sound isnot muted
Closed-Caption Mode Lets you choose which captioning mode is used
for displaying captioning information. Use the MENU button to toggle
between the choices CC1 and CC2
Not all programs are encoded with dosed-captioning information When
a program isclosed captioned, the letters CC are displayed in the
Channel Marker.
Menu Language Lets you select the language of your choice. English,
French, or Spanish Use the MENU button to toggle between the chotces
Screen ]
1 CC Display: OFF
2 CC Mode" ccl I
3 Menu Language: ENGLISH, .I
0 Exit " "_'",I
TheScreen Menu
Closed Caption Modes
CCI: full translation of the primary
language In your area
CC2: secondary language translation,
simplified English, or whatever is being
broadcast in your area
5

THE CHANNEL MENU
The Channel menu contains all the commands used to control your
channels, including custom-budding your channel list
Signal Type Displays a toggle that lets you select the current antenna
type
Antenna Choose this if you are currently using an off-air antenna
for UHF/VHF TV signals
Cable TV Choose this if you are currently using cable or a cable
box for TV signals
Auto Channel Search Selecting this option tells the TV to search
automatically for all the channels available through the antenna input
When the TV finds an active channel, it places _tin the channel list
Inactive channels. (Weak stations or channels with no signal at all) will
be removed from the channel hst You may interrupt this process by
pressing the MENU button )
Lists and Labels Displays a control panel that lets you custom-budd
your channel scan list and choose a four-character label for each
channel Usethe VOL +/- buttons to move left and right between fields,
use the CH^/v buttons to move up and down enter settings and create
labels PressMENU to exit
Channel Number Use the CH^/v buttons to scroll through the
channel scan list You can also enter the channel number dtrectly
using the number buttons
Channel Labels Use the CH^/v buttons to enter afour-character
label for each channel
Scan List Only the channels included in the Scan list are avadable
when you scan up and down using the CH ^Iv buttons Use them to
indicate whether the channel number indicated _sincluded (YES) or
ts not included (NO) m the channel scan list.
Channel
1 SignalType: ANTENNA
2 Auto Channel Search
3 ListsandLabels
0 Exit
The Channel menu
Lists and Labels
Chart Chan Scan
#Labe_ L_st
16 NBC YES
Press MENU to exit
The Lists and Labels screen
ITip
You can always press MENU to exit
back to the prewous screen ]
6

V-CHIP AND PARENTAL CONTROLS
The V-Chip Parental Controls menu allows you to program your TV so
that children cannot see certain programs
The choices in this menu involve a chip inside your TV, called V-Chip
These V-Chip functtons will not work on your TV because the features
depend upon special additions to the broadcast signal, not yet
available in your market Please disregard them
Unlocking V-Chip Parental Controls
The V-Ch_p inside your TV comes turned "off " However, if the screen
shown on the right appears, the V-Chp Parental Controls have been
locked Follow these steps to unlock the Parental Controls and return
to normal viewing
1 Press DISPLAY on the remote control to bring up the Enter
Password screen shown on the rtght.
2 With the Enter Password screen stdl up, press the following
buttons on the remote, one by one MUTE, DISPLAY, CLEAR and
RESET
TV Main Menu
1 Picture QuahLy
2 Screen
3 Channel
4 V-Chip Parental Controls
5 Time
0Exit
Selecting V-ChipParental Controls
-;. This program ts blocked.
-_ : :-uNRATED
-,_ .," Ch_ge channel or
....3_l_r_ _DISP_.AY't_en_r password.
Enter Password
,q_ .
Enter four_digi_ Password.
PreSs MENU tb_xit.
TheEnter Passwordscreen
THETIMEMENU
The Time menu contains the controls that let you set the Sleep Ttmer
and Set Time functions
Sleep Timer Displays a control panel that lets you select the
amount of t_me you want to gwe the TV before It shuts ttself off
Use the CH^/v buttons to increase or decrease the sleep bmer by 15
minute increments Press MENU to exit
Set Time Displays acontrol panel that lets you enter the current
time UsetheCH ^/vand number buttons to set the time Press
MENU to ex=t
Time
1SleepTimer
2SetTime
0Exit
The Time menu
7

CHANNEL MARKER
The Channel Marker comes up when you first turn on the "IV, change
channels, or press the DISPLAY button
08:59 Displays the current time
WRTV Displays the label assigned to the current channel
06 Displays the current channel
Sleep Displayed when the Sleep Timer has been set
Stereo Displayed when the current channel is broadcasting in Stereo
CC Dtsplayed when Closed Capttonmg ts avadable
Mute Displayed when you mute the audto
Unlocked Displays whether the V-Chtp system ts locked, unlocked, or
disabled
01:30 Displayed to count down t_me left on the commeroal skip timer
08 59 •WRTV 06
Sleep Stereo CC
The Channel Marker shown is just an example of
what your screen may look like
rYou can press MENU or CLEARto make the
Channel Marker disappear; it will disappear|
automatically after a short time. )
TOUR OF THE TV:THE FRONT PANEL
VOL < Decreases the volume When m the menu system, VOL < isused
to point left to ttems and adjust menu controls
VOL > Increases the volume When in the menu system, VOL > _sused
to point right to ttems and adjust menu controls
tHAN ^ Scans up through the channelhst in the menu system, it
points up to items and adjusts menu controls
CHANv Scans down through the current channelhst In the menu
system, _tpoints down to Items and adJusts menu controls
MENU Brings up the Main menu When in the menu system, It selects
highhghted _tems Also returns you to the prewous menu
POWER Turns the TV on and off
M_,u V c.,,, A < voL> pO*ER
111111
8

TOUR OF THE REMOTE
DISPLAY Brings up available channel information.
POWER Turns the TV on and off.
MUTE Turns off the TV's sound. Pressagain to restore the sound.
PREV CH Returns you to the previous channel.
VOL -or VOL + Decreases or increases the TV's volume. Also used
as left and right arrows in the menu system,
CHAN ^ or CHAN v Scans up or down through the current
channel list. Press once to change channels; press and hold to
continue changing channels. Also used as up and down arrows in
the menu system.
CLEAR Removes any menu or display from the screen and returns
you to TV viewing. Also cancels the SKIP timer.
MENU Brings up the Main menu. When in the menu system,
selects highlighted items or returns you to the previous menu,
RESET Returns all picture quality controls to their original settings.
(0-9) Number Buttons Enters channel numbers and time settings
directly though the remote control. To enter a three-digit channel,
press and hold the first digit, then add the second two.
INPUT Pressto toggle through available input sources (CH3, CH4,
etc.),
SKIP (Commercial Skip) Press once before changing channels.
The TV will wait 30 seconds before returning you to the original
channel. Press again to add more time, Press CLEAR to cancel the
SKIP timer,
MUTE PREVCH
O ©
CHAN
VOL _ VOL
GD cHA°E3D
CLEAR MENU RESET
102o 3o
,o o
7o8o9o
INPUT 0 0 SKiP
O O
• ]
DISPLAY Button Functions
Press once to bring up the channel marker.
Press twice to clear the screen.
9

If you experience any difficulty with your TV, check these basic remedies
before calling your service technician.
TV will not turn on or controls don't work
Check to make sure it is plugged in.
• Check the wall receptacle (or extension cord) to make sure it is "live" by
plugging in something else.
•Try unplugging set for two minutes, plugging it back in, and then
turning it on again.
Problems with remote
Maybe something isbetween the remote and the remote sensor.
• Maybe the remote is not aimed directly at the TV's remote sensor.
Maybe batteries in remote are weak, dead or installed incorrectly. Try
replacing batteries.
• Remove batteries and hold down one or more buttons for several
seconds. Install the batteries and try remote.
Turns on or off while playing
Electronic protection circuit may have been activated because of a
power surge, Wait 30 seconds and then turn on again, If this happens
frequently, the voltage in your house may be abnormally high.
Maybe the component connected to the input jacks is not turned on.
• Maybe the Sleep Timer is active.
"This program is blocked" message appears on the screen
The V-Chip Parental Controls have been activated. Follow these steps to
deactivate them:
1. Press DISPLAY on the remote control to bring up the Enter Password
screen.
2. With the Enter Password screen still up, press the following buttons
on the remote, one by one: MUTE, DISPLAY, CLEAR and RESET,
Blank screen or black box appears on the screen
• Try another channel.
Press RESET,in case the picture controls are set too low.
• Captioning may be turned on. Check the Closed-Caption Display control
panel in the Screen menu.
No sound, picture okay
• Maybe sound is muted. Try pressing volume up button to restore sound.
No picture, no sound, but power is on
Maybe cablelair function is in wrong position.
Maybe a vacant channel is tuned.
Sound okay, picture poor
Check antenna connections.
Try adjusting sharpness function to improve weak signals.
10

A
Active channel 6
Antenna input 6
Auto Color 4
B
Batteries 2
Black level 4
Buttons
Remote 9
C
Cable TV 6
Captioning information 5
Captioning mode 5
CHAN 9
Channel #6
Channel indicator 8
Channel information 8
Channel list 9
Channel numbers 9
CLEAR 9
Closed Captioning indicator 8
Closed-Caption Mode 5
Commercial skip timer 8
Connecting your TV 2
Current channel list 9
E
Entering channel numbers 9
F
Front panel 8
I
INPUT 9
Input sources 9
L
Labelling channels 6
Labels 6, 8
Lists and Labels 6
M
Main Menu 9
MENU 9
MUTE 9
N
Normal channel list 6
Number buttons 9
O
Original picture settings 4
P
Parental Controls
Menu 7
Point and select 3
PREV CH button 9
Previous channel 9
R
Remote buttons 9
RESET 9
Reset Picture Controls 4
S
Set Time 7
Signal Type 6
T
Time display 8
TV button 2
11

12

Please do not send any products to the Indianapolis address listed in this manual or on the carton. This will only add delays
in service for your product.
Importer:
COMERCIALIZADORA THOMSON
DE MEXICO S.A. DE C.V.
SIERRA CANDELA NO.111, PISO 11
COL. LOMAS DE CHAPULTEPEC
DEL. MIGUEL HIDALGO
MEXICO D.F.C.P. 11000
R.F.C. CTM-980723 KS5
Exporter:
Thomson multimedia Inc.
10330 North Meridian Street
Indianapolis, IN 46290
©2001 Thomson multimedia Inc.
Trademark(s)© Registered
Marca(s) Registrada(s)
Printed in USA .............
MODELS: F19261, MR19011,
TOCOM 1542501B MR19035, MR25035, MR27300,
MR27035
This manual suits for next models
5
Table of contents
Other RCA TV manuals