RCA X20103 User manual

USER’S
GUIDE
COLOR TV

Please fill out the product registration card and return it immediately.
Returning this card allows us to contact you if needed.
Keep your sales receipt to obtain warranty parts and service and for proof
of purchase. Attach it here and record the serial and model numbers in
case you ever need them. The numbers are located on the back of the TV.
Model No.________________________________________________________
Serial No._________________________________________________________
Purchase Date: ___________________________________________________
Dealer/Address/Phone:____________________________________________
__________________________________________________________________
__________________________________________________________________
Important Information
i
WARNING
To reduce the risk of fire or
shock hazard, do not expose
this TV to rain or moisture.
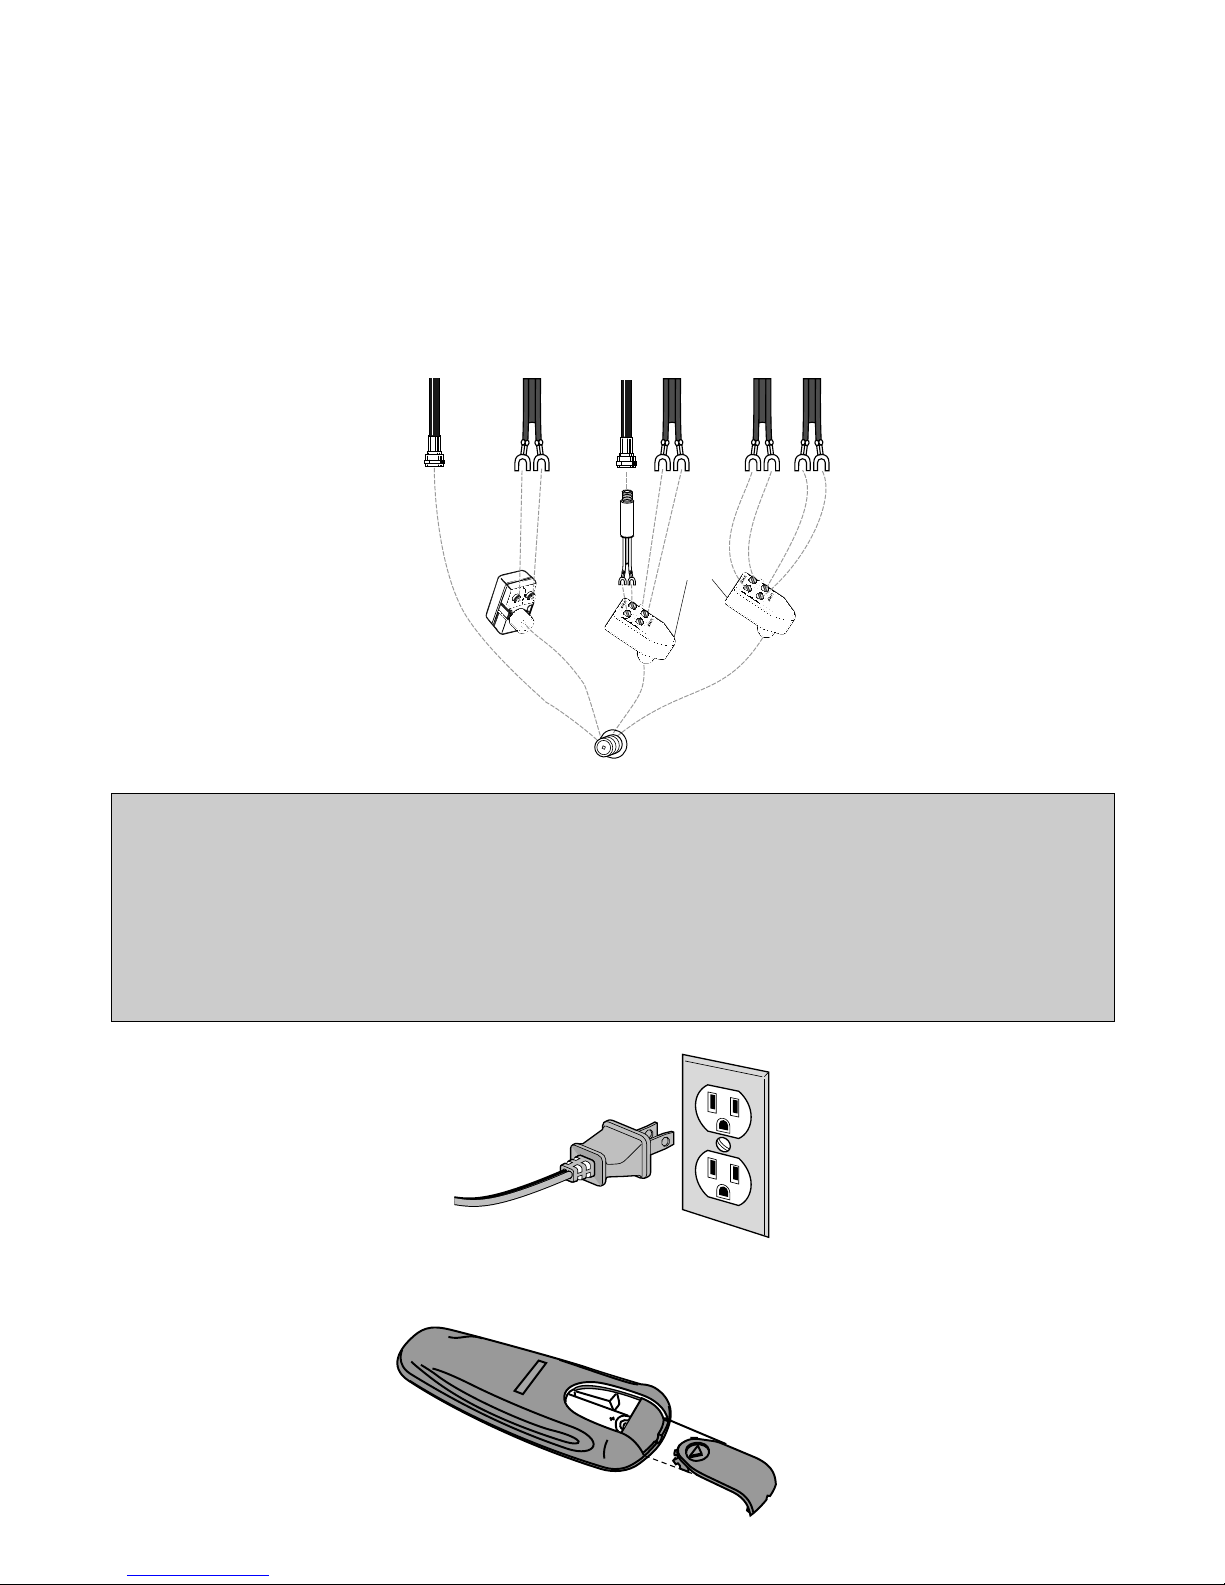
CAUTION:
To prevent electric shock, match wide blade of plug to wide
slot, fully insert.
ATTENTION:
Pour éviter les chocs électriques, introduire la lame la plus
large de la fiche dans la borne correspondante de la prise et
pousser jusqú au fond.
Cautions
Operate TV only on 120 volts, 60 Hz AC power (normal house power).
FCC Regulations state that unauthorized changes or modifications to this
equipment may void the user’s authority to operate it.
Note To Cable TV Installer This reminder is provided to call your attention to Article 820-40 of the
National Electrical Code (Section 54 of the Canadian Electrical Code,
Part 1) which provides guidelines for proper grounding and, in particular,
specifies that the cable ground shall be connected to the grounding system
of the building as close to the point of cable entry as practical.
Product
Registration
WARNING
RISK OF ELECTRIC SHOCK
DO NOT OPEN
TO REDUCE THE RISK OF ELECTRIC SHOCK, DO
NOT REMOVE COVER (OR BACK). NO USER
SERVICEABLE PARTS INSIDE. REFER SERVICING
TO QUALIFIED SERVICE PERSONNEL.
This symbol indicates
“dangerous voltage” inside
the product that presents a
risk of electric shock or
personal injury.
This symbol indicates
important instructions
accompanying the
product.

Table of Contents
1
Important Information Warning, Product Registration ____________________________________ i
Quick Guide to Your TV Startup ____________________________________________________________________ 2-3
Hook up your TV, Plug in the TV, Put Batteries in the Remote,
Turn on the TV and Place Channels in Memory
Basic Tour of the Remote ____________________________________________ 4
Power, Volume, Channel, Special and Menu Buttons
Menu Basics ______________________________________________________________ 5
Colors, Menu Buttons and Moving through the Menus
Using Your Remote With Remote Buttons ________________________________________________ 6
Adjusting Your TV Overall Picture __________________________________________________________ 7
Picture Settings __________________________________________________________ 8
Color, Tint, Brightness, Sharpness, Autocolor and Picture Reset
Using Advanced Features Placing Channels in Memory/Autoprogram ______________ 9
Watching Closed Captioning ____________________________________ 10
Setting Your TV for Antenna or Cable ________________________ 11
References Front Panel Buttons __________________________________________________ 12
Displays on the Screen _____________________________________________ 13
Trouble Checks ____________________________________________________ 14-15
Order Form for Parts ___________________________________________ 16-18
Limited Warranty ____________________________________________________ 19
Glossary __________________________________________________________________ 20
Index _______________________________________________________________________ 21

Quick Guide to Your TV
Startup
2
Plug the cord into the outlet,
matching the wide and the small
end of the plug with the outlet.
2. Plug in the TV
The steps below will get your TV connected and ready for watching. For
more details, see the page numbers listed.
3. Put Batteries in the Remote A. Pull off the cover of the battery
compartment.
B. Place two AAA batteries as
shown, matching the +and –
end of each battery in the
compartment.
C. Replace the cover.
CAUTION: Matching stands were designed to be used with 25 inch and larger table model TVs. The
recommended stands are provided with hardware to secure the TV to the stand so that it cannot be easily
pulled off or tipped over. Your RCA dealer can help you choose the appropriate stand for your TV.
If you choose to use a stand with your TV, take precautions that the stand or other furniture the TV is placed
on is properly located and of adequate size and strength to prevent the TV from accidentally being tipped over
or pulled off. This could cause damage to the TV and or personal injury.
Stands are not available by mail order. To locate your nearest RCA dealer call 1-800-336-1900.
OROR
OR
CABLE /
ANTENNA
Back of TV
Use Only
Adapter
( #193983)
Transformer
( #AH011)
Use Only
Adapter
( #193984)
1. Hook up your TV
It is important to use only
the adapters specified as
they incorporate special
isolation circuitry to meet
safety regulations. Parts
can be ordered on page 17.
Hook up your antenna or
cable to the TV before you
follow the steps below.
Match your type of antenna or cable
UHF & VHF UHF & VHF VHF UHF VHF UHF

Quick Guide to Your TV
Startup
3
A. Press MENU on the TV front
panel until the Setup menu is
selected. This menu is white.
B. Press VOLUME +to place chan-
nels in the TV’s memory
(Autoprogram).
C. Wait until TV has cycled
through all the channels and
returns to the original channel.
5. Place all available
channels in memory
(Autoprogram)
Details for adding and deleting
channels are on page 9.
Press POWER on the remote.
OR
Press POWER on the TV.
4. Turn on the TV
DISPLAY
MUTE
INPUT SKIP
VOL VOL
CHAN
CHAN
MENUCLEAR RESET
PREV CH
POWER
1 32
4 65
7 98
0
MENU CH VOL–VOL+POWERCH
13
Controls Adjust Setup
Autoprogram
Channel Memory: 13 Stored
Cable/Air: Cable

DISPLAY
MUTE
INPUT SKIP
VOL VOL
CHAN
CHAN
MENUCLEAR RESET
PREV CH
POWER
1 32
4 65
7 98
0
DISPLAY
MUTE
INPUT SKIP
VOL VOL
CHAN
CHAN
MENUCLEAR RESET
PREV CH
POWER
1 32
4 65
7 98
0
Quick Guide to Your TV
Basic Tour of the Remote
4
Turns the TV on and off.
Operate the TV.
Operate special features of the TV.
Power Button
Volume, Channel and
Special Buttons
Details are on page 6.
Basic information about your remote is shown below. This will give you a
general idea of how your remote works. For more details, see page 6.
Change the menus and features on
the screen.
Menu Buttons
See next page for details.

Quick Guide to Your TV
Menu Basics
5
Colors
Menu Buttons
These buttons are used with the
TV’s menus to adjust the features.
You can use the menu buttons on
the remote or the front of the TV.
Press MENU repeatedly to see
each of the four menu colors.
Each menu has a different color
background as shown at the left.
DISPLAY
MUTE
INPUT SKIP
VOL VOL
CHAN
CHAN
MENUCLEAR RESET
PREV CH
POWER
1 32
4 65
7 98
0
General information about using the on-screen menu system is shown
below. Details on using the remote buttons are on page 6. Many menu items
are explained in detail in Adjusting Your TV starting on page 7 and Using
Advanced Features starting on page 9.
Moving through the Menus 1. Press MENU to move from
menu to menu.
2. Press CHANNEL up and down
to move through the features in
the menu.
3. Press VOLUME +and –to
move left and right on the
menu lines.
MENU CH VOL–VOL+POWERCH
Yellow Light
Blue White
Controls Adjust Setup
Autoprogram
Channel Memory: 13 Stored
Cable/Air: Cable
Controls Adjust Setup
Autoprogram
Channel Memory: 13 Stored
Cable/Air: Cable

Using Your Remote
With Remote Buttons
6
DISPLAY
Shows displays on the screen.
Clears menus from the screen.
POWER
Turns the TV on and off.
MUTE
Switches the TV sound on or off.
PREV CH (Previous Channel)
Changes back and forth between
two channels.
Select a channel and then select
another. Press PREV CH to switch
between the two channels.
CHAN 2 and 1
(Channel up and down)
Scans up and down through
channels in the TV’s memory.
Moves up and down menus. See
Menu Basics on page 5.
VOL +and –
(Volume up and down)
Raises and lowers sound.
Moves left and right on a menu
line. See Menu Basics on page 5.
Changes a feature setting.
CLEAR
Clears menus and displays from
the screen.
MENU
Shows menus on the screen and
moves from menu to menu.
RESET
Returns the picture adjustments to
the original settings.
INPUT
Switches the TV to channel 03 to
easily access VCR or other
components hooked up to the TV.
SKIP (Commercial Skip)
Allows you to look at other
channels during commercials.
Each press adds 30 seconds. Use
the CHANNEL or number buttons
to scan the other channels. TV
switches back to original channel
when time runs out. Press CLEAR
to cancel SKIP.
Number Buttons (0-9)
Selects any channel number.
Two numbers must be pressed for
each channel. Press 0 and 6 for
channel 6.
For three digit channels, press and
hold 1 until 1-- appears on the
screen. Then press the other two
numbers.
DISPLAY
MUTE
INPUT SKIP
VOL VOL
CHAN
CHAN
MENUCLEAR RESET
PREV CH
POWER
1 32
4 65
7 98
0

Adjusting Your TV
Overall Picture
7
Follow the steps below to lighten or darken the overall picture without
changing the color levels.
1. Select the Controls Menu Press MENU to select the Controls
menu. This menu is yellow.
Press CHANNEL down to
highlight Picture.
Press +to lighten the picture.
OR
Press –to darken the picture.
2. Highlight Picture
3. Use VOLUME +and –to
adjust the Picture
Controls Adjust Setup
Closed Captioning: Off
Picture -.....I.....+
Picture -.......I...+
Controls Adjust Setup
Closed Captioning: Off
Picture -.....I.....+

Picture Reset
Adjusting Your TV
Picture Settings
1. Select the Adjust Menu Press MENU repeatedly to select the
Adjust menu. This menu is light
blue.
Press CHANNEL down to
highlight the picture item you
want to adjust.
Press + or –to adjust each item.
Press DISPLAY to remove the
menu from the screen when you
are finished.
2. Highlight item to change
3. Use VOLUME +or –to
adjust each item
Follow the steps below to change the picture on the screen to your
personal setting. The chart below explains your options.
Color
Tint
Bright (Brightness)
Sharp (Sharpness)
Autocolor
Picture Reset
Press VOLUME +to:
Increase color richness
Give red tint to skin color
Add more light to dark parts of
the picture
Show cleaner, clearer images
Turn on to keep Color and Tint in
proper balance each time you
change channels
Reset the picture back to the
original settings
Press VOLUME –to:
Lower color to black and white
Give green tint to skin color
Add more dark to light parts of
the picture
Make picture more smooth
Turn off for manual adjustment
of Color and Tint
Reset the picture back to the
original settings
8
Controls Adjust Setup
Color -.....I.....+
Tint G.....I.....R
Bright -.....I.....+
Sharp -.....I.....+
Autocolor: On
Controls Adjust Setup
Color -.....I.....+
Tint G.....I.....R
Bright -.....I.....+
Sharp -.....I.....+
Autocolor: On
Picture Reset
Picture Reset

Using Advanced Features
Placing Channels in Memory (Autoprogramming)
9
Only channels 2–13 appear in the TV’s memory when you first turn it on.
The channels available in your area must be programmed into the TV's
memory when you hook up your TV. Using CHANNEL up or down
allows you to scan through these channels.
You may want to add or delete a few channels if some stations have weak
signals or were off the air when the TV was programmed. Refer to the Add
or Delete Channels section below.
A. Hook up an antenna, cable or
components before you begin
these steps or you will not be
able to add channels into
memory.
B. Press MENU repeatedly to
select the Setup Menu and
highlight Autoprogram. This
menu is white.
C. Press VOLUME +to start the
TV adding all active channels
into memory.
D. Wait until the TV has cycled
through all the channels and
returns to the original channel.
E. Press DISPLAY to remove the
menu from the screen when
you are finished.
1. Place channels in
memory (Autoprogram)
2. Add or delete channels A. Press MENU repeatedly to
select the Setup menu. This
menu is white.
B. Press CHANNEL down to
highlight Channel Memory.
C. Press VOLUME +to highlight
the channel number.
D. Select the channel number you
want to add or delete with the
CHANNEL buttons.
E. Press VOLUME +to add or
delete a channel (you will see
Stored on the screen when
added and Erased when
deleted).
F. Repeat D and E for more
channels.
15
Controls Adjust Setup
Autoprogramming
Channel Memory: 15 Stored
Cable/Air: Cable
13
Controls Adjust Setup
Autoprogram
Channel Memory: 13 Stored
Cable/Air: Cable
13
Controls Adjust Setup
Autoprogram
Channel Memory: 13 Stored
Cable/Air: Cable
13
Controls Adjust Setup
Autoprogram
Channel Memory: 13 Erased
Cable/Air: Cable

Using Advanced Features
Watching Closed Captioning
10
Closed captioning displays the audio portion of a program as words on
the TV screen. It is useful for the deaf, hearing impaired, or anyone who
wants to watch a program without sound.
If you have turned Closed Captioning on and it does not appear on the
screen, it is not available on the channel you are watching. Closed
captioning is not available on all programs or at all times.
This TV does not support the text mode. Text information typically
consists of program information, weather bulletins, local activities, etc.
Press MENU to select the Controls
menu and highlight Closed
Captioning. This menu is yellow.
Press VOLUME +or –to select
Off, C1, or C2. Select C1 for the dis-
play of the primary language in
your area. Select C2 for an alternate
service, such as secondary
language translation or simplified
English.
1. Select the Controls Menu
2.Select Setting
Controls Adjust Setup
Closed Captioning: Off
Picture -.....I.....+
Controls Adjust Setup
Closed Captioning: C1
Picture -.....I.....+

Using Advanced Features
Setting Your TV for Antenna or Cable
11
Your TV automatically adjusts this feature when the TV places channels
in memory (Autoprogram). Follow the steps below to change the setting
as needed.
Press MENU repeatedly to select
the Setup menu. This menu is
white.
Press CHANNEL down to
highlight Cable/Air.
Press VOLUME +or –to select
Cable or Air. Select Cable if you
have cable. Select Air if you have
a home antenna connected to
your TV.
1. Select the Setup menu
2. Highlight Cable/Air
3. Select Cable or Air
13
Controls Adjust Setup
Autoprogram
Channel Memory: 13 Stored
Cable/Air: Cable
13
Controls Adjust Setup
Autoprogram
Channel Memory: 13 Stored
Cable/Air: Cable
13
Controls Adjust Setup
Autoprogram
Channel Memory: 13 Stored
Cable/Air: Air

12
MENU
CH 2 and 1
VOL +and –
POWER
Shows menus on screen.
Moves from menu to menu.
Channel up and down.
Scans up and down through channels in the TV’s memory.
Moves up and down menus.
Volume up and down
Raises and lowers sound.
Moves left and right on a menu line.
Changes a feature setting.
Turns the TV on or off.
For details on using buttons with menus, see Menu Basics on page 5.
MENU CH VOL–VOL+POWERCH
References
Front Panel Buttons

13
Volume –.......I.......+
Mute
References
Displays on the Screen
13
Your TV shows the settings of several features on the screen. To see what
features have been set on your TV, press DISPLAY on the remote.
Screen Display Description
13 Channel number you are watching.
Volume Sound level of the TV.
Mute No sound comes from the TV. MUTE is not displayed when the Closed
Captioning feature is turned on. See MUTE button on page 6.

14
References
Trouble Checks
You may have problems that can be fixed with a few minor adjustments.
Look for the type of problem you are having below and then try the
suggestions to get your TV going again. For warranty information see page 19.
Checks and Adjustments
Plug TV in.
Plug something else into the outlet to make sure it is working.
Make sure batteries in the remote are not dead.
Aim the remote at the TV and press POWER.
Make sure batteries are placed in the remote the right way. See batteries
on page 2.
Unplug TV for a few minutes and then turn it on again.
Check antenna connections.
Check position of Cable/Air feature. See page 11.
Try another channel. Inactive channel may be tuned.
Check antenna connections.
Adjust TV picture. See pages 7-8.
Press VOLUME + or MUTE to restore sound.
Try another channel.
Trouble
Power
TV will not turn on
No picture, no sound but
TV has power
Picture
Blank screen
Picture poor, sound okay
Sound
Picture okay, no sound
Picture okay, sound poor

References
Trouble Checks
Checks and Adjustments
Remove batteries and hold down one or more buttons for several seconds
to drain the microprocessor inside the remote and reset it. Re-install the
batteries and try remote again.
Clear the path between the remote and TV of any objects.
Make sure remote batteries are not dead and placed in remote correctly.
See batteries, page 2.
Press number buttons. Channel may not be in memory. See Autoprogram
on page 9.
For numbers over 100, press and hold 1 until 1-- appears, then press the
other two numbers.
Set Cable/Air feature to Cable for channels higher than 69. See page 11.
Turn on closed captioning. See page 10.
Trouble
Remote
Remote lockup
Works part or none of the
time
Can’t select certain channel
Closed Captioning
No Closed Captioning
15

References
Order Form for Parts
These parts can be ordered using the form on the next page.
Screw-on Cable
#AH037 (3-ft)
Use this to attach antenna
connectors on the back of your TV
or VCR.
Push-on Cables
#AH065G (6-ft)
#AH066G (10-ft)
Use one of these cables to attach
antenna connectors on the back of
your TV or VCR .
Coaxial Cables
Adapter #193983
Use this adapter to connect a
twin-lead cable to the connector
on your TV or VCR.
Adapter #193984
Use this adapter to attach two
twin-lead cables to the connector
on your TV or VCR.
Transformer #AH011
Use this transformer to attach a
coaxial cable to the 300-ohm screw
terminals on the adapter.
Antenna Adapters
16

17
References
Order Form for Parts
Remote #226551
This is the remote
that came packed
with your TV. You
can use the order
form at the right to
order it by mail.
Detach Here
All specifications and descriptions of parts are subject to change
without notice.
Fill out both sides of the information
DISPLAY
MUTE
INPUT SKIP
VOL VOL
CHAN
CHAN
MENUCLEAR RESET
PREV CH
POWER
1 32
4 65
7 98
0
Cleaner #AHO35
To clean your TV cabinet, we
recommend Murphy’s®Oil Soap or
Cleaner #AH035. You should not
use cleaners such as Windex®with
vinegar, Lenox®Furniture Polish
spray or Heinz®Cleaning Vinegar
to clean your TV cabinet. Using
these cleaners will permanently
mar the surface of the cabinet.
Such damage is not covered under
your purchase warranty.
Order Form
Book No. 15081450
Part Part Number Price Qty Total
Adapter 193983 $ 9.80
Adapter 193984 $10.73
Transformer AH011 $ 1.90
Cleaner AH035 $ 6.95
Push-on Cable AH065G $ 6.99
Push-on Cable AH066G $ 8.99
Remote--CRK10A1 226551 $34.95
Screw-on Cable AH037 $ 3.99
Total ($10 Minimum Order) .................... $
Sales Tax ..................................................... $
We are required by law to collect the
appropriate sales tax for each individual
state, county, and locality to which the
merchandise is being sent.
Shipping, Handling, and Insurance ....... $ 5.00
Total Amount Enclosed............................ $
VISA or MasterCard preferred.
Money order or check must be in U.S. currency only.
No COD or CASH.

18
References
Order Form for Parts
U.S. and Canadian Orders
By Phone:
1 – 800 – 338 – 0376
Call this toll-free number between
8AM and 8PM Eastern Standard Time
and place your order using your Visa
or MasterCard. Use this number
only to place an order for accessory
items listed on this order form.
By Mail:
Detach the information at the left and
mail the payment to Thomson
Consumer Electronics, Inc., at:
Video Accessories
PO Box 8419
Ronks, PA 17573
Most orders are shipped UPS within
72 hours. If it is not possible to ship
within 30 days, we will notify you.
For more current information on
these accessories, write to the
following address:
Video Accessories Customer Service
Thomson Consumer Electronics, Inc.
Distributor & Special Products
2000 Clements Bridge Rd
Deptford, NJ 08096-2088
International Orders
This offer is valid only in the U.S. and
Canada. Send your request for price
quotation (not orders) to:
International Customer Service
Thomson Consumer Electronics, Inc.
Distributor & Special Products
2000 Clements Bridge Rd
Deptford, NJ 08096-2088 USA
®
rr
sTM
USE YOUR CREDIT CARD
Copy complete account number
Card expires:
Card expires:
Copy Number above the name
on your MasterCard
AUTHORIZED SIGNATURE
Prices are subject to change without notice.
PLEASE
Name:
Street:
Apt:
City:
State: Zip:
Print or type your name and address.
This will be your mailing label.
A complete and correct order will
save you days of waiting.
Make sure that both sides of this
form have been filled out.
Table of contents
Other RCA TV manuals