RCBS Primer Pocket Swager Instruction sheet

Primer Pocket Swager —
Bench Tool
PRODUCT INSTRUCTIONS
PRECISIONEERED RELOADING EQUIPMENT
We think that we make the very best reloading equipment in the world.
If you agree, please tell your friends.
If you disagree, tell us we want to do something about it!
Customer Service
1-800-533-5000 (US or Canada) or 530-533-5191
Hours: Monday - Thursday, 6:30 a.m. - 4:00 p.m. Paci c Time
(hours may vary)
e-mail: [email protected] or visit our website at www.rcbs.com
RCBS 605 Oro Dam Blvd. East Oroville, CA 95965
Federal Premium Ammunition - RCBS - Alliant Powder - CCI
Speer Ammo - Speer Bullets - Fusion Ammunition
Estate Cartridge - Blazer Ammunition - Force on Force
Weaver - BLACKHAWK! - Champion - Gunslick Pro - Outers
Buck Commander - Ramline - Red eld - Shooters Ridge
7200497/0112

WARNING!
Before using the RCBS Primer Pocket Swager—Bench Tool, read these
instructions carefully to fully learn how to safely operate the related reloading
equipment. Failure to properly operate the related reloading equipment can
result in severe personal injury and/or equipment damage.
If you have any questions while assembling or operating this tool,
Call us at 1-800-533-5000 or 1-530-533-5191
Monday – Thursday 6:30 am – 4:00 pm Pacific Time
(hours may vary)
Or email us at [email protected]
This instruction manual contains specic safety and operating information. It
should be considered a permanent part of your reloading equipment and remain
with the equipment at all times for easy reference.
LIFETIME LIMITED WARRANTY
Your Primer Pocket Swager—Bench Tool is warranted to be free from defects in
material or workmanship for lifetime of the original consumer purchaser. All RCBS
products are intended for non-commercial use by hobbyists. Any other use of
these products will void the warranty. Should you believe that your Primer Pocket
Swager—Bench Tool is defective in material or workmanship, you must return it to
Ammunition Accessories Inc. through its Oroville operation (hereinafter “Oroville
Operations”) postage paid for evaluation. If defective, the product will be repaired or
replaced at Oroville Operations’ option, at no charge.
Send a dated proof of purchase to Oroville Operations for return shipping and
handling, along with the Primer Pocket Swager—Bench Tool to:
Ammunition Accessories Inc.,
Oroville Operations
605 Oro Dam Blvd East
Oroville, California 95965
Warranty services cannot be provided without meeting the above requirements.
THIS LIFETIME LIMITED WARRANTY DOES NOT COVER DEFECTS OR DAMAGE
RESULTING FROM: CARELESSNESS, MISUSE, COMMERCIAL USE, ABUSE,
IMPROPER INSTALLATION, MODIFICATION, OR NORMAL WEAR AND TEAR.
THE IMPLIED WARRANTIES OF MERCHANTABILITY AND FITNESS FOR A
PARTICULAR PURPOSE ARE LIMITED TO THE DURATION OF THIS LIFETIME
LIMITED WARRANTY. OROVILLE OPERATIONS IS NOT LIABLE FOR DAMAGES
IN EXCESS OF THE PURCHASE PRICE OF THE PRODUCT AND UNDER
NO CIRCUMSTANCES SHALL OROVILLE OPERATIONS BE LIABLE FOR
CONSEQUENTIAL OR INCIDENTAL DAMAGES. HOWEVER, SOME STATES DO
NOT ALLOW LIMITATIONS ON INCIDENTAL, OR CONSEQUENTIAL DAMAGES,
SO THE ABOVE LIMITATION OR EXCLUSION MAY NOT APPLY TO YOU.
The above warranty provides the sole and exclusive warranty available to the
customer in the event of a defect in material or workmanship in the reloading
product. This warranty gives you specic legal rights, and you may also have other
rights which vary from State to State.
SAFETY
Reloading is an enjoyable and rewarding hobby that can be conducted safely. But,
as with any hobby, carelessness or negligence can make reloading hazardous. This
product has been designed from the beginning with the user’s safety in mind. When
reloading, safety rules must be followed. By observing these rules, the chance of a
hazardous occurrence causing personal injury or property damage is minimized.
GENERAL
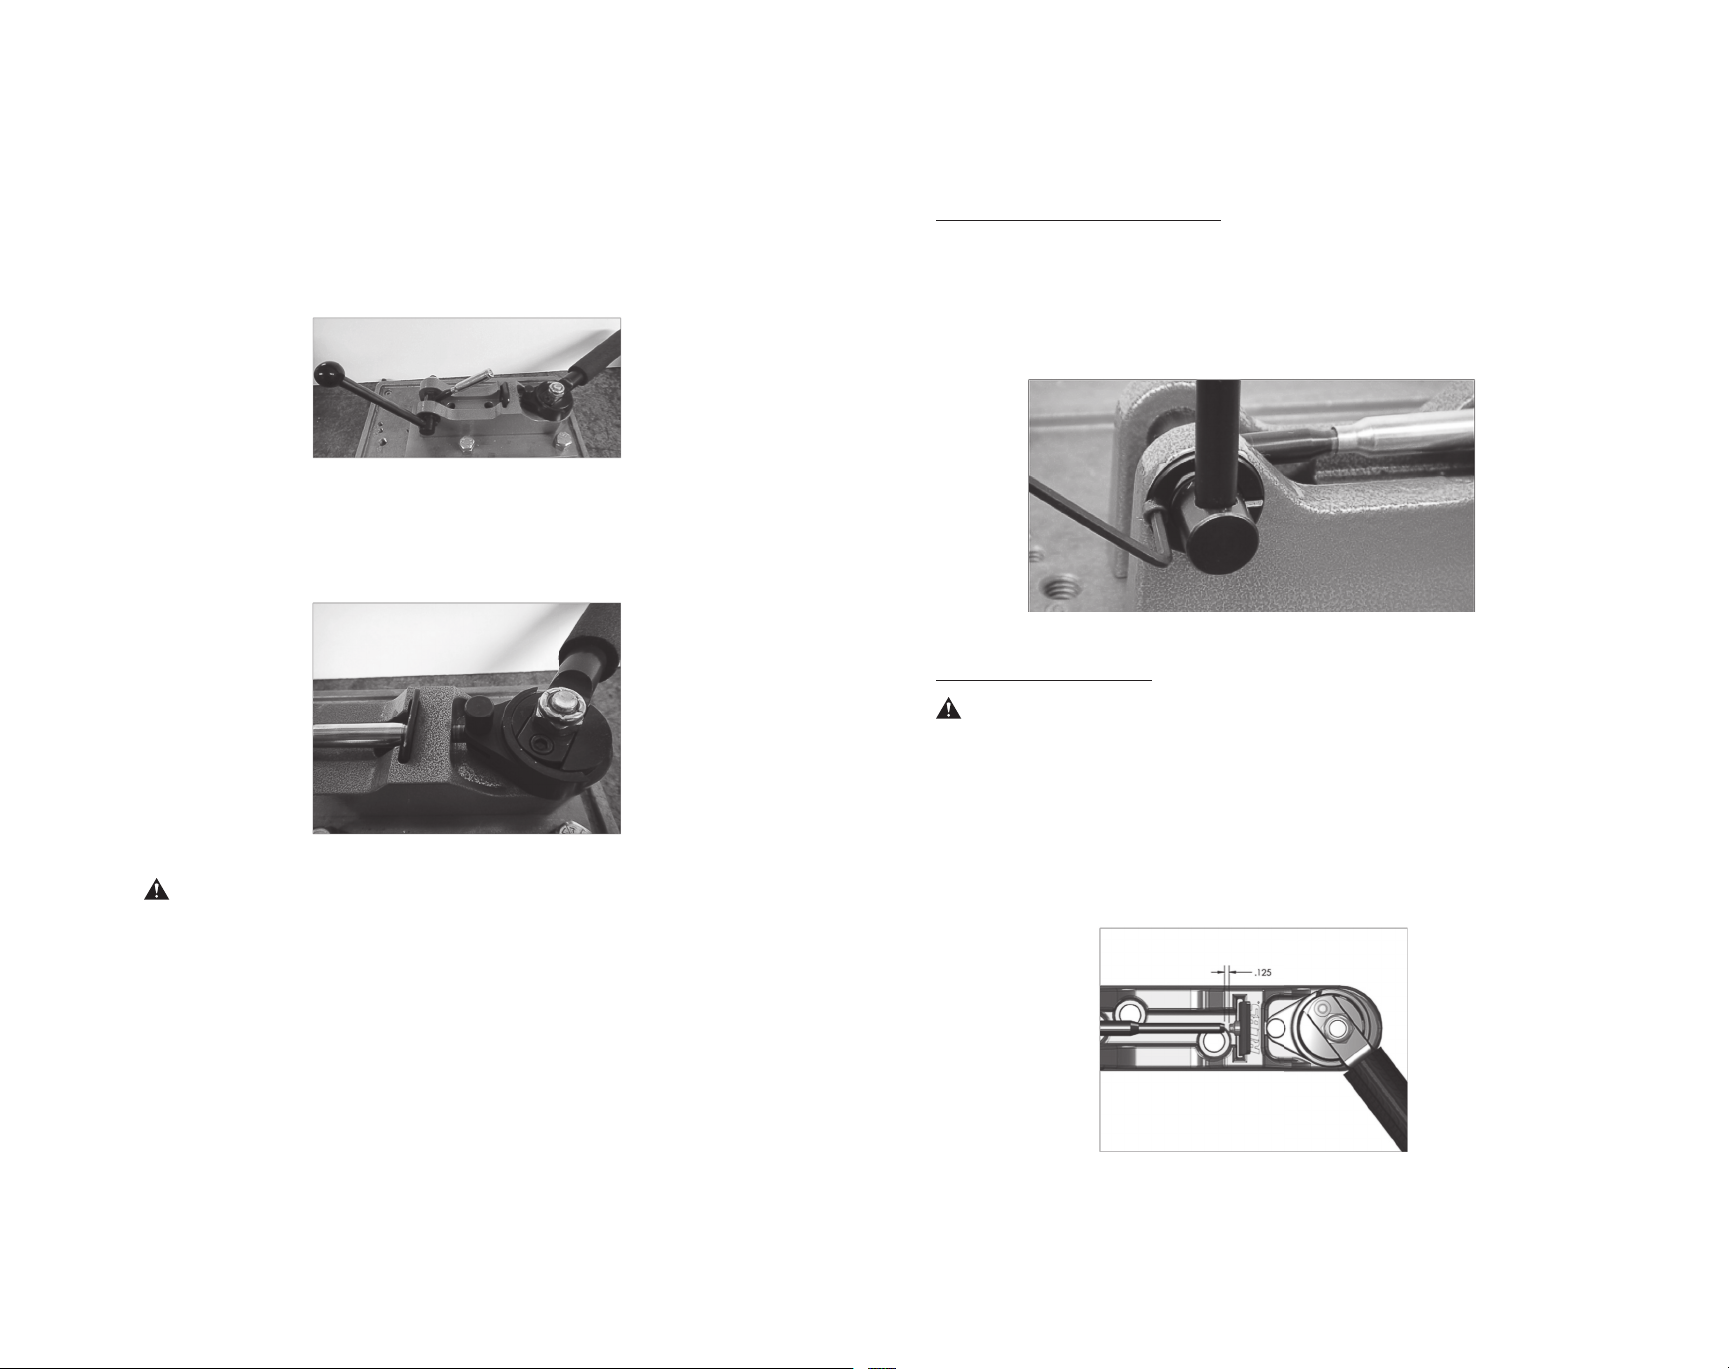
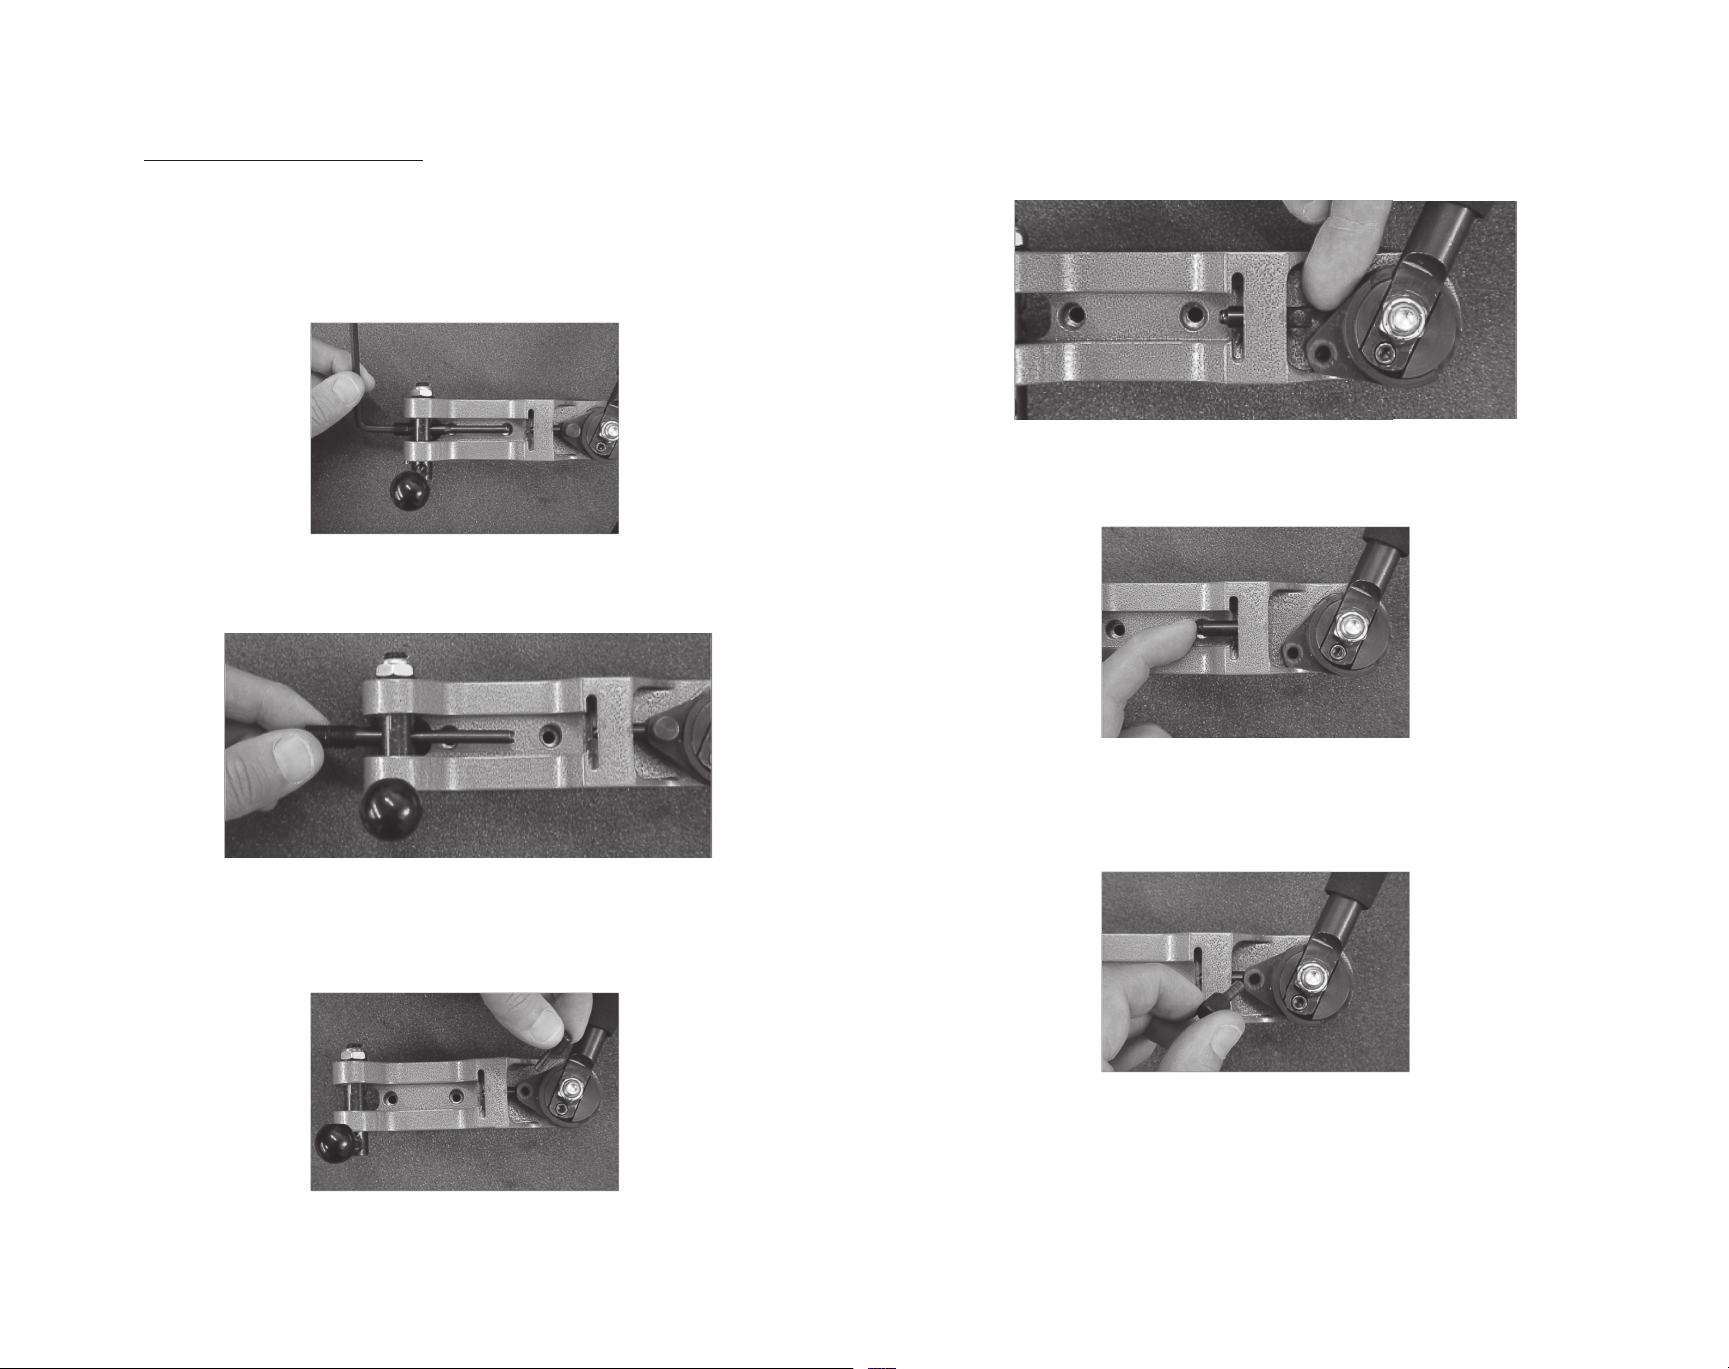
• Use all equipment as the manufacturer recommends. Study the instructions
carefully and become thoroughly familiar with the operation of the product. If you
do not have written instructions, request a copy from the equipment manufacturer.
• Do not take short cuts. Attempting to bypass established procedures is an
invitation to an accident.
• Observe “good housekeeping” in the reloading area. Keep tools and components
neat, clean and orderly. Promptly and completely clean up primer and powder
spills.
• Reload only when you can give your undivided attention. Do not reload when
fatigued or ill, or under the inuence of medications or alcohol.
• Develop a reloading routine to avoid mistakes which may prove hazardous. Do not
rush - load at a leisurely pace.
• Always wear adequate eye protection to protect your eyes from ying particles.
You assume unnecessary risk when reloading without wearing safety glasses.
LOADING DATA
• Use only laboratory tested reloading data. We highly recommend the current
Speer Reloading Manual.
OBSERVE ALL WARNINGS ABOUT THE USE OF MAXIMUM LISTED LOADS.
WARNING/ CAUTION
PRIMERS AND POWDER
• Store primers and powder beyond the reach of children and away from heat,
dampness, open ames and electrical equipment. Avoid areas where static
electricity is evident.
• DO NOT use primers of unknown identity.
• Dispose of unknown primers in accordance with applicable regulations.
• Keep primers in the original factory container until ready to use. Return unused
primers to the same factory packaging for safety and to preserve their identity.
Primer packaging is designed to provide safe storage.
• DO NOT store primers in bulk. The blast of just a few hundred primers is sufcient
to cause serious injury to anyone nearby.
• DO NOT force primers. Use care in handling primers.
• DO NOT have more than one can of powder on the bench at one time. Powder
cans should be stored away from the bench to avoid picking up the wrong one.
• DO NOT use any powder unless its identity is positively known. The only positive
identication is the manufacturer’s label on the original canister. Discard all mixed
powders and those of uncertain identity.
• If you use a powder measure, replace the lids on both the powder hopper and
powder can after the powder hopper has been lled.
• When using a powder measure, settle the powder in the powder hopper before
charging any cases. Throw and check the weight of at least ten charges. This will
assure you that the correct powder charge is being thrown.
2 3

• When you nish a reloading session, pour any remaining powder back into its
original factory container. This will preserve the identity and shelf life of the powder.
• DO NOT smoke while reloading.
RECORD KEEPING
• Keep complete records of reloads. Apply a descriptive label to each box showing
the date produced, and the primer, powder and bullet used. Labels for this
purpose are packed with Speer bullets.
• Never attempt to guess at the identity of your ammunition
Because RCBS has no control over the choice of components, the manner in which
they are assembled, the use of this product, or the fi rearms in which the resulting
ammunition may be used, we assume no responsibility, expressed or implied, for the
use of ammunition reloaded with this product.
USE
The RCBS Primer Pocket Swager—Bench Tool is designed to deform the crimp ring
around the primer pocket of cartridge cases that have staked or crimped primers.
It is not intended to swage the entire primer pocket. Much of today’s commercial
ammunition (for certain cartridges) is sold this way, as well as all military ammunition.
The crimping process leaves a thin lip of brass folded onto the edge of the primer to
secure it in place. When reloading a crimped case, that brass lip around the primer
pocket must be removed.
The RCBS Primer Pocket Swager—Bench Tool comes partially assembled with parts
installed to swage small primer pockets. To swage large pockets, simply switch out
the Small Swaging Rod and Head to Large set (both included). See Adjustment
section of this manual for more information.
TERMINOLOGY REFERENCE
The following abbreviations are used throughout this instruction manual:
• BHCS – Button Head Cap Screw
• SHCS – Socket Head Cap Screw
• CW – Clockwise
• CCW – Counter Clockwise
UNPACKING
Refer to the list below to identify parts as you unpack your new Primer Pocket
Swager—Bench Tool:
Parts Bag #1
Large Swager Rod (1)
Large Swager Head (1)
Case Base Plate (1)
8-32 x 1/2” long SHCS (1)
3/8-16 x 1” long SHCS (2)
Note: The 3/8-16 SHCS are optional for mounting to an RCBS Accessory Base
Plate-2 (#9280, sold separately). To order one or nd out more information, contact
RCBS or visit our website (www.rcbs.com).
4 5

ASSEMBLY
Reference the part schematic on page 14 for more information.
You will need the following tools in order to assemble and install this Kit:
• 3/16” hex key/ Allen wrench
• 9/64” hex key/ Allen wrench
• 9/16” wrench or small adjustable wrench
Cam Handle
Remove the Nyloc Nut from Swager Tool’s Cam using a 9/16” wrench (Photo 1).
Photo 1. Cam Nyloc Nut
Place the Cam Handle over the Cam Bolt aligning the small holes in the Handle and
Cam. Install the 8-32 x 1/2” long SHCS and tighten securely with a 9/64” hex key/
Allen wrench. (Photo 2).
Photo 2. Cam Handle Assembly
Verify the head of the Cam Bolt is inside the hex-shaped pocket on the bottom side
of the Swager. Reinstall and tighten the Nyloc Nut ensuring that the Cam is still free
to rotate.
CAUTION Do not over-tighten!
Case Holder Pivot Handle
Thread the Pivot Handle into the Swager Tool’s Pivot (Photo 3).
Photo 3. Install Pivot Handle
Rotate the Cam Handle CCW to retract the Swager Head. Slide the Case Base Plate
into the Swager’s slot (Photo 4). Make sure it is oriented with the bent tab up and
toward the Cam.
Photo 4. Install Case Base Plate
INSTALLATION
Reference the part schematic on page 14 for more information.
Mount the Swager Tool through the two holes along the center slot of the tool.
Mount it to a at stable surface as you see t using appropriately sized hardware.
The Swager Tool can be installed onto an RCBS Accessory Base Plate-2 (#9280,
sold separately) in holes labeled C & D using the provided 3/8-16 SHCS.
6 7

FUNCTION
First sort cases by brand before swaging. DIf erent brands of cases have different
web thickness which will affect the swaging repeatability.
Make sure the Swager Head is retracted by rotating the Cam Handle CCW. Rotate
the Pivot Handle so the Swager Rod is pointing upward at an angle. Next, place
the mouth of the case over the Swager Rod and slide it down until end of Rod is
contacting the case web (Photo 5).
Photo 5. Placing case on Swager Rod
Then rotate the Pivot Handle to lower the case down into the Tool to align the Primer
Pocket with the Swager Head (Photo 6). Adjust the Swager Rod’s alignment per
Swaging Rod Alignment Adjustment section of this manual (see ADJUSTMENT
section for more information)
Photo 6. Align case with Swager Head
CAUTION If the Swager Rod is set too close to the Swager Head, it will bend
the Rod during the swaging operation. Proceed slowly making minor modifi cations
until the correct distance is established.
Adjust the Swager Rod’s depth per Swaging Depth Adjustment section of this
manual (see ADJUSTMENT section for more information)
Rotate the Cam Handle CW (clockwise) rmly until a hard stop is felt. This will force
the Swager Head into the Primer Pocket (you will feel resistance). Rotate the Cam
Handle CCW and unload case. Inspect the Primer Pocket to insure the Crimp Ring is
removed and the edge is radiused.
ADJUSTMENT
Note: Reference the part schematics on page 14 of this booklet for more information.
Swaging Rod Alignment Adjustment
The Swager Rod’s ‘Stop’ position (when it is horizontal) can be adjusted slightly to
compensate for Primer Pocket alignment with the Swager Head. Start by inserting
case over the Swager Rod then lower the Pivot Handle to the ‘Stop’ position. Next,
loosen the SHCS on the side of the Pivot Assembly ~1/2 turn using a 3/32” hex
key/ Allen wrench (Photo 7). Rotate the Case Holder Pivot to the desired position.
Carefully check your adjustment to verify the Swager Head is aligned and operating
correctly. Tighten the SHCS.
Photo 7. Adjusting horizontal “stop” position
Swaging Depth Adjustment
CAUTION If the Swager Rod is set too close to the Swager Head, it will bend
the Rod during the swaging operation. Proceed slowly making minor modifi cations
until the correct distance is established.
The amount of material you swage on the Primer Pocket lip/ edge is controlled by
the depth the Swager Head is inserted into the Pocket. Start by setting the Swager
Rod’s position so there is at least a 0.125” gap between it and the Swager Head
(Photo 8). Swage a case and inspect the Primer Pocket. Adjust the Swager Rod’s
position in small increments until the desired amount of swaging is achieved. One
full revolution of the Swager Rod will move it ~ .04 inches.
Photo 8.
8 9

Changing to Large Pocket Swaging
For swaging cases with large primer pockets, you must change the Swager Rod and
Swager Head to large con gurations.
With the Cam Handle in the CCW position, remove the Case Base Plate. Then raise
the Pivot Handle to its vertical position (Swager Rod will be horizontal) and unscrew
the Small Swager Rod using a 3/16” hex key wrench (Photo 9).
Photo 9. Loosen Swager Rod
Now pull the Swager Rod out of Pivot Shaft (Photo 10).
Photo 10. Remove Swager Rod
Next, remove the Swager Head Pin by pulling straight out of the Connecting Rod
Clevis (Photo 11).
Photo 11. Pull Swager Head Pin
Now rotate the clevis and push the Small Swager Head out of the Swager Base
(Photo 12).
Photo 12. Remove Small Swager Head
Now reinstall the Large Swager Head into the Base (Photo 13).
Photo 13. Install Large Swager Head
Align the hole in the Swager Head with the hole in the Connecting Rod Clevis and
insert the Swager Head Pin (Photo 14).
Photo 14. Install Swager Head Pin
10 11

Insert the Large Swager Rod through the Pivot Shaft (Photo 15) and tighten it using a
3/16” hex key wrench (Photo 16).
Photo 15. Install Large Swager Rod
Photo 16. Tighten Large Swager Rod
Insure the Cam Handle is rotated CCW to retract the Swager Head. Slide the Case
Base Plate into the Swager’s slot (Photo 17). Make sure it is oriented with the bent
tab up and toward the Cam.
Photo 17. Install Case Base Plate
Adjust the Swager Rod’s position per ADJUSTMENT section of this manual.
MAINTENANCE
Reference the part schematic on page 14 for more information.
Occasionally clean your Primer Pocket Swager—Bench Tool to keep the pivot
points free of debris, brass shavings, etc. Dissassemble and clean under the Cam
Assembly and the Swager Head. As needed, apply a small amount of lubricant/
grease between the Cam and Cam Plate (item 9) to reduce wear and friction
between the rotating parts of the Cam Assembly
Swager Head and Swager Rod should be clean, dry, and free of lubricants/ oils
during operation to keep contaminents out of your Primer Pocket and cases.
12 13

20
21
12
14
25
8
11
9
17
18
10
6
23
4
22
16
3
24
5
15
13
1
2
719
16
8
ITEM # PART # DESCRIPTION QTY.
1 709300 Base 1
2 709309 Head Bushing 1
3 709313 Adjustment Disc 1
4 188109 5-40 x 3/8L SHCS 1
5 709311 Pivot 1
6 109200 Dowel Pin 1/8 diam x 1/2 L 1
7 109260 Bow Washer 3/8 ID 1
8 186106 3/8-16 Nyloc Nut 2
9 709304 Cam Plate 1
10 109202 Cam Bolt 1
11 709302 Cam 1
12 709301 Connecting Rod 1
13 709307 Swager Head Small 1
14 709308 Swager Head Pin 1
15 709310 Case Rod Small 1
16 109204 Oring #009 2
17 709303 Cam Handle 1
18 109201 Foam Handle Grip 1
19 709312 Pivot Handle 1
20 180054 Handle Knob 1
21 709305 Case Base Plate 2
22 709306 Swager Head Large 1
23 109203 3/8-16 x 1L SHCS 2
24 709314 Case Rod Large 1
25 187227 8-32 x 1/2L SHCS 2
14 15
Table of contents
Other RCBS Power Tools Accessories manuals
Popular Power Tools Accessories manuals by other brands

Wallenstein
Wallenstein P202 Assembly instructions

Dustless
Dustless DUST SHROUD PRO owner's manual

Deprag
Deprag MICROMAT-ULTRA 345-300-31UL Operating instruction booklet

Forstreich Maschinenbau
Forstreich Maschinenbau TR24-AQ operating instructions

Rockler
Rockler 3/8 Tenon Router Bit instructions

Teknatool
Teknatool SUPERNOVA 2 manual