RCF H-BR 2X COMPACT M User manual

USER MANUAL
MANUALE D’USO
H-BR 2X COMPACT M
V-BR 2X COMPACT M
Horizontal and vertical brackets
for
COMPACT M speakers
Staffe orizzontali e verticali per
diffusori
COMPACT M

2
ENGLISH
IMPORTANT NOTES
Before using this product, please read this instruction manual carefully and keep it on
hand for future reference. This manual is to be considered an integral part of this product
and must accompany it when it changes ownership as a reference for correct installation
and use as well as for the safety precautions.
RCF S.p.A. will not assume any responsibility for the incorrect installation and / or use of
this product.
IMPORTANT NOTES
1. All the precautions, in particular the safety ones, must be read with special attention,
as they provide important information.
2. Do not mount loudspeakers to any equipment or accessories not foreseen.
For suspended installation, only use the dedicated anchoring points and do not try to
hang loudspeakers by using elements that are unsuitable or not specific for this purpose.
Also check the suitability of the support surface to which the product is anchored (wall,
ceiling, structure, etc.), and the components used for attachment (wall plugs, screws,
brackets not supplied by RCF etc.), which must guarantee the security of the system /
installation over time, also considering, for example, the mechanical vibrations normally
generated by transducers.
3. RCF S.p.A. strongly recommends this product is only installed by professional qualified
installers (or specialised firms) who can ensure a correct installation and certify it
according to the regulations in force. The entire audio system must comply with the
current standards and regulations regarding electrical systems.
4. Mechanical and electrical factors need to be considered when installing a professional
audio system (in addition to those which are strictly acoustic, such as sound pressure,
angles of coverage, frequency response, etc.).
5. Place loudspeakers far from any heat source.
6. Do not use solvents, alcohol, benzene or other volatile substances for cleaning the
external parts of this product. Use a dry cloth.
7. Refer to loudspeaker user manuals for all that regards connections and specifications.
SAFETY
PRECAUTIONS
IMPORTANT
ENGLISH
ITALIANO
2
5
LANGUAGE

3
ENGLISH
RCF S.P.A. THANKS YOU FOR PURCHASING THIS PRODUCT, WHICH HAS BEEN
DESIGNED TO GUARANTEE RELIABILITY AND HIGH PERFORMANCE.
DESCRIPTION
Horizontal and vertical brackets for
COMPACT M speakers.
INSTALLATION
WARNING
Loudspeakers are to be install by qualified personnel, respecting all safety standards.
Loudspeakers are to be installed securely.
Make sure the support structure (walls / ceilings) has the necessary mechanical
characteristics for the loudspeaker weight, without the risk of a fall that could damage
things or cause an injury.
Use attachments elements suitable for walls / ceilings (e.g. wall plugs for bricks, for
concrete, etc.).
a) HORIZONTAL MOUNTING WITH U BRACKET
Necessary optional accessory:
-
HORIZONTAL BRACKET H-BR 2X COMPACT M 05 (for COMPACT M 05 model);
-
HORIZONTAL BRACKET H-BR 2X COMPACT M 06 (for COMPACT M 06 model);
-
HORIZONTAL BRACKET H-BR 2X COMPACT M 08 (for COMPACT M 08 model);
- HORIZONTAL BRACKET H-BR 2X COMPACT M 10 (for COMPACT M 10 model);
- HORIZONTAL BRACKET H-BR 2X COMPACT M 12 (for COMPACT M 12 model);
1. Fix the U bracket to the wall / ceiling through at least 4 lateral wall plugs (max. M8)
plus a central one (max. M10).
2. Mount the U bracket to the loudspeaker by tightening the two M10x35 bolts (or
M8x45 for M05 and M06 models) into the holes of the loudspeaker top and bottom, as
shown in the figure below.
Alternatively, it’s possible to install the speaker in a less protruding way by using the
other two inner holes on the U bracket.
Before tightening the two M10 bolts (or M08), adjust the loudspeaker vertical tilt and
then (when you found the right angle) fix it through two 4.2x22 self-threading screws
(or 4.2x16 for M05 and M06 models), passing through the small hole of the U bracket,
directly into the loudspeaker cabinet wood.
NOTE: DO NOT TILT THE LOUDSPEAKER UPWARDS!
INSTEAD OF SIMPLE M10 (or M08) BOLTS, IT IS POSSIBLE TO USE THE M10/M08 BOLT
INCLUDED KNOBS.

4
ENGLISH
b) VERTICAL MOUNTING WITH U BRACKET
Necessary optional accessory:
-
VERTICAL BRACKET V-BR 2X COMPACT M 08 (for COMPACT M 08 model);
- VERTICAL BRACKET V-BR 2X COMPACT M 10 (for COMPACT M 10 model);
- VERTICAL BRACKET V-BR 2X COMPACT M 12 (for COMPACT M 12 model);
Fix the U bracket to the wall / ceiling through at least 4 lateral wall plugs (max. M8) plus
a central one (max. M10)..
1. After removing the screwes on the speaker sides, fix the angular adaptor on the
speaker with the M8x45 screws.
2. Place the plastic cover on the angular adaptor.
3. Fix the braket to the speaker with the M10x30 screws placing a grower washer
between the bracket and the plastic cover.
Alternatively, a less protruding installation is possibile thanks to the inner holes of the U
bracket.
Set the speaker vertical tilt and fix the inclination by screwing the two M6 screws on the
adaptor.
NOTE: DO NOT TILT THE LOUDSPEAKER UPWARDS!
ANGULAR
ADAPTOR
M8x45
GROWER WASHER
PLASTIC COVER
M10x30
M4x16

5
ITALIANO
IMPORTANTE
Prima di utilizzare questo prodotto, leggere attentamente le istruzioni contenute in questo
manuale, il quale è da conservare per riferimenti futuri.
Il presente manuale costituisce parte integrante del prodotto e deve accompagnare
quest’ultimo anche nei passaggi di proprietà, per permettere al nuovo proprietario
di conoscere le modalità d’installazione e d’utilizzo e le avvertenze per la sicurezza.
L’installazione e l’utilizzo errati del prodotto esimono la RCF S.p.A. da ogni responsabilità.
RCF S.p.A. will not assume any responsibility for the incorrect installation and / or use of
this product.
AVVERTENZE PER LA SICUREZZA
1. Tutte le avvertenze, in particolare quelle relative alla sicurezza, devono essere lette con
particolare attenzione, in quanto contengono importanti informazioni.
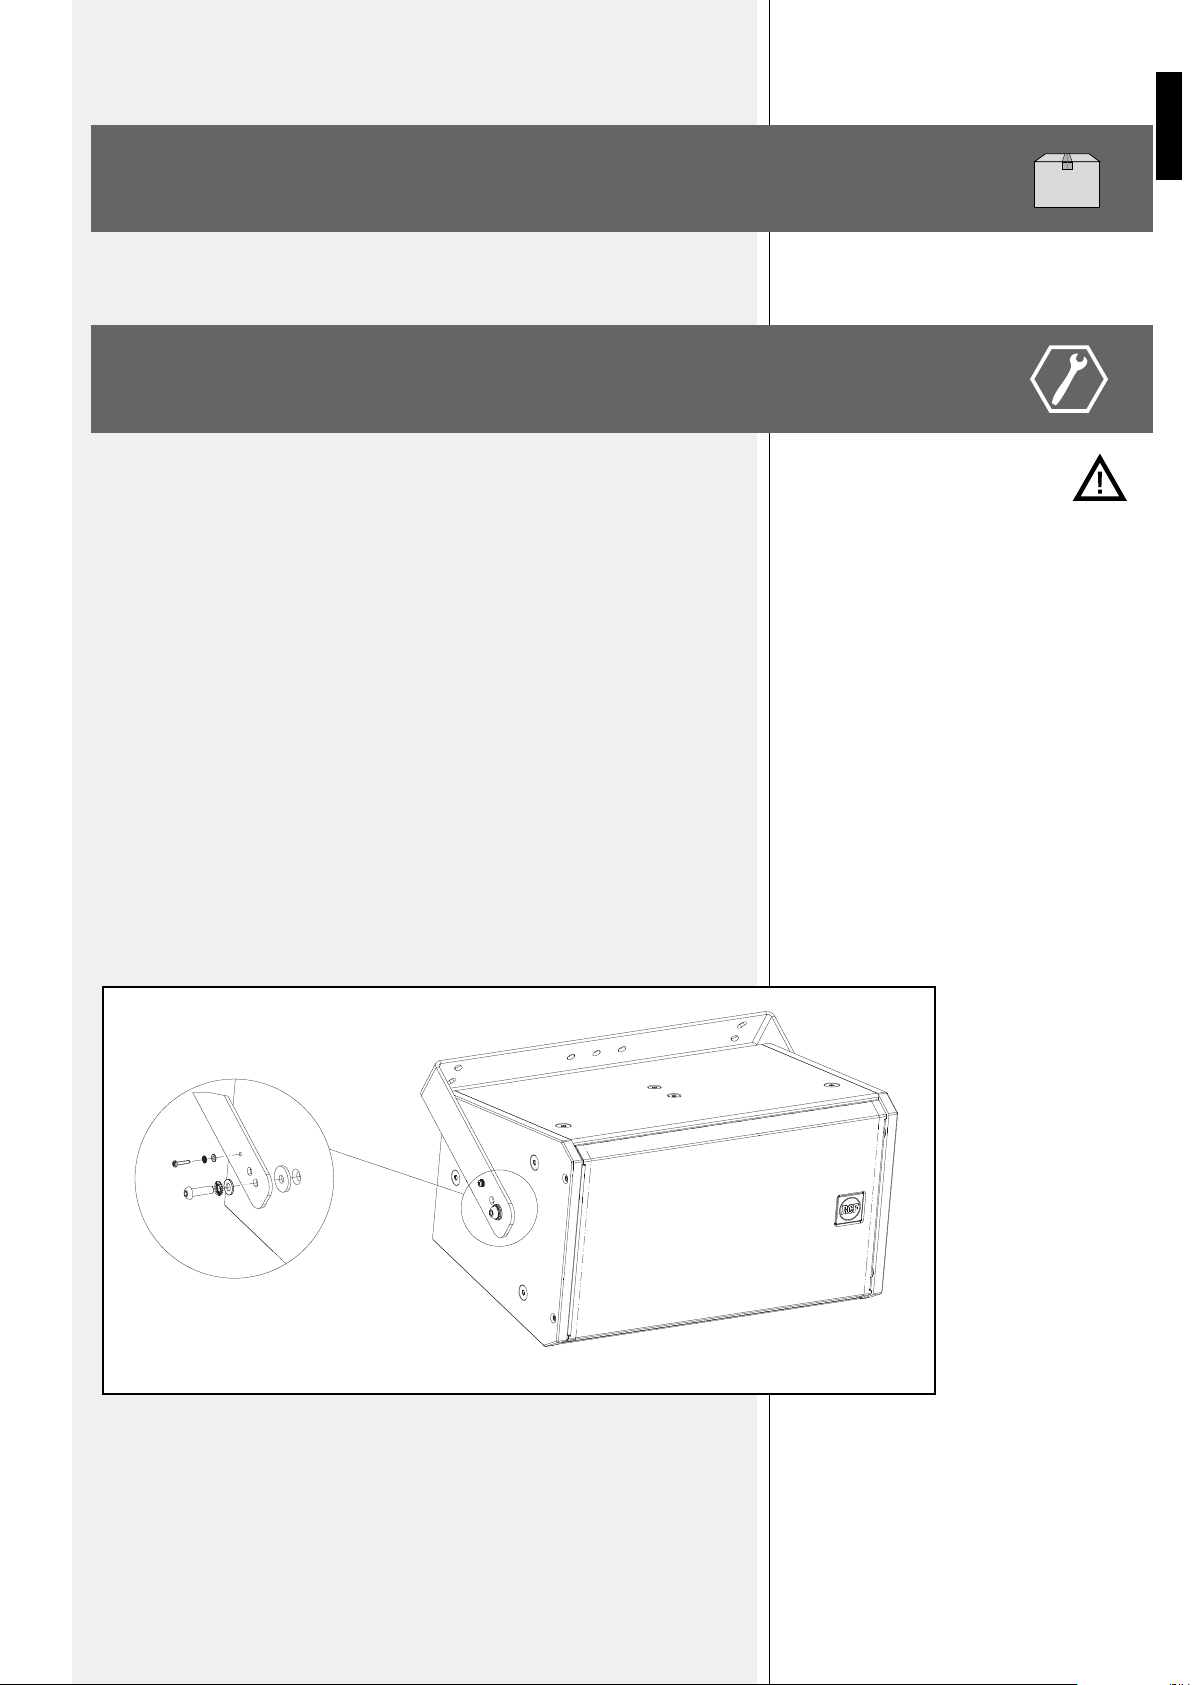
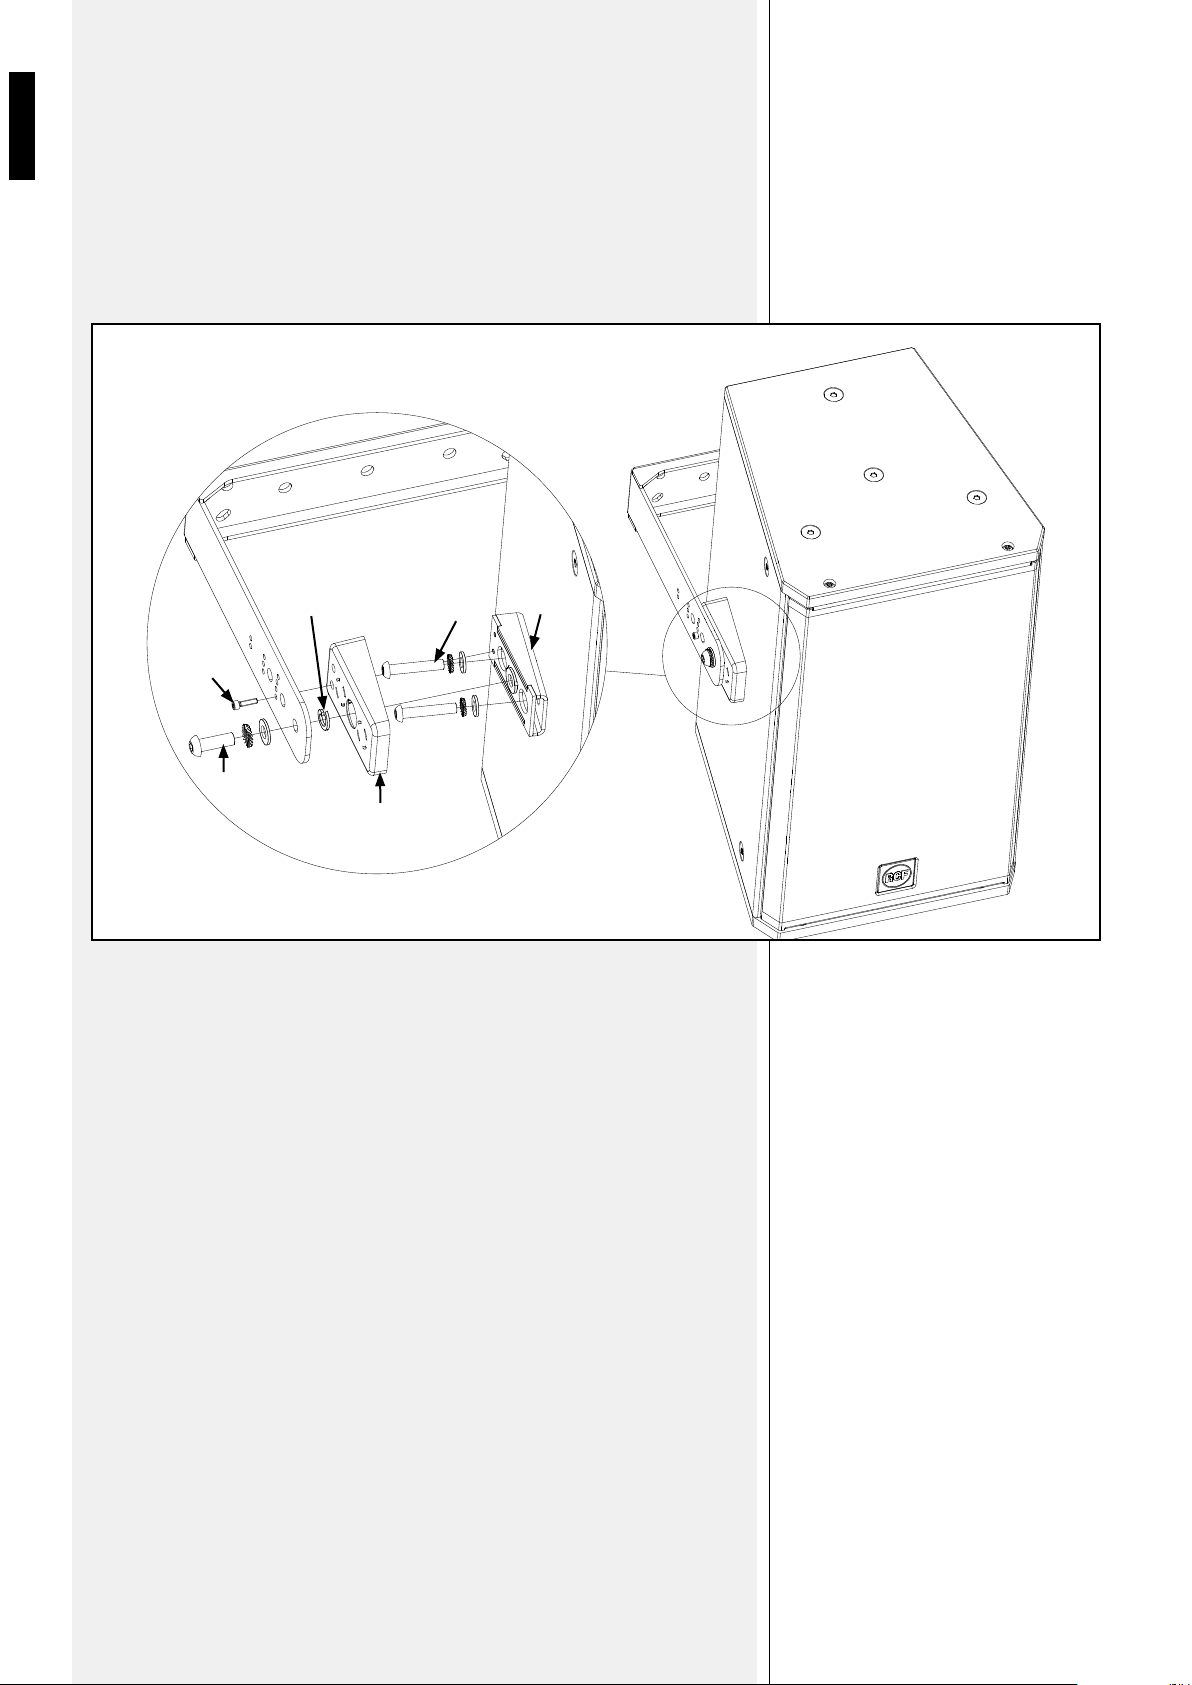
2. Non collegare al diffusore acustico accessori non previsti.
Utilizzare solamente gli appositi punti di ancoraggio e non cercare di appendere il
diffusore con elementi non idonei o previsti allo scopo.
Verificare inoltre l’idoneità del supporto (parete, soffitto, struttura ecc.) e dei componenti
utilizzati per il fissaggio (tasselli, viti, staffe non fornite da RCF ecc.) che devono garantire
la sicurezza dell’impianto / installazione nel tempo, anche considerando, ad esempio,
vibrazioni meccaniche normalmente generate da un trasduttore.
3. La RCF S.p.A. raccomanda vivamente che l’installazione di questo prodotto sia eseguita
solamente da installatori professionali qualificati (oppure da ditte specializzate) in grado
di farla correttamente e certificarla in accordo con le normative vigenti. Tutto il sistema
audio dovrà essere in conformità con le norme e le leggi vigenti in materia di impianti
elettrici.
4. I fattori meccanici ed elettrici sono da considerare quando si installa un sistema audio
professionale (oltre a quelli prettamente acustici, come la pressione sonora, gli angoli di
copertura, la risposta in frequenza, ecc.).
5. Collocare i diffusori acustici lontani da fonti di calore.
6. Non usare solventi, alcool, benzina o altre sostanze volatili per la pulitura delle parti
esterne; usare un panno asciutto.
7. Riferirsi ai manuali dei diffusori acustici per quanto riguarda i collegamenti e le
specifiche tecniche.
AVVERTENZE PER
LA SICUREZZA
IMPORTANTE

6
ITALIANO
RCF S.P.A. VI RINGRAZIA PER L’ACQUISTO DI QUESTO PRODOTTO, REALIZZATO
IN MODO DA GARANTIRNE L’AFFIDABILITÀ E PRESTAZIONI ELEVATE.
DESCRIZIONE
Staffe orizzontali e verticali per i diffusori della serie
COMPACT M.
INSTALLAZIONE
ATTENZIONE
L’installazione dei diffusori deve essere effettuata da personale qualificato rispettando
gli standard di sicurezza. Eseguire un’installazione sicura di ogni diffusore, controllando
che la struttura di supporto (es. parete, soffitto, ecc.) abbia le necessarie caratteristiche
meccaniche, tali da consentirle di sopportarne il peso senza il pericolo di cadute che
potrebbero compromettere l’incolumità di persone e/o danneggiare cose.
Utilizzare elementi di fissaggio adatti al tipo di struttura che deve sostenere i diffusori (es.
tasselli per mattoni forati, calcestruzzo, ecc.).
a) INSTALLAZIONE IN POSIZIONE ORIZZONTALE TRAMITE STAFFA AD “U”
Accessori opzionalI necessari:
-
STAFFA ORIZZONTALE H-BR 2X COMPACT M 05 (per il modello COMPACT M 05);
-
STAFFA ORIZZONTALE H-BR 2X COMPACT M 06 (per il modello COMPACT M 06);
-
STAFFA ORIZZONTALE H-BR 2X COMPACT M 08 (per il modello COMPACT M 08);
- STAFFA ORIZZONTALE H-BR 2X COMPACT M 10 (per il modello COMPACT M 10);
- STAFFA ORIZZONTALE H-BR 2X COMPACT M 12 (per il modello COMPACT M 12);
1. Fissare la staffa ad U alla parete od al soffitto tramite almeno 4 tasselli laterali (max.
M8) ed uno centrale (max. M10).
2. Installare il diffusore alla staffa ad U avvitando i due bulloni M10x35 (M8x45 per i
modelli M05 e M06) nei fori sui lati superiore ed inferiore del diffusore, come mostrato
nella figura sotto.
Come alternativa, è possibile un’installazione un po’ meno sporgente grazie ai fori più
interni della staffa ad U.
Prima di stringere i due bulloni M10 (o M8), regolare l’inclinazione verticale del diffusore
e successivamente (quando si è certi dell’angolo) fissarla tramite due viti autofilettanti
4.2 x 22 (o 4.2x16 per i modelli M05 e M06), passanti per il foro piccolo della staffa a U,
direttamente nel legno del diffusore.
NOTA: NON INCLINARE IL DIFFUSORE VERSO L’ALTO!
IN ALTERNATIVA AI SEMPLICI BULLONI M10 (o M8), È POSSIBILE UTILIZZALE LE
MANOPOLE (CON BULLONI M10 o M8) IN DOTAZIONE.

7
ITALIANO
b) INSTALLAZIONE IN POSIZIONE VERTICALE TRAMITE STAFFA AD “U”
Accessori opzionali necessari:
-
STAFFA VERTICALE V-BR 2X COMPACT M 08 (per il modello COMPACT M 08);
- STAFFA VERTICALE V-BR 2X COMPACT M 10 (per il modello COMPACT M 10);
- STAFFA VERTICALE V-BR 2X COMPACT M 12 (per il modello COMPACT M 12);
Fissare la staffa ad U alla parete od al soffitto tramite almeno 4 tasselli laterali (max. M8)
ed uno centrale (max. M10).
1. Dopo aver rimosso le viti avvitate alle pareti laterali del diffusore, fissare l’adattatore
angolare sul diffusore tramite le viti M8x45.
2. Posizionare la cover in plastica sull’adattatore angolare.
3. Fissare la staffa al diffusore mediante le viti M10x30 interponendo una rondella
spaccata tra la staffa e la cover in plastica.
Regolare l’angolo verticale del diffusore e fissare l’inclinazione avvitando le due viti M6
sull’adattatore.
Come alternativa, è possibile un’installazione un po’ meno sporgente grazie ai fori più
interni della staffa ad U.
NOTA: NON INCLINARE IL DIFFUSORE VERSO L’ALTO!
ADATTATORE
ANGOLARE
M8x45
RONDELLA SPACCATA
(GROWER)
COVER IN PLASTICA
M10x30
M4x16

www.rcf.it
10307686 RevD
RCF SpA: Via Raffaello, 13 - 42124 Reggio Emilia -Italy
tel. +39 0522 274411 - fax +39 0522 274484 - e-mail: rcfservice@rcf.it
This manual suits for next models
1
Table of contents
Languages:
Other RCF Speakers manuals