ReadyNet WRT-500 User manual

WRT500
User Manual

Table of Contents
User Manual ........................................................................................................................ 1
1 Preface........................................................................................................................... 1
2 LED Indicators and Connectors .................................................................................... 1
2.1 LED Indicators ................................................................................................. 1
2.2 Hardware Installation ....................................................................................... 2
3 Configuring Basic Settings ........................................................................................... 2
3.1 Two-Level Management .................................................................................. 2
3.2 Accessing the User Interface Web Page........................................................... 2
3.3 Webpage ........................................................................................................... 3
3.4 Setting Up the Time Zone ................................................................................ 3
3.5 Setting up the Internet Connection................................................................... 3
3.5.1 Static IP...................................................................................................... 4
3.5.2 DHCP......................................................................................................... 4
3.5.3 PPPoE ........................................................................................................ 4
3.6 Setting up the Wireless Connection ................................................................. 5
3.6.1 Enable Wireless and Set the SSID ............................................................. 5
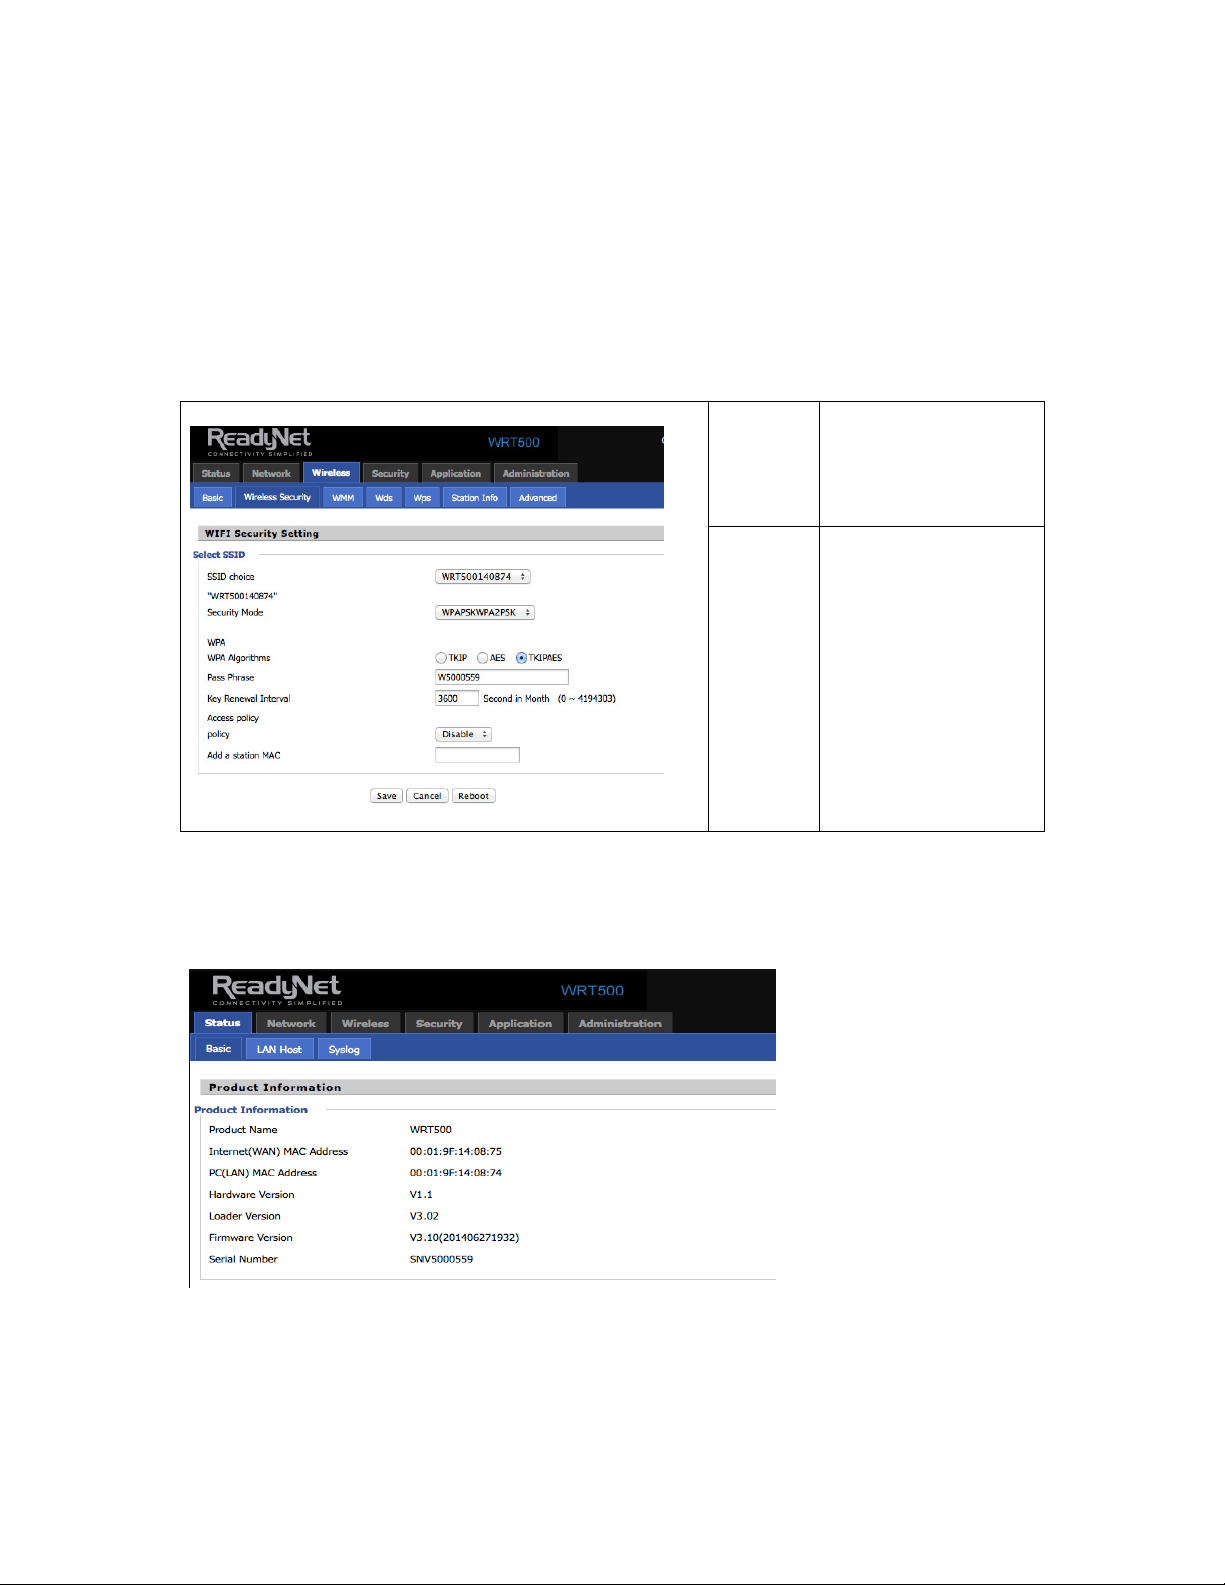
3.6.2 Encryption.................................................................................................. 6
3.6.3 View the Register Status............................................................................ 6
4 Web Configuration ........................................................................................................ 6
4.1 Login ................................................................................................................ 7
4.2 Configuring the WAN and LAN Ports ............................................................. 7
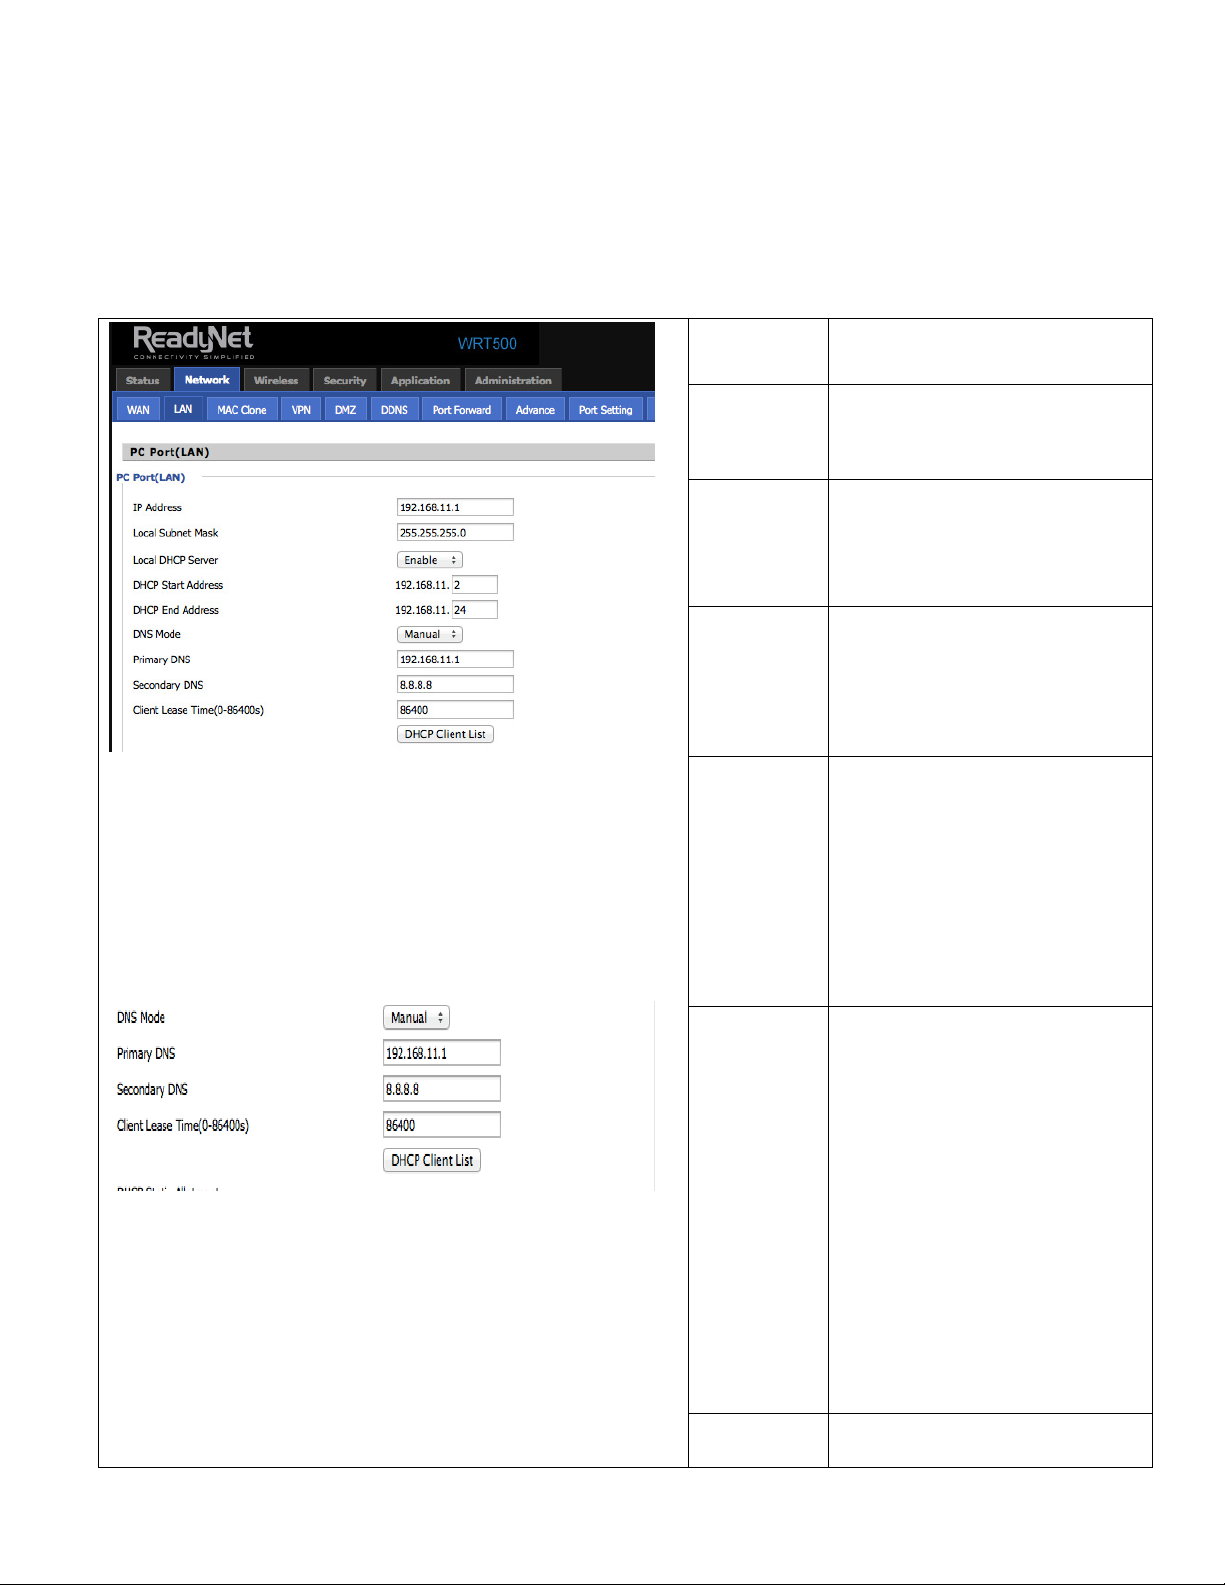
4.2.1 LAN ........................................................................................................... 7
4.2.2 DMZ/Port Forward .................................................................................... 9
4.2.3 MAC Clone................................................................................................ 9
4.3 Wireless .......................................................................................................... 10
4.3.1 Basic ........................................................................................................ 10
4.3.2 Wireless Security ..................................................................................... 10
4.3.3 WMM ...................................................................................................... 11
4.3.4 WPS ......................................................................................................... 11
4.3.5 Station list ................................................................................................ 12
4.3.6 Advanced ................................................................................................. 12
4.4 Security .......................................................................................................... 13
4.4.1 Filtering Setting ....................................................................................... 13
4.4.2 DMZ ........................................................................................................ 13
4.4.3 MAC Clone.............................................................................................. 14
4.4.4 Port Forward ............................................................................................ 14
4.4.5 Content Filtering...................................................................................... 14
4.5 Administration................................................................................................ 15
4.5.1 Management ............................................................................................ 15
4.6 System Log..................................................................................................... 15
4.7 Logout ............................................................................................................ 16
4.8 Reboot ............................................................................................................ 16
5 FCC Statement ............................................................................................................ 16

Version 1.1 P a g e | 1
1Preface
T
Th
ha
an
nk
k
y
yo
ou
u
f
fo
or
r
c
ch
ho
oo
os
si
in
ng
g
t
th
he
e
R
Re
ea
ad
dy
yN
Ne
et
t
W
WR
RT
T5
50
00
0
w
wi
ir
re
el
le
es
ss
s
r
ro
ou
ut
te
er
r.
.
T
Th
hi
is
s
p
pr
ro
od
du
uc
ct
t
p
pr
ro
ov
vi
id
de
es
s
W
Wi
i-
-F
Fi
i
r
ro
ou
ut
te
er
r
f
fu
un
nc
ct
ti
io
on
ns
s.
.
T
Th
hi
is
s
m
ma
an
nu
ua
al
l
p
pr
ro
ov
vi
id
de
es
s
b
ba
as
si
ic
c
i
in
nf
fo
or
rm
ma
at
ti
io
on
n
o
on
n
h
ho
ow
w
t
to
o
i
in
ns
st
ta
al
ll
l
a
an
nd
d
c
co
on
nn
ne
ec
ct
t
t
th
he
e
R
Re
ea
ad
dy
yN
Ne
et
t
W
WR
RT
T5
50
00
0
w
wi
ir
re
el
le
es
ss
s
r
ro
ou
ut
te
er
r
t
to
o
t
th
he
e
I
In
nt
te
er
rn
ne
et
t.
.
I
It
t
a
al
ls
so
o
d
di
is
sc
cu
us
ss
se
es
s
t
th
he
e
r
ro
ou
ut
te
er
r’
’s
s
f
fe
ea
at
tu
ur
re
es
s
a
an
nd
d
f
fu
un
nc
ct
ti
io
on
ns
s
a
an
nd
d
h
ho
ow
w
t
to
o
u
us
se
e
t
th
he
em
m
c
co
or
rr
re
ec
ct
tl
ly
y.
.
B
Be
ef
fo
or
re
e
y
yo
ou
u
c
ca
an
n
c
co
on
nn
ne
ec
ct
t
t
th
he
e
W
WR
RT
T5
50
00
0
t
to
o
t
th
he
e
I
In
nt
te
er
rn
ne
et
t
a
an
nd
d
u
us
se
e
i
it
t,
,
y
yo
ou
u
m
mu
us
st
t
h
ha
av
ve
e
a
a
h
hi
ig
gh
h-
-s
sp
pe
ee
ed
d
b
br
ro
oa
ad
db
ba
an
nd
d
c
co
on
nn
ne
ec
ct
ti
io
on
n
i
in
ns
st
ta
al
ll
le
ed
d.
.
2LED Indicators and Connectors
2.1 LED Indicators
LED Status Explanation
F
Fr
ro
on
nt
t
P
Pa
an
ne
el
l
S
SY
YS
S
B
Bl
li
in
nk
ki
in
ng
g
(
(G
Gr
re
ee
en
n)
)
R
Ro
ou
ut
te
er
r
f
fu
un
nc
ct
ti
io
on
ni
in
ng
g.
.
W
WL
LA
AN
N
O
On
n
(
(G
Gr
re
ee
en
n)
)
W
Wi
ir
re
el
le
es
ss
s
a
ac
cc
ce
es
ss
s
p
po
oi
in
nt
t
i
is
s
r
re
ea
ad
dy
y.
.
B
Bl
li
in
nk
ki
in
ng
g
(
(G
Gr
re
ee
en
n)
)
I
It
t
w
wi
il
ll
l
b
bl
li
in
nk
k
w
wh
hi
il
le
e
w
wi
ir
re
el
le
es
ss
s
t
tr
ra
af
ff
fi
ic
c
g
go
oe
es
s
t
th
hr
ro
ou
ug
gh
h.
.
L
LA
AN
N
1
1/
/2
2/
/3
3/
/4
4
O
On
n
(
(G
Gr
re
ee
en
n)
)
T
Th
he
e
p
po
or
rt
t
i
is
s
c
co
on
nn
ne
ec
ct
te
ed
d
w
wi
it
th
h
1
10
00
0M
Mb
bp
ps
s.
.
O
Of
ff
f
T
Th
he
e
p
po
or
rt
t
i
is
s
d
di
is
sc
co
on
nn
ne
ec
ct
te
ed
d.
.
B
Bl
li
in
nk
ki
in
ng
g
(
(G
Gr
re
ee
en
n)
)
T
Th
he
e
d
da
at
ta
a
i
is
s
t
tr
ra
an
ns
sm
mi
it
tt
ti
in
ng
g.
.
W
WA
AN
N
O
On
n(
(G
Gr
re
ee
en
n)
)
T
Th
he
e
p
po
or
rt
t
i
is
s
c
co
on
nn
ne
ec
ct
te
ed
d
w
wi
it
th
h
1
10
00
0M
Mb
bp
ps
s.
.
O
Of
ff
f
T
Th
he
e
p
po
or
rt
t
i
is
s
d
di
is
sc
co
on
nn
ne
ec
ct
te
ed
d.
.
B
Bl
li
in
nk
ki
in
ng
g
(
(G
Gr
re
ee
en
n)
)
I
It
t
w
wi
il
ll
l
b
bl
li
in
nk
k
w
wh
hi
il
le
e
t
tr
ra
an
ns
sm
mi
it
tt
ti
in
ng
g
d
da
at
ta
a.
.
P
PO
OW
WE
ER
R
O
On
n
(
(R
Re
ed
d)
)
T
Th
he
e
r
ro
ou
ut
te
er
r
i
is
s
p
po
ow
we
er
re
ed
d
o
on
n
a
an
nd
d
r
ru
un
nn
ni
in
ng
g
n
no
or
rm
ma
al
ll
ly
y.
.
O
Of
ff
f
T
Th
he
e
r
ro
ou
ut
te
er
r
i
is
s
p
po
ow
we
er
re
ed
d
o
of
ff
f.
.
Interface
Description
R
Re
ea
ar
r
P
Pa
an
ne
el
l
P
PW
WR
R
P
Po
ow
we
er
r
S
Sw
wi
it
tc
ch
h.
.
D
DC
C
5
5V
V/
/2
2A
A
C
Co
on
nn
ne
ec
ct
to
or
r
f
fo
or
r
a
a
p
po
ow
we
er
r
a
ad
da
ap
pt
te
er
r.
.
W
WA
AN
N
C
Co
on
nn
ne
ec
ct
to
or
r
f
fo
or
r
a
ac
cc
ce
es
ss
si
in
ng
g
t
th
he
e
I
In
nt
te
er
rn
ne
et
t.
.
L
LA
AN
N
(
(1
1/
/2
2/
/3
3/
/4
4)
)
C
Co
on
nn
ne
ec
ct
to
or
rs
s
f
fo
or
r
l
lo
oc
ca
al
l
n
ne
et
tw
wo
or
rk
ke
ed
d
d
de
ev
vi
ic
ce
es
s.
.

Version 1.1 P a g e | 2
2.2 Har
dware
Installation
S
St
te
ep
p
1
1.
.
C
Co
on
nn
ne
ec
ct
t
t
th
he
e
W
WA
AN
N
p
po
or
rt
t
t
to
o
a
an
n
a
ac
cc
ce
es
ss
s
p
po
oi
in
nt
t
s
su
uc
ch
h
a
as
s
a
a
m
mo
od
de
em
m,
,
s
sw
wi
it
tc
ch
h,
,
o
or
r
r
ro
ou
ut
te
er
r
w
wi
it
th
h
a
an
n
E
Et
th
he
er
rn
ne
et
t
c
ca
ab
bl
le
e.
.
S
St
te
ep
p
2
2.
.
C
Co
on
nn
ne
ec
ct
t
o
on
ne
e
o
of
f
t
th
he
e
L
LA
AN
N
p
po
or
rt
ts
s
t
to
o
y
yo
ou
ur
r
c
co
om
mp
pu
ut
te
er
r
w
wi
it
th
h
a
an
n
E
Et
th
he
er
rn
ne
et
t
c
ca
ab
bl
le
e.
.
S
St
te
ep
p
3
3.
.
C
Co
on
nn
ne
ec
ct
t
o
on
ne
e
e
en
nd
d
o
of
f
t
th
he
e
p
po
ow
we
er
r
c
co
or
rd
d
t
to
o
t
th
he
e
p
po
ow
we
er
r
p
po
or
rt
t
o
of
f
t
th
hi
is
s
d
de
ev
vi
ic
ce
e.
.
C
Co
on
nn
ne
ec
ct
t
t
th
he
e
o
ot
th
he
er
r
e
en
nd
d
t
to
o
t
th
he
e
w
wa
al
ll
l
o
ou
ut
tl
le
et
t
o
of
f
e
el
le
ec
ct
tr
ri
ic
ci
it
ty
y.
.
S
St
te
ep
p
4
4.
.
P
Pu
us
sh
h
t
th
he
e
P
PW
WR
R
s
sw
wi
it
tc
ch
h
t
to
o
p
po
ow
we
er
r
o
on
n
t
th
he
e
r
ro
ou
ut
te
er
r.
.
S
St
te
ep
p
5
5.
.
C
Ch
he
ec
ck
k
t
th
he
e
P
Po
ow
we
er
r,
,
W
WA
AN
N,
,
a
an
nd
d
L
LA
AN
N
L
LE
ED
Ds
s
t
to
o
a
as
ss
su
ur
re
e
n
ne
et
tw
wo
or
rk
k
c
co
on
nn
ne
ec
ct
ti
io
on
ns
s.
.
3Configuring Basic Settings
3.1 wo-Level Management
T
Th
he
e
W
WR
RT
T5
50
00
0
s
su
up
pp
po
or
rt
ts
s
u
us
se
er
r
m
ma
an
na
ag
ge
em
me
en
nt
t.
.
F
Fo
or
r
u
us
se
er
r
m
mo
od
de
e
o
op
pe
er
ra
at
ti
io
on
n,
,
p
pl
le
ea
as
se
e
l
lo
og
g
i
in
n
t
to
o
t
th
he
e
u
us
se
er
r
i
in
nt
te
er
rf
fa
ac
ce
e
W
We
eb
b
P
Pa
ag
ge
e.
.
T
Th
he
e
U
Us
se
er
rn
na
am
me
e
i
is
s
“
“u
us
se
er
r”
”
a
an
nd
d
t
th
he
e
d
de
ef
fa
au
ul
lt
t
P
Pa
as
ss
sw
wo
or
rd
d
i
is
s
t
th
he
e
l
la
as
st
t
8
8
l
le
et
tt
te
er
rs
s
o
of
f
t
th
he
e
L
LA
AN
N
p
po
or
rt
t
M
MA
AC
C
a
ad
dd
dr
re
es
ss
s.
.
T
Th
hi
is
s
s
se
ec
ct
ti
io
on
n
a
al
ls
so
o
e
ex
xp
pl
la
ai
in
ns
s
h
ho
ow
w
t
to
o
s
se
et
t
u
up
p
a
a
p
pa
as
ss
sw
wo
or
rd
d
f
fo
or
r
a
an
n
a
ad
dm
mi
in
ni
is
st
tr
ra
at
to
or
r/
/r
ro
oo
ot
t
u
us
se
er
r
a
an
nd
d
h
ho
ow
w
t
to
o
a
ad
dj
ju
us
st
t
b
ba
as
si
ic
c/
/a
ad
dv
va
an
nc
ce
ed
d
s
se
et
tt
ti
in
ng
gs
s
f
fo
or
r
s
su
uc
cc
ce
es
ss
sf
fu
ul
ll
ly
y
a
ac
cc
ce
es
ss
si
in
ng
g
t
th
he
e
I
In
nt
te
er
rn
ne
et
t.
.
3.2 Accessing the User Interface Web Page
S
St
te
ep
p1
1.
.
C
Co
on
nn
ne
ec
ct
t
y
yo
ou
ur
r
c
co
om
mp
pu
ut
te
er
r
t
to
o
o
on
ne
e
o
of
f
t
th
he
e
r
ro
ou
ut
te
er
r’
’s
s
L
LA
AN
N
p
po
or
rt
ts
s
u
us
si
in
ng
g
a
an
n
E
Et
th
he
er
rn
ne
et
t
c
ca
ab
bl
le
e.
.
Notice: You may either simply set up your computer to get IP dynamically from the router or
set up the IP address of the computer to be the same subnet as the default IP address
of the router, which is 192.168.11.1.
S
St
te
ep
p
2
2.
.
O
Op
pe
en
n
a
a
w
we
eb
b
b
br
ro
ow
ws
se
er
r
o
on
n
y
yo
ou
ur
r
c
co
om
mp
pu
ut
te
er
r,
,
t
ty
yp
pe
e
h
ht
tt
tp
p:
:/
//
/1
19
92
2.
.1
16
68
8.
.1
11
1.
.1
1.
.
T
Th
he
e
f
fo
ol
ll
lo
ow
wi
in
ng
g
l
lo
og
gi
in
n
w
wi
in
nd
do
ow
w
w
wi
il
ll
l
o
op
pe
en
n.
.
R
RS
ST
T
R
Re
es
se
et
t
t
to
o
f
fa
ac
ct
to
or
ry
y
d
de
ef
fa
au
ul
lt
t.
.

Version 1.1 P a g e | 3
S
St
te
ep
p
3
3.
.
T
To
o
l
lo
og
gi
in
n,
,
t
ty
yp
pe
e
i
in
n
t
th
he
e
U
Us
se
er
rn
na
am
me
e
a
an
nd
d
P
Pa
as
ss
sw
wo
or
rd
d
f
fo
ou
un
nd
d
o
on
n
t
th
he
e
l
la
ab
be
el
l
o
on
n
t
th
he
e
b
bz
za
ao
ot
tt
to
om
m
o
of
f
t
th
he
e
W
WR
RT
T5
50
00
0
a
an
nd
d
c
cl
li
ic
ck
k
L
Lo
og
gi
in
n.
.
(
(T
Th
he
e
u
us
se
er
rn
na
am
me
e
i
is
s
“
“u
us
se
er
r”
”
a
an
nd
d
t
th
he
e
p
pa
as
ss
sw
wo
or
rd
d
i
is
s
t
th
he
e
l
la
as
st
t
8
8
c
ch
ha
ar
ra
ac
ct
te
er
rs
s
o
of
f
t
th
he
e
L
LA
AN
N
M
MA
AC
C
a
ad
dd
dr
re
es
ss
s.
.)
)
T
Th
he
e
w
we
eb
b
p
pa
ag
ge
e
w
wi
il
ll
l
l
lo
og
g
o
ou
ut
t
a
af
ft
te
er
r
5
5
m
mi
in
nu
ut
te
es
s
o
of
f
n
no
o
a
ac
ct
ti
iv
vi
it
ty
y.
.
3.3 Webpage
N
No
o.
.
N
Na
am
me
e
D
De
es
sc
cr
ri
ip
pt
ti
io
on
n
1 Navigation
bar
Click navigation bar, sub-navigation
bars will appear on the second line.
2 Title Click on the sub-navigation bars to
choose a configuration page.
3 Parameter To configure the parameters.
After every change, click this button to
apply the change.
After clicking Save, the red
will appear.
Click to cancel changes.
Click to reboot the router.
3.4 Setting Up the ime Zone
O
Op
pe
en
n
A
Ad
dm
mi
in
ni
is
st
tr
ra
at
ti
io
on
n/
/M
Ma
an
na
ag
ge
em
me
en
nt
t
w
we
eb
bp
pa
ag
ge
e
a
as
s
s
sh
ho
ow
wn
n
b
be
el
lo
ow
w,
,
s
se
el
le
ec
ct
t
t
th
he
e
T
Ti
im
me
e
Z
Zo
on
ne
e,
,
s
sp
pe
ec
ci
if
fy
y
t
th
he
e
N
NT
TP
P
s
se
er
rv
ve
er
r
a
an
nd
d
s
se
et
t
t
th
he
e
u
up
pd
da
at
te
e
i
in
nt
te
er
rv
va
al
l
i
in
n
N
NT
TP
P
s
sy
yn
nc
ch
hr
ro
on
ni
iz
za
at
ti
io
on
n.
.
3.5 Setting up the Internet Connection
O
Op
pe
en
n
t
th
he
e
N
Ne
et
tw
wo
or
rk
k/
/W
WA
AN
N
w
we
eb
bp
pa
ag
ge
e
a
as
s
s
sh
ho
ow
wn
n
b
be
el
lo
ow
w
a
an
nd
d
s
se
el
le
ec
ct
t
t
th
he
e
a
ap
pp
pr
ro
op
pr
ri
ia
at
te
e
I
IP
P
M
Mo
od
de
e
a
ac
cc
co
or
rd
di
in
ng
g
t
to
o
t
th
he
e
i
in
nf
fo
or
rm
ma
at
ti
io
on
n
f
fr
ro
om
m
y
yo
ou
ur
r
I
IS
SP
P.
.
T
Th
he
er
re
e
a
ar
re
e
t
th
hr
re
ee
e
t
ty
yp
pe
es
s
o
of
ff
fe
er
re
ed
d
–
–
S
St
ta
at
ti
ic
c,
,
D
DH
HC
CP
P
a
an
nd
d
P
PP
PP
Po
oE
E.
.

Version 1.1 P a g e | 4
3.5.1 Static IP
Y
Yo
ou
u
w
wi
il
ll
l
r
re
ec
ce
ei
iv
ve
e
a
a
f
fi
ix
xe
ed
d
p
pu
ub
bl
li
ic
c
I
IP
P
a
ad
dd
dr
re
es
ss
s
o
or
r
a
a
p
pu
ub
bl
li
ic
c
s
su
ub
bn
ne
et
t
(
(m
mu
ul
lt
ti
ip
pl
le
e
p
pu
ub
bl
li
ic
c
I
IP
P
a
ad
dd
dr
re
es
ss
se
es
s)
)
f
fr
ro
om
m
y
yo
ou
ur
r
D
DS
SL
L
o
or
r
C
Ca
ab
bl
le
e
I
IS
SP
P
s
se
er
rv
vi
ic
ce
e
p
pr
ro
ov
vi
id
de
er
rs
s.
.
I
In
n
m
mo
os
st
t
c
ca
as
se
es
s,
,
a
a
C
Ca
ab
bl
le
e
s
se
er
rv
vi
ic
ce
e
p
pr
ro
ov
vi
id
de
er
r
w
wi
il
ll
l
o
of
ff
fe
er
r
a
a
f
fi
ix
xe
ed
d
p
pu
ub
bl
li
ic
c
I
IP
P
w
wh
hi
il
le
e
a
a
D
DS
SL
L
s
se
er
rv
vi
ic
ce
e
p
pr
ro
ov
vi
id
de
er
r
w
wi
il
ll
l
o
of
ff
fe
er
r
a
a
p
pu
ub
bl
li
ic
c
s
su
ub
bn
ne
et
t.
.
I
If
f
y
yo
ou
u
h
ha
av
ve
e
a
a
p
pu
ub
bl
li
ic
c
s
su
ub
bn
ne
et
t,
,
y
yo
ou
u
c
ca
an
n
a
as
ss
si
ig
gn
n
a
an
n
I
IP
P
a
ad
dd
dr
re
es
ss
s
t
to
o
t
th
he
e
W
WA
AN
N
i
in
nt
te
er
rf
fa
ac
ce
e.
.
IP Address Type the IP address.
Subnet Mask Type the subnet mask.
Gateway IP
Address Type the gateway IP address.
Primary DNS
Server
Type in the primary IP
address for the route.
Secondary
DNS Server
Type in secondary IP address
for necessity in the future.
3.5.2 DHCP
I
It
t
i
is
s
n
no
ot
t
n
ne
ec
ce
es
ss
sa
ar
ry
y
f
fo
or
r
y
yo
ou
u
t
to
o
t
ty
yp
pe
e
a
an
ny
y
I
IP
P
a
ad
dd
dr
re
es
ss
s
m
ma
an
nu
ua
al
ll
ly
y.
.
S
Si
im
mp
pl
ly
y
c
ch
ho
oo
os
se
e
t
th
hi
is
s
t
ty
yp
pe
e
a
an
nd
d
t
th
he
e
s
sy
ys
st
te
em
m
w
wi
il
ll
l
o
ob
bt
ta
ai
in
n
t
th
he
e
I
IP
P
a
ad
dd
dr
re
es
ss
s
a
au
ut
to
om
ma
at
ti
ic
ca
al
ll
ly
y
f
fr
ro
om
m
t
th
he
e
D
DH
HC
CP
P
s
se
er
rv
ve
er
r.
.
DNS Mode
Set the DNS Mode to Auto or Manual. If
user chooses Manual, fill in the primary
and secondary DNS addresses.
Primary DNS
Server
Type in the primary IP address for the
route.
Secondary
DNS Server
Type in secondary IP address for
necessity in the future.
3.5.3 PPPoE
P
PP
PP
Po
oE
E
s
st
ta
an
nd
ds
s
f
fo
or
r
P
Po
oi
in
nt
t-
-t
to
o-
-P
Po
oi
in
nt
t
P
Pr
ro
ot
to
oc
co
ol
l
o
ov
ve
er
r
E
Et
th
he
er
rn
ne
et
t.
.
I
It
t
r
re
el
li
ie
es
s
o
on
n
t
tw
wo
o
w
wi
id
de
el
ly
y
a
ac
cc
ce
ep
pt
te
ed
d

Version 1.1 P a g e | 5
s
st
ta
an
nd
da
ar
rd
ds
s:
:
P
PP
PP
P
a
an
nd
d
E
Et
th
he
er
rn
ne
et
t.
.
I
It
t
c
co
on
nn
ne
ec
ct
ts
s
u
us
se
er
rs
s
t
th
hr
ro
ou
ug
gh
h
a
an
n
E
Et
th
he
er
rn
ne
et
t
t
to
o
t
th
he
e
I
In
nt
te
er
rn
ne
et
t
w
wi
it
th
h
a
a
c
co
om
mm
mo
on
n
b
br
ro
oa
ad
db
ba
an
nd
d
m
me
ed
di
iu
um
m,
,
s
su
uc
ch
h
a
as
s
a
a
s
si
in
ng
gl
le
e
D
DS
SL
L
l
li
in
ne
e,
,
w
wi
ir
re
el
le
es
ss
s
d
de
ev
vi
ic
ce
e,
,
o
or
r
c
ca
ab
bl
le
e
m
mo
od
de
em
m.
.
A
Al
ll
l
u
us
se
er
rs
s
o
ov
ve
er
r
t
th
he
e
E
Et
th
he
er
rn
ne
et
t
c
ca
an
n
s
sh
ha
ar
re
e
a
a
c
co
om
mm
mo
on
n
c
co
on
nn
ne
ec
ct
ti
io
on
n.
.
P
PP
PP
Po
oE
E
i
is
s
o
of
ft
te
en
n
u
us
se
ed
d
f
fo
or
r
D
DS
SL
L.
.
A
Al
ll
l
l
lo
oc
ca
al
l
u
us
se
er
rs
s
c
ca
an
n
s
sh
ha
ar
re
e
o
on
ne
e
P
PP
PP
Po
oE
E
c
co
on
nn
ne
ec
ct
ti
io
on
n
f
fo
or
r
a
ac
cc
ce
es
ss
si
in
ng
g
t
th
he
e
I
In
nt
te
er
rn
ne
et
t.
.
Y
Yo
ou
ur
r
s
se
er
rv
vi
ic
ce
e
p
pr
ro
ov
vi
id
de
er
r
w
wi
il
ll
l
p
pr
ro
ov
vi
id
de
e
y
yo
ou
u
i
in
nf
fo
or
rm
ma
at
ti
io
on
n
a
ab
bo
ou
ut
t
u
us
se
er
r
n
na
am
me
e,
,
p
pa
as
ss
sw
wo
or
rd
d,
,
a
an
nd
d
a
au
ut
th
he
en
nt
ti
ic
ca
at
ti
io
on
n
m
mo
od
de
e.
.
PPPoE
Account
Assign a specific valid user name
provided by the ISP.
PPPoE
Password
Assign a valid password provided by
the ISP.
Confirm
Password Input the password again.
DNS Mode
Set the DNS Mode to Auto or
Manual.
If Manual, fill in primary and
secondary DNS addresses.
Primary
DNS Server
Type in the primary IP address for
the route.
Secondary
DNS Server
Type in secondary IP address for
necessity in the future.
3.6 Setting up the Wireless Connection
T
To
o
s
se
et
t
u
up
p
t
th
he
e
w
wi
ir
re
el
le
es
ss
s
c
co
on
nn
ne
ec
ct
ti
io
on
n,
,
p
pl
le
ea
as
se
e
f
fo
ol
ll
lo
ow
w
t
th
he
es
se
e
s
st
te
ep
ps
s.
.
3.6.1 Enable Wireless and Set the SSID
O
Op
pe
en
n
t
th
he
e
W
Wi
ir
re
el
le
es
ss
s/
/B
Ba
as
si
ic
c
w
we
eb
bp
pa
ag
ge
e
a
as
s
s
sh
ho
ow
wn
n
b
be
el
lo
ow
w.
.
Radio On/Off Press to disable.
Press to enable.
Network Mode Choose one network mode from
the drop down list.
Network
Name(SSSID)
The name of the wireless name, it
can be any text numbers or
various special characters.
Multiple
SSSD1-3 Set more wireless network.
Frequency Choose channel frequency.

Version 1.1 P a g e | 6
3.6.2 Encryption
O
Op
pe
en
n
t
th
he
e
W
Wi
ir
re
el
le
es
ss
s/
/S
Se
ec
cu
ur
ri
it
ty
y
w
we
eb
bp
pa
ag
ge
e
t
to
o
s
se
et
t
u
up
p
e
en
nc
cr
ry
yp
pt
ti
io
on
n.
.
SSID
Choice
Choose one SSID from
Off-premises 1,
off-premises 2 and
Premises.
Security
Mode
Select an appropriate
encryption mode for the
security and privacy of
your wireless data
packets.
Each encryption mode
will bring out a different
web page to offer
additional configurations.
3.6.3 View the Register Status
T
To
o
v
vi
ie
ew
w
t
th
he
e
s
st
ta
at
tu
us
s,
,
o
op
pe
en
n
t
th
he
e
S
St
ta
at
tu
us
s
w
we
eb
bp
pa
ag
ge
e.
.
I
If
f
t
th
he
e
v
va
al
lu
ue
e
i
is
s
r
re
eg
gi
is
st
te
er
re
ed
d
a
as
s
f
fo
ol
ll
lo
ow
ws
s,
,
t
th
he
e
W
WR
RT
T5
50
00
0
i
is
s
r
re
ea
ad
dy
y
t
to
o
o
op
pe
er
ra
at
te
e.
.
4Web Configuration
T
Th
hi
is
s
c
ch
ha
ap
pt
te
er
r
w
wi
il
ll
l
g
gu
ui
id
de
e
u
us
se
er
rs
s
i
in
n
c
co
on
nf
fi
ig
gu
ur
ri
in
ng
g
t
th
hr
ro
ou
ug
gh
h
t
th
he
e
w
we
eb
b
i
in
nt
te
er
rf
fa
ac
ce
e.
.

Version 1.1 P a g e | 7
4.1 Login
S
St
te
ep
p
1
1.
.
C
Co
on
nn
ne
ec
ct
t
t
th
he
e
L
LA
AN
N
p
po
or
rt
t
o
of
f
t
th
he
e
r
ro
ou
ut
te
er
r
t
to
o
y
yo
ou
ur
r
P
PC
C
S
St
te
ep
p
2
2.
.
O
Op
pe
en
n
a
a
w
we
eb
b
b
br
ro
ow
ws
se
er
r
o
on
n
y
yo
ou
ur
r
P
PC
C
a
an
nd
d
t
ty
yp
pe
e
i
in
n
h
ht
tt
tp
p:
:/
//
/1
19
92
2.
.1
16
68
8.
.1
11
1.
.1
1.
.
T
Th
he
e
w
wi
in
nd
do
ow
w
w
wi
il
ll
l
a
as
sk
k
f
fo
or
r
a
a
u
us
se
er
rn
na
am
me
e
a
an
nd
d
p
pa
as
ss
sw
wo
or
rd
d.
.
S
St
te
ep
p
3
3.
.
E
En
nt
te
er
r
t
th
he
e
U
Us
se
er
rn
na
am
me
e
a
an
nd
d
P
Pa
as
ss
sw
wo
or
rd
d
a
as
s
i
in
nd
di
ic
ca
at
te
ed
d
i
in
n
t
th
he
e
r
ro
ou
ut
te
er
r
p
pa
ac
ck
ka
ag
gi
in
ng
g
o
or
r
o
on
n
t
th
he
e
r
ro
ou
ut
te
er
r’
’s
s
b
ba
ac
ck
k
l
la
ab
be
el
l.
.
A
Af
ft
te
er
r
s
su
uc
cc
ce
es
ss
sf
fu
ul
l
l
lo
og
gi
in
n,
,
t
th
he
e
w
we
eb
bp
pa
ag
ge
e
s
sh
ho
ow
ws
s
b
ba
as
si
ic
c
i
in
nf
fo
or
rm
ma
at
ti
io
on
n
a
ab
bo
ou
ut
t
t
th
he
e
r
ro
ou
ut
te
er
r,
,
s
su
uc
ch
h
a
as
s
t
th
he
e
c
cu
ur
rr
re
en
nt
t
W
WA
AN
N
I
IP
P,
,
D
DN
NS
S
s
se
er
rv
ve
er
r
I
IP
P,
,
W
WA
AN
N
p
po
or
rt
t
c
co
on
nn
ne
ec
ct
ti
io
on
n
m
mo
od
de
e,
,
W
WA
AN
N
l
li
in
nk
k
s
st
ta
at
tu
us
s,
,
w
wi
ir
re
el
le
es
ss
s
S
SS
SI
ID
D,
,
w
wi
ir
re
el
le
es
ss
s
c
ch
ha
an
nn
ne
el
l
a
an
nd
d
f
fi
ir
rm
mw
wa
ar
re
e
v
ve
er
rs
si
io
on
n.
.
4.2 Configuring the WAN and LAN Ports
T
Th
he
e
m
ma
ai
in
n
w
we
eb
bp
pa
ag
ge
e
s
sh
ho
ow
ws
s
s
st
ta
at
tu
us
s,
,
p
pr
ro
od
du
uc
ct
t,
,
n
ne
et
tw
wo
or
rk
k
a
an
nd
d
s
sy
ys
st
te
em
m
i
in
nf
fo
or
rm
ma
at
ti
io
on
n.
.
I
It
t
s
sh
ho
ow
ws
s
t
th
he
e
b
ba
as
si
ic
c
i
in
nf
fo
or
rm
ma
at
ti
io
on
n
o
of
f
t
th
he
e
p
pr
ro
od
du
uc
ct
t,
,
s
su
uc
ch
h
a
as
s
p
pr
ro
od
du
uc
ct
t
n
na
am
me
e,
,
s
se
er
ri
ia
al
l
n
nu
um
mb
be
er
r,
,
M
MA
AC
C
a
ad
dd
dr
re
es
ss
s,
,
h
ha
ar
rd
dw
wa
ar
re
e
v
ve
er
rs
si
io
on
n
a
an
nd
d
s
so
of
ft
tw
wa
ar
re
e
v
ve
er
rs
si
io
on
n.
.
I
It
t
a
al
ls
so
o
s
sh
ho
ow
ws
s
W
WA
AN
N
P
Po
or
rt
t
S
St
ta
at
tu
us
s,
,
L
LA
AN
N
P
Po
or
rt
t
S
St
ta
at
tu
us
s
a
an
nd
d
c
cu
ur
rr
re
en
nt
t
t
ti
im
me
e
a
an
nd
d
r
ru
un
nn
ni
in
ng
g
t
ti
im
me
e
o
of
f
t
th
he
e
p
pr
ro
od
du
uc
ct
t.
.
4.2.1 LAN
L
LA
AN
N
P
Po
or
rt
t:
:
T
Th
he
e
m
mo
os
st
t
g
ge
en
ne
er
ri
ic
c
f
fu
un
nc
ct
ti
io
on
n
o
of
f
t
th
he
e
r
ro
ou
ut
te
er
r
i
is
s
N
NA
AT
T,
,
w
wh
hi
ic
ch
h
t
tr
ra
an
ns
sl
la
at
te
es
s
p
pa
ac
ck
ke
et
ts
s
f
fr
ro
om
m
p
pu
ub
bl
li
ic
c
I
IP
P
a
ad
dd
dr
re
es
ss
se
es
s
t
to
o
l
lo
oc
ca
al
l
I
IP
P
a
ad
dd
dr
re
es
ss
se
es
s
t
to
o
f
fo
or
rw
wa
ar
rd
d
t
th
he
e
r
ri
ig
gh
ht
t
p
pa
ac
ck
ke
et
ts
s
t
to
o
t
th
he
e
r
ri
ig
gh
ht
t
h
ho
os
st
t
a
an
nd
d
v
vi
ic
ce
e
v
ve
er
rs
sa
a.
.
Local IP
Address
Type in local IP address
(Default: 192.168.11.1)
Local Subnet
Mask
Type in an address code that
determines the size of the
network. (Default:
255.255.255.0/ 24)
Local DHCP
Server If or not enable DHCP server.
DHCP
Start/End
Address
The DHCP start/end address.
DNS Mode
Set the DNS Mode to Auto or
Manual.
If Manual, fill in the primary and
secondary DNS addresses.
Primary DNS
Server
Type in the primary IP address
for the route
Secondary
DNS Server
Type in the secondary IP
address for the route

Version 1.1 P a g e | 8
D
DH
HC
CP
P
S
Se
er
rv
ve
er
r:
:
T
Th
he
e
r
ro
ou
ut
te
er
r
h
ha
as
s
a
a
b
bu
ui
il
lt
t-
-i
in
n
D
DH
HC
CP
P
s
se
er
rv
ve
er
r
t
th
ha
at
t
a
as
ss
si
ig
gn
ns
s
p
pr
ri
iv
va
at
te
e
I
IP
P
a
ad
dd
dr
re
es
ss
s
t
to
o
e
ea
ac
ch
h
l
lo
oc
ca
al
l
h
ho
os
st
t.
.
D
DH
HC
CP
P
s
st
ta
an
nd
ds
s
f
fo
or
r
D
Dy
yn
na
am
mi
ic
c
H
Ho
os
st
t
C
Co
on
nf
fi
ig
gu
ur
ra
at
ti
io
on
n
P
Pr
ro
ot
to
oc
co
ol
l.
.
T
Th
he
e
r
ro
ou
ut
te
er
r
b
by
y
f
fa
ac
ct
to
or
ry
y
d
de
ef
fa
au
ul
lt
t
a
ac
ct
ts
s
a
as
s
a
a
D
DH
HC
CP
P
s
se
er
rv
ve
er
r
f
fo
or
r
y
yo
ou
ur
r
n
ne
et
tw
wo
or
rk
k
s
so
o
i
it
t
a
au
ut
to
om
ma
at
ti
ic
ca
al
ll
ly
y
d
di
is
sp
pa
at
tc
ch
he
es
s
r
re
el
la
at
te
ed
d
I
IP
P
s
se
et
tt
ti
in
ng
gs
s
t
to
o
a
an
ny
y
l
lo
oc
ca
al
l
u
us
se
er
r
c
co
on
nf
fi
ig
gu
ur
re
ed
d
a
as
s
a
a
D
DH
HC
CP
P
c
cl
li
ie
en
nt
t.
.
I
It
t
i
is
s
h
hi
ig
gh
hl
ly
y
r
re
ec
co
om
mm
me
en
nd
de
ed
d
y
yo
ou
u
l
le
ea
av
ve
e
t
th
he
e
r
ro
ou
ut
te
er
r
e
en
na
ab
bl
le
ed
d
a
as
s
a
a
D
DH
HC
CP
P
s
se
er
rv
ve
er
r
i
if
f
y
yo
ou
u
d
do
o
n
no
ot
t
h
ha
av
ve
e
a
a
D
DH
HC
CP
P
s
se
er
rv
ve
er
r
f
fo
or
r
y
yo
ou
ur
r
n
ne
et
tw
wo
or
rk
k.
.
Local DHCP
Server To enable DHCP server.
DHCP
Starting
Address
Enter a value of the IP address pool
for the DHCP server to start with
when issuing IP addresses.
DHCP Ending
Address
Enter a value of the IP address pool
for the DHCP server to end with when
issuing IP addresses.
Primary/Sec-
ondary DNS
Input the primary or secondary DNS
IP address.
Primary DNS
You must specify a DNS server IP
address here because your ISP
should provide you with usually more
than one DNS Server. If your ISP
does not provide it, the router will
automatically apply default DNS
Server IP address: 202.96.134.33 to
this field.
Secondary
DNS
You must specify a DNS server IP
address here because your ISP
should provide you with usually more
than one DNS Server. If your ISP
does not provide it, the router will
automatically apply default DNS
Server IP address: 202.96.128.86 to
this field.
If both the Primary and Secondary IP
Address fields are left empty, the
router will assign its own IP address
to local users as a DNS proxy server
and maintain a DNS cache.
Client Lease It allows you to set the leased time for

Version 1.1 P a g e | 9
Time the specified PC.
DNS Proxy If or not enable DNS proxy.
4.2.2 DMZ/Port Forward
D
DM
MZ
Z
DMZ Enable
Enable DMZ
DMZ Host IP
Address
Enter the private IP address of
the DMZ host
P
Po
or
rt
t
F
Fo
or
rw
wa
ar
rd
d
4.2.3 MAC Clone
S
So
om
me
e
I
IS
SP
Ps
s
w
wi
il
ll
l
r
re
eq
qu
ui
ir
re
e
y
yo
ou
u
t
to
o
r
re
eg
gi
is
st
te
er
r
y
yo
ou
ur
r
M
MA
AC
C
a
ad
dd
dr
re
es
ss
s.
.
I
If
f
y
yo
ou
u
d
do
o
n
no
ot
t
w
wi
is
sh
h
t
to
o
r
re
e-
-r
re
eg
gi
is
st
te
er
r
y
yo
ou
ur
r
M
MA
AC
C
a
ad
dd
dr
re
es
ss
s,
,
y
yo
ou
u
c
ca
an
n
h
ha
av
ve
e
t
th
he
e
r
ro
ou
ut
te
er
r
c
cl
lo
on
ne
e
t
th
he
e
M
MA
AC
C
a
ad
dd
dr
re
es
ss
s
t
th
ha
at
t
i
is
s
r
re
eg
gi
is
st
te
er
re
ed
d
w
wi
it
th
h
y
yo
ou
ur
r
I
IS
SP
P.
.
T
To
o
u
us
se
e
t
th
he
e
C
Cl
lo
on
ne
e
A
Ad
dd
dr
re
es
ss
s
b
bu
ut
tt
to
on
n,
,
t
th
he
e
c
co
om
mp
pu
ut
te
er
r
v
vi
ie
ew
wi
in
ng
g
t
th
he
e
W
We
eb
b-
-b
ba
as
se
e
u
ut
ti
il
li
it
ty
y
s
sc
cr
re
ee
en
n
w
wi
il
ll
l
h
ha
av
ve
e
t
th
he
e
M
MA
AC
C
a
ad
dd
dr
re
es
ss
s
a
au
ut
to
om
ma
at
ti
ic
ca
al
ll
ly
y
e
en
nt
te
er
re
ed
d
i
in
n
t
th
he
e
C
Cl
lo
on
ne
e
W
WA
AN
N
M
MA
AC
C
f
fi
ie
el
ld
d.
.
Step 1. Press to clone the
current PC or MAC address to router’s Internet port.
Step 2. Press to save the changes.
Step 3. Press Reboot to make changes effective.

Version 1.1 P a g e | 10
4.3 Wireless
4.3.1 Basic
Radio
On/Off
Select Radio On to enable
the wireless, select Radio
Off to disable wireless.
Network
Mode
Choose one network mode
from the five types.
SSID
The name of the wireless. It
can be any text numbers or
various special characters.
The default SSID is
"WRT500XXXXX (last 5
digits of the LAN MAC)".
Multiple
SSID1-3
Broadcast
(SSID)
User can set multiple SSIDs.
Enable SSID broadcast.
4.3.2 Wireless Security
SSID Choice
Choose one SSID from
SSID, Multiple SSID1,
Multiple SSID2 and
Multiple SSID3.
Security
Mode
Select an appropriate
encryption mode to
improve the security and
privacy of your wireless
data packets.
Each encryption mode will
activate a different web
page to configure.

Version 1.1 P a g e | 11
4.3.3 WMM
4.3.4 WPS
W
WP
PS
S
(
(W
Wi
i-
-F
Fi
i
P
Pr
ro
ot
te
ec
ct
te
ed
d
S
Se
et
tu
up
p)
)
p
pr
ro
ov
vi
id
de
es
s
a
an
n
e
ea
as
sy
y
p
pr
ro
oc
ce
ed
du
ur
re
e
t
to
o
m
ma
ak
ke
e
a
a
n
ne
et
tw
wo
or
rk
k
c
co
on
nn
ne
ec
ct
ti
io
on
n
b
be
et
tw
we
ee
en
n
a
a
w
wi
ir
re
el
le
es
ss
s
s
st
ta
at
ti
io
on
n
a
an
nd
d
a
a
w
wi
ir
re
el
le
es
ss
s
a
ac
cc
ce
es
ss
s
p
po
oi
in
nt
t
(
(r
ro
ou
ut
te
er
r)
)
w
wi
it
th
h
t
th
he
e
e
en
nc
cr
ry
yp
pt
ti
io
on
n
o
of
f
W
WP
PA
A
a
an
nd
d
W
WP
PA
A2
2.
.
I
It
t
i
is
s
t
th
he
e
s
si
im
mp
pl
le
es
st
t
w
wa
ay
y
t
to
o
b
bu
ui
il
ld
d
a
a
c
co
on
nn
ne
ec
ct
ti
io
on
n
b
be
et
tw
we
ee
en
n
w
wi
ir
re
el
le
es
ss
s
n
ne
et
tw
wo
or
rk
k
c
cl
li
ie
en
nt
ts
s
a
an
nd
d
t
th
he
e
r
ro
ou
ut
te
er
r.
.
U
Us
se
er
rs
s
d
do
o
n
no
ot
t
n
ne
ee
ed
d
t
to
o
s
se
el
le
ec
ct
t
a
an
ny
y
e
en
nc
cr
ry
yp
pt
ti
io
on
n
m
mo
od
de
e
o
or
r
t
ty
yp
pe
e
a
a
l
lo
on
ng
g
e
en
nc
cr
ry
yp
pt
ti
io
on
n
p
pa
as
ss
sp
ph
hr
ra
as
se
e
t
to
o
s
se
et
t
u
up
p
a
a
w
wi
ir
re
el
le
es
ss
s
c
cl
li
ie
en
nt
t
e
ev
ve
er
ry
y
t
ti
im
me
e.
.
U
Us
se
er
rs
s
n
ne
ee
ed
d
o
on
nl
ly
y
p
pr
re
es
ss
s
a
a
b
bu
ut
tt
to
on
n
o
on
n
t
th
he
e
w
wi
ir
re
el
le
es
ss
s
c
cl
li
ie
en
nt
t
a
an
nd
d
W
WP
PS
S
w
wi
il
ll
l
c
co
on
nn
ne
ec
ct
t
t
th
he
e
c
cl
li
ie
en
nt
t
a
an
nd
d
r
ro
ou
ut
te
er
r
a
au
ut
to
om
ma
at
ti
ic
ca
al
ll
ly
y.
.
WPS Enable WPS.
Press the button to
apply.

Version 1.1 P a g e | 12
4.3.5 Station list
4.3.6 Advanced

Version 1.1 P a g e | 13
4.4 Security
4.4.1 Filtering Setting
4.4.2 DMZ

Version 1.1 P a g e | 14
4.4.3 MAC Clone
4.4.4 Port Forward
4.4.5 Content Filtering

Version 1.1 P a g e | 15
4.5 Administration
4.5.1 Management
User Type Select the user type
New User
Name
User can change new
user name
New
Password Input the new password
Confirm
Password Confirm the password
NTP Enable Enable NTP
Current Time Display the current time.
NTP Settings Select the time zone.
Primary NTP
Server The primary NTP server
Secondary
NTP Server
The secondary NTP
server
NTP syn-
chronization
Set the NTP
synchronization.
4.6 System Log
B
By
y
d
de
ef
fa
au
ul
lt
t,
,
t
th
he
e
l
lo
oc
ca
al
l
s
sy
ys
st
te
em
m
l
lo
og
g
i
is
s
e
en
na
ab
bl
le
ed
d.
.
U
Us
se
er
r
c
ca
an
n
c
ch
he
ec
ck
k
t
th
he
e
s
sy
ys
st
te
em
m
l
lo
og
g
i
in
n
S
St
ta
at
tu
us
s-
--
->
>B
Ba
as
si
ic
c.
.

Version 1.1 P a g e | 16
4.7 Logout
P
Pr
re
es
ss
s
l
lo
og
go
ou
ut
t
t
to
o
e
ex
xi
it
t.
.
4.8 Reboot
P
Pr
re
es
ss
s
t
th
he
e
R
Re
eb
bo
oo
ot
t
b
bu
ut
tt
to
on
n
t
to
o
r
re
eb
bo
oo
ot
t
W
WR
RT
T5
50
00
0.
.
5FCC Statement
T
Th
hi
is
s
d
de
ev
vi
ic
ce
e
i
is
s
i
in
n
c
co
om
mp
pl
li
ia
an
nc
ce
e
w
wi
it
th
h
t
th
he
e
e
es
ss
se
en
nt
ti
ia
al
l
r
re
eq
qu
ui
ir
re
em
me
en
nt
ts
s
a
an
nd
d
o
ot
th
he
er
r
r
re
el
le
ev
va
an
nt
t
p
pr
ro
ov
vi
is
si
io
on
ns
s
o
of
f
D
Di
ir
re
ec
ct
ti
iv
ve
e
1
19
99
99
9/
/5
5/
/E
EC
C.
.
I
It
t
h
ha
as
s
b
be
ee
en
n
t
te
es
st
te
ed
d
a
an
nd
d
f
fo
ou
un
nd
d
t
to
o
c
co
om
mp
pl
ly
y
w
wi
it
th
h
t
th
he
e
l
li
im
mi
it
ts
s
f
fo
or
r
a
a
C
Cl
la
as
ss
s
B
B
d
di
ig
gi
it
ta
al
l
d
de
ev
vi
ic
ce
e,
,
p
pu
ur
rs
su
ua
an
nt
t
t
to
o
p
pa
ar
rt
t
1
15
5
o
of
f
t
th
he
e
F
FC
CC
C
r
ru
ul
le
es
s.
.
T
Th
he
es
se
e
l
li
im
mi
it
ts
s
a
ar
re
e
d
de
es
si
ig
gn
ne
ed
d
t
to
o
p
pr
ro
ov
vi
id
de
e
r
re
ea
as
so
on
na
ab
bl
le
e
p
pr
ro
ot
te
ec
ct
ti
io
on
n
a
ag
ga
ai
in
ns
st
t
h
ha
ar
rm
mf
fu
ul
l
i
in
nt
te
er
rf
fe
er
re
en
nc
ce
e
i
in
n
a
a
r
re
es
si
id
de
en
nt
ti
ia
al
l
i
in
ns
st
ta
al
ll
la
at
ti
io
on
n.
.
T
Th
hi
is
s
e
eq
qu
ui
ip
pm
me
en
nt
t
g
ge
en
ne
er
ra
at
te
es
s,
,
u
us
se
es
s
a
an
nd
d
c
ca
an
n
r
ra
ad
di
ia
at
te
e
r
ra
ad
di
io
o
f
fr
re
eq
qu
ue
en
nc
cy
y
e
en
ne
er
rg
gy
y
a
an
nd
d,
,
i
if
f
n
no
ot
t
i
in
ns
st
ta
al
ll
le
ed
d
a
an
nd
d
u
us
se
ed
d
i
in
n
a
ac
cc
co
or
rd
da
an
nc
ce
e
w
wi
it
th
h
t
th
he
e
i
in
ns
st
tr
ru
uc
ct
ti
io
on
ns
s,
,
m
ma
an
ny
y
c
ca
au
us
se
e
h
ha
ar
rm
mf
fu
ul
l
i
in
nt
te
er
rf
fe
er
re
en
nc
ce
e
t
to
o
r
ra
ad
di
io
o
c
co
om
mm
mu
un
ni
ic
ca
at
ti
io
on
ns
s.
.
H
Ho
ow
we
ev
ve
er
r,
,
t
th
he
er
re
e
i
is
s
n
no
o
g
gu
ua
ar
ra
an
nt
te
ee
e
t
th
ha
at
t
i
in
nt
te
er
rf
fe
er
re
en
nc
ce
e
w
wi
il
ll
l
n
no
ot
t
o
oc
cc
cu
ur
r
i
in
n
a
a
p
pa
ar
rt
ti
ic
cu
ul
la
ar
r
i
in
ns
st
ta
al
ll
la
at
ti
io
on
n.
.
I
If
f
t
th
hi
is
s
e
eq
qu
ui
ip
pm
me
en
nt
t
d
do
oe
es
s
c
ca
au
us
se
e
h
ha
ar
rm
mf
fu
ul
l
i
in
nt
te
er
rf
fe
er
re
en
nc
ce
e
t
to
o
r
ra
ad
di
io
o
o
or
r
t
te
el
le
ev
vi
is
si
io
on
n
r
re
ec
ce
ep
pt
ti
io
on
n,
,
w
wh
hi
ic
ch
h
c
ca
an
n
b
be
e
d
de
et
te
er
rm
mi
in
ne
ed
d
b
by
y
t
tu
ur
rn
ni
in
ng
g
t
th
he
e
e
eq
qu
ui
ip
pm
me
en
nt
t
o
of
ff
f
a
an
nd
d
o
on
n,
,
t
th
he
e
u
us
se
er
r
i
is
s
e
en
nc
co
ou
ur
ra
ag
ge
ed
d
t
to
o
t
tr
ry
y
t
to
o
c
co
or
rr
re
ec
ct
t
t
th
he
e
i
in
nt
te
er
rf
fe
er
re
en
nc
ce
e
b
by
y
o
on
ne
e
o
or
r
m
mo
or
re
e
o
of
f
t
th
he
e
f
fo
ol
ll
lo
ow
wi
in
ng
g
m
me
ea
as
su
ur
re
es
s:
:
-
-R
Re
eo
or
ri
ie
en
nt
t
o
or
r
r
re
el
lo
oc
ca
at
te
e
t
th
he
e
r
re
ec
ce
ei
iv
vi
in
ng
g
a
an
nt
te
en
nn
na
a.
.
-
-I
In
nc
cr
re
ea
as
se
e
t
th
he
e
s
se
ep
pa
ar
ra
at
ti
io
on
n
b
be
et
tw
we
ee
en
n
t
th
he
e
e
eq
qu
ui
ip
pm
me
en
nt
t
a
an
nd
d
r
re
ec
ce
ei
iv
ve
er
r.
.
-
-C
Co
on
nn
ne
ec
ct
t
t
th
he
e
e
eq
qu
ui
ip
pm
me
en
nt
t
i
in
nt
to
o
a
an
n
o
ou
ut
tl
le
et
t
o
on
n
a
a
c
ci
ir
rc
cu
ui
it
t
d
di
if
ff
fe
er
re
en
nt
t
f
fr
ro
om
m
t
th
ha
at
t
t
to
o
w
wh
hi
ic
ch
h
t
th
he
e
r
re
ec
ce
ei
iv
ve
er
r
i
is
s
c
co
on
nn
ne
ec
ct
te
ed
d.
.
-
-C
Co
on
ns
su
ul
lt
t
t
th
he
e
d
de
ea
al
le
er
r
o
or
r
a
an
n
e
ex
xp
pe
er
ri
ie
en
nc
ce
ed
d
r
ra
ad
di
io
o/
/T
TV
V
t
te
ec
ch
hn
ni
ic
ci
ia
an
n
f
fo
or
r
h
he
el
lp
p.
.
T
To
o
a
as
ss
su
ur
re
e
c
co
on
nt
ti
in
nu
ue
ed
d
c
co
om
mp
pl
li
ia
an
nc
ce
e,
,
a
an
ny
y
c
ch
ha
an
ng
ge
es
s
o
or
r
m
mo
od
di
if
fi
ic
ca
at
ti
io
on
ns
s
n
no
ot
t
e
ex
xp
pr
re
es
ss
sl
ly
y
a
ap
pp
pr
ro
ov
ve
ed
d
b
by
y
t
th
he
e
p
pa
ar
rt
ty
y
r
re
es
sp
po
on
ns
si
ib
bl
le
e
f
fo
or
r
c
co
om
mp
pl
li
ia
an
nc
ce
e
c
co
ou
ul
ld
d
v
vo
oi
id
d
t
th
he
e
u
us
se
er
r’
’s
s
a
au
ut
th
ho
or
ri
it
ty
y
t
to
o
o
op
pe
er
ra
at
te
e
t
th
hi
is
s
e
eq
qu
ui
ip
pm
me
en
nt
t.
.
(
(E
Ex
xa
am
mp
pl
le
e-
-
u
us
se
e
o
on
nl
ly
y
s
sh
hi
ie
el
ld
de
ed
d
i
in
nt
te
er
rf
fa
ac
ce
e
c
ca
ab
bl
le
es
s
w
wh
he
en
n
c
co
on
nn
ne
ec
ct
ti
in
ng
g
t
to
o
c
co
om
mp
pu
ut
te
er
r
o
or
r
p
pe
er
ri
ip
ph
he
er
ra
al
l
d
de
ev
vi
ic
ce
es
s)
)
T
Th
hi
is
s
e
eq
qu
ui
ip
pm
me
en
nt
t
c
co
om
mp
pl
li
ie
es
s
w
wi
it
th
h
F
FC
CC
C
R
RF
F
r
ra
ad
di
ia
at
ti
io
on
n
e
ex
xp
po
os
su
ur
re
e
l
li
im
mi
it
ts
s
s
se
et
t
f
fo
or
rt
th
h
f
fo
or
r
a
an
n
u
un
nc
co
on
nt
tr
ro
ol
ll
le
ed
d
e
en
nv
vi
ir
ro
on
nm
me
en
nt
t.
.
T
Th
hi
is
s
t
tr
ra
an
ns
sm
mi
it
tt
te
er
r
m
mu
us
st
t
n
no
ot
t
b
be
e
c
co
o-
-l
lo
oc
ca
at
te
ed
d
o
or
r
o
op
pe
er
ra
at
ti
in
ng
g
i
in
n
c
co
on
nj
ju
un
nc
ct
ti
io
on
n
w
wi
it
th
h
a
an
ny
y
o
ot
th
he
er
r
a
an
nt
te
en
nn
na
a
o
or
r
t
tr
ra
an
ns
sm
mi
it
tt
te
er
r.
.
T
Th
hi
is
s
e
eq
qu
ui
ip
pm
me
en
nt
t
c
co
om
mp
pl
li
ie
es
s
w
wi
it
th
h
P
Pa
ar
rt
t
1
15
5
o
of
f
t
th
he
e
F
FC
CC
C
R
Ru
ul
le
es
s.
.
O
Op
pe
er
ra
at
ti
io
on
n
i
is
s
s
su
ub
bj
je
ec
ct
t
t
to
o
t
th
he
e
f
fo
ol
ll
lo
ow
wi
in
ng
g
t
tw
wo
o
c
co
on
nd
di
it
ti
io
on
ns
s:
:
(
(1
1)
)
T
Th
hi
is
s
d
de
ev
vi
ic
ce
e
m
ma
ay
y
n
no
ot
t
c
ca
au
us
se
e
h
ha
ar
rm
mf
fu
ul
l
i
in
nt
te
er
rf
fe
er
re
en
nc
ce
e,
,
a
an
nd
d
(
(2
2)
)
T
Th
hi
is
s
d
de
ev
vi
ic
ce
e
m
mu
us
st
t
a
ac
cc
ce
ep
pt
t
a
an
ny
y
i
in
nt
te
er
rf
fe
er
re
en
nc
ce
e
r
re
ec
ce
ei
iv
ve
ed
d,
,
i
in
nc
cl
lu
ud
di
in
ng
g
i
in
nt
te
er
rf
fe
er
re
en
nc
ce
e
t
th
ha
at
t
m
ma
ay
y
c
ca
au
us
se
e
u
un
nd
de
es
si
ir
re
ed
d
o
op
pe
er
ra
at
ti
io
on
n.
.
T
Th
hi
is
s
e
eq
qu
ui
ip
pm
me
en
nt
t
s
sh
ho
ou
ul
ld
d
b
be
e
i
in
ns
st
ta
al
ll
le
ed
d
a
an
nd
d
o
op
pe
er
ra
at
te
ed
d
w
wi
it
th
h
m
mi
in
ni
im
mu
um
m
d
di
is
st
ta
an
nc
ce
e
2
20
0c
cm
m
b
be
et
tw
we
ee
en
n
t
th
he
e
r
ra
ad
di
ia
at
to
or
r
a
an
nd
d
y
yo
ou
ur
r
b
bo
od
dy
y.
.
Other manuals for WRT-500
1
Table of contents
Other ReadyNet Wireless Router manuals

ReadyNet
ReadyNet WRT300N-DD User manual

ReadyNet
ReadyNet AC1300MS User manual

ReadyNet
ReadyNet WR300NQ User manual

ReadyNet
ReadyNet QX300 Installation and user guide

ReadyNet
ReadyNet WRT300N-D6 User manual

ReadyNet
ReadyNet WRT150N User manual

ReadyNet
ReadyNet LTE520 User manual

ReadyNet
ReadyNet LTE520 User manual

ReadyNet
ReadyNet WR300NQ User manual

ReadyNet
ReadyNet AC1000M User manual