manuals.online logo
Brands
  1. Home
  2. •
  3. Brands
  4. •
  5. Red Smoke Alarms
  6. •
  7. Smoke Alarm
  8. •
  9. Red Smoke Alarms R240 User manual

Red Smoke Alarms R240 User manual

Specifications:
SMOKE ALARM R240
240 V a.c, Mains Power Photoelectric Smoke Alarm with 9V Battery Backup
INSTALLATION INSTRUCTIONS
55mm
PLEASE NOTE: READ ALL INSTRUCTIONS BEFORE INSTALLATION. NO USER SERVICEABLE PARTS INSIDE THIS SMOKEALARM.
Main Power Source
Backup Battery
Operating Current
Sensing Type
Temperature Range
Humidity Range
Interconnecting
Terminals
Sound Level
Alarm Condition
Visual Indicators
Approval
220-240 V a.c., 50 Hz
9V carbon zinc or alkaline battery
≤40 mA
Type A Photoelectric smoke alarm - contains NO radioactive material
0 °C to 45 °C
5% to 95%
40 alarms for wireless
40 alarms wired over 150 metres maximum
Active, Neutral, Loop and Interconnect terminals,
each accommodates 2 × 1.5 mm
85 dB at three metres minimum
Audible signal pattern (ISO 8201)
Green LED for mains power ON
Red LED for warning and low battery indication
AS 3786:2014, UL S36341
2
Installation & Interconnecting Smoke Alarms:
1.
Strip the Active/Neutral and Interconnect (if used) wires back to the strip length shown below.
2. Connect the wires to the correct terminals on the base and ensure the terminal screws are
fully tightened.
3. Clip the terminal cover closed to avoid contact with the live terminals.
4. Clip the flap closed to prevent accidential contact with the live terminals.
5. Screw the mounting base onto the ceiling or wall using plugs and screws.
6.
Clip the smoke alarm on to the base and install the 9V battery. The smoke alarm will not latch
to the base unless battery is installed.
7. Turn on the mains power and check that the green and red LEDs function. The Green LED
should illuminate to show mains power present. The Red LED will pulse every 40-60 seconds
to indicate correct operation and that the 9V battery is okay.
8. Press the Test/Hush button for 3 seconds to check the alarm works.
Installation is not complete until both LEDs are functioning correctly.
Use a minimum of 1.0 mm
2
250 V insulated wire for all wiring, including interconnecting wiring.
N
A
E/LOOP
Black—Neutral (N)
220-240 V a.c. Interconnect (I)
Red—Active (A)
I
N
A
E/LOOP
I
N
A
E/LOOP
I
N
A
E/LOOP
I
TERMINAL
A: Active / Line
E/LOOP: Earth or Loop
N: Neutral
I: Interconnect
Local
obal
Gl
BATTERY
REMOVAL FINGER SLOT
LATCH
HINGE
ELECTRICAL
CONTACT
(I, N, A)
Red LED
Green LED
140mm
CAUTION
• Alternative Energy Sources - (Wind, Solar, UPS etc.) This product is
designed to be connected to a Pure or True Sine Wave 230 Vac supply.
• It should not be connected to a power source that utilises an inverter, e.g.
PV solar panel, the Total Harmonic Distortion (THD).
• Light Dimmer Circuits – The Alarms must not be powered from a light
dimmer circuit
•
Red LED flashes very quickly (3 times per second) without sound. This
means neutral connection is bad or wiring is wrong.
Please check wiring and connection of smoke alarms with flashing red LED
and rectify wiring issue immediately.
• An optional wireless base (RWB) may be purchased separately if wired
connection is not possible.
CAUTION
EQUIPMENT INSTALLATION HAZARD
• All interconnected smoke alarms must be supplied from the same circuit.
• A common Neutral must be used for the Interconnect to operate.
• DO NOT connect the Interconnect wire to Active or Neutral.
• Maximum of 40 interconnected smoke alarms.
•
Only Red smoke alarms can be interconnected.
WARNING: Failure to follow these instructions may result in equipment
damage or injury.
IMPORTANT
50mm
10mm
NOTICE - EQUIPMENT INSTALLATION COMPLIANCE
This smoke alarm must be installed in accordance with the National
Electrical Code and any local state legislation requirements.
Failure to follow these instructions may result in a non-compliant
installation.
IMPORTANT
The operation of the smoke
alarm must test with the
test facility whenever the
batteries are replaced.
Battery & Battery Replacement:
Battery Instruction
• The smoke alarm uses one 9V battery to automatically provide back-up power to the alarm if AC power
fails. The battery will operate the alarm for approximately one to three months with AC power off.
• The battery should last at least one year under normal operating conditions. Recommended batteries
included: Energiser 522
• To replace battery, unlatch unit from mounting base and remove the battery from compartment.
Replace the old battery with a fresh one and close unit. Verify that the green LED is on.
Battery Replacement
• The battery should be replaced once a year.
• Smoke alarm cannot be closed properly without battery in place.
SMOKE ALARMS
Operation and Testing
OPERATION
Once the mains power (220-240 V a.c.) is connected and the 9V battery is
installed correctly, the smoke alarm is operating.
Once Smoke Is Detected
The smoke alarm will sound a loud alarm (85 dB) and the red LED will
flash rapidly. This will continue until the air is cleared.
Standby Condition
The red LED flashes once every 40-60 seconds to indicate the smoke
alarm and battery are functioning correctly.
Green LED
The green LED is illuminated when the mains power (220-240V a.c.) is on.
Memory Function
If one of the alarm indicator (RED LED) is flashing every 4 seconds this
indicates that a smoke alarm, has previously been activated.
Hush or Silence Feature
•
This smoke alarm has a built-in Hush or Silence feature incorporated into the Test/Hush button.
•
If cooking or other non-hazardous sources cause the alarm to sound, it can be temporarily
silenced by pressing the Test/Hush button for 3 seconds.
•
The alarm then enters a dormant period for 10 minutes.
•
After the 10 minute dormant period, the smoke alarm will resume normal operation.
Note: After the Test/Hush button has been pressed, wait 10 minutes before any additional
testing is conducted to avoid any abnormal responses as the smoke alarm is not sensitive to
smoke during this period.
TESTING
TEST THE SMOKE ALARM ONCE PER MONTH TO ENSURE PROPER
OPERATION
Test by pushing the Test/Hush button on the smoke alarm for three
seconds until the alarm sounds. The alarm will sound if all electronic
circuitry, horn and battery are working.
If no alarm sounds, check the battery is installed the correct way around or
replace the battery. If the battery is new and installed correctly and the
alarm still doesn’t sound, replace the smoke alarm.
If the smoke alarm is installed in a mobile home, test weekly and after every
journey.
Never use an open flame of any type to test your alarm.
Check that all interconnected smoke alarms operate during the test.
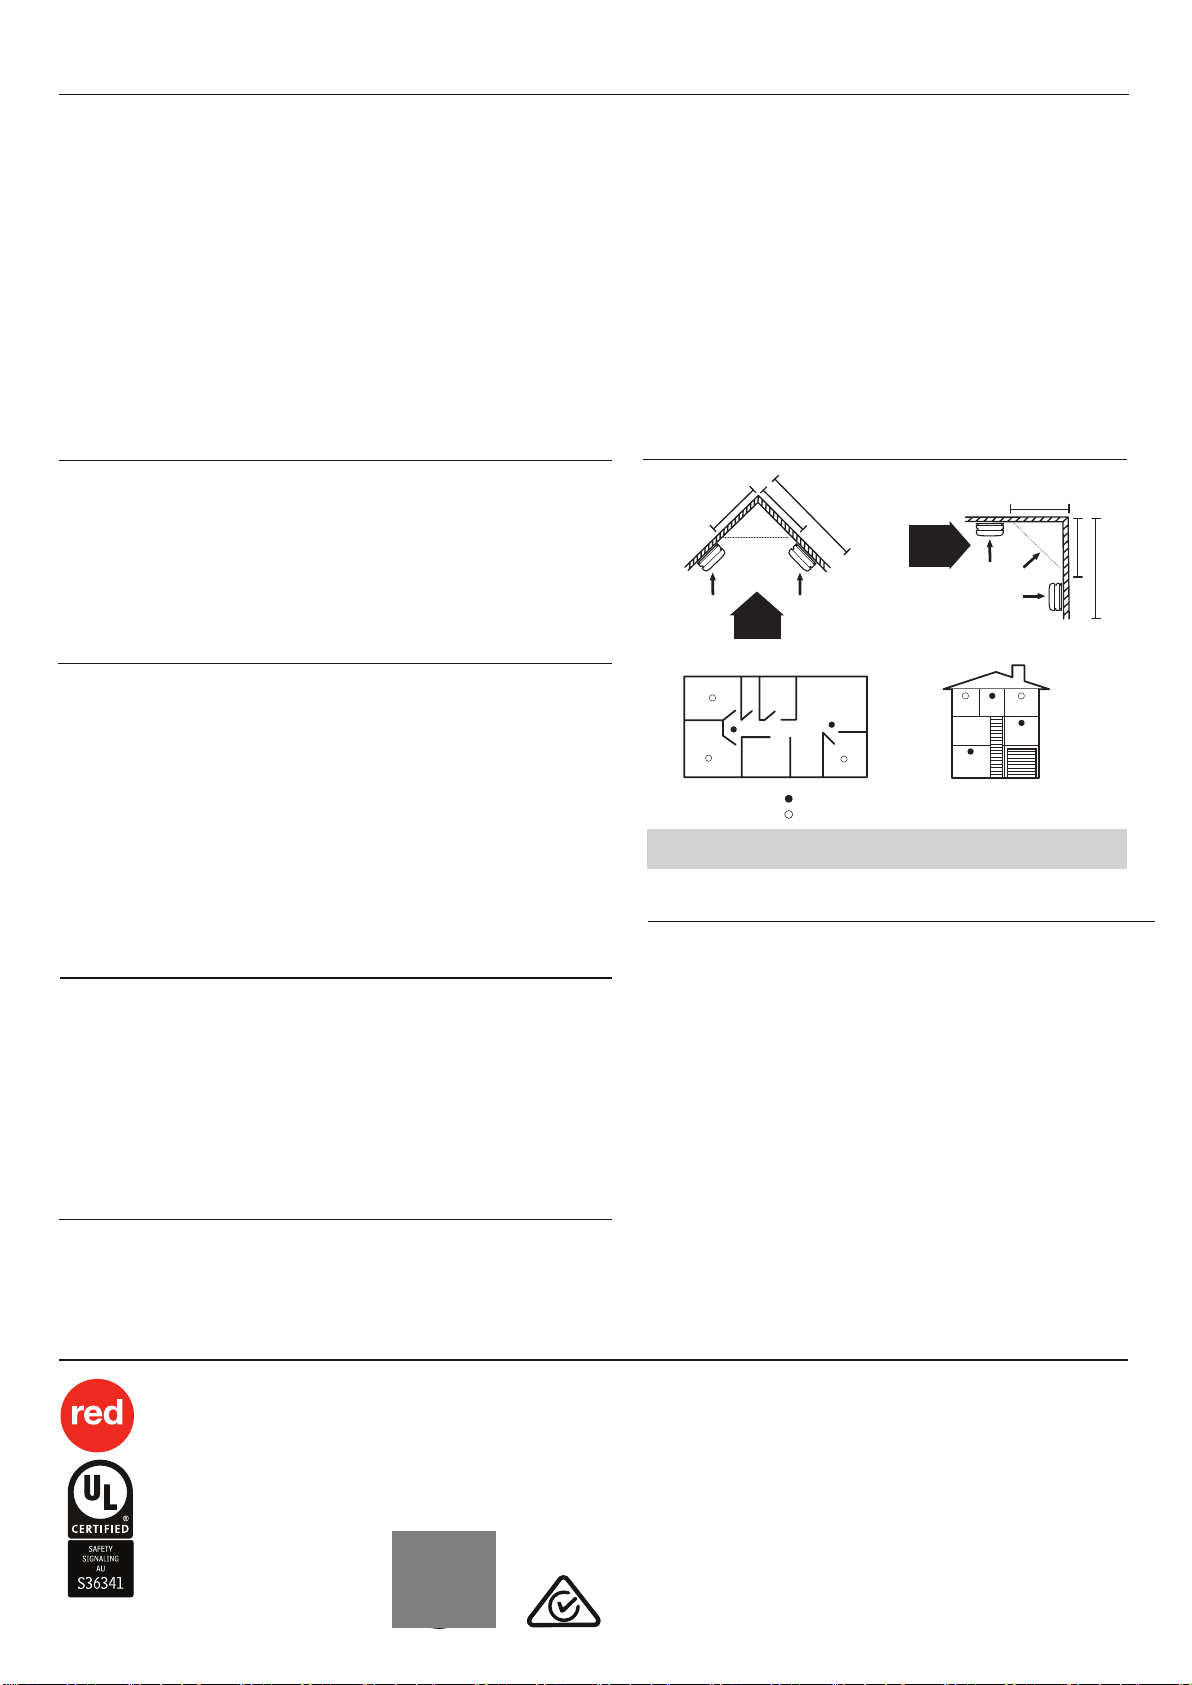
Recommended Locations of Alarms:
•
Install at least one alarm for each room (sleeping area)
•
Install at least one alarm to protect any stairway
•
Install at least one alarm on every floor level.
•
Install an alarmin every room where a smoker sleeps as additional protection.
•
Install an alarmin every room where electrical appliances are operated (i.e. portable
heaters or humidifiers) as additional protection.
•
Install an alarmin every room where someone sleeps with the door closed as
additional protection. The closed doormay prevent the alarm from waking the sleeper.
•
When mounting an alarm on the ceiling install it at a minimum of 300mm
from the side wall and 600mm from any corner (see diagram).
•
When mounting an alarm on awall, install it at a minimum of 300mm from the ceiling
level butnotmore than 600mm from the ceiling level and any corner (see diagram)
•
When mounting an alarmat the apex of a sloping ceiling it should be located a
minimum of 500mm from the apex but should not exceed 1500mm (see diagram).
Avoid These Locations:
Do notplace alarm in the following locations:
•
The garage. Gas released when you start your automobile may cause false alarms.
•
In front of forced air supply ducts used for heating and air-conditioningand otherhigh
airflow areas.
•
In the peak of an “A”frame type of ceiling.
•
In areas where temperatures may fall below +5ºC or rise above +50ºC.
•
In dusty areas, dust particles may cause smoke alarm to false alarm or fail to alarm.
•
We do not recommend installation in or directly adjacent to areas of high condensation
suchas bathrooms & laundries due to potential for false alarms.
•
Kitchen/cooking areas.
Maintenance:
The smoke alarm is virtually maintenance free. However, under dustyor greasy
conditions, a vacuum cleaner maybe used to clean the exterior of unit (including slots
on cover).
DO NOT IMMERSE IN OR SPRAY WITH HOUSEHOLD CLEANERS.
If the unit gives a chirping sound every 60sec the battery may need to be replaced.
Important information: After the Test/Hush button has been pressed, wait 10 minutes before any additional testing is conducted to avoid any false alarm
responses as product has reduced sensitivity during this period. Refer to ‘Hush or Silence Feature’ on the first page
Warranty:
Red Smoke Alarms has a service life of at least 10 years under normal use.
Red Smoke Alarms warrants this product to be free from defects in materials
and workmanship for a period of ten (10) years from the date of installation.
Refer to the Red Smoke Alarms terms of sale for full warranty conditions.
http://www.redsmokealarms.com.au
One audible beep
every 40 to 60
seconds.
Two audible beeps
every 40 to 60
seconds.
Red LED flashing
every 4 seconds
Low battery warning
The smoke alarm
may not be
operating correctly.
The smoke alarm
has previously been
activated.
• Test and check the mains power
connection.
• Make sure the transport disconnect
interlock is removed.
• Clean smoke alarm according to
“Maintenance, Repairs and Service”.
If the problem still persists, contact
an electrician for replacement.
• If there is evidence of an alarm
event, be sure to investigate further
Condition Meaning
Resolution / Action
Troubleshooting Guide:
Installation of Smoke Alarms:
IMPORTANT: INCORRECT ORIENTATION OF SMOKE ALARMS MAY
DECREASEOPERATIONAL EFFECTIVENESS
SINGLE FLOOR
BEDROOMBEDROOM
BEDROOM W/C
KITCHEN DINING
BATH
LOUNGE ROOM
Smoke alarms for minimum protection.
Smoke alarms for additional protection.
TYPICAL MULTIPLE
FLOOR INSTALLATION
BD/RM HALL BD/RM
KITCHEN
RUMPUS
LOUNGE
ROOM
CEILING / WALL JUNCTION
CEILING
ACCEPTABLE HERE
BEST
HERE NEVER
HERE
HEAT &
SMOKE
FROM
FIRE
DEAD AIR
SPACE
SIDE WALL
300mm min
300mm min
600mm min
APEX OF
SLOPING
CEILING
HEAT & SMOKE
FROM FIRE
DEAD
AIR SPACE
1500mm max
500mm min
500mm min
BEST
HERE
BEST
HERE
Red Smoke Alarms reserves the right to change specifications,
modify designs and discontinue items without incurring obligation
and whilst every effort is made to ensure that descriptions, specifica-
tions and other information in this catalogue are correct, no warranty
is given in respect theseof and the company shall not be liable for any
error therein.
© Red Smoke Alarms 2020
This material copyright under Australian and international laws.
Except as permitted under the relevant law, no part of this work may
be reproduced by any process without prior written permission of and
acknowledgment to Red Smoke Alarms.
MNPRG269175A0
RED SMOKE ALARMS PTY. LTD.
PO Box 9596
PACIFIC PARADISE QLD 4564
service@redsmokealarms.com.au
www.redsmokealarms.com.au
1300 316 552
SMOKE ALARMS

Other Red Smoke Alarms Smoke Alarm manuals

Red Smoke Alarms R10RF User manual

Red Smoke Alarms

Red Smoke Alarms R10RF User manual

Red Smoke Alarms R9 User manual

Red Smoke Alarms

Red Smoke Alarms R9 User manual

Red Smoke Alarms R10RF User manual

Red Smoke Alarms

Red Smoke Alarms R10RF User manual

Red Smoke Alarms RFMDUAL User manual

Red Smoke Alarms

Red Smoke Alarms RFMDUAL User manual

Red Smoke Alarms R240RC User manual

Red Smoke Alarms

Red Smoke Alarms R240RC User manual

Red Smoke Alarms RWB2 User manual

Red Smoke Alarms

Red Smoke Alarms RWB2 User manual

Red Smoke Alarms R10 User manual

Red Smoke Alarms

Red Smoke Alarms R10 User manual

Red Smoke Alarms RAC User manual

Red Smoke Alarms

Red Smoke Alarms RAC User manual

Popular Smoke Alarm manuals by other brands

Mini Gadgets BBSSmoke user manual

Mini Gadgets

Mini Gadgets BBSSmoke user manual

Kidde WFPCO user manual

Kidde

Kidde WFPCO user manual

VESDA LaserCOMPACT Product guide

VESDA

VESDA LaserCOMPACT Product guide

jablotron SD-283ST quick start guide

jablotron

jablotron SD-283ST quick start guide

Bellman & Symfon BE1480 manual

Bellman & Symfon

Bellman & Symfon BE1480 manual

System Sensor 2112 Installation and maintenance instructions

System Sensor

System Sensor 2112 Installation and maintenance instructions

Mustang KYMI manual

Mustang

Mustang KYMI manual

Xtralis VESDA-E VEU Installation instructions manual

Xtralis

Xtralis VESDA-E VEU Installation instructions manual

detectomat HDv 300 OS Series Operation and installation manual

detectomat

detectomat HDv 300 OS Series Operation and installation manual

Kidde KN-COSM-BA user manual

Kidde

Kidde KN-COSM-BA user manual

MORLEY-IAS ZX1e installation manual

MORLEY-IAS

MORLEY-IAS ZX1e installation manual

Dyna-Glo DGY784BDP manual

Dyna-Glo

Dyna-Glo DGY784BDP manual

x-sense XS01-WT user manual

x-sense

x-sense XS01-WT user manual

Kidde 19HI owner's manual

Kidde

Kidde 19HI owner's manual

Ei Electronics Ei144 Heat product manual

Ei Electronics

Ei Electronics Ei144 Heat product manual

ELRO FC400211 instruction manual

ELRO

ELRO FC400211 instruction manual

Climax SD-16-ZBS manual

Climax

Climax SD-16-ZBS manual

techem radio frequency smoke alarm 2 operating instructions

techem

techem radio frequency smoke alarm 2 operating instructions

manuals.online logo
manuals.online logoBrands
  • About & Mission
  • Contact us
  • Privacy Policy
  • Terms and Conditions

Copyright 2025 Manuals.Online. All Rights Reserved.