Photoelectric Smoke Alarm with 9V Battery & Test Button
INSTALLATION INSTRUCTIONS
PLEASE NOTE: READ ALL INSTRUCTIONS BEFORE INSTALLATION. NO USER SERVICEABLE PARTS INSIDE THIS SMOKE ALARM.
Specifications: Features:
Main Power Source :
Sensing Type :
Sensitivity to smoke :
Operation Current :
Temperature Range :
Humidity Range :
Type of Installation :
Sound Level Alarm :
Condition Visual :
Indicators :
Approval :
IMPORTANT: This manual contains important information about the installation and operation of your smoke alarm. Please read carefully before
installation and keepfor future reference. Please ensure thatthis leaflet remains in the household where the alarm is installed.
IMPORTANT SAFETY INFORMATION Installation of Smoke Alarms:
1.The battery must be operational for correct alarm function. To test the
battery, press the test button on this smoke alarm.
2.The test button accurately tests all smoke alarm functions. DO NOT
use any other test method.
3.DO NOT remove or disconnect battery to silence unwanted alarms, this
will remove your protection. Press hush button or open windows to
ventilate the smoke alarm to silence it.
4. This smoke alarm is designed to be used inside a single dwelling only. In
buildings with several dwellings/units, each individual living unit should
have its own smoke alarms. DO NOT install in non-residential buildings.
5.Install a smoke alarm on every level of the home.
6. Smoke alarms can only sound their alarms when they detect smoke. Smoke
alarms detect combustion particles in the air. They do not sense heat, flame
or gas. This smoke alarm is designed to give an audible warning of a
developing fire; however, many fires are fast burning, explosive or
intentional, others are caused by carelessness or safety hazards. Smoke
may not reach the smoke alarm quickly enough to ensure safe escape.
7.Smoke alarms have limitations, this smoke alarm is not foolproof and is
not warranted to protect lives or property from fire. Smoke alarms are
not a substitute for insurance and homeowners and renters should
insure their lives and property. In addition, it is possible for the smoke
alarm to fail at anytime, for this reason, you must test the smoke alarm
weekly and replace every 10 years.
Locating and Positioning of Smoke Alarms:
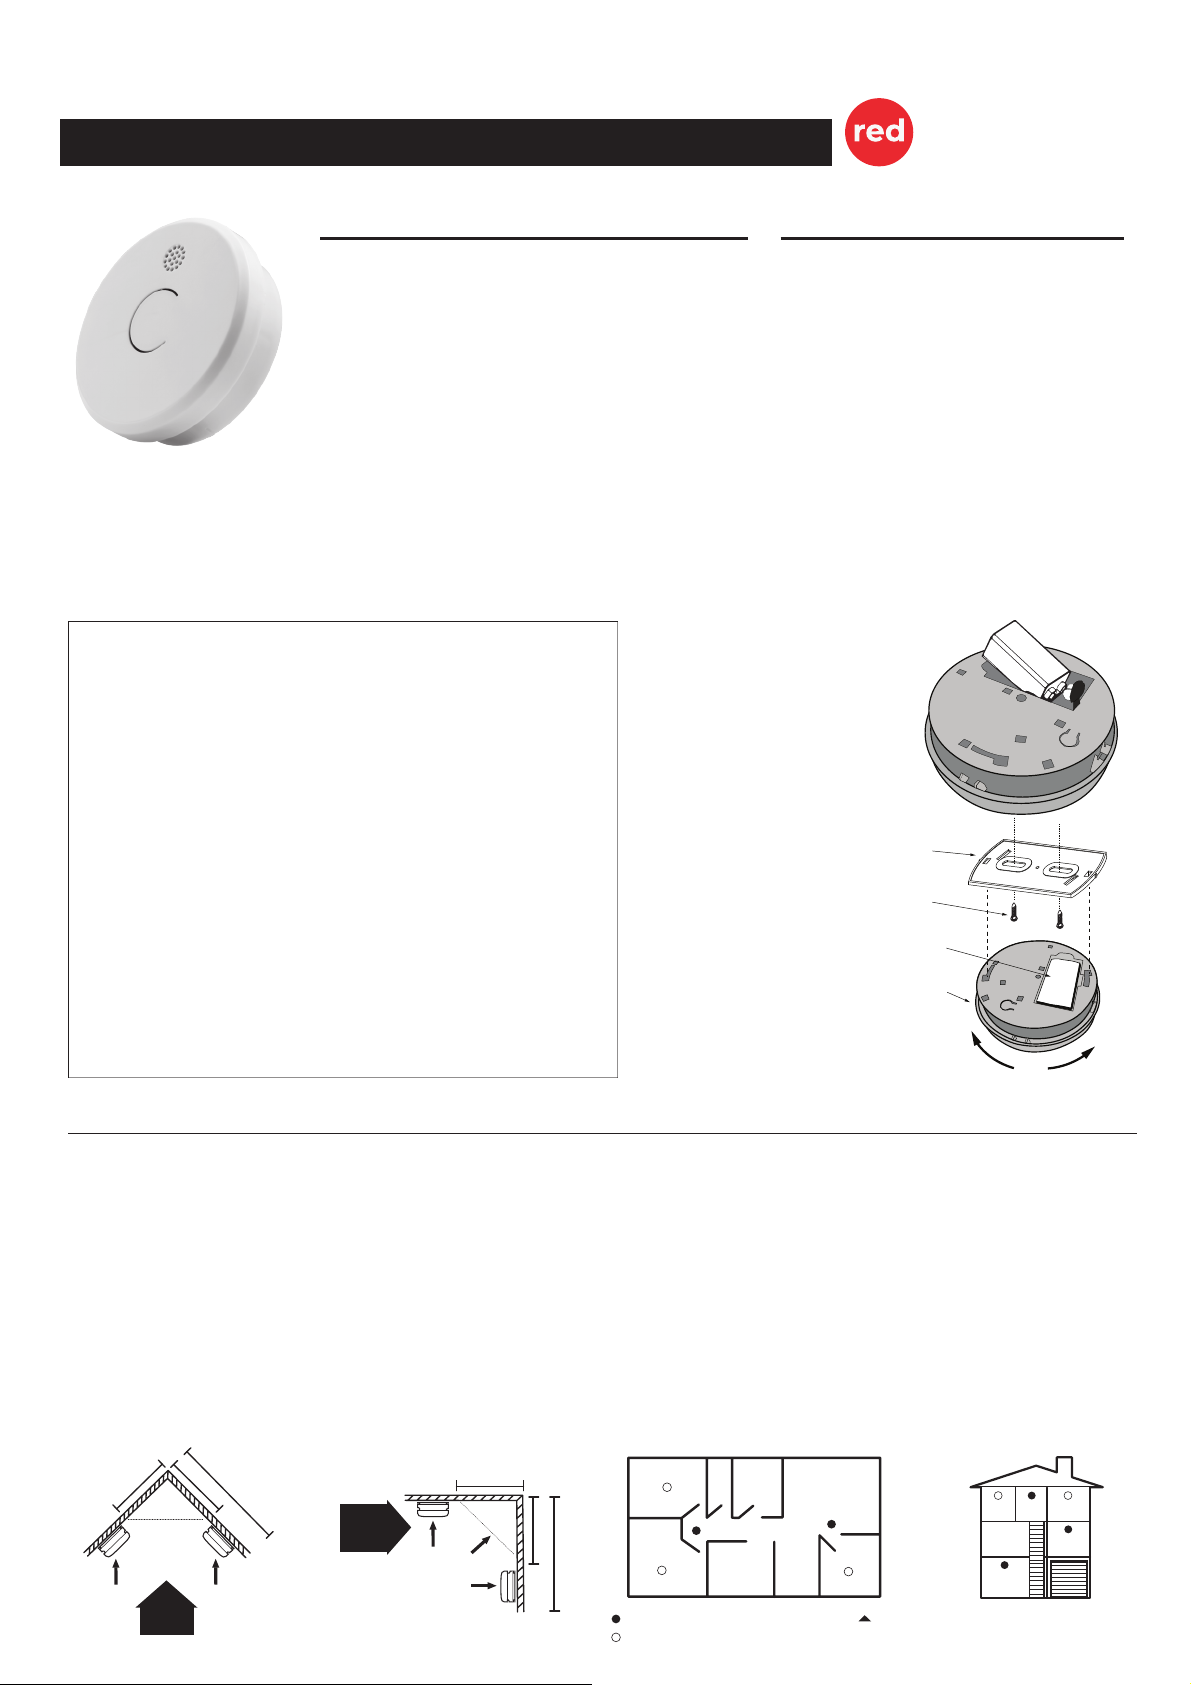
1.From the back of the smoke alarm,
remove the mounting plate by turning
it counter clockwise.
2. Secure plate to ceiling or wall
with mounting screws
appropriate to the surface on
which the unit is to be mounted.
3. Connect new 9-volt battery to battery
connector inside battery pocket. Be
sure battery is securely connected.
The red LED may blink briefly when
battery is installed.
4. Position smoke alarm to
mounting plate and turn
clockwise to lock into place.
5.Push test button to test smoke
alarm. See Operation, Testing
and Maintenance
Figure 3i
Smoke alarms for minimum protection.
Smoke alarms for additional protection.
CEILING / WALL JUNCTION
CEILING
ACCEPTABLE HERE
BEST
HERE NEVER
HERE
HEAT &
SMOKE
FROM
FIRE
DEAD AIR
SPACE
SIDE WALL
300mm min
300mm min
500mm max
APEX OF
SLOPING
CEILING
HEAT & SMOKE
FROM FIRE
DEAD
AIR SPACE
1500mm max
500mm min
500mm min
BEST
HERE
BEST
HERE
Figure 3ii
SINGLE-STOREY RESIDENCE, APARTMENT
BEDROOMBEDROOM
BEDROOM W/C
KITCHEN DINING
BATH
LOUNGE ROOM
MULTI-STOREY RESIDENCE
HALL BED
ROOM
BED
ROOM
KITCHEN
BASEMENT
LIVING
R0OM
Smoke alarms with hush features recommended
for additional protection
Turn clockwise
to install and activate
Turn counter clockwise
to uninstall and deactivate
Monuting
Plate
Alarm Unit
Screw
9V Battery
SMOKE ALARMS
• DC operated photoelectric type smoke alarm
• Photoelectric sensor for slow smouldering fires
• Test & Hush button
• Environmentally friendly non-radioactive technology
• High and stable sensitivity
• Quick fix mounting bracket for easy installation
• Extra loud alarm sound over 85 dB
• Low-battery and battery missing warning indicators
• Auto reset when smoke clears
9V Battery
Type A Photoelectric smoke alarm
- contains NO radioactive material
0.08-0.2db/m
<20mA operation (In Alarm)
0°C to 45°C
5% to 95%
Indoor
85dB at three metres minimum
Audible signal pattern (ISO 8201)
Red LED for warning and low
battery indication
AS 3786:2014
WARNING: This smoke alarm is designed to alert you to the presence of smoke. It cannot prevent a fire. There are hazards involvedwhich smoke
alarms may not be effective against,such as smoking in bed, explosions, etc. The ultimate responsibility for fire protection rests with you, this
responsibility includes escape planning, safety checks and an effective warning system. In case of fire, a well-placed, properly looked after smoke
alarm may provide a few vital seconds so that you can escape and call the fire brigade.
This smoke alarm is a single station photoelectric alarm and should NOT be
connected to other smoke alarms.
If your dwelling is on a single storey, for minimum protection you should fit an
alarm in the hallway between the living areas (incl. Kitchens) and sleeping
areas. Place it as near to the living areas as possible and ensure the alarm
is audible when the bedrooms are occupied. If your dwelling is multi-storey,
for minimum protection one alarm should be fitted at the bottom of the
staircase with further alarms fitted on each upstairs landing. This includes
basements but excludes crawl spaces and unfinished attics.
NOTE: For maximum protection, an alarm should be fitted in every room
(except kitchen, bathroom, and garage).
DO NOT FIT AN ALARM IN THE KITCHEN or BATHROOM, as cooking
fumes or steam may trigger the alarm.
DO NOT FIT ALARM IN A GARAGE, as exhaust fumes are likely to set it
off.
Ceiling Mounting
As hot smoke rises and spreads out, it is advisable to mount on a ceiling in a
central position. Avoid areas where there isno air circulation. E.g.,Corners of
rooms and keep away from items which may prevent the free flow of air. Place the
unit at least 300mm from and light fitting or decorative object which might obstruct
smoke / heat entering the alarm. Keep at least 300mm away from walls. See
Figure 3i
Wall Mounting
Do not mount tight into the corners. Put the top edge of your smoke alarm 300mm
below the ceiling. Keep at least 300mm from room corners. See Figure 3i
On a Sloping Ceiling
In areas with sloping or peaked ceilings install your Smoke Alarm 900mm from the
highest point measured horizontally because “dead air” at the apex may prevent
smoke from reaching the unit. See Figure 3ii.


