RED Hydrogen ONE User manual

User Guide

Content
Welcome ..................................................................................................................................... 5
Getting Started ......................................................................................................................... 5
Initial setup................................................................................................................................. 5
Setting a SIM card .................................................................................................................... 5
Locking and unlocking the screen........................................................................................... 7
Screen and Display.................................................................................................................. 8
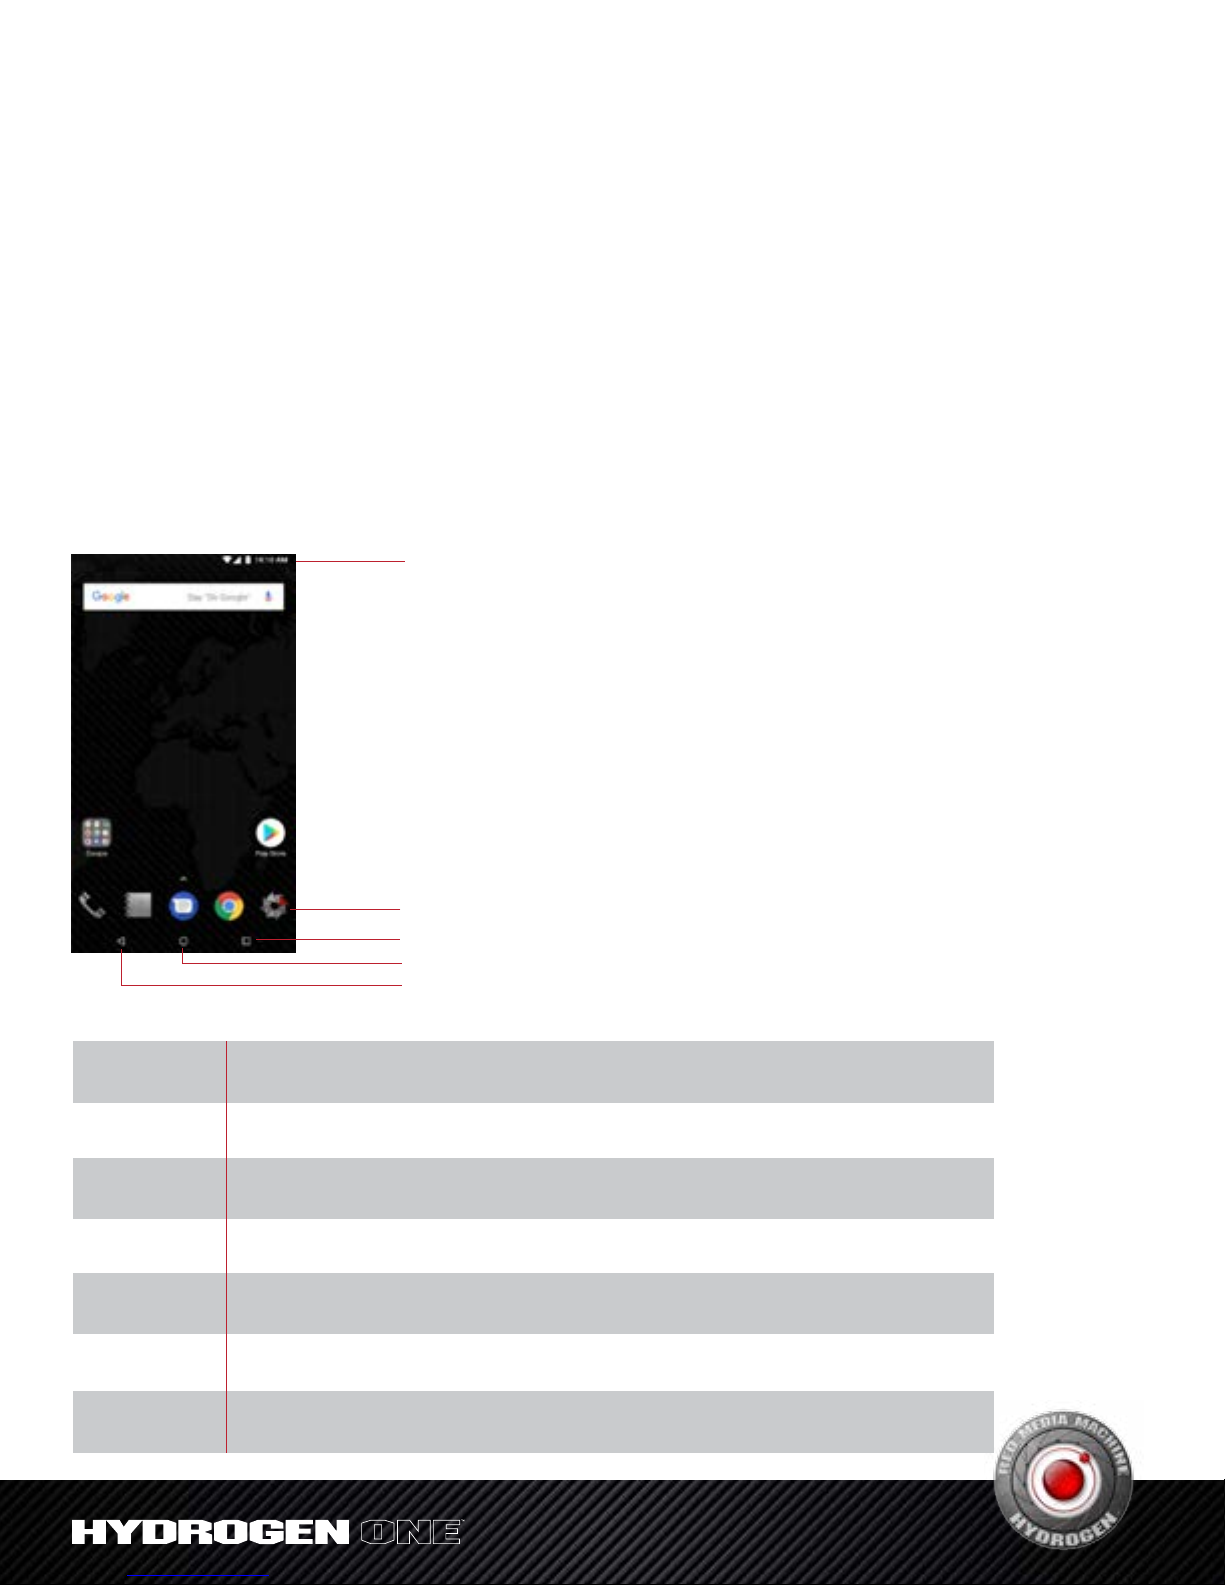
The home screen ..................................................................................................................... 8
Notifications............................................................................................................................. 11
Managing Apps.......................................................................................................................14
Downloading apps.................................................................................................................. 14
Removing apps....................................................................................................................... 14
Deleting apps.......................................................................................................................... 15
Managing permissions ........................................................................................................... 15
Setting default apps................................................................................................................ 15
Internet and Sharing..............................................................................................................15
Configuring the network ......................................................................................................... 15
Controlling data use................................................................................................................ 18
Calls and Contacts ................................................................................................................19
Making phone calls................................................................................................................. 19
Answering calls ....................................................................................................................... 22
Setting call options ................................................................................................................. 23
Contacts....................................................................................................................................24
Creating a new contact .......................................................................................................... 24
Importing/exporting contacts ................................................................................................. 25
Create a personal name card ................................................................................................ 26
Managing contacts................................................................................................................. 26
Messaging ................................................................................................................................28
Sending a message .................................................................................................................... 28
Replying to a message........................................................................................................... 28
Deleting messages................................................................................................................. 29
Camera and Video .................................................................................................................29
Camera interface .................................................................................................................... 29
Taking photos.......................................................................................................................... 29
Taking quick photos................................................................................................................ 30
Recording videos.................................................................................................................... 30
Panorama................................................................................................................................ 30
Beauty mode........................................................................................................................... 30
Histogram................................................................................................................................ 31
Timelapse................................................................................................................................ 31
Slow motion ............................................................................................................................ 31
Selecting flash modes ............................................................................................................ 31
Viewing 4V mode photos and videos.................................................................................... 32
Camera setting ....................................................................................................................... 32

Tools ...........................................................................................................................................34
Calendar.................................................................................................................................. 34
Clock ....................................................................................................................................... 35
File manager............................................................................................................................ 37
Phone Settings........................................................................................................................39
Switch on or off airplane mode .............................................................................................. 39
NFC ......................................................................................................................................... 39
Cast your screen .................................................................................................................... 40
Managing the battery.............................................................................................................. 40
Display settings....................................................................................................................... 40
Setting Sound ......................................................................................................................... 42
Viewing the phone storage..................................................................................................... 42
Setting the screen unlock method......................................................................................... 43
Setting a fingerprint................................................................................................................. 43
Setting smart lock................................................................................................................... 43
Restoring factory settings....................................................................................................... 43
Setting the volume and sound alerts..................................................................................... 44
Accessibility............................................................................................................................. 44

Welcome
Hello! Welcome to HYDROGEN One. In this manual, you will learn about HYDROGEN One’s basic
operation and features.
Before reading the contents of this manual, please note:
The functions described in this manual are those featured on your phone as it is now.
If the descriptions do not match your phone’s actual functions due to software or hardware
changes, then please use the functions as they actually are on your phone.
Getting Started
Initial setup
Please read the quick start guide inside the box before using your phone.
When you first turn on the device, follow the instructions on the screen to choose your language,
connect to a network, migrate data, log in to a Google account, record a fingerprint, set
a password, and personalize the device.
Setting a SIM card
Enabling or disabling a SIM card
If you want to stop one of your SIM cards from being used to make calls, send messages,
or access the Internet, you have the option to disable that SIM card.
1. From the home screen, swipe up to access app list.
2. Tap Settings.
3. Tap Network & Internet > SIM cards.
4. Click the switches besides the two SIM cards to enable or disable each SIM card.
5. Confirm your choice when prompted.
When re-enabling a previously disabled SIM card, the phone will restore the previous
SIM card settings, including your mobile data preferences.
Renaming a SIM Card
By default, each SIM card is named after the carrier, but you can rename your SIM card to make it
easier to remember.
1. From the home screen, swipe up to access app list.
2. Tap Settings > Network & Internet > SIM cards.
3. Tap the SIM card name, and enter a new name.
4. Tap OK.

Setting the preferred card for mobile data
Select which SIM card is preferred for mobile data. Once set, the phone will connect to the mobile
network using this card. No mobile data will be consumed via the other SIM card.
1. From the home screen, swipe up to access app list.
2. Tap Settings > Network & Internet > SIM cards.
3. Tap Cellular data, and select an SIM card as the preferred card.
Setting a preferred card for phone calls
Select which SIM card is preferred for phone calls. All phone calls will be made using this SIM card.
1. From the home screen, swipe up to access app list.
2. Tap Settings > Network & Internet > SIM cards.
3. Tap Calls, and select your preferred SIM card for phone calls or select Ask every time.
If you don’t set a preferred card for calls, you will have to select a SIM card each time you make
a phone call.
Setting a preferred card for messages
Select which SIM card is preferred for messages. All text messages will be sent using this card.
1. From the home screen, swipe up to access app list.
2. Tap Settings > Network & Internet > SIM cards.
3. Tap SMS messages, and select your preferred SIM card for messages
or select Ask every time.
If you don’t set a preferred card for phone-calls, you will have to select a SIM card each time
you send a message.
Locking and unlocking the screen
By default, your phone’s screen will automatically lock after a period of time. You can set the screen
lock time and method.
Setting the lock screen method
1. From the home screen, swipe up to access app list.
2. Tap Settings > Security & location > Screen lock.
You can choose one of the following lock screen methods.
• None: Do not lock the screen.
• Swipe: Swipe up on the screen to unlock your device.
• Pattern: Draw a pattern on the screen to unlock your device.
• PIN: Set a PIN code for unlocking the screen.
• Password: Enter a password to unlock the device.
To remove the screen unlock password, select None and follow the onscreen instructions.

Unlocking the screen
1. Press Power/Lock button to turn on the screen.
2. Swipe the screen up to unlock it.
• When pattern, PIN, or password unlock has been set up, you need to draw the pattern,
enter the PIN or a password to unlock the screen.
• Please enter the password to unlock the screen from time to time to prevent it being
forgotten after using the iris and fingerprint options for a long period.
Screen and Display
The home screen
The home screen interface
Screen gestures
Status bar
Favorite apps
Recent apps
Home
Back
Tap Tap an item on the screen once. For example, tap to select an option or open
an app on the home screen.
Double tap Tap the target on the screen twice in quick succession. For example, double tap
an image in full screen mode to zoom in or out.
Tap and hold Tap and hold a target until the phone vibrates, then proceed to the next step. For
example, tap and hold an app in the home screen to allow you to move the app icon.
Swipe Swipe your fingers on the screen. For example, swipe up or down your contact list
to scroll through it.
Drag Tap and hold an icon until the phone vibrates, then move it to another position
on the screen. For example, drag an icon to change its position.
Spread fingers
apart
Spread two fingers apart on the screen. For example, spread two fingers apart to
zoom in on a picture.
Pinch fingers
together
Pinch two fingers together on the screen. For example, pinch two fingers together
to zoom out on a picture.

Revealing hidden navigation icons
In some circumstances, such as when you are taking a photo or viewing an image, the device
automatically hides the navigation icons at the bottom of the screen. Swipe up from the bottom of the
screen to reveal the hidden navigation icons.
Customizing the home screen
Setting the wallpaper
1. From the home screen, swipe up to access app list.
2. Tap Settings.
3. Tap Display > Wallpaper.
4. Select a picture from the gallery or a pre-saved wallpaper, and then click Set wallpaper
in the top of the screen. Follow the onscreen instructions to set the picture as a
wallpaper for the home screen or the lock screen, or both.
Setting the home screen switch effect
Your phone comes loaded with numerous special effects for switching between home screens.
1. Tap and hold an empty area on the home screen until the phone vibrates.
2. Tap Transitions.
3. Select a special effect for switching between home screens.
Adding widgets
Widgets cannot be added if there is not enough empty space on the home screen. Please first
ensure there’s enough empty space on the current home screen, or create a new home screen.
1. Tap and hold an empty area on the home screen until the phone vibrates.
2. Tap Widgets.
3. Select a widget and drag it to home screen.
Moving icons or widgets
Tap and hold an icon on the home screen until the phone vibrates, and then drag it to
a new position.

Resizing widgets
Only some widgets can be resized.
1. Tap and hold a widget until the phone vibrates.
2. Drag the dots appearing around the widget to adjust its size.
3. Tap any empty space on the screen to finish.
Deleting widgets
Tap and hold the widget until the phone vibrates, and then drag it onto REMOVE at the top
of the screen.
Adjusting the font size on the home screen
You can set a bigger font size for the home screen if you feel the text is too small.
1. From the home screen, swipe up to access app list.
2. Tap Settings > Display > Advanced.
3. Tap Font size.
4. Follow the instructions and drag the slider to make the font size larger or smaller.
Creating a folder
On the home screen, drag an application icon onto another application icon to create a folder.
Renaming a folder
Tap a folder and then tap the folder’s name in the folder details interface to rename it.
Adding objects to a folder
Tap and hold an icon on the home screen until the phone vibrates, and then drag it onto
the desired folder icon.
Quickly browsing folders
If the home screen has multiple folders, you can quickly switch between folders by touching
different folder names at the top of the screen when viewing a folder’s details.
If the home screen has multiple folders, you can quickly switch between folders by swiping left
or right when viewing a folder’s details.
Taking screenshots
You can take a screenshot of the screen by pressing the Power/Lock button and the Volume Down
button simultaneously.
The screenshot will be saved to Internal storage/Pictures/Screenshots/.
Viewing recently opened apps
To view a list of recently opened apps, tap . Scroll up and down to view the apps.
Tap an app window to access it.

Notifications
Opening the notification bar
1. Depending on the screen mode, you can:
• When the screen is unlocked: swipe down from the top of the screen to open
the notification bar.
• When the screen is locked: tap the Power/Lock button to turn on the screen, and swipe
down from the top of the screen to open the notification bar.
2. View or close notifications using the switches, or tap a notification to see more details.
A password is needed when the screen is locked.
You can set up how to display notifications when the screen is locked at Settings > Apps
& notifications > Notifications. For details, see Setting how notifications are displayed.
Viewing notifications
When the screen is locked, turn on the screen and all new notifications will be displayed on the
screen. When the screen is unlocked, swipe down from the top of the screen to open the
notification bar and view the list of notifications.
Setting how notifications are displayed
You can set up how to display notifications on your phone, adjust the level of detail, and change which
apps can send notifications.
1. From the home screen, swipe up to access app list.
2. Tap Settings.
3. Tap Apps & notifications > Notifications.
4. You can:
• Tap App notifications, and select an application to switch notification on.
• Tap On the lock screen, set up how notifications are displayed when the screen
is locked.
• Switch Allow notification dots on and off.
• Switch Blink light on and off.
• Tap Default notification sound, select a ringtone and tap OK to save as the
default notification sound.
Setting the do not disturb mode
Enabling do not disturb
In the do not disturb mode, your phone will remain silent when you do not want to be disturbed, and
it will neither make sounds nor vibrate. You can also set the screen not to light up for notifications to
avoid visual distractions.
1. Swipe down from the top of the screen with two fingers.

2. Tap the on the right of Do not disturb, or Priority only. You can:
• Select Total silence to disable all sounds and vibrations (including alarm clock, music,
video and games), while still being able to make phone calls.
• Select Alarms only to disable all sounds and vibrations except for the alarm clock.
• Select Priority only to disable all sounds and vibrations from the alarm clock,
reminders, and events other than calls from designated callers.
3. Select how long do not disturb mode lasts:
• To keep do not disturb mode on indefinitely, tap Until you turn off Do Not Disturb.
• To enable do not disturb for a specific period, tap +or —to increase or decrease
the time.
4. Tap Done.
Customizing do not disturb options
1. From the home screen, swipe up to access app list.
2. Tap Settings.
3. Tap Sound > Do not disturb preferences. You can:
• Tap Priority only allows to allow only certain content types to play sounds or vibrate.
• Tap Block visual disturbances to allow or prevent notifications lighting up the screen
in do not disturb mode.
• Tap rules under Automatic rules, and switch them on or off. Each do not disturb rule
contains options including duration, start and end time and do not disturb type.
Status icons
In the status bar, different status icons have different meanings:
Signal strength
Connected over 4G+
Connected over LTE+
Connected over LTE
Battery full
Battery low
No SIM card found
Flight mode enabled
Connected over 4G
Connected over Wi-Fi
Charging
Vibration mode enabled

Managing Apps
Downloading apps
To protect your phone, please download apps from the Google Play Store on your phone.
Downloading apps from other sources may cause unforeseeable damage to your phone.
To download apps from the Google Play Store, please visit play.google.com/store/apps to learn how
to download and install apps.
Removing apps
Tap and hold an icon on the home screen until the phone vibrates, and then drag it to REMOVE at the
top of the screen.
Apps removed from the home screen can be found in app list.
Deleting apps
Tap and hold an icon on the home screen until the phone vibrates, tap , and then tap
UNINSTALL > OK.
Pre-loaded apps cannot be deleted.
Managing permissions
1. From the home screen, swipe up to access app list.
2. Tap Settings.
3. Tap Apps & notifications > App permissions.
4. Select a type of permission, and the apps requesting that permission will be displayed
in a list.
5. Use the switches to turn the permissions for the apps on or off, enabling
or disabling access.
If you disable certain permissions for system apps, you might lose some of the phone’s basic
functionality. To you want to disable such permissions, you can tap DENY ANYWAY to dismiss
the warning.
Setting default apps
1. From the home screen, swipe up to access app list.
2. Tap Settings.
3. Tap Apps & notifications > Advanced > Default apps and buttons.
4. You can select default apps for the functions listed for the current domain.

Internet and Sharing
Configuring the network
Activating mobile data
1. From the home screen, swipe up to access app list
2. Tap Settings.
3. Tap Network & Internet > Data usage.
4. Switch on Mobile data.
Setting the preferred mobile network
1. From the home screen, swipe up to access app list.
2. Tap Settings.
3. Tap Network & Internet > Mobile network > Advanced.
4. Tap Preferred network type and select the preferred network type.
Activating mobile data roaming
When you move outside of the area covered by your mobile service contract to another part of the
country or overseas, you will need to pay roaming fees if you need to connect to the Internet using
mobile data. Please consult your carrier for details.
1. From the home screen, swipe up to access app list.
2. Tap Settings.
3. Tap Network & Internet > Mobile network.
4. To select the SIM card for mobile data roaming, switch on Roaming.
Sharing your mobile network
The mobile network cannot be shared in the business domain.
Sharing a network via a USB cable
1. Use a USB cable to connect your phone to a PC.
2. From the home screen, swipe up to access app list.
3. Tap Settings.
4. Tap Network & Internet > Hotspot & tethering.
5. Switch on USB tethering.
Sharing a network via Bluetooth
1. From the home screen, swipe up to access app list.
2. Tap Settings.
3. Tap Network & Internet > Hotspot & tethering.
4. Switch on Bluetooth tethering.

Using your device as a Wi-Fi hotspot
1. From the home screen, swipe up to access app list.
2. Tap Settings.
3. Tap Network & Internet > Hotspot & tethering.
4. Switch on Wi-Fi hotspot.
To change the Wi-Fi hotspot name, network security options and other properties,
tap Set up Wi-Fi hotspot.
Wi-Fi
Connecting to Wi-Fi
Please do not connect to unknown Wi-Fi networks to prevent data or property loss.
1. From the home screen, swipe up to access app list.
2. Tap Settings.
3. Tap Network & Internet > Wi-Fi, and turn on the switch. Available Wi-Fi networks
will be displayed in a list.
4. You can:
• Connect to a Wi-Fi network: tap the Wi-Fi network you want to connect to.
A password may be needed for encrypted networks.
• Manually refresh the Wi-Fi network list: tap > Refresh to refresh the Wi-Fi list.
• Manually add a Wi-Fi network: swipe down the Wi-Fi network list, tap +,
and follow the instructions to enter the network properties.
Controlling data use
Setting a data alert
You can set up data alert to avoid exceeding the data limit for your contract. When data usage is ap-
proaching the limit, the phone will display a warning to remind you to conserve data.
1. From the home screen, swipe up to access app list.
2. Tap Settings.
3. Tap Network & Internet > Data usage > Billing cycle.
4. Switch on Set data warning.
5. Tap Data warning to select a unit of measurement and enter a number for the data limit.
6. Tap SET.
Setting data usage restrictions
1. From the home screen, swipe up to access app list.
2. Tap Settings.
3. Tap Network & Internet > Data usage > Billing cycle.
4. Switch on Set data limit, and after reading the warning, tap OK.
5. Tap Data limit to select a unit of measurement and enter a number for the data limit.
6. Tap SET.

Controlling data usage for apps
If you want to limit how much data apps use, you can allow certain apps to connect to the Internet
without restrictions while making other apps send and receive data less frequently and only while in use.
1. From the home screen, swipe up to access app list.
2. Tap Settings.
3. Tap Network & Internet > Data usage > Data saver > Unrestricted data.
4. Switch on to allow the app unrestricted Internet access.
5. Tap , then tap Off to enable the mobile data saving program.
Once enabled, the mobile data saving program applies to both personal and business
domains simultaneously.
Calls and Contacts
Making phone calls
Smart dialing
When making phone calls, the phone can find the relevant contact by telephone number or the pinyin
or alphabetic spelling of their names.
1. On the home screen, tap Phone.
2. Tap and enter the contact’s number or the letters in their name. For example, to
make a call to a person named Jane Smith with the number 12345678900, simply enter
123 or JS, and the phone will present this contact and contacts with similar information.
Making phone calls from the contact list
1. On the home screen, tap Contacts.
2. Tap and enter the first few numbers of the phone number or the initials of the contact
in the search box.
3. Tap the number to be dialed.
Making phone calls from the call log
1. On the home screen, tap Phone.
2. Tap .
3. Tap the call log entry to be dialed.

Using your phone during a call
During a phone call, you can swipe up from the bottom of the screen, and tap to leave the call
interface without interrupting the call. To return to the call interface, tap the green call bar at the top of
the screen.
Dialing an extension number
1. On the home screen, tap Phone.
2. Open the dial pad and enter the main number.
3. Tap to the left of the number, then tap Add 2-sec pause to enter the pause symbol “,”.
4. Enter the extension number.
5. Tap .
When dialing a number, you can also enter the pause symbol “,” by touching and holding the *key.
Speed dial
With the speed dial feature you can assign telephone numbers to dial pad number keys. Tap and hold
a speed dial number key to dial a pre-set number quickly.
Assigning a speed dial number
1. On the home screen, tap Phone.
2. Tap to open the dial pad.
3. Tap and hold any number between 2 and 9.
4. Tap YES in the pop-up window.
5. Tap a number, you can:
• Enter a number.
• Tap and select a number from your contacts.
Calling a speed dial number
1. On the home screen, tap Phone.
2. Open the dial pad.
3. Tap and hold a number key assigned a speed dial number.
Turn on mute so the caller cannot hear sounds from your end.
Open the dial pad.
Switch between the receiver, speaker or Bluetooth headset.
Place the current call on hold.
Dial another call.

Making international phone calls
Please first ensure international calling services or international roaming services have
been enabled with your carrier.
1. On the home screen, tap Phone.
2. Tap to open the dial pad.
3. Tap and hold the 0 key to insert the + symbol, and then enter the country code,
area code, and phone number.
4. Tap .
Making an emergency call
In the event of an emergency, you can make emergency calls from your device even without
a SIM card. However, you must be in an area with cellular coverage.
As different countries have different emergency numbers, please first confirm the local
emergency number.
You cannot dial an emergency number if there is no cellular coverage where you are.
Please do not rely on your mobile phone as the only means of seeking help.
1. On the home screen, tap Phone.
2. Open the dial pad.
3. Enter the emergency number.
4. Tap .
Answering calls
Accepting calls
When a call is incoming, the screen will light up and display the incoming number or the caller’s
contact information. You can:
• Swipe up to answer the call.
• Swipe down to reject the call.
• Swipe from to decline with message.
When you using the phone, a call is incoming, you can tap DECLINE to reject the call,
or tap ANSWER to answer the call.
Switching between calls
If you receive a new incoming call while on the phone, you can tap to answer the new call.
The original call will be kept on hold. To resume the original call, tap Change on the call interface
to put the new call on hold.
Sending a quick text response
When receiving an incoming call which cannot be answered right away, you can respond quickly with
a text message to inform the caller of the situation.
1. In the incoming call interface, swipe from .

2. Select a message from the template list. The incoming call will be rejected and the caller will
receive the text message.
3. You can pre-set a quick text response in call settings. See Setting a quick text response
Setting a quick text response for details.
Making a conference call
When you need to communicate with multiple parties, you can choose to set up a conference call.
Conference calling must be supported by your carrier. Please ensure you have activated
this service. For more details, please consult your carrier.
1. On the home screen, tap Phone to call the first participant.
2. Once the call is connected, tap the dial pad and call the second participant.
3. When the second call is connected, the call to the first participant will be put on hold.
At this time, you can tap Merge in the call interface to start the conference call.
4. To add more participants, just repeat steps 2 and 3.
Tap Manage conference call during a call to view a list of participants. You can:
• Tap to remove a participant from the conference call and keep them in a separate call.
• Tap to end a call with a participant.
Setting call options
Setting a quick text response
When there is an incoming call, you can send a pre-set message to provide a quick response.
Pre-set messages can be customized.
1. On the home screen, tap Phone.
2. Tap > Settings in the search box at the top.
3. Tap Quick responses.
4. Select and edit a pre-set message.
5. Tap OK.
Setting a blacklist
You can add a number to the blacklist to stop nuisance calls. Calls and messages from blacklisted
numbers will be blocked.
1. On the home screen, tap Phone.
2. In the search box at the top, tap > Settings > Call blocking.
3. Enter the number you want to block.
4. Tap BLOCK.
To remove a number from the blacklist, tap next to the number, and then tap UNBLOCK.

Contacts
Creating a new contact
Adding a contact
The number of contacts that can be saved on your phone depends on the amount of free
space on your phone. The more free space, the more contacts that can be saved.
The number of contacts that can be saved on the SIM card depends on its specifications.
Please consult your carrier for details.
1. On the home screen, tap Contacts.
2. Tap .
3. Tap Saving to. You can:
• Save a contact to your Google account.
• Save a contact to your SIM card.
4. Enter the name, number and other information of the new contact.
5. Tap More fields to enter more information.
6. Tap to create an avatar for a contact by taking their picture
or selecting one from the gallery.
7. Tap SAVE.
Saving a contact from the call log
1. On the home screen, tap Phone.
2. Tap .
3. Tap on the right of the call log entry from the unknown number.
4. Tap , you can:
• Tap to create a new contact.
• Tap a contact to save the unknown number.
5. Tap SAVE.
Importing/exporting contacts
Importing contacts from a microSD card
1. On the home screen, tap Contacts.
2. Tap > > Import > .vcf file.
3. Select a .vcf file to import.
Importing contacts from a SIM card
1. On the home screen, tap Contacts.
2. Tap > > Import.
3. Tap SIM card name.
4. Tap the contacts you want to import.
5. Tap IMPORT.

Exporting contact information to a microSD card
1. On the home screen, tap Contacts.
2. Tap > > Export > Export to .vcf file.
3. Enter the name, and tap SAVE.
Exporting contact information to a SIM card
1. On the home screen, tap Contacts.
2. Tap > > Export.
3. Tap SIM card name.
4. Select the contacts you want to export, and tap OK.
Contacts saved on a SIM card can be identified in the address book by the SIM card icon.
Create a personal name card
1. On the home screen, tap Contacts.
2. Tap > > My info.
3. Tap .
4. Enter the name, number and other information.
5. Tap to create an avatar by taking a picture or selecting one from the gallery.
6. Tap SAVE.
Managing contacts
Editing contacts
You can edit the information saved for a contact, such as telephone number or email address,
at any time.
1. On the home screen, tap Contacts.
2. Tap the contact you want to edit.
3. Tap to edit the contact’s information.
4. Tap SAVE.
Creating frequent contacts
You can get in touch with your contacts more easily by creating frequent contacts.
1. On the home screen, tap Contacts.
2. Tap the contact you want to save as a frequent contact.
3. In the contact details view, you can:
• Add contacts to your favorites: tap .
• Create a contact shortcut on the home screen: tap > Create shortcut
and follow the instructions on the screen.

Linking contacts
When there are multiple records for the same contact in the contact list, you can link these records
and remove the duplicate entries.
1. On the home screen, tap Contacts.
2. Tap the contact to be linked.
3. Tap > Link.
4. Tap the contacts to be linked.
To unlink contacts, tap a contact and then tap > View linked contacts > UNLINK.
Sharing contacts
1. On the home screen, tap Contacts.
2. Tap and hold the contact you want to share, and then tap > Share. If you want to
share multiple contacts, select multiple contacts to be shared together.
3. Select the sharing method and follow the instructions on the screen.
Deleting contacts
1. On the home screen, tap Contacts.
2. Tap and hold the contacts you want to delete, and then tap .
3. Tap OK.
Messaging
Sending a message
1. On the home screen, tap Messages.
2. Tap .
3. You can:
• Tap the recipient box and enter the name or number of the recipient,
and the phone will automatically present relevant contacts.
• Tap to add a recipient group from the address book.
4. Enter the message content. Tap to add extra information such as attachments.
5. Tap or to send the message from SIM card 1 or SIM card 2. If only one SIM card
is inserted in the phone, tap to send.
Replying to a message
1. On the home screen, tap Messages.
2. Tap the message you want to reply to.
3. You can:
• Reply: tap or to send the message from SIM card 1 or SIM card 2.
If only one SIM card is inserted in the phone, tap to send.
Other manuals for Hydrogen ONE
2
Table of contents
Other RED Cell Phone manuals