Redmond RV-R150 User manual

ENG
UKR
KAZ
Robot Vacuum Cleaner
RV-R150
User manual

CONTENTS
IMPORTANT SAFEGUARDS................................................................................................................13
Technical Specications ............................................................................................................................14
Package Includes.........................................................................................................................................14
Parts of Appliance........................................................................................................................................15
I. PRIOR TO THE FIRST USE.............................................................................................................15
II. OPERATION OF THE APPLIANCE............................................................................................15
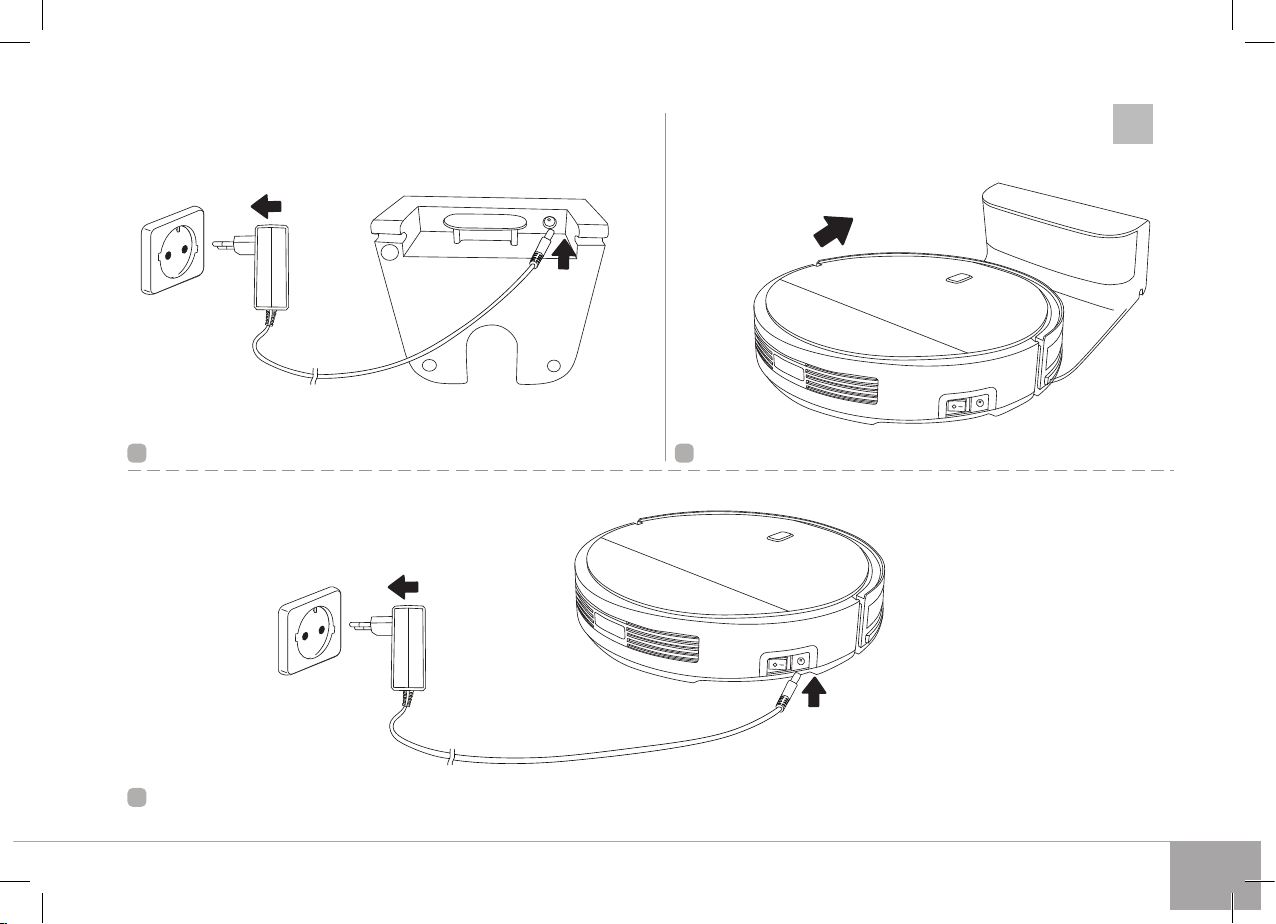
Charging the battery...................................................................................................................................15
Use the appliance........................................................................................................................................15
Choosing mode with remote control.....................................................................................................16
Clock setting..................................................................................................................................................16
Cleaning planning function......................................................................................................................17
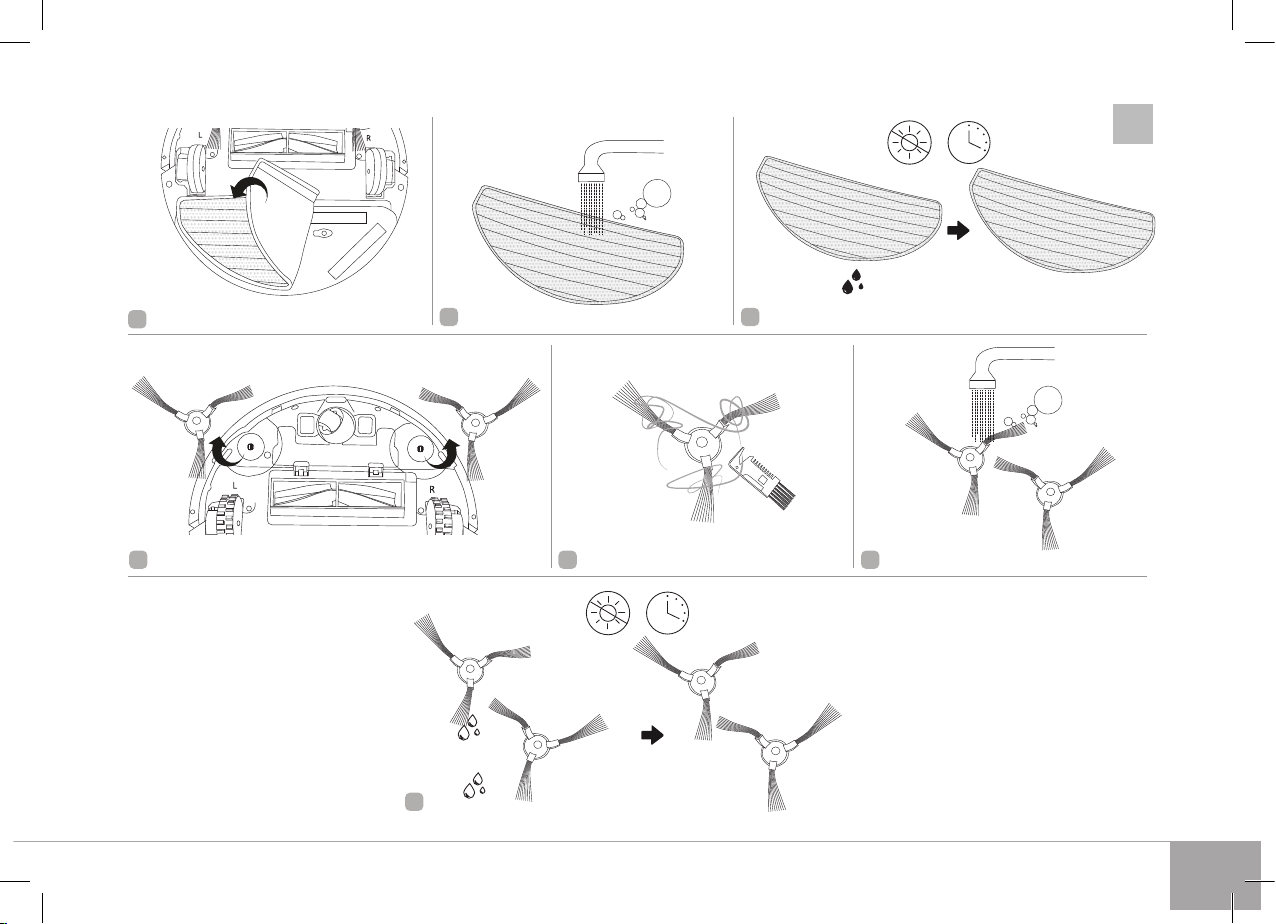
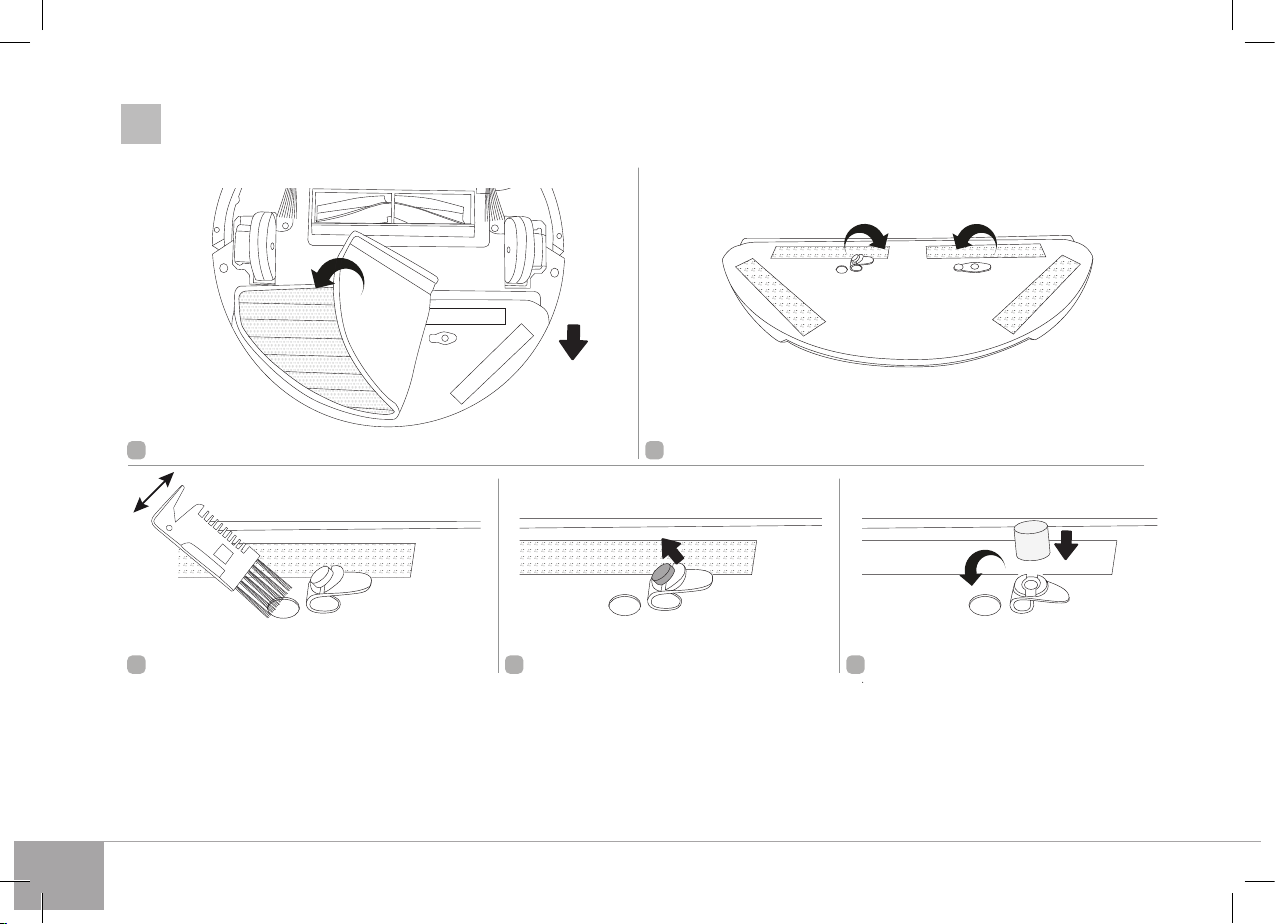
III. CLEANING AND MAINTENANCE ...........................................................................................17
Storage and transportation ......................................................................................................................17
IV. BEFORE CONTACTING A SERVICE CENTER .....................................................................17

3
1
3
4
43
7
10
11
12 12
14 15
13 13
16
2
5
8
9
6
2528
A1

4
PLAN
ON/OFF
MODE CLK MAX
HOME
MODE
TUE WED THU FRI SATSUN MON
12
26
17
18 19
20
21
22
42
23
27
24
25
29 30
36
32
31
33
3740
34 35
39
41
38
A1

5
b
a
b
a
1
3
2
A2

6
a
b
1 2
43
A3

7
A4
12
5 64
7
3
ab

8
A5
a
b
a
b
1 2
543

9
a
b
c
c
b
a
11 2 3 4
15 6
18 9 10 11
7
A6

10
A7
11
14 15
16
2
7
3

11
a
b
c
c
b
a
11 2 3
15 6 7
4
8
A8

12
A9
11 12 13
14 5
87
6

RV-R150
13
ENG
UKR
KAZ
Before using this appliance, please read the User Manual carefully and keep it as a reference.
Proper use of the appliance will signicantly extend its service life.
The safety precautions and instructions contained in this manual do not cover all possible
situations that may arise during the operation of the appliance. When working with the
appliance, the user should be guided by common sense, be careful and attentive.
IMPORTANT SAFEGUARDS
•
The manufacturer is not responsible for damage caused by non-compliance
with safety requirements and operating rules of the product.
•
This appliance is intended for use in domestic conditions and can be used
in apartments, country houses or other similar conditions of non-industrial
operation. Industrial or any other misuse of the appliance will be considered
as a violation of the conditions of proper use of the product. In this case, the
manufacturer is not responsible for the possible consequences.
•
Before connecting the appliance to the power supply, check whether its
voltage is the same as the nominal voltage of the device adapter (see
technical specications or the product nameplate).
•
It is allowed to use the appliance only with the adapter included in the
package.
•
Use an extension cord designed for the power consumption of the appli-
ance, otherwise any mismatch of parameters can lead to a short circuit or
re of the cord.
•
Unplug the appliance from the mains during cleaning. Remove the adapt-
er with dry hands, holding it by the case, not by the wire.
•
Do not extend the power cord in doorways or near heat sources. Make
sure that the cord is not twisted or bent, not in contact with sharp objects,
corners and edges of furniture.
KEEP IN MIND: accidental damage to the power supply cord may
cause problems that do not comply with the warranty, as well as
electric shock. If the power cord is damaged, it must be replaced
by the manufacturer, service or similar qualied personnel to avoid
danger.
•
Before cleaning the appliance ensure that it is unplugged. Follow clean-
ing and general maintenance guidelines when cleaning the unit.
Do NOT immerse the appliance in water or place it under a stream
of water!
•
Move the device, holding it by its body with both hands.
•
Do not install foreign objects in the device, do not sit or stand on the
device.
Protect your eyes from infrared light. Do not aim infrared light at eyes.
•
Do not allow foreign objects to enter the motor compartment of the ap-
pliance. Do not block the suction openings. Blocking the air intake may
damage the motor.
•
It is not allowed to operate the appliance in the following conditions:
—
In the premises and areas with high humidity. There is a danger of
short circuit, motor failure.
—
Outdoors — moisture or foreign objects inside the appliance may cause
serious damage to the appliance.
—
Near toxic and ammable substances, in rooms with a high concentration
of vapors of combustible substances (paint, solvent, etc.) or combustible
dust. There is a danger of explosion or re.
•
It is not alllowed to bring the suction nozzle to any parts of the body or
clothing. Careless handling can result in serious injury.
•
It is not allowed to suck up red-hot or cooled ash, coals, as well as
outstanding cigarette butts, smoldering or burning debris. Clogging may
cause a re.

14
•
It is not allowed to suck up any liquids, as well as clean wet surfaces — wet
oors or carpets. Ingress of moisture can cause serious damage to the
vacuum cleaner.
•
It is not allowed to suck in powders for lling cartridges (toners) of copi-
ers and printers, our and other ne bulk substances, as well as construc-
tion dust, particles of plaster, gypsum, concrete or cement. There is a risk
of lter clogging or motor damage.
•
It is not allowed to suck up sharp objects: nails, broken glass, etc. They
may damage the dust collector and lters.
•
Do not use the device to clean furniture. Using the device on a soft, uneven
surface or falling off a piece of furniture may lead to a malfunction. Do
not use the device on long hair rugs (longer than 0.5 cm).
•
This appliance can be used by children over 8 years old and physically or
mentally challenged persons or as well as those who lack experience and
knowledge only provided they have been given supervision or instruction
concerning use of the appliance in a safe way and understand the hazards
involved. Children should not play with the appliance. Keep the appliance
and the power cord out of reach of children under 8 y.o. Cleaning and
maintenance should not be performed by children without supervision.
•
Packaging material (lm, foam, etc.) may be hazardous to children. Chok-
ing hazard! Keep the packaging out of the reach of children.
•
It is not allowed to repair the appliance or make any changes in its design.
Repair of the appliance must be carried out exclusively by a specialist of
an authorized service center. Unprofessional repair can lead to damage
to the appliance, injuries and property damage.
ATTENTION! It is not allowed to use the appliance with any faults!
Technical Specications
Model...................................................................................................................................................RV-R150
Appliance type.........................................................................................................robot vacuum cleaner
Power..........................................................................................................................................................25 W
Battery type..............................................................................................................................................li-ion
Battery voltage.............................................................................................................................. 10.8 V
Battery capacity...........................................................................................................................2600 mA*h
Power adapter input voltage..................................................................................... 100–240 V~, 0.4 А
Power adapter output voltage......................................................................................19 V 600 mA
Electrical safety...................................................................................................................................Class II
Suction power..........................................................................................................................................18 W
Exhaust lter class ............................................................................................................................. ЕРА 12
Dust collector capacity.........................................................................................................................0.35 l
Noise level...............................................................................................................................................65 dB
Continuous operation time........................................................................................ up to 120 minutes
Full charge time................................................................................................................................. 4 hours
Number of cleaning modes......................................................................................................................... 4
Remote control................................................................................................................................ available
Remote control power source..........................................................................................2 × LR03 (AAA)
Indication....................................................................................................................................LED, audible
Obstacle sensor............................................................................................................................................14
Reset to charging point ..............................................................................................................automatic
Auto shut-off.................................................................................................................................... available
Clean-up planning feature........................................................................................................... available
Wet cleaning feature ..................................................................................................................... available
Overall dimensions ....................................................................................................315 × 315 × 80 mm
Net weight.............................................................................................................................................. 2.7 kg
Package Includes
Robot vacuum cleaner............................................................................................................................1 pc.
Charging point..........................................................................................................................................1 pc.
Power adapter...........................................................................................................................................1 pc.
Remote control.........................................................................................................................................1 pc.
Rotating brush..........................................................................................................................................4 pc.
Replaceable dispensers..........................................................................................................................4 pc.
Container for wet cleaning...................................................................................................................1 pc.
Wet cleaning attachment......................................................................................................................1 pc.
Exhaust ЕРА-lter....................................................................................................................................2 pc.
Cleaning brush..........................................................................................................................................1 pc.
User manual..............................................................................................................................................1 pc.

RV-R150
15
ENG
UKR
KAZ
Service book..............................................................................................................................................1 pc.
The manufacturer has the right to make changes in the design, conguration or package, as well
as in the technical characteristics of the product in the course of continuous improvement of its
products without further notice of these changes. The specications allow the error of ±10%.
Parts of Appliance (scheme A1 , p. 3–4)
1. button with indication – start/end of
work
2. Dust collector compartment cover
3. Dust collector lid with handle
4. Dust collector
5. Dust collector compartment
6. Dust collector nozzle
7. Front bumper
8. Exhaust EPA lter holder
9. Exhaust ЕРА-lter
10. Front wheel
11. Charging contact pins
12. Rotating brushes
13.
Rear wheels with auto-switch off when
removed from surface
14. Suction port
15. Turbobrush
16. Ventilation holes
17. Wet cleaning attachment
18. Container for wet cleaning
19. Water outlet
20. Dispensers
21. Remote control
22. Battery compartment
23. Charging point
24. Charging contact pins
25. Socket for connecting power adapter
26. Power adapter
27. Charging point indicator
28. I/O power switch
29. PLAN button – планирование уборки
30. HOME button – reset to charging point
31. ON/OFF button – start/end of work
32. , , , buttons – choose movement
direction
33. MODE button – choose claaning mode
34. CLK button – time setting mode
35. MAX button– turbo mode
36. Digital display
37. – return to charging station indicator
38. – current time indicator
39. – planned cleaning function indicator
40. Cleaning mode indicator
41. Week day indicator
42. Replaceable ЕРА-lter
43. Cleaning brush
I. PRIOR TO THE FIRST USE
Carefully take out the appliance and its components from the box. Remove all the packaging
materials and promotional stickers.
Be sure to keep in place warning labels, index stickers (if any) and a label with the serial
number of the appliance on its body!
After the transportation or storage at low temperatures, it is necessary to keep the appliance
at the room temperature for at least 2 hours before switching on.
Wipe the body of the appliance and all removable parts with a damp cloth and dry. Carefully
dry all parts of the device before use. Install batteries (not included) in the remote control,
taking note of polarity.
Installing the battery ensure that your hands and the unit are dry.
I I. OPERATION OF THE APPLIANCE
Charging the battery
Before using the appliance, the battery must be fully charged (scheme A2, p. 5).
1. Connect the charging station to the power supply and install it in a at position next to
the wall, the charging station light will switch on. If the device cannot be installed di-
rectly by the wall, place the device on any at surface. There must not be interference at
a radius of up to two metres from the charging station to ensure that the vacuum can
return to the charging station to recharge.
2.
Turn the O/I switch to the I position, the device will make a sound, the button indicator
will ash a blue.
3. Place the device on the charging station so that the charging pins touch the contacts on
the charging station. The device will make a sound, the button indicator will ash a
red. Full charge time is approximately 4 hours.
Before rst use, charging the battery for 12 hours is recommended to increase service life.
4. The battery can also be charged by plugging a power adapter straight into the device.
The device will make a sound, the button will ash a red. The vacuum cleaner will not
react to button or the remote control and the planned cleaning function will be
unavailable while the power adapter is connected to the appliance.
5. When the device is fully charged, it will make a sound, the button indicator will glow
a constant blue.
WARNING! The charging station must be connected to a power supply.
When charge reaches a critical level, the device will automatically return to the charging station.
If the device is unable to return to the charging station, place it on the charging station by
hand, making sure the charging pins connect.
When storing for a long period of time, charging the battery completely and turning the I/0
switch to the 0 position is recommended.
Use the appliance
1. If necessary, use the container for wet cleaning (see scheme A3 , p. 6). Fill the container
through the special hole, lifting the lid rst. Close the lid and attach the wet cleaning
attachment using the velcro on the surface of the container. Place the container in the
body of the vacuum.

16
The base of the container for wet cleaning is equipped with micro-hooks that secure the
attachment.
DO NOT use the container for wet cleaning without water.
DO NOT use attachment for wet cleaning on carpets, it will disrupt the vacuum cleaner's movement.
2. Press the button on the device or the ON/OFF on the remote. It will make a sound, the
device will start working automatically. During the operation the button indicator will
be lit a blue constantly.
3. If necessary, change the mode (see “Choosing mode with remote control” section).
4.
To go into waiting mode, press the button on the device or the ON/OFF on the remote;
it will make a sound, the button indicator will ash a blue. Cleaning will not take place
during the waiting mode.
5. To put the appliance into sleep mode, press and hold the button until a beep sounds
and the button indicator turns off. During sleep mode, the device will not react to the remote
control unless the ON/OFF button is pressed. To exit sleep mode, press the button on
the device or ON/OFF on the remote, it will make a sound.
If the device is inactive for a 5 minutes it will go into sleep mode.
6. When work is completed, the device will return to its charging station. You can also press
the HOME button on the remote control (the indicator will light up on the display) to
force the device to return to the charging station; the button will be lit a red.
The maximum period of continuous use is 120 minutes, depending on the oor and positioning
of furniture in the cleaning area.
Choosing mode with remote control
You can choose the mode using the corresponding buttons on the remote control while the
device is operating:
• one click – (MODE 1 indicator lights up on the display)
• two click – (MODE 2 indicator lights up on the display);
• three click – (MODE 3 indicator lights up on the display);
• four click — (MODE 4 indicator lights up on the display).
Spiral cleaning mode
(MODE 1)
The device will move in a spiral, gradually
increasing trajectory. For cleaning a particu-
larly dusty area
Automatic mode
(MODE 2)
The device will then
clean the whole
area, building a
route according to
that individual room
Press the button
on the appliance
body or the ON/OFF
button on the remote
control to quickly
start automatic op-
eration
Corner cleaning mode
(MODE 3)
The device will move along the wall and
past obstacles, cleaning the edges of the
room
Режим «зигзаг»
(MODE 4)
The device automatically switches to this
mode in large spaces with a small number
of obstacles.
To control the device manually, press and hold the movement direction buttons while the device
is in waiting mode or operating:
– forward. The device will move forward while the button is held down;
– turn left. The device will turn left on its axis while the button is held down;
– turn right. The device will turn right on its axis while the button is held down;
– backwards. The device will move backwards while the button is held down.
To use the high suction power (turbo) mode, press the MAX button.
Clock setting
1. Press and hold the CLK button on the remote. The current time indicator and the hour
value will ash on the display. Set the hour value with the and buttons. By pressing
the button, you can proceed to setting the week day (see part 3).
2. Press the button to move to setting the minutes. Set the minute value with the and
buttons. Pressing the button will return you to setting the hours, by pressing the
button, you can proceed to setting the week day.
3.
Set the day of the week with and buttons, the corresponding indicator will be ashing
on the display: SUN – Sunday, MON – Monday, TUE – Tuesday, WED – Wednesday, THU–
Thursday, FRI – Friday, SAT – Saturday.
4.
Pressing the button when you reach the end of the week days will return you to setting
the hours, pressing the button will return you to setting the minutes. To return to setting
day of the week, press the or button.

RV-R150
17
ENG
UKR
KAZ
5. Press the CLK button to conrm and save all changes.
If there is no operation for a long time, the display on the remote control will turn off. To turn
on the display, press any button.
Cleaning planning function
CAUTION! The function operation requires the appliance power switch to the I position.
With the remote control, you can set daily cleaning at the same time. To do this:
1. In standby mode, press and hold the PLAN button on the remote control; the hour value
on the display will ash.
2. Set the hour value with the and buttons. By pressing the or button, you can
proceed to setting the minutes.
3. Set the minute value with the and buttons. The setting step is 30 minutes. To return
to setting hour, press the or button.
4.
Press the ON/OFF button to conrm and save all changes; the planned cleaning indicator
will light up, the appliance will beep once. After a while, the display will proceed to
showing the current time. The planned cleaning function has been successfully congured,
the appliance will start cleaning after the selected period of time. From now on, the
appliance will automatically start cleaning at the same time.
5.
To view the time remaining before the planned cleaning, press the PLAN button; the value
will be displayed on the display for a few seconds.
6.
To cancel the function, press and hold the PLAN button again in standby mode; the display
will show the time remaining until the planned cleaning starts. After that, press and hold
the ON/OFF button until the time value changes to 00:00; press the ON/OFF button again,
the appliance will beep twice. After a while, the display will proceed to showing the
current time.
If planned cleaning is set to 00:00, the function will not be enabled.
III. CLEANING AND MAINTENANCE
For maximum effectiveness, perform a full clean of the device once every two weeks. Clean the
dust compartment after each use.
Before you start cleaning the appliance, make sure that it is unplugged. Wipe the housing of
the appliance and the charging point with a damp, soft cloth. Do not allow the device to get
wet.
DO NOT place the appliance body, plug or power supply adapter under a stream of water or
submerge it in water.
DO NOT use any chemically aggressive substances or abrasive pastes, a sponge or tissue with
hard or abrasive surface.
The cleaning brushes, dust compartment and attachment for wet cleaning can be cleaned
in running water. If necessary, use a soft cleaning cloth. Dry completely before reuse!
See Diagram A4 (p. 7) for full procedure on cleaning the attachment for wet cleaning and
brushes.
Check the moving parts of the device periodically for dirt, the device may malfunction if dirt is
caught in them!
Refer to Diagram A5 for cleaning and replacing dispensers (p. 8).
When cleaning, watch out for small removable parts!
To clean the dust compartment and EPA lter, refer to the Diagram A6 (p.9).
Clean the turbo brush as it becomes dirty, refer to the Diagram
A7
(p. 10) for cleaning
procedure.
Refer to the Diagram A8 (p. 11) for the exhaust EPA lter replacing procedure.
Do not clean the exhaust EPA lter, this may damage the device.
The EPA lter's working life is no more than 12 months.
Refer to the Diagram A9 (p. 12) for the accumulator battery replacement procedure.
The accumulator battery needs to be replaced after the end of its effective life.
You can purchase the replaceable accumulator battery REB-R150 for this vacuum cleaner model on the
website www.redmond.company or in the ofcial dealers’ stores.
The accumulator battery must be disposed of in accordance with the local recycling program.
Take care of the environment: do not dispose of such items with normal household waste.
Storage and transportation
Clean and dry all the components of the appliance completely before storage and re-use. Store
the appliance in a dry, ventilated place away from heating appliances and direct sunlight.
During the transportation and storage it is not allowed to expose the appliance to mechani-
cal inuences which can cause the damage of the appliance and/or violation of integrity of
packing.
It is necessary to protect the packaging of the device from water and other liquids.
I V. BEFORE CONTACTING A SERVICE CENTER
Problem Possible cause Solution
The appliance does not turn on The appliance battery is discharged
Fully charge the battery (see
“Charging the battery”)
The device has been switched off
(switch is in the 0 position) Turn the switch to the I position
The appliance is installed on the charging
station and beeps, the button is ashing a
red

18
Problem Possible cause Solution
The battery does not charge
Power supply failure or wall socket is
not working properly
Check the power supply or connect
to a properly working wall socket
The AC adapter is not connected to
the mains Verify that the AC adapter is con-
nected properly
The device has been placed on the
charging station incorrectly
Place the device on the charging
station so that the charging pins
touch the contacts on the charging
station
The battery is running out too quickly
The lter, main brush or rotating
brushes are dirty
Remove the dirt, clean the device
according to the recommendations
in the “Cleaning and Maintenance”
section
The appliance
turned off sponta-
neously
The button is ashing
a red
The dust collector is not installed or
incorrectly installed in the device
Ensure the dust collector is in-
stalled correctly
The button ashes red
and blue alternately The brushes are dirty
Check the brushes and remove the
dirt (according to the recommen-
dations in the “Cleaning and Main-
tenance” section
The button flashes
once red and twice blue
alternately
The turbo brush is clogged, the turbo
brush lock protection has activated
Clean the turbo brush in accord-
ance with the recommendations
specied in the “Cleaning and
Maintenance” section
The button flashes
once red and three times
blue alternately
The appliance is overheated Unplug the appliance and do not
use it until it has completely
cooled down
The button flashes
twice red and once blue
alternately
Error with front bumper meaning the
device cannot move forwards Do not block the device's path, do
not use the device in a small space
The button flashes
twice red and twice blue
alternately
The wheels have been separated from
the surface
Place the device on an even surface
and restart
The button flashes
three times red and once
blue alternately
The device is stuck and the wheels
have difculty turning
Place the device on an even surface
and restart. Check the device's wheels,
do not put pressure on the device, do
not place anything on the device
Device giving off a loud noise Dust collector full Clean the dust collector
The device is working but does not respond to
the remote
IR signal from
the remote con-
trol is not
reaching the
vacuum
The remote control
is located too far
from the device
Reduce the distance between the
remote control and the device
The device's IR re-
ceive is turned
away or there are
obstacles between
the remote control
and the device
Point the remote control in a
different direction
The remote's batteries have run out
Change the batteries (see the “Prior
The First Use“ section)
Problem Possible cause Solution
The device is working but does not respond to
the remote
The IR receiver and the appliance
sensors are contaminated
Wipe the appliance body sides with
a damp soft cloth
Movement of the appliance is interrupted
Cleaning does not start at the set time
Прибор был выключен (переключа-
тель питания был переведен в по-
ложение 0)
Настройте режим уборки повтор
-
но
The wet cleaning container is lled with water,
but the wet cleaning attachment is not wet Dispensers are contaminated Clean the dispensers according to
the “Cleaning and Maintenance”
Section.
The device does not start cleaning or is moving
incorrectly
The device is cleaning a surface that
is too dark Stop the device and move it to a
lighter part of the oor
The device is cleaning a strongly
reective surface
Close the curtains to prevent
bright sunlight entering the room.
Clean the room in a less bright
environment
If the problem persists, contact an authorized service center.
Environmentally Friendly Disposal (WEEE)
The packaging, user manual and the device itself shall be taken to the applicable
collection point for the recycling of electrical and electronic equipment. Do not throw
away the electronic waste to help protect the environment.
Old appliances must not be disposed with other household waste but must be
collected separately. Municipal disposal of recyclable wastes is free of charge. The
owners of old appliances are required to bring it to a waste facility centre. With this little extra
effort, you can help to ensure that valuable raw materials are recycled and pollutants are
treated as appropriate.
This appliance is labelled in accordance with European Directive 2012/19/EU – concerning used
electrical and electronic appliances (waste electrical and electronic equipment WEEE).
The guideline determines the framework for the return and recycling of used appliances as
applicable throughout the EU.

Manufacturer: “Power Point Inc Limited” №1202 Hai Yun Ge (В1) Lin Hai Shan Zhuang Xiameilin Futian Shenzhen. China. 518049. Under license of REDMOND®
Изготовитель: «Пауэр Пойнт Инк. Лимитед» №1202 Хай Юн Гэ (B1) Лин Хай Шан Чжуан Сямейлин Футьян, Шеньжень, Китай, 518049. По лицензии REDMOND®
Виробник: «Пауер Поінт Інк. Лімітед» № 1202 Хай Юн Ге (B1) Лін Хай Шан Чжуан Сямейлін Футьян, Шеньжень, Китай, 518049. За ліцензією REDMOND®
Importer (EU): SIA “SPILVA TRADING” Address: Jelgava, Meiju cels 43 — 62, LV-3007 Reg. Nr. 43603078598. BA Uvoznik i distributer za Bosnu i Hercegovinu: ASBIS d.o.o., Džemala Bijedića
162, 71 000, Sarajevo, Bosna i Hercegovina. Tel: +387 33 770 200, e-mail: [email protected], www.asbis.ba. BG Вносител: АСБИС България ЕООД И.Н.: BG121655056 Адрес: София, бул.
Искърско шосе 7, ТЦ Европа, сгр. 3. Тел.: 02/4284111, www.asbis.bg. CZ Dovozce: ASBIS CZ spol. s r.o Obchodní 103, 251 01 Čestlice, Praha — východ, Praha, Czech Republic. Tel: +420 272
117 111, www.asbis.cz. HU Importőr: ASBIS Magyarország Kft., H-1135, Budapest, Reitter Ferenc utca 46-48. Tel.: +36 1 236-1000, Fax: +36 1 236-1010, www.asbis.hu. PL ASBIS POLAND SP
Z O.O., Ul. Krasnowolska 17 A, 02-849, Warszawa. Tel +48 22 33 71 510, www.asbis.pl. RO Importator: ASBIS Romania SRL, Splaiul Independentei 319, SEMA PARC, Obiectiv 5, Etaj 2, Sector
6, Bucuresti, 062650, Romania. Tel. +40 21 337 1099, www.asbis.ro. RU Импортер в России: ООО «ИЛОТ», 198099, г. Санкт-Петербург, ул. Промышленная., д. 38, к. 2, лит. А, тел.: +7(812)
740-16-30. SK Importér/distribútor pre SR: ASBIS SK spol. s r.o., Tuhovská 33, 831 06, Bratislava. Tel: +440-2-32165111, www.online.asbis.sk. RS Uvoznik i servis za Republiku Srbiju: ASBIS
d.o.o., Cara Dušana 205A, 11080 Zemun, Beograd. Tel: +381 11 310 77 00, www.asbis.rs. LV Izplatītājs: SIA „ASBIS BALTICS”; Latvia, Riga, Bauskas iela 58A-15, LV-1004; Tel.: +371 66047820,
e-mail: [email protected], www.asbis.lv. UA Імпортер в Україні: ТОВ ПІІ «АСБІС-УКРАЇНА», 03061, м. Київ, вул. Газова, будинок 30. Тел. +38 044 455 44 11, www.asbis.ua. SL Distributer, dajalec
garancije in servis za Slovenijo, Asbis d.o.o., Brodišče 15, 1236 Trzin; Tel: + 386 (0) 590 79 927; e-mail: [email protected]; www.asbis.si. HR ASBISc-CR d.o.o.; Slavonska avenija, 24/6 -1 kat;
10000, Zagreb, Croatia; Tel: + 385 1 600 9900, e-mail: [email protected]; www.asbis.hr. EE Maaletooja: SIA „ASBIS BALTICS”; Türi 10c, 11313, Tallinn, Estonia; Tel.: + 372 66047815, e-mail:
[email protected]; www.asbis.ee. LT Importuotojas: SIA „ASBIS BALTICS”; Ateities g. 25B, 06326, Vilnius, Lietuva; Tel.: +370 66047814, e-mail: [email protected]; www.asbis.lt. CY Importer Cyprus:
ASBIS Kypros Limited; 26, Spyrou Kyprianou Str, 4040, Germasogeia, Limassol, Cyprus. Tel: +357 25 257 350; Fax: +357 25 322 432, e-mail: [email protected]y; www.asbis.com.cy

www.redmond.company
www.multivarka.pro
www.store.redmond.company
www.smartredmond.com
Made in China
RV-R150-ENG-UM-1
Table of contents
Other Redmond Vacuum Cleaner manuals