Redmond RV-R280 User manual

ENG
UKR
KAZ
Robot Vacuum Cleaner
RV-R280
User manual

Manufacturer: “Power Point Inc Limited” №1202 Hai Yun Ge (В1) Lin Hai Shan Zhuang Xia-
meilin Futian Shenzhen. China. 518049. Under license of REDMOND®
Изготовитель: «Пауэр Пойнт Инк. Лимитед» №1202 Хай Юн Гэ (B1) Лин Хай Шан Чжуан
Сямейлин Футьян, Шеньжень, Китай, 518049. По лицензии REDMOND®
Виробник: «Пауер Поінт Інк. Лімітед» № 1202 Хай Юн Ге (B1) Лін Хай Шан Чжуан Сямейлін
Футьян, Шеньжень, Китай, 518049. За ліцензією REDMOND®
Importer (EU): SIA “SPILVA TRADING” Address: Jelgava, Meiju cels 43 — 62, LV-3007 Reg.
Nr. 43603078598. BA Uvoznik i distributer za Bosnu i Hercegovinu: ASBIS d.o.o., Džemala
Bijedića 162, 71 000, Sarajevo, Bosna i Hercegovina. Tel: +387 33 770 200, e-mail: prodaja@
asbis.ba, www.asbis.ba. BG Вносител: АСБИС България ЕООД И.Н.: BG121655056 Адрес:
София, бул. Искърско шосе 7, ТЦ Европа, сгр. 3. Тел.: 02/4284111, www.asbis.bg. CZ Dovozce:
ASBIS CZ spol. s r.o Obchodní 103, 251 01 Čestlice, Praha — východ, Praha, Czech Republic.
Tel: +420 272 117 111, www.asbis.cz. HU Importőr: ASBIS Magyarország Kft., H-1135, Buda-
pest, Reitter Ferenc utca 46-48. Tel.: +36 1 236-1000, Fax: +36 1 236-1010, www.asbis.hu.
PL ASBIS POLAND SP Z O.O., Ul. Krasnowolska 17 A, 02-849, Warszawa. Tel +48 22 33 71 510,
www.asbis.pl. RO Importator: ASBIS Romania SRL, Splaiul Independentei 319, SEMA PARC,
Obiectiv 5, Etaj 2, Sector 6, Bucuresti, 062650, Romania. Tel. +40 21 337 1099, www.asbis.ro.
RU Импортер в России: ООО «ИЛОТ», 198099, г. Санкт-Петербург, ул. Промышленная., д.
38, к. 2, лит. А, тел.: +7(812) 740-16-30. SK Importér/distribútor pre SR: ASBIS SK spol. s r.o.,
Tuhovská 33, 831 06, Bratislava. Tel: +440-2-32165111, www.online.asbis.sk. RS Uvoznik i
servis za Republiku Srbiju: ASBIS d.o.o., Cara Dušana 205A, 11080 Zemun, Beograd. Tel: +381
11 310 77 00, www.asbis.rs. LV Izplatītājs: SIA „ASBIS BALTICS”; Latvia, Riga, Bauskas iela
58A-15, LV-1004; Tel.: +371 66047820, e-mail: [email protected], www.asbis.lv. UA Імпортер
в Україні: ТОВ ПІІ «АСБІС-УКРАЇНА», 03061, м. Київ, вул. Газова, будинок 30. Тел. +38 044
455 44 11, www.asbis.ua. SL Distributer, dajalec garancije in servis za Slovenijo, Asbis d.o.o.,
Brodišče 15, 1236 Trzin; Tel: + 386 (0) 590 79 927; e-mail: [email protected]; www.asbis.
si. HR ASBISc-CR d.o.o.; Slavonska avenija, 24/6 -1 kat; 10000, Zagreb, Croatia; Tel: + 385
1 600 9900, e-mail: [email protected]; www.asbis.hr. EE Maaletooja: SIA „ASBIS BALTICS”;
Türi 10c, 11313, Tallinn, Estonia; Tel.: + 372 66047815, e-mail: [email protected]; www.asbis.
ee. LT Importuotojas: SIA „ASBIS BALTICS”; Ateities g. 25B, 06326, Vilnius, Lietuva; Tel.: +370
66047814, e-mail: [email protected]; www.asbis.lt. CY Importer Cyprus: ASBIS Kypros Limited;
26, Spyrou Kyprianou Str, 4040, Germasogeia, Limassol, Cyprus. Tel: +357 25 257 350; Fax:
+357 25 322 432, e-mail: [email protected]; www.asbis.com.cy
CONTENTS
IMPORTANT SAFEGUARDS ...................................................................................................................7
Technical Specications ..............................................................................................................................8
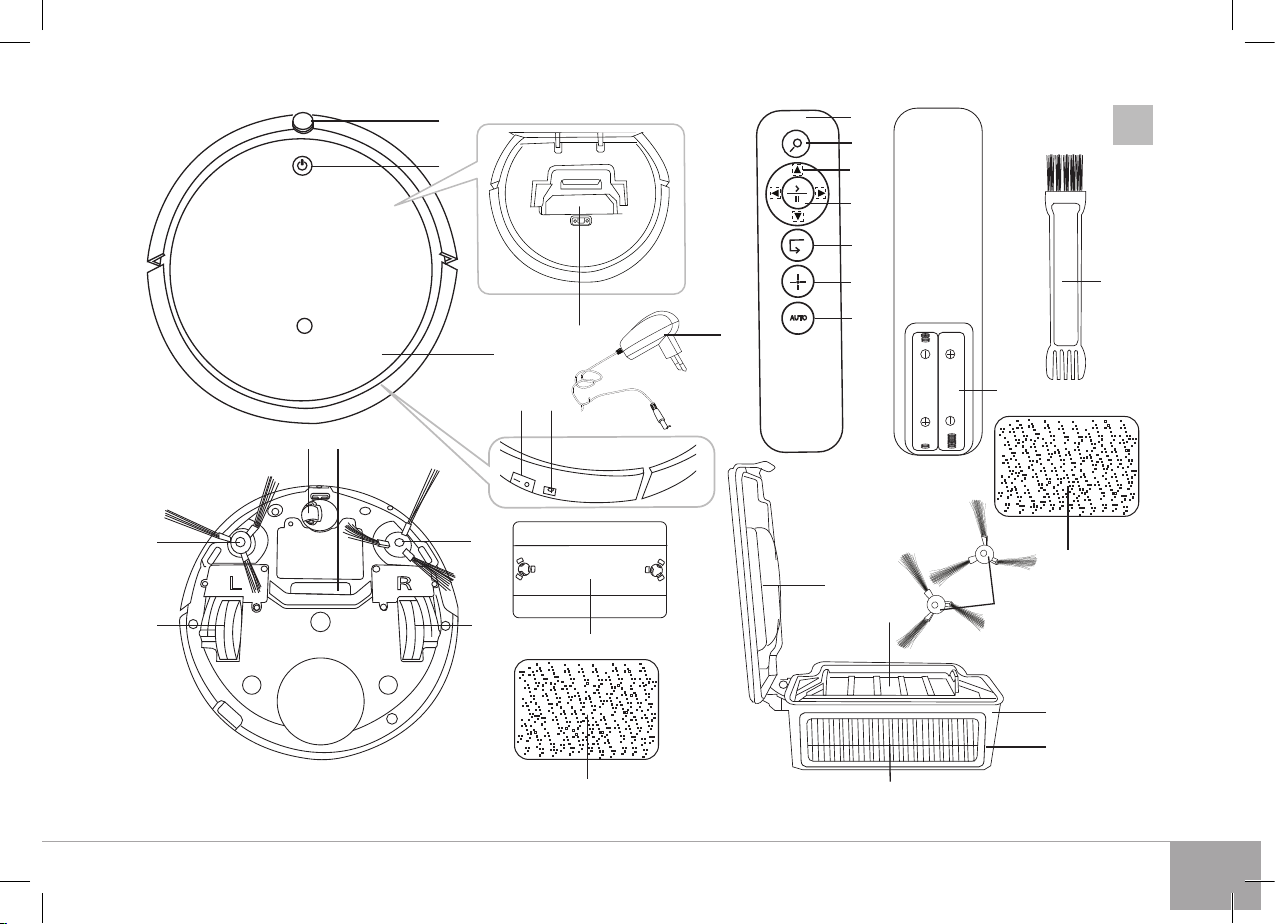
Package Includes ........................................................................................................................................... 8
Parts of Appliance ..........................................................................................................................................9
I. PRIOR TO THE FIRST USE ............................................................................................................... 9
II. OPERATION OF THE APPLIANCE .............................................................................................. 9
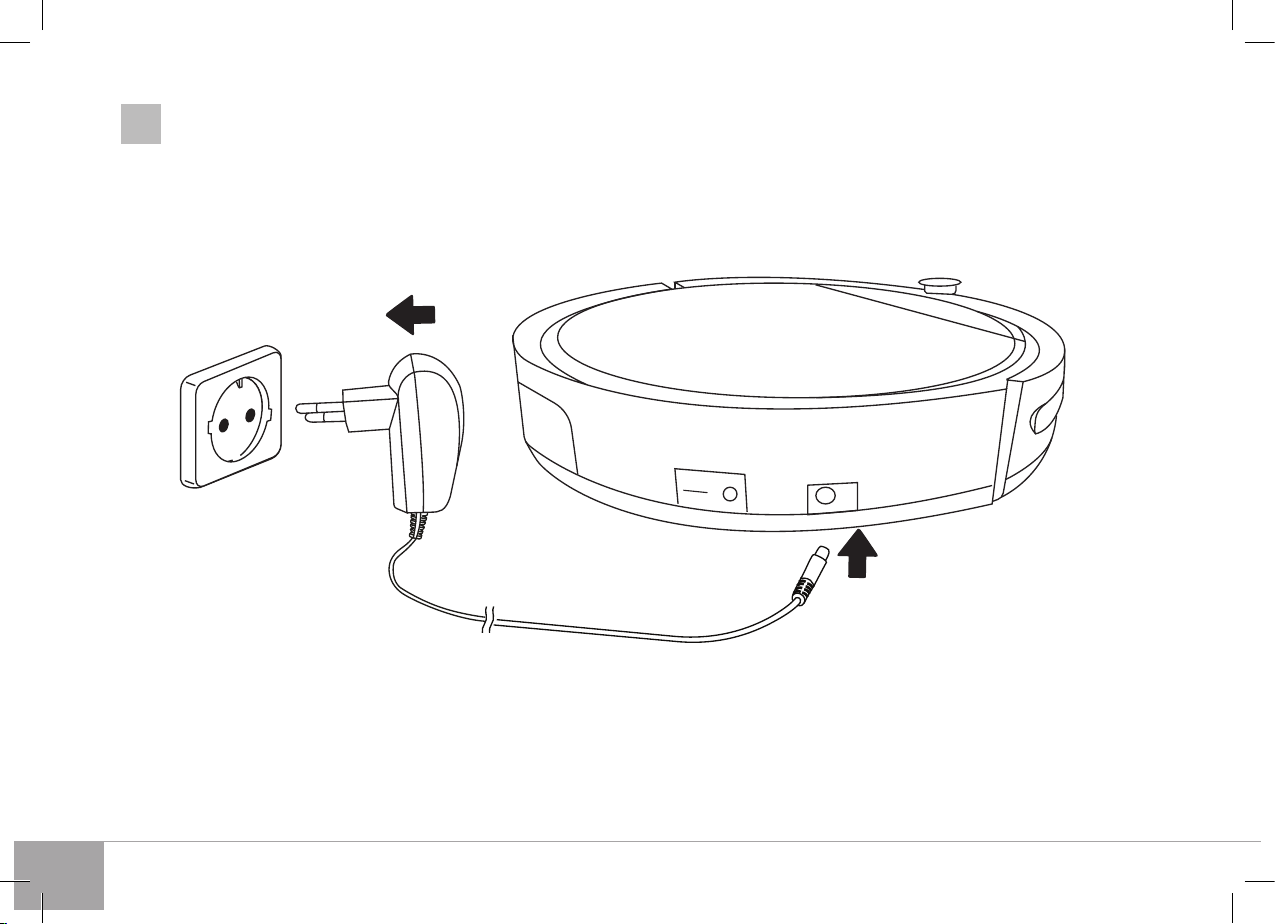
Charging the battery .....................................................................................................................................9
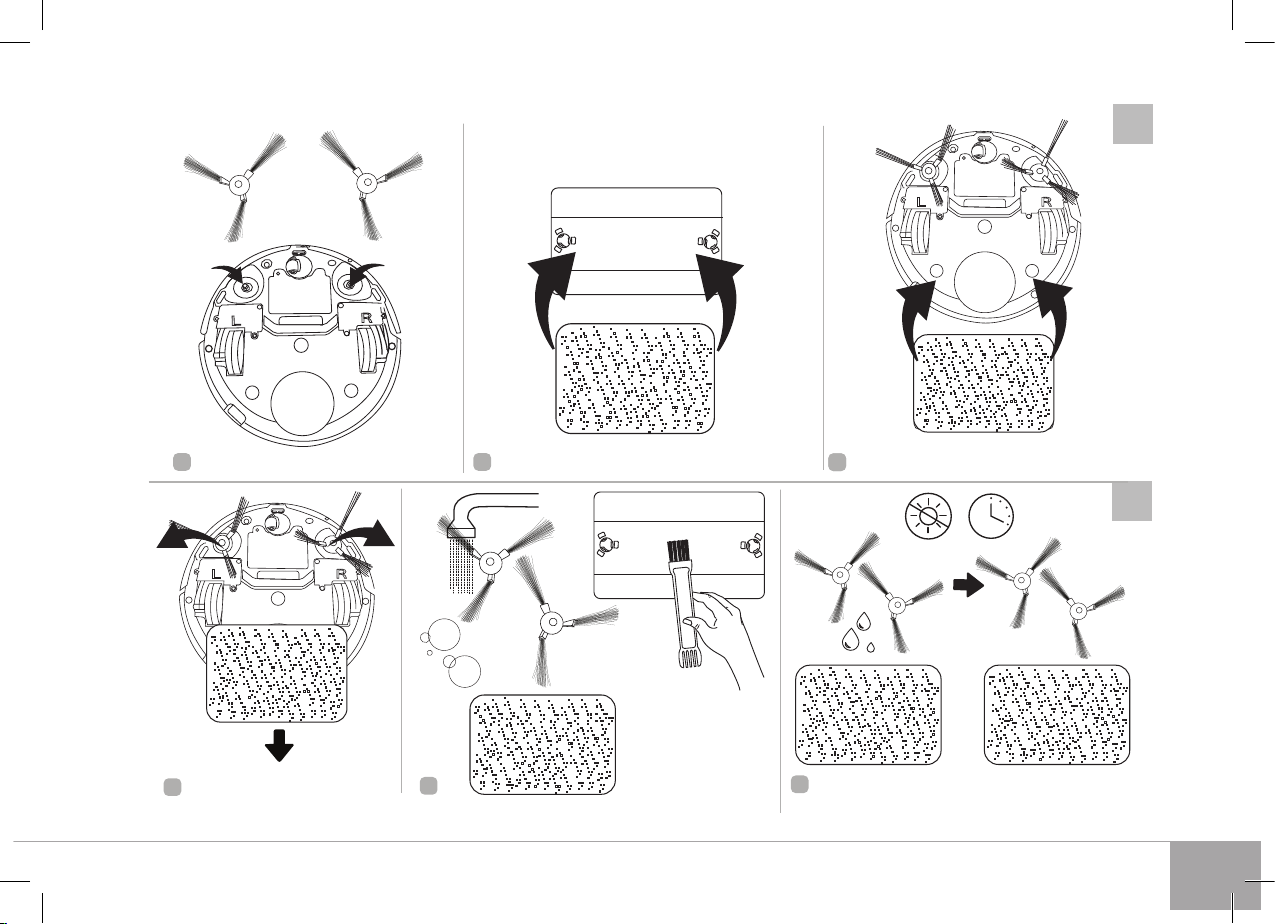
Assembly ..........................................................................................................................................................9
Use the appliance ..........................................................................................................................................9
Choosing mode with remote control .....................................................................................................10
Find my vacuum cleaner ............................................................................................................................10
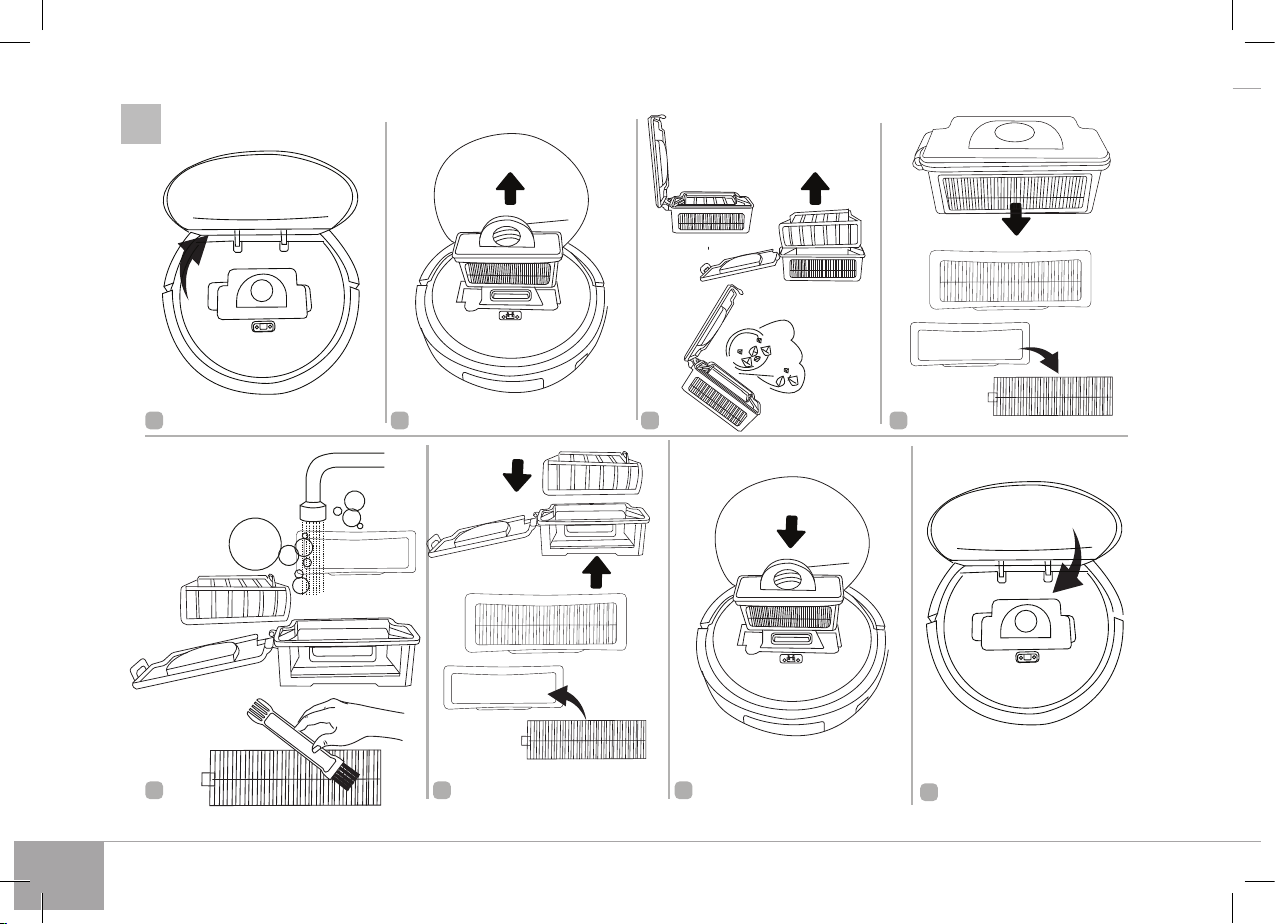
III. CLEANING AND MAINTENANCE ...........................................................................................10
Storage and transportation ......................................................................................................................10
IV. BEFORE CONTACTING A SERVICE CENTER .....................................................................10

3
A1
R
L
AUTO
28
10
11
9
11
L R
7
3
1
13
29
19
23
24
25
26
27
22
21
20
12
5 6
8
4
R
18
30
14
15
17
16
2
L

4
A2
a
b

5
A3
A4
1
1
23
23
R
L
R
L
R
L
3
LR
LR
LR
LR

6
A5
1 2 3 4
5 6 7 8

RV-R280
7
ENG
UKR
KAZ
Before using this appliance, please read the User Manual carefully and keep it as a reference.
Proper use of the appliance will signicantly extend its service life.
The safety precautions and instructions contained in this manual do not cover all possible
situations that may arise during the operation of the appliance. When working with the
appliance, the user should be guided by common sense, be careful and attentive.
IMPORTANT SAFEGUARDS
•
The manufacturer is not responsible for damage caused by non-compliance
with safety requirements and operating rules of the product.
•
This appliance is intended for use in domestic conditions and can be used
in apartments, country houses or other similar conditions of non-industrial
operation. Industrial or any other misuse of the appliance will be considered
as a violation of the conditions of proper use of the product. In this case, the
manufacturer is not responsible for the possible consequences.
•
Before connecting the appliance to the power supply, check whether its
voltage is the same as the nominal voltage of the device adapter (see
technical specications or the product nameplate).
•
It is allowed to use the appliance only with the adapter included in the
package.
•
Use an extension cord designed for the power consumption of the appli-
ance, otherwise any mismatch of parameters can lead to a short circuit or
re of the cord.
•
Unplug the appliance from the mains during cleaning. Remove the adapt-
er with dry hands, holding it by the case, not by the wire.
•
Do not extend the power cord in doorways or near heat sources. Make
sure that the cord is not twisted or bent, not in contact with sharp objects,
corners and edges of furniture.
KEEP IN MIND: accidental damage to the power supply cord may cause
problems that do not comply with the warranty, as well as electric
shock. If the power cord is damaged, it must be replaced by the man-
ufacturer, service or similar qualied personnel to avoid danger.
•
Before cleaning the appliance ensure that it is unplugged. Follow clean-
ing and general maintenance guidelines when cleaning the unit.
Do NOT immerse the appliance in water or place it under a stream
of water!
•
Move the device, holding it by its body with both hands.
•
Do not install foreign objects in the device, do not sit or stand on the
device.
•
Do not allow foreign objects to enter the motor compartment of the ap-
pliance. Do not block the suction openings. Blocking the air intake may
damage the motor.
•
It is not allowed to operate the appliance in the following conditions:
—
In the premises and areas with high humidity. There is a danger of
short circuit, motor failure.
—
Outdoors — moisture or foreign objects inside the appliance may cause
serious damage to the appliance.
—
Near toxic and ammable substances, in rooms with a high concentra-
tion of vapors of combustible substances (paint, solvent, etc.) or com-
bustible dust. There is a danger of explosion or re.
•
It is not alllowed to bring the suction nozzle to any parts of the body or
clothing. Careless handling can result in serious injury.
•
It is not allowed to suck up red-hot or cooled ash, coals, as well as outstand-
ing cigarette butts, smoldering or burning debris. Clogging may cause a re.
•
It is not allowed to suck up any liquids, as well as clean wet surfaces — wet
oors or carpets. Ingress of moisture can cause serious damage to the
vacuum cleaner.

8
•
It is not allowed to suck in powders for lling cartridges (toners) of copi-
ers and printers, our and other ne bulk substances, as well as construc-
tion dust, particles of plaster, gypsum, concrete or cement. There is a risk
of lter clogging or motor damage.
•
It is not allowed to suck up sharp objects: nails, broken glass, etc. They
may damage the dust collector and lters.
•
Do not use the device to clean furniture. Using the device on a soft, un-
even surface or falling off a piece of furniture may lead to a malfunction.
Do not use the device on long hair rugs (longer than 0.5 cm).
•
This appliance can be used by children over 8 years old and physically or
mentally challenged persons or as well as those who lack experience and
knowledge only provided they have been given supervision or instruction
concerning use of the appliance in a safe way and understand the hazards
involved. Children should not play with the appliance. Keep the appliance
and the power cord out of reach of children under 8 y.o. Cleaning and
maintenance should not be performed by children without supervision.
•
Packaging material (lm, foam, etc.) may be hazardous to children. Chok-
ing hazard! Keep the packaging out of the reach of children.
•
It is not allowed to repair the appliance or make any changes in its design.
Repair of the appliance must be carried out exclusively by a specialist of
an authorized service center. Unprofessional repair can lead to damage
to the appliance, injuries and property damage.
ATTENTION! It is not allowed to use the appliance with any faults!
Technical Specications
Model...................................................................................................................................................RV-R280
Appliance type .........................................................................................................robot vacuum cleaner
Power ..........................................................................................................................................................18 W
Battery type .............................................................................................................................................Li-ion
Battery voltage ............................................................................................................................... 14.8 V
Battery capacity ..............................................................................................................................800 mA*h
Power adapter input voltage ................................................................................100–240 V~, 400 mA
Power adapter output voltage .......................................................................................24 V 600 mA
Electrical safety ...................................................................................................................................Class II
Suction power ..........................................................................................................................................13 W
Exhaust lter class ................................................................................................ EPA-lter + microlter
Dust compartment capacity .............................................................................................................250 ml
Noise level ...............................................................................................................................................65 dB
Continuous operation time ...........................................................................................up to 60 minutes
Full charge time .................................................................................................................................5 hours
Number of cleaning modes ......................................................................................................................... 3
Remote control ................................................................................................................................available
Remote control power source ..........................................................................................2 × LR03 (AAA)
Indication ....................................................................................................................................LED, audible
Obstacle sensor ..............................................................................................................................................5
Wet cleaning feature .....................................................................................................................available
Overall dimensions .............................................................................................................Ø290 × 70 mm
Net weight ............................................................................................................................................1.75 kg
Package Includes
Robot vacuum cleaner ............................................................................................................................1 pc.
Remote control .........................................................................................................................................1 pc.
Power adapter ...........................................................................................................................................1 pc.
Brush set .....................................................................................................................................................2 pc.
Wet cleaning attachment ......................................................................................................................2 pc.
Exhaust EPA lter .....................................................................................................................................1 pc.
Cleaning brush..........................................................................................................................................1 pc.
User manual ..............................................................................................................................................1 pc.
Service book ..............................................................................................................................................1 pc.
The manufacturer has the right to make changes in the design, conguration or package, as
well as in the technical characteristics of the product in the course of continuous improvement
of its products without further notice of these changes. The specications allow the error of
±10%.

RV-R280
9
ENG
UKR
KAZ
Parts of Appliance (scheme A1, p. 3)
1. IR receiver
2.
button – enable/disable appliance,
start/end of work
3. Dust collector compartment cover
4. Dust collector
5. I/O power switch
6. Socket for connecting power adapter
7. Front wheel
8. Suction port
9. Left side brush
10. Right side brush
11. Rear wheels
12. Wet cleaning attachment base
13. Wet cleaning attachment
14. EPA-lter
15. EPA lter holder
16. Dust compartment
17. Pre-lter
18. Dust collector lid with handle
19. Power adapter
20. Remote control
21. button — nd my vacuum cleaner
22.
▼, ▲, ►, ◄ buttons — choose move-
ment direction
23. button — start/end of work
24. button — corner cleaning mode
25. button — cleaning of a set area
26. A
AA
U
UU
T
TT
O
O
button — automatic mode
27. Battery compartment
28. Cleaning brush
29. Replaceable wet cleaning attachment
30. Replaceable rotating brushes
I. PRIOR TO THE FIRST USE
Carefully take out the appliance and its components from the box. Remove all the packaging
materials and promotional stickers.
Be sure to keep in place warning labels, index stickers (if any) and a label with the serial
number of the appliance on its body!
After the transportation or storage at low temperatures, it is necessary to keep the appliance
at the room temperature for at least 2 hours before switching on.
Wipe the body of the appliance and all removable parts with a damp cloth and dry. Carefully
dry all parts of the device before use. Install batteries (not included) in the remote control,
taking note of polarity.
Installing the battery ensure that your hands and the unit are dry.
I I. OPERATION OF THE APPLIANCE
Charging the battery (scheme A2, p. 4)
Before using the appliance, the battery must be fully charged. To do this, connect the robot
vacuum cleaner to the mains using the adapter, turn the O/I switch to the I position, it will
make a sound, the button indicator will icker an orange. Full charge time is approxi-
mately 5 hours.
It is recommended to charge the battery fully before rst use to prolong battery life.
When the device is fully charged, it will make a sound, the button indicator will glow a
constant green.
CAUTION! The appliance will not work while it is connected to the mains.
An audible signal will sound when the appliance is disconnected from the mains.
When storing for a long period of time, charging the battery completely and turning the I/0
switch to the 0 position is recommended.
Assembly (scheme A3, p. 5)
When beginning assembly, make sure the I/O switch is in the O position.
Install the brushes in accordance with the directional markings, R should go into slot R, L into
slot L.
If necessary, use the wet cleaning attachment (see scheme A3, p. 5). Moisten the wet clean-
ing nozzle with water and wring it out thoroughly; x it on the base. Insert the pins on the
attachment base into the holes on the bottom of the vacuum cleaner and press until they
click. To remove the attachment, use both hands to gently pull on the edges of the base, ap-
plying light pressure to the middle of the base with your thumbs.
DO NOT use attachment for wet cleaning on carpets, it will disrupt the vacuum cleaner's move-
ment.
Use the appliance
1. Turn the O/I switch to the I position, two beeps will sound. The button indicator will
be lit a green.
2. Press the button on the device or the on the remote. It will make a sound, the
device will start working automatically. The device will then clean the whole area,
building a route according to that individual room. To interrupt the cleaning process,
press the button on the appliance body or the button on the remote control, it
will make a sound.
3. If necessary, change the mode (see “Choosing mode with remote control” section).
4.
To go into waiting mode, press the button on the device or the on the remote.
Cleaning will not take place during the waiting mode.
5.
To switch the appliance into sleep mode, press and hold the button for 5 seconds, then
release the button, it will make a sound, the button indication will go off.To exit sleep
mode, press the button either the or button on the remote, it will make a sound,
the button indicator will be lit in green again.
If the device is inactive for a minute it will go into sleep mode.
The maximum period of continuous use is 60 minutes, depending on the oor and positioning
of furniture in the cleaning area.

10
When the battery charge reaches a critical level, the appliance will beep, the button indica-
tor will ash orange.
6. To turn off the device, turn the power switch 0/I to position 0.
Choosing mode with remote control
You can choose the mode using the corresponding buttons on the remote control in waiting
mode or while the device is operating:
• A
AA
U
UU
T
TT
O
O
button — automatic mode;
• button — fast cleaning of a set area;
• button – corner cleaning mode.
Automatic mode
The device will then clean the whole
area, building a route according to that
individual room
Corner cleaning mode
The device will move along the wall
and past obstacles, cleaning the edges
of the room
Fast cleaning of a set area
The appliance moves in a rectangular
spiral, gradually expanding the trajec-
tory. Upon a collision with an obstacle,
the appliance switches to automatic
mode. For cleaning a particularly dusty
area
To control the device manually, press and hold the movement direction buttons while the device
is in waiting mode or operating:
▲ — forward. The device will move forward while the button is held down;
— turn left. The device will turn left on its axis while the button is held down;
— turn right. The device will turn right on its axis while the button is held down;
▼ — backwards. The device will move backwards while the button is held down.
Find my vacuum cleaner
With the button, you can always nd the robot vacuum cleaner when you have lost sight
of it. Press the button; if the appliance is within the range of the remote control, an audi-
ble signal will sound.
III. CLEANING AND MAINTENANCE
For maximum effectiveness, perform a full clean of the device once every two weeks. Clean the
dust compartment after each use.
Before you start cleaning the appliance, make sure that it is unplugged. Wipe the housing of
the appliance with a damp, soft cloth. Do not allow the device to get wet.
DO NOT place the appliance body, plug or power supply adapter under a stream of water or
submerge it in water.
DO NOT use any chemically aggressive substances or abrasive pastes, a sponge or tissue with
hard or abrasive surface.
The cleaning brushes, dust compartment and attachment for wet cleaning can be cleaned in running
water. If necessary, use a soft cleaning cloth. Dry completely before reuse!
To clean the brushes and attachment for wet cleaning, refer to the diagram A4 (p. 5). If the
bristles of the side brushes have lost their shape, place them in boiling water for a short time–
the bristles will straighten out. Dry completely before reuse!
To clean the dust compartment and EPA-lter, refer to the diagram A5 (p. 6).
Storage and transportation
Clean and dry all the components of the appliance completely before storage and re-use. Store
the appliance in a dry, ventilated place away from heating appliances and direct sunlight.
During the transportation and storage it is not allowed to expose the appliance to mechani-
cal inuences which can cause the damage of the appliance and/or violation of integrity of
packing.
It is necessary to protect the packaging of the device from water and other liquids.
I V. BEFORE CONTACTING A SERVICE CENTER
Problem Possible cause Solution
The appliance does not turn on
The appliance battery is discharged
Fully charge the battery (see “Charging the
battery”)
The appliance switches off un-
timely; an audible signal sounds;
the button indicator lights up
in orange
The battery does not charge
Power supply failure or wall socket
is not working properly
Check the power supply or connect to a properly
working wall socket
The power adapter is not connected
to the mains
Verify that the power adapter is connected
properly
The battery is running out too
quickly The brushes or lters are dirty Remove the dirt, clean the device according to
the recommendations in the “Cleaning and
Maintenance” section
The button indicator lights up
in red System failure
Wipe the bottom with a damp cloth. Place the
device on an even surface and restart
The button indicator is blinking
a red, an audible signal sounds
three times
Anti-fall sensor detected a vertical
drop, the device have been separated
from the surface

RV-R280
11
ENG
UKR
KAZ
Problem Possible cause Solution
The button indicator ashes
red and orange alternately, an
audible signal sounds three times
Error with front bumper meaning the
device cannot move forwards
Place the device on an even surface. Wipe the
front bumper with a damp cloth; make sure that
there are no foreign objects between the front
bumper and the appliance body. Do not block
the device's path, do not use the device in a small
space
The button indicator ashes
red and green alternately, an au-
dible signal sounds three times
The device is stuck and the wheels
have difculty turning
Place the device on an even surface and restart.
Check the device's wheels, do not put pressure
on the device, do not place anything on the
device
The button indicator ashes
orange and green alternately, an
audible signal sounds three times
The brushes are dirty, the side brush
lock protection has activated
Check the brushes and remove the dirt
(according to the recommendations in the
“Cleaning and Maintenance” section
The button indicator is blinking
an orange, an audible signal
sounds three times Fan overload Clean the dust collector and lters
The button indicator is blinking
a red, the appliance halted Dust collector full Clean the dust collector
Device giving off a loud noise
The device does not start cleaning
or is moving incorrectly
The device is cleaning a surface that
is too dark Stop the device and move it to a lighter part of
the oor
The device is cleaning a strongly
reective surface
Close the curtains to prevent bright sunlight
entering the room. Clean the room in a less
bright environment
If the problem persists, contact an authorized service center.
Environmentally Friendly Disposal (WEEE)
The packaging, user manual and the device itself shall be taken to the applicable
collection point for the recycling of electrical and electronic equipment. Do not throw
away the electronic waste to help protect the environment.
Old appliances must not be disposed with other household waste but must be col-
lected separately. Municipal disposal of recyclable wastes is free of charge. The
owners of old appliances are required to bring it to a waste facility centre. With this little
extra effort, you can help to ensure that valuable raw materials are recycled and pollutants
are treated as appropriate.
This appliance is labelled in accordance with European Directive 2012/19/EU – concerning used
electrical and electronic appliances (waste electrical and electronic equipment WEEE).
The guideline determines the framework for the return and recycling of used appliances as
applicable throughout the EU.

www.redmond.company
www.multivarka.pro
www.store.redmond.company
www.smartredmond.com
Made in China
RV-R280-ENG-UM-1
Table of contents
Other Redmond Vacuum Cleaner manuals