manuals.online logo
Brands
  1. Home
  2. •
  3. Brands
  4. •
  5. ReelCraft
  6. •
  7. Cables And Connectors
  8. •
  9. ReelCraft BA34000 M Series User manual

ReelCraft BA34000 M Series User manual

Personal injury and/or equipment damage may result if proper safety precautions are not observed.
• Ensure that the reel has been properly installed before connecting supply line (see installation instructions).
• Before connecting reel to supply line ensure that supply line pressure does not exceed maximum rated working pressure of reel.
• Bleed fluid/gas pressure from system before servicing reel.
• Do not play pranks on other personnel. Even low pressure is very dangerous and can cause irreparable damage or death.
• Do not wear loose fitting clothing while operating reel.
• Be aware of other personnel in work area.
• Be aware of other machinery in work area.
• If a leak occurs in the hose or reel, remove supply line pressure immediately.
• If the reel is power driven check for loose, frayed, and/or broken wires before operating.
• Pull hose from reel by grasping the hose itself, not the control valve.
• If reel ceases to unwind or rewind, remove system pressure immediately. Do not pull or jerk on hose!
• Treat and respect a hose reel as any other piece of machinery, observing all common safety practices.
Operating Instructions
Series BA34000 M Hand Crank Reels
Twin Hydraulic Model Numbers:
Reelcraft Industries, Inc. • 2842 E Business Hwy 30, Columbia City, IN 46725
Ph: 800-444-3134 / 260-248-8188 • Fax: 800-444-4587 / 260-248-2605
Customer Service: 855-634-9109 • [email protected] • www.reelcraft.com
Form# 1242-612 Rev: 3/2016
BA34106 M BA34118 M BA34128 M
BA34112 M BA34122 M
Dimensional Data
BA34106 M BA34112 M BA34118 M BA34122 M BA34128 M
A17” 23” 29” 33” 38”
B6” 12” 18” 22” 27”
C9.75” 15.75” 21.75” 25.75” 30.75”
Safety Precautions
INSTALLATION INSTRUCTIONS
Inspection
Unpack and inspect the reel for damage.
Turn the reel by hand to check for smooth
operation. Check for completeness.
WARNING-PREVENT STATIC
SPARKING: When working around flam-
mable liquids such as solvents, paints,
chemicals or petroleum products, ensure
that the hose reel, hose and the equipment
being serviced are properly grounded.
Use grounded hose(s) (static wire). Use
an ohmmeter to check continuity of the
ground circuit. Fire and/or explosion can
result if proper grounding is not achieved.
If reel is power or air driven, be careful of
chain/sprocket drive system. Keep hands
clear. Do not wear loose fitting cloth-
ing. Pull hose from the reel by grasping
the hose itself, not the control handle or
swivel.
Maximum Operating Temperature
Low pressure (300 PSI) = 150 °F (66 °C)
Medium pressure (3000 PSI) = 210 °F (99 °C)
High pressure (4800 PSI) = 210 °F (99 °C)
Mounting of All Hose Reels
NOTE: Ensure that mounting surface is
flat to prevent binding on reel after it is
mounted.
1. Two 1/2” diameter mounting holes are
located at the base of each side
support panel (2 each). Mount reel
using four (customer supplied) bolts;
tightening them securely to ensure a
solid, rigid attachment.
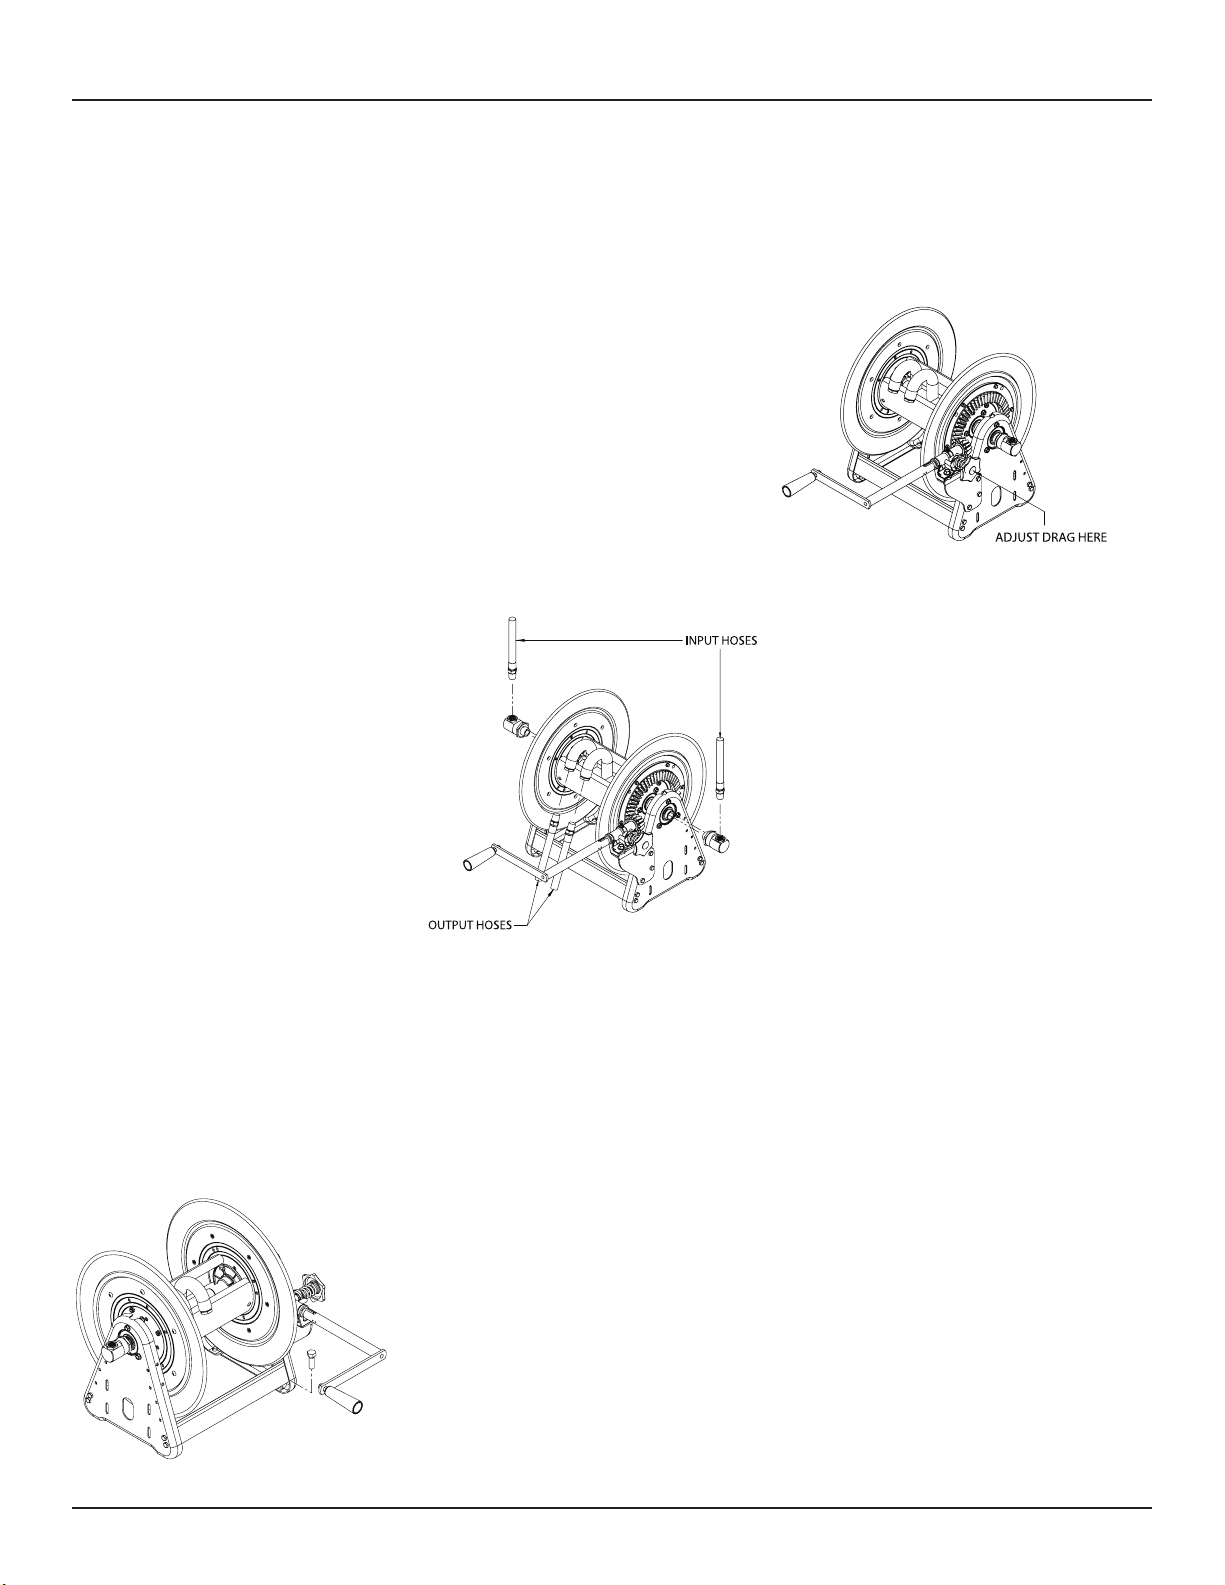
Installing the Input Hose(s)
WARNING: Ensure that supply line pres-
sure does not exceed maximum working
pressure rating of reel. Apply pipe thread
sealant where applicable to all threads on
standard reels. Do not over-tighten con-
nection.
CAUTION: A flexible hose connection
must be used to compensate for any off-
set between the supply line and the reel
swivel. Do not use rigid plumbing.
1. Apply thread sealant as directed and
connect swivels to main shaft inputs
on opposite sides of the reel.
2. Connect customer supplied supply
line hose to swivel input as indicated
in illustration.
Installing the Output Hose(s)
WARNING: Ensure that supply line pres-
sure does not exceed maximum working
pressure rating of reel.
CAUTION: Apply pipe thread sealant
where applicable to all threads on standard
reels. Do not over-tighten connection.
1. Connect output hoses to goosenecks
paying special attention to which
gooseneck should be used depending
on application. The left inlet is con-
nected to the left gooseneck and the
right inlet to the right gooseneck.
2. Charge hoses. Momentarily open
control valve to purge hose of gases.
When fluid appears at control valve,
close valve. With hose fully charged,
wind output hoses onto reel.
ADJUSTMENT PROCEDURES
Adjusting the reel
1. Adjust reel drag by loosening or
tightening the knob on the side of the
hand rewind assembly.
SERVICE INSTRUCTIONS
User servicing of the reel is limited to
replacing input/output hoses only. Refer
all other repairs to an authorized service
person or directly to Reelcraft. Failure to
do so can result in personal injury and/
or equipment damage and may void the
warranty.
WARNING: Bleed pressure from system
before servicing reel.
1. Replace hoses in accordance with
procedures given in “Installation In-
structions” section of this manual.
2. All mating moving parts have been
factory lubricated as required.
Series BA34000 M Hand Crank Reels
Page 2 www.reelcraft.com
Series BA34000 M Hand Crank Reels
www.reelcraft.com Page 3
ITEM DESCRIPTION QTY. BA34106 M BA34112 M BA34118 M BA34122 M BA34128 M
1 TIE ROD 4 260402-100 260402-200 260402-300 260402-400 260402-500
2 CROSS BRACE 2 261501-1 261501-2 261501-3 261501-4 261501-5
3 LOCK NUT 11 300107 300107 300107 300107 300107
4 HUB & BUSHING ASSEMBLY 2 S600640 S600640 S600640 S600640 S600640
5 SELF TAPPING SCREW 12 S317-31 S317-31 S317-31 S317-31 S317-31
6 MACHINE SCREW 8 S2-51 S2-51 S2-51 S2-51 S2-51
7 SWIVEL ASSEMBLY 2 S602026 S602026 S602026 S602026 S602026
8 SIDE FRAME 2 260403 260403 260403 260403 260403
9 NYLOC NUT 8 S85-7 S85-7 S85-7 S85-7 S85-7
10 SPOOL FLANGE 2 S260399-3 S260399-3 S260399-3 S260399-3 S260399-3
11 SET SCREW 1 300006 300006 300006 300006 300006
12 SHAFT ASSEMBLY 1 600189-1 600189-1 600189-3 600189-4 600189-5
13 SNAP RING 4 300007 300007 300007 300007 300007
14 CAP SCREW 6 S27-108 S27-108 S27-108 S27-108 S27-108
15 CRANK HANDLE 1 S390838-10-35 S390838-10-35 S390838-10-35 S390838-10-35 S390838-10-35
16 HEX FLANGE NUT 2 S281-6 S281-6 S281-6 S281-6 S281-6
17 CRANK SUPPORT 1 262344-35 262344-35 262344-35 262344-35 262344-35
18 MACHINE SCREW 3 S2-52 S2-52 S2-52 S2-52 S2-52
19 HAND REWIND ASSEMBLY 1 S390843-2-ANZ S390843-2-ANZ S390843-2-ANZ S390843-2-ANZ S390843-2-ANZ
20 MACHINE SCREW 2 S44-6 S44-6 S44-6 S44-6 S44-6
21 HEX FLANGE NUT 6 S79-3 S79-3 S79-3 S79-3 S79-3
22 CROWN GEAR 1 S323058M-ANZ S323058M-ANZ S323058M-ANZ S323058M-ANZ S323058M-ANZ
23 SPOOL SPACER 1 260401-1 260401-2 S260401-3 260401-4 260401-5
24 COLLAR 2 602688 602688 602688 602688 602688

This manual suits for next models

5

Other ReelCraft Cables And Connectors manuals

ReelCraft LG3065 123 9Q User manual

ReelCraft

ReelCraft LG3065 123 9Q User manual

ReelCraft 5000 Series User manual

ReelCraft

ReelCraft 5000 Series User manual

ReelCraft LG3040 123 9 User manual

ReelCraft

ReelCraft LG3040 123 9 User manual

ReelCraft 7000 Series User manual

ReelCraft

ReelCraft 7000 Series User manual

ReelCraft SGA3650 OLP Use and care manual

ReelCraft

ReelCraft SGA3650 OLP Use and care manual

Popular Cables And Connectors manuals by other brands

IPEX ISH instruction manual

IPEX

IPEX ISH instruction manual

Staubli MA213-05 Assembly instructions

Staubli

Staubli MA213-05 Assembly instructions

Euvision Split 16 4x4 Service notes

Euvision

Euvision Split 16 4x4 Service notes

AMX HPX-600 installation guide

AMX

AMX HPX-600 installation guide

Omron XN2 manual

Omron

Omron XN2 manual

Staubli CombiTac Assembly instructions

Staubli

Staubli CombiTac Assembly instructions

tellur green TLL155501 user manual

tellur green

tellur green TLL155501 user manual

KS Tools efuturo Mode 3 operating instructions

KS Tools

KS Tools efuturo Mode 3 operating instructions

Philips SWA2523T Specifications

Philips

Philips SWA2523T Specifications

Russound SA-ZX3 - DIAGRAM Update

Russound

Russound SA-ZX3 - DIAGRAM Update

Kyocera 5861 Series instruction manual

Kyocera

Kyocera 5861 Series instruction manual

SCHURTER 4795 Series Assembly instruction

SCHURTER

SCHURTER 4795 Series Assembly instruction

OUNEVA VC02-0005 installation guide

OUNEVA

OUNEVA VC02-0005 installation guide

Marmitek Split 412 user manual

Marmitek

Marmitek Split 412 user manual

Tripp Lite 352-01M Specification sheet

Tripp Lite

Tripp Lite 352-01M Specification sheet

TE Connectivity SolderSleeve CWT Series Installation procedures

TE Connectivity

TE Connectivity SolderSleeve CWT Series Installation procedures

Cairn TWINCAM quick start

Cairn

Cairn TWINCAM quick start

Siemens SIVACON 8PS BD01 installation instructions

Siemens

Siemens SIVACON 8PS BD01 installation instructions

manuals.online logo
manuals.online logoBrands
  • About & Mission
  • Contact us
  • Privacy Policy
  • Terms and Conditions

Copyright 2025 Manuals.Online. All Rights Reserved.