REGEN-i BK-200S User manual

USER MANUAL
- Table of Contents -
1. Purposes of Use and Features---------------------------------------2page
2. Installation the products------------------------------------------------2page
3. Handling the Products--------------------------------------------------3page
4. Operation of products--------------------------------------------------3page
5. Maintenance of products ---------------------------------------------9page
6. Troubleshooting----------------------------------------------------------9page
7. Product Warranty-------------------------------------------------------10page
8. Product Specifications-------------------------------------------------11page
Thank you so much for purchasing the product of Regen-i.
Our company has always been dedicated to customer
satisfaction.
This user instruction and manual describes the functions of your
purchased product and instructions and precautions for handling
and using the product. All users of this product must read and
understand the contents of this user instruction and manual
before using and/or handling the product.
Smartphone Rework System
MODEL: BK-200S
www.regeni.com -1-

1. Purposes of Use and Features
1) Purpose of Use
This product is manufactured with purpose of replacement SMD part
for Smartphone PCB and Small PCB under 200 mm(W*D) size.
2) Features
①This Rework system’s simple design delivers highly user
friendly operability.
②This is available adjustment in 3 Steps for Temperature and
Time.
③This is easy PCB mounting by magnetic fixing block.
④This is simple PCB relocation by applying sliding way for
Nozzle movement.
⑤It is possible to realize temperature graph that cannot be
implemented in hot gun.
2. Installation of products
1) This products is designed operate in a rated voltage. Ensure that
provided electricity before installing the products.
2) Install the products on a solid and flat surface.
3) Ensure that there are clearances of at least 10 cm between all
sides of the products and the environment.
4) Avoid heat sources or direct sunlight.
3. Handling the products
1) Do not touch the power cord and other electrical components with
wet hands.
2) Be sure to wear heat-resistant gloves for operation because it is a
heating device.
3) When the nozzle is replaced, please make sure to wear heat-
resistant gloves requisitely in case equipment’s temperature is 30
degrees or less.
4) Do not turn off while heating.
4. Operation of the products
1) Nozzle installation
①Upper Nozzle(Magnetic)
Install tightly so that there is no gap in the heat outlet of the
upper heater.
②Lower Nozzle(Magnetic)
Install tightly so that there is no gap in the heat outlet of the
lower heater.
2) PCB Mounting
①Slide the upper heater backward to the end.
②Match the center of the workpiece to the center of the lower heater
by using 6 kinds of magnetic PCB fixing blocks.
www.regeni.com -2-
www.regeni.com -3-

3) Control Panel
①Program number is displayed for current applied program
(Program number: 1~5(Pre-programed) / 6~9(User’s set up)
②At standby, the upper and lower parts are cross-lighting. When the
upper lighting, the current temperature of the upper heater is
displayed. When the bottom lighting, the current temperature of the
bottom heater is displayed.
③Program value division for user using program number from 6 to 9.
④Current temperature display by stages
⑤Remaining time display by stages
⑥Power switch
⑦Selecting program (#1~5: pre-programed by factory, 6~9: available
by user’s set up)
⑧To change the temperature, time and airflow settings of user’s set
up only for program number 6~9
⑨Button to increase numerical value
(When heating in the third step, remaining time can be extended by
30 second per one pressing)
⑩Button to decrease numerical value
⑪Start and Stop for operation.
4) Initial Setting Program
①Graph
②Default value(Factory setting)
Prog.
Sort
Step1
Step2
Step3
Applied parts
1
Temperature
100
180
230
E.T.C
Holding time
30
50
50
2
Temperature
110
190
240
MIC, IF
Holding time
30
50
50
3
Temperature
120
200
250
IF, BAT CON
Holding time
30
50
50
4
Temperature
130
210
260
IC, POP,
MEMORY
Holding time
30
50
50
5
Temperature
140
220
270
E.T.C
Holding time
30
50
50
6~9
Temperature
TEMP.1
TEMP.2
TEMP.3
User setting
Holding time
TIME 1
TIME 2
TIME 3
User setting
www.regeni.com -4-
www.regeni.com -5-

5) Change of Program setting (Program number 6 to 9)
Select the program number that you want to change by ⑦PROGRAM
button on control panel and press the ⑧SET button to enter set value
change mode. Temperature can be set up to 300 degrees in Celsius
and time can be maximum 120 seconds.
①UPPER and S1 lamp are turned on and Temp Screen Blinks.
Set temperature of STEP1 by UP / DOWN button and press "SET"
button. Then, TIME on display is blinking and change time of
STEP1 in same way.
②Change temperature and time of STEP2 and STEP3 of the upper
heater sequentially
③Upper air volume can be adjusted by 1 ~ 3 steps.
④Change the lower heater setting in the same way as the upper
heater setting.
www.regeni.com -6-
www.regeni.com -7-

6) Start and Stop for Heating
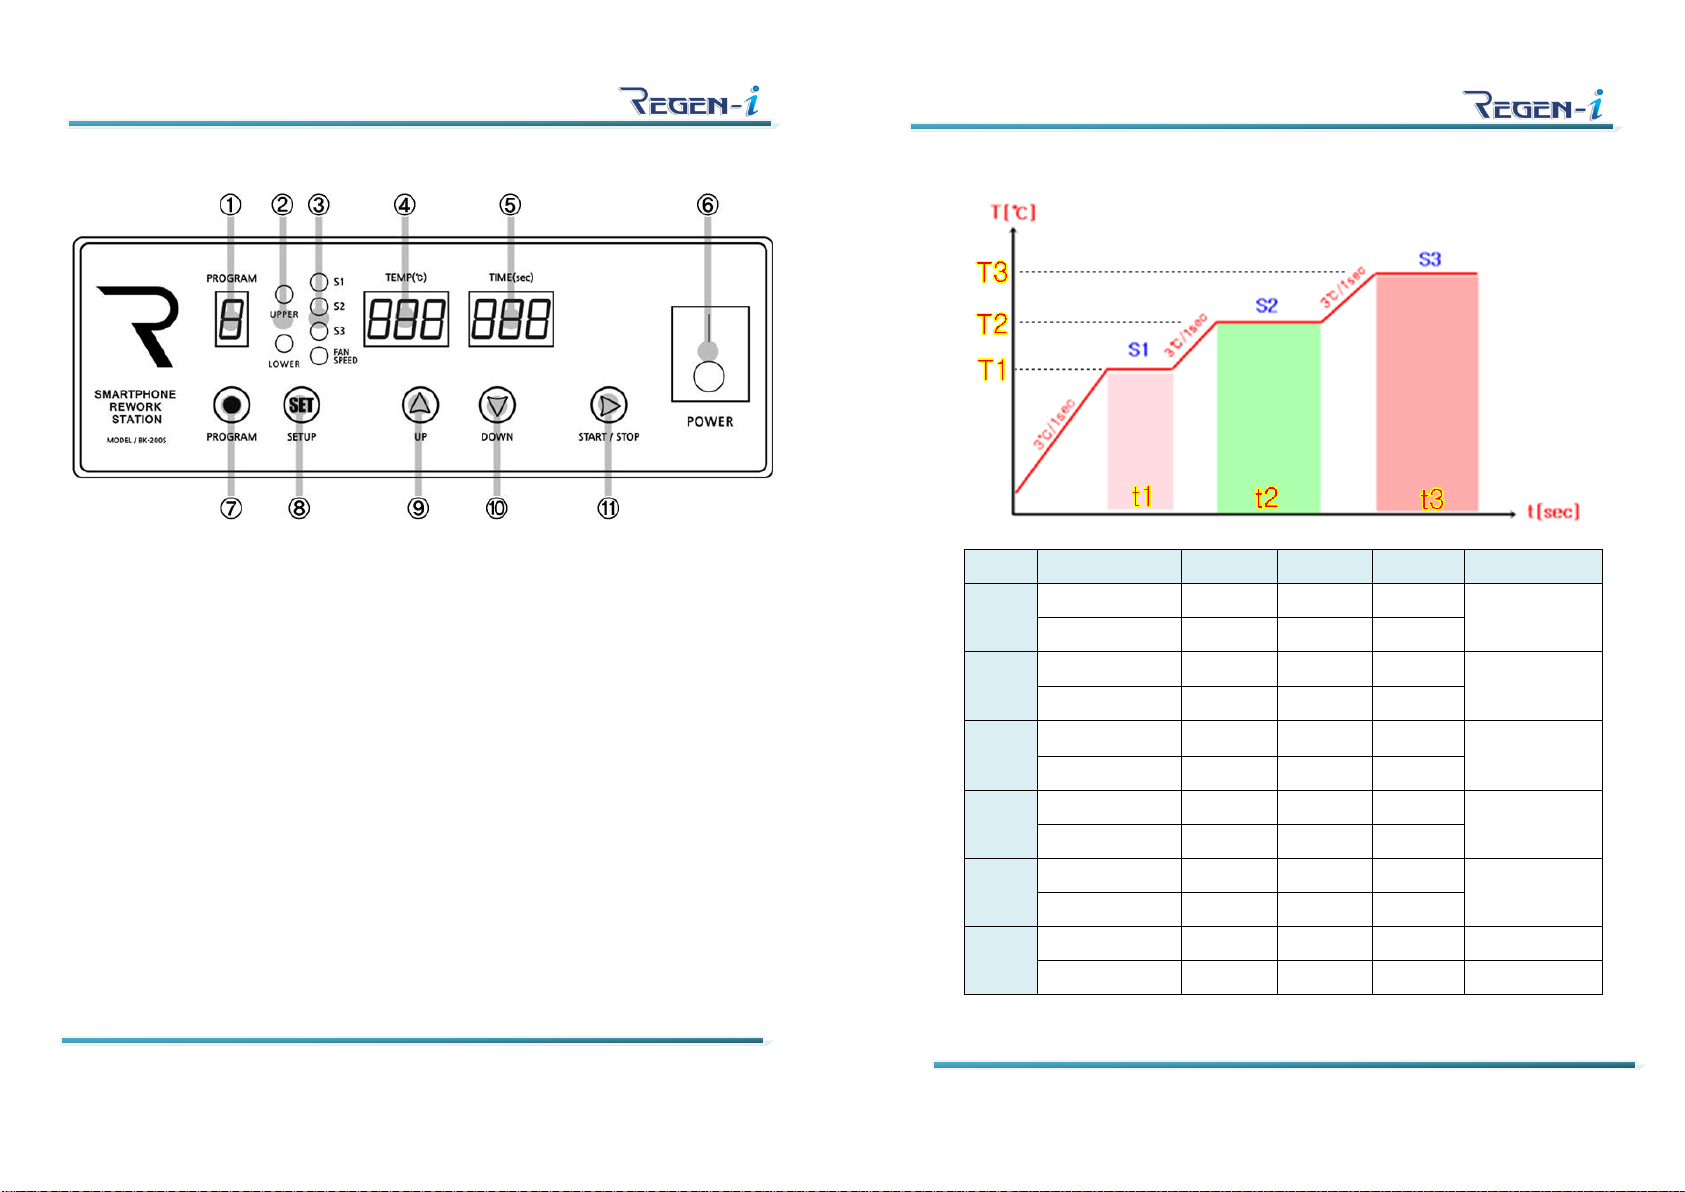
①Heating Start: Heating is started based on the selected program.
From the current temperature to the set temperature of STEP1,
temperature is increased at 3 degree per second. When set
temperature is reached, the temperature is maintained for a period
of time of setting values. After that, heating is carried out according
to the set values of STEP2 and STEP3.
②Extension time: Each time the "UP" button is pressed once in
STEP3, the heating holding time can be further extended by 30
seconds.
③Stop: When you press the Stop button to terminate the heating
operation, upper and lower heater will cool down to 40 degree. After
that, cooling function will stop and the system will switch to standby
mode.
④Restart: When you resume the heating operation after pressing
program stop button, the heating does not proceed at temperature
higher than 80 degree even if start button is pressed. As the
temperature drops to 80 degrees or less, the heating operation can
proceed.
⑤Heating Pause of Upper heater: In order to stop the heating of the
upper heater during operation, if the upper heater is pushed back
about 4 cm, a physical weak jam is confirmed and its power is cut
off. The fans will continue to operate and "UP" and "OFF" will
illuminate on the temperature display. At this time, the program in
progress is continued, and when the upper heater is pulled forward
again, the pause function is canceled and the Upper heater begins
to rise to the temperature of the current ongoing stage.
5. Maintenance of the products
1) Unplug the power cable when the product is cleaned.
2) Use dry cloths when the product is cleaned.
3) Do not store flammable materials near equipment as this is a heating
device.
4) Tearing down of the products is strictly prohibited. We will not be
held responsible for malfunctions caused by disassembly.
5) When the product is not in use for prolonged period of time, remove
the power plug from electrical outlet and store in a dry place.
6. Troubleshooting
1) When the product does not turn on
①When smoke is emitted from the upper heater or the lower heater
during operation. Power off immediately and ask for A/S
consultation.
②Check the power supply.
③Make sure if the upper heater is pushed backward.
(At the start of heating, the upper heater must be fully pulled to
the front.)
④Check if it is not a power failure.
2) When temperature does not rise.
①Check if the temperature rises during heating.
②Make sure if the upper heater is pushed backward.
(At the start of heating, the upper heater must be fully pulled to
the front.)
③Check the operation statues of heater.
3) Error message
During malfunction, three times of buzzer sound, “beep” and error
message will be displayed as below.
①"UP" "th": Defective thermal sensor of Upper heater
②"LO" "th": Defective thermal sensor of Lower heater
③"U-H" "OFF": Improper temperature rise of Upper heater
④"L-H" "OFF": Improper temperature rise of Lower heater
www.regeni.com -8-
www.regeni.com -9-

7. Product Warranty
1) General Terms
①The term of warranty for product failures due to manufacturing
defects expires in 1 year from the date of purchase.
②You can receive quicker and more precise service if the followings
are forwarded to us along with your warranty claim.
③Heater parts are consumable parts and warranty period is 3 months.
2) Warranty Period
①Within Warranty Period:
Parts will be provided free of charge only if defective parts are
confirmed. Extra Cost of transportation and custom clearance to
concerned address in your country shall be borne by you.
②After Warranty Period:
After confirming the defective parts, all expense including new parts,
transportation and custom shall be borne by you.
3) Warranty Exception
In the following cases, it will be subject to No Free Repair within the
warranty period.
8. PRODUCT SPECIFICATIONS
Product Name
Smartphone Rework System
Model
BK-200S
Power
AC 200~240V 50/60Hz
Max Watts
1600 [W]
Max Current
7 [A]
Size
(L)380mm x (W)230mm x (H)260mm
Weight
7kg
Country of Origin
MADE IN KOREA
Manufacturer: REGEN-I, INC.
Address: #1109, Daeryung Technotown 6, 648, Seobu saet-gil,
Geumcheon-gu, Seoul, Korea 08504
Tel : 02-866-7285 , Fax : 02-866-7285
Website : www.regeni.com
E-Shop : www.best-korea.com
Date of Purchase a Product (label picture):
Failure or Trouble symptoms :
Using environment of product:
Improper operator's use, handling, storage, etc.
Unauthorized use, alteration and repair
Failure due to disasters such as fire, flood, abnormal
voltage
Breakdown due to not following user manual
www.regeni.com -7-
www.regeni.com -7-
www.regeni.com -11-
www.regeni.com -10-
Table of contents
Other REGEN-i Rework Station manuals