www.reggiani.net 010
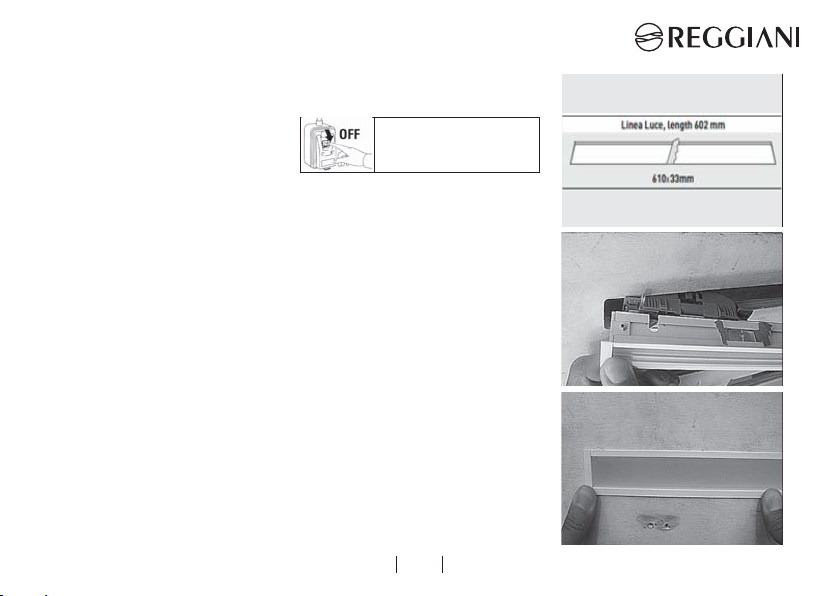
LINEA LUCE SLIM | ITA |
amministrative, il cui ammontare è stabilito a
norma di legge.
N.B. Il ritiro gratuito di un apparecchio di il-
luminazione può essere rifiutato nel caso
in cui vi sia un rischio di contaminazione del
personale incaricato della raccolta o nel caso
in cui risulta evidente che l’apparecchiatura in
questione non contiene i suoi componenti es-
senziali o contiene rifiuti diversi dai RAEE o nel
caso in cui il peso dell’apparecchiatura ritirata
sia superiore al doppio del peso dell’apparec-
chiatura nuova acquistata.
In queste circostanze lo smaltimento è a cari-
co del detentore che conferisce.
RAEE n° IT08010000000055E
La Direttiva Europea 2012/19/
UE dispone che gli apparecchi di
illuminazione sono per definizione
degli RAEE (Rifiuti di Apparecchiatu-
re Elettriche ed Elettroniche) e, per
quanto tali, non possono essere assimilati a
rifiuti solidi urbani.
Perciò, al termine del loro ciclo di vita, gli
RAEE devono essere correttamente trattati
e smaltiti perché potenzialmente pericolosi
sia per l’ambiente e sia per la salute umana
a causa della presenza di sostanze pericolose
nei componenti elettrici ed elettronici.
Pertanto è fatto obbligo all’utilizzatore di
consegnare gli apparecchi di illuminazione
usati al Distributore, a fronte dell’acquisto di
un’equivalente apparecchio nuovo, o esclu-
sivamente per il territorio italiano diretta-
mente al Consorzio per lo smaltimento degli
Apparecchi di Illuminazione –Ecolight- come
delegato dalla Reggiani S.p.A. Illuminazione,
che si incaricheranno del ritiro gratuito e o e
del conferimento presso i centri di raccolta
specializzati, opportunamente costituiti dalle
Amministrazioni Pubbliche atti al recupero,
trattamento e smaltimento dei RAEE.
Le lampade, se smaltite con l’apparecchio,
non devono essere frantumate perché con-
tengono sostanze altamente inquinanti per
l’ambiente.
Lo smaltimento abusivo o inadeguato di detti
rifiuti comporterà sanzioni economiche e/o