Reggiani HAKO User manual

HAKO
GUIDA ALL’ INSTALLAZIONE
INSTALLATION GUIDE
MONTAGEANWEISUNGEN
GUIDE D’INSTALLATION
INSTRUCCIONES PARA LA INSTALACIÓN
РУКОВОДСТВО ПО УСТАНОВКЕ
ITA 003
ENG 009
DEU 015
FRA 021
ESP 027
RUS 033


www.reggiani.net 03
HAKO | ITA |
CARATTERISTICHE GENERALI
La linea di prodotto HAKO è composta da
proiettori orientabili da binario.
Per maggiori informazioni tecniche sul
prodotto (dati fotometrici, elettrici, dimen-
sionali, peso, certificazioni,…) consultare il
catalogo o accedere alla scheda tecnica sul
sito web: www.reggiani.net/codice
ISTRUZIONI DI MONTAGGIO
AVVERTENZE
Prima di montare il proiettore, leggere
attentamente le presenti istruzioni per
garantire un funzionamento corretto e
sicuro. Le istruzioni debbono essere con-
servate con cura per ogni futura consul-
tazione, per eventuali problemi contattare
il fornitore. Il proiettore non deve essere
modifi cato. Qualsiasi modifi ca fa decade-
re la garanzia di conformità alle norme e
direttive vigenti e può rendere pericoloso il
proiettore stesso.
La Reggiani s.p.a. Illuminazione declina
ogni responsabilità per i danni causati da
un proprio proiettore montato in modo non
conforme alle seguenti istruzioni.
L’installazione del proiettore deve essere
eseguito a regola d’arte.
Prima di collegare il proiettore, accertarsi
che la tensione di rete corrisponda a quel-
la indicata sulla marcatura del proiettore.
L’impianto elettrico a cui è collegato il
proiettore dovrà essere realizzato in con-
formità alle leggi vigenti.
Per garantire la sicurezza i componenti
che dovessero danneggiarsi durante il fun-
zionamento devono essere sostituiti con
componenti analoghi prima del riutilizzo
del proiettore.
La distanza minima del proiettore dal sog-
getto illuminato deve essere 0.5mt per le
sorgenti a LED e 0.8mt per le sorgenti ALO-
GENURI. Mai coprire il proiettore durante
l’impiego. Per la pulizia dei vetri si racco-
manda di non usare mai abrasivi o solventi.
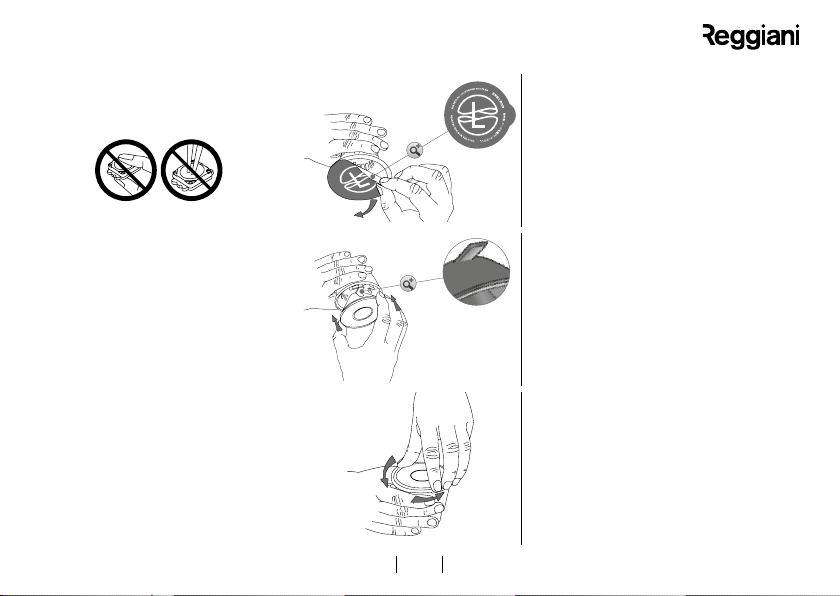
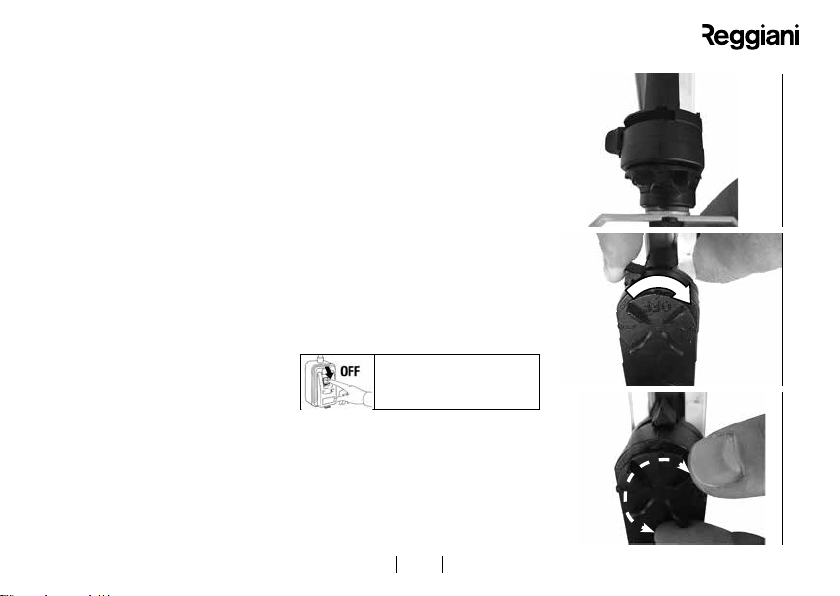
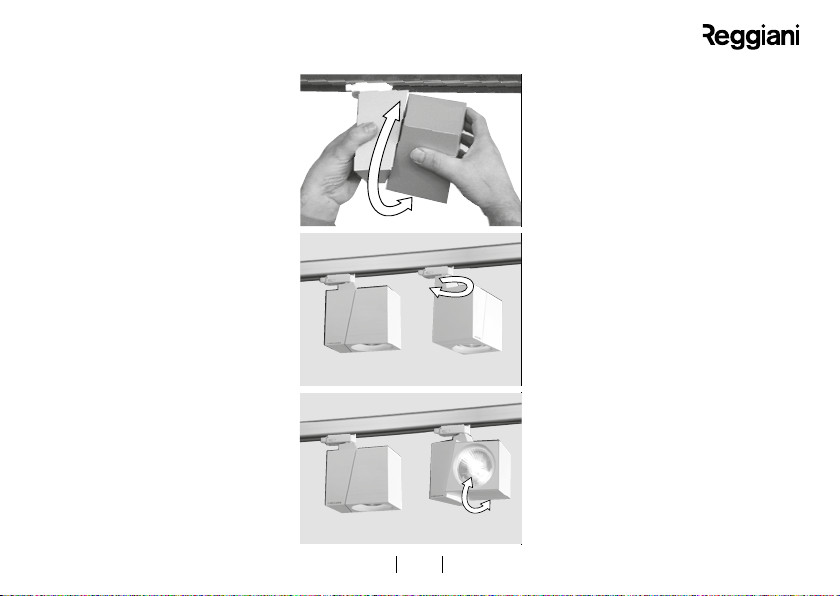
PREDISPOSIZIONE E
MONTAGGIO APPARECCHI
Per procedere al montaggio
del proiettore disinserire la
tensione di rete e seguire le
istruzioni sotto riportate.
La famiglia HAKO è composta da proiettori
già pronti al montaggio sui binari elettri-
ficati trifase Reggiani, esclusivamente a
plafone.
Per innestare l’adattatore al binario trifase
Reggiani: fare attenzione al verso d’inse-
rimento dell’adattatore fig.1 A; ruotare la
leva di blocco fig.1 B; selezionare la fase
1-2-3, in funzione della linea di alimenta-
zione prescelta fig.1 C.
1
A
ONOFF
1
B
1
2
3
1
C

www.reggiani.net 04
HAKO | ITA |
Definito il verso di montaggio dell’adatta-
tore, conseguentemente è definito il verso
di montaggio dell’apparecchio. A questo
punto si può procedere all’installazione
del HAKO a binario perchè l’adattatore ha
anche la funzione di supporto meccanico.
ORIENTAMENTO VANO OTTICO
Per l’orientamento del vano ottico si con-
siglia di utilizzare entrambe le mani, con
una tenere il braccetto e con l’altra orien-
tare l’ottica (fig.2).
Il proiettore è estremamente flessibile
consentendo la regolazione di 356° sull’as-
se orizzontale (fig.3 A), e +/- 140° sull’as-
se verticale (fig.3 B).
2
3
A
3
B
356°
+/-140°

www.reggiani.net 05
HAKO | ITA |
4
A
4
B
4
C
INSERIMENTO / CAMBIO
RIFLETTORI E SORGENTI
LUMINOSE
Per l’HAKO sono previste 2 tipi di sorgenti
luminose: a LED e ad alogenuri metallici.
Per maggiori chiarimenti sulle sorgenti
consultare il catalogo o accedere alla
scheda tecnica sul sito web: www.
reggiani.net/codice.
Terminata l’installazione del proiettore
e prima di dare tensione all’impianto
procedere all’inserimento o il cambio di
riflettore e sorgente luminosa.
Disinserire la tensione di rete
e seguire le istruzioni sotto
riportate.
• Per le sorgenti luminose ad Alogenuri
metallici MT G8,5 da 20/35/70W:
A Rimuovere il riflettore ruotandolo in
senso antiorario (fig.4);
B Inserire/sostituire la lampada (con
una di pari potenza dell’alimentatore
abbinato, vedi etichetta);
C Riagganciare correttamente il riflettore
ruotandolo in senso orario;
N.B. verificare sempre l’integrità del
vetro di protezione e il perfetto aggancio
alla ghiera
Avvertenza:
con lampada a fine vita, ovvero, al
decadimento del flusso luminoso, è
doverosa la sostituzione della lampada
stessa per prevenire gravi danni al gruppo
d’alimentazione.

www.reggiani.net 06
HAKO | ITA |
R
I
M
U
O
V
E
R
E
D
O
P
O
L
’
I
N
S
T
A
L
L
A
Z
I
O
N
E
R
E
M
O
V
E
A
F
T
E
R
I
N
S
T
A
L
L
A
T
I
O
N
O
T
E
R
A
P
R
E
S
L
’
I
N
S
T
A
L
L
A
T
I
O
N
P
A
R
A
Q
U
I
T
A
R
D
E
S
P
U
É
S
D
E
L
A
I
N
S
T
A
L
A
C
I
Ó
N
5
A
5
B
5
C
• Per le sorgenti luminose a LED:
I proiettori sono forniti con il LED già montato.
Rimuovere la pellicola di protezione blu,
prima dell’accensione del LED (fig.5 A).
Evitare di toccare il LED in particolare con
oggetti accuminati che possono danneggia-
re le connessioni interne.
L’innesto a baionetta del riflettore (fig.5 B)
(prevista per la maggior parte dei prodotti
con LED) permette di variare il fascio di
luce da stretto a largo e Mira-wall-washer
(consultare il catalogo o accedere alla
scheda tecnica sul sito web: www.reggiani.
net/codice per l’accessorio corrispondente
desiderato).
Disporre le alette di aggancio nel vano
ottico, premere e ruotare il riflettore in
senso orario fino all’aggancio (fig.5 C).
I riflettori Mira-wall-washer consentono un
ulteriore orientamento del fascio ellittico
ruotando lo schermo.
Per i proiettori a LED non è previsto il cam-
bio del dispositivo di illuminazione.
Qualora si presentassero malfunzionamen-
ti rivolgersi alla Reggiani Spa Illuminazione
per la sostituzione dell’apparecchio.

www.reggiani.net 07
HAKO | ITA |
NOTE GENERALI
Per le sorgenti luminose ad Alogenuri Metallici
Norme europee CEI EN 60598-2-5, CEI EN 60598-1, CEI EN 60598-2-1, CEI EN 60598-2-2.
Direttive Comunitarie BT 73/23, EMC 89/336 e CEE 93/68. • 2006/95/CE (bassa tensione) • 2004/108/CE (EMC)
• 2009/125/CE (Ecodesign) • 2002/96/CE (RAEE) • 2011/65/CE (RoHS)
IP20 Grado di protezione.
Montaggio diretto su superfici normalmente infiammabili.
Messa a terra.
0,xm Distanza minima dall’oggetto illuminato.
Sostituire gli schermi di protezione se danneggiati. È vietata l’accensione degli apparecchi privi
degli schermi previsti. Utilizzare esclusivamente ricambi originali Reggiani.
UV
stop Utilizzare esclusivamente lampade UV-Stop.
Per le sorgenti luminose a LED
IP20 Grado di protezione.
Montaggio diretto su superfici normalmente infiammabili.
Apparecchi in Classe II.

www.reggiani.net 08
HAKO | ITA |
Lo smaltimento abusivo o inadeguato di
detti rifiuti comporterà sanzioni economi-
che e/o amministrative, il cui ammontare
è stabilito a norma di legge.
N.B. Il ritiro gratuito di un apparecchio di
illuminazione può essere rifiutato nel caso
in cui vi sia un rischio di contaminazione
del personale incaricato della raccolta o
nel caso in cui risulta evidente che l’ap-
parecchiatura in questione non contiene
i suoi componenti essenziali o contiene
rifiuti diversi dai RAEE o nel caso in cui il
peso dell’apparecchiatura ritirata sia su-
periore al doppio del peso dell’apparec-
chiatura nuova acquistata.
In queste circostanze lo smaltimento è a
carico del detentore che conferisce.
RAEE n° IT08010000000055E
La Direttiva Europea 2012/19/UE
dispone che gli apparecchi di il-
luminazione sono per definizione
degli RAEE (Rifiuti di Apparec-
chiature Elettriche ed Elettroni-
che) e, per quanto tali, non possono essere
assimilati a rifiuti solidi urbani.
Perciò, al termine del loro ciclo di vita, gli
RAEE devono essere correttamente tratta-
ti e smaltiti perché potenzialmente perico-
losi sia per l’ambiente e sia per la salute
umana a causa della presenza di sostanze
pericolose nei componenti elettrici ed elet-
tronici.
Pertanto è fatto obbligo all’utilizzatore di
consegnare gli apparecchi di illuminazione
usati al Distributore , a fronte dell’acqui-
sto di un’equivalente apparecchio nuovo, o
esclusivamente per il territorio italiano di-
rettamente al Consorzio per lo smaltimen-
to degli Apparecchi di Illuminazione –Eco-
light- come delegato dalla Reggiani S.p.A.
Illuminazione, che si incaricheranno del
ritiro gratuito e o e del conferimento pres-
so i centri di raccolta specializzati, oppor-
tunamente costituiti dalle Amministrazioni
Pubbliche atti al recupero, trattamento e
smaltimento dei RAEE.
Le lampade, se smaltite con l’apparecchio,
non devono essere frantumate perché
contengono sostanze altamente inquinanti
per l’ambiente.

www.reggiani.net 09
HAKO | ENG |
GENERAL FEATURES
The HAKO product line is composed of
track mounted adjustable projectors.
For more technical information about the
product (photometric, electrical data, size,
weight, certification, accessories, etc.) refer
to the catalogue or see the product data-
sheet on the website:
www.reggiani.net/reference.
ASSEMBLY INSTRUCTIONS
WARNINGS
Before assembling the projector, carefully
read these instructions to make sure the
luminaire functions correctly and safely.
Keep the instructions in a safe place for fu-
ture consultation; contact your supplier for
any problems that may arise.
The projector must not be modified. Mod-
ifying the luminaire in any way invalidates
the guarantee of conformity with standards
and directives in force and it could make the
actual projector hazardous.
Reggiani SPA Illuminazione shall not be
held liable for any damage caused by one of
its projectors if not assembled in conformity
to the following instructions.
The projector must be installed in accord-
ance with the best working standards.
Before connecting the projector, make sure
the mains power supply corresponds to the
power indicated on the projector label.
The electrical installation the projector is
connected to must be wired in conformity to
the laws in force.
As a safety guarantee, any components
damaged while operating must be replaced
with the same components before the pro-
jector is used again.
The minimum distance between the projec-
tor and the lighted object must be 0.5 m for
LEDs and 0.8 m for METAL HALIDE LAMPS.
Never cover the projector during use.
Never use abrasives or solvents to clean
the glass.
PREPARATION AND
ASSEMBLY OF THE
PROJECTOR
To assemble the projector,
turn the electricity off at the
mains and follow the instruc-
tions below.
The HAKO family consists of projectors
ready for mounting on the Reggiani elec-
trified 3-circuit tracks, exclusively for ceil-
ing mounting.
To engage the adapter with the Reggiani
3-circuit track:
• observe the correct direction when in-
serting adapter fig.1 A ;
• turn locking lever fig.1 B ;
1
A
ONOFF
1
B
1
2
3
1
C

www.reggiani.net 010
HAKO | ENG |
• select circuit 1-2-3 in accordance with
the chosen power supply line fig.1 C .
Deciding on the mounting direction of the
adapter results in selection of the mount-
ing direction of the luminaire. At this point,
the track mounted HAKO luminaire
can be installed because the adapter also
acts as mechanical support.
ADJUSTMENT OF THE OPTICAL COM-
PARTMENT
Two hands should be used to orient the
optical compartment, holding the bracket
with one hand and adjusting the optical
compartment with the other (fig.2).
This projector is extremely fl exible and
can be adjusted through 356° on the
horizontal axis (fig.3 A) and by +/- 140° on
the vertical (fig.3 B).
2
3
A
3
B
356°
+/-140°

www.reggiani.net 011
HAKO | ENG |
4
A
4
B
4
C
INSTALLATION/
REPLACEMENT OF
REFLECTORS AND LIGHT
SOURCES
HAKO can be fi tted with two types of light
source: LEDs and metal halide lamps.
For more information about the light
sources, refer to the catalogue or see the
product datasheet on the website:
www.reggiani.net/reference.
After installation of the projector and
before powering the system, install or
replace the reflector and light source.
Turn the electricity off at the
mains and follow the instruc-
tions below.
• For metal halide lamps MT G8.5,
20/35/70W:
A Remove the reflector by turning it anti-
clockwise (fig.4);
B insert/replace the lamp (with one of
equal rating as the ballast, see rating
plate);
C re-engage the reflector correctly by
turning it clockwise.
N.B. Always check the safety glass for
intactness and for perfect fitting on the
locking ring
Warning:
when the lamp is dying – i.e. the luminous
flux is decreasing – it must be replaced to
prevent serious damage to the control gear.

www.reggiani.net 012
HAKO | ENG |
R
I
M
U
O
V
E
R
E
D
O
P
O
L
’
I
N
S
T
A
L
L
A
Z
I
O
N
E
R
E
M
O
V
E
A
F
T
E
R
I
N
S
T
A
L
L
A
T
I
O
N
O
T
E
R
A
P
R
E
S
L
’
I
N
S
T
A
L
L
A
T
I
O
N
P
A
R
A
Q
U
I
T
A
R
D
E
S
P
U
É
S
D
E
L
A
I
N
S
T
A
L
A
C
I
Ó
N
5
A
5
B
5
C
• For LEDs:
The projectors are supplied with the LED
already installed.
Remove the blue protective film before
switching on the LED (fig.5).
Do not touch the LED; in particular, avoid
the use of pointed tools which could oth-
erwise damage internal connections.
The reflector twist-lock fixing system
(present on most products equipped with
the LED) allows the adjustment of the
beam from narrow to wide or Wall Washer
Mira (refer to the catalogue or access the
product datasheet on the website:
www.reggiani.net/reference for the cor-
responding accessory).
Arrange the retainer tabs in the optical
compartment. Press and turn the reflec-
tor clockwise until it snaps into place.
The Wall Washer Mira reflectors enable
additional adjustment of the elliptical
beam by rotating the shield. There is no
provision for replacing the light source on
LED projectors. If any malfunction occurs,
contact Reggiani Spa Illuminazione to re-
place the luminare.

www.reggiani.net 013
HAKO | ENG |
GENERAL NOTES
For metal halide lamps
Conformity: European standards: EN 60598-1, EN 60598-2-1;
European directives: 2006/95/EC (LV), 2004/108/EC (EMC), 2009/125/EC (Ecodesign),
2002/96/EC (WEEE), 2011/65/EC (RoHS)
IP20 Degree of protection.
Direct mounting on normally flammable surfaces.
Earth ground.
0,xm Minimum distance from the object to be illuminated.
The safety shields must be replaced in case of damage. The luminaires must not be turned on without the
safety shields. Only use original Reggiani spare parts.
UV
stop Use UV-Stop lamps only.
For LEDs
IP20 Degree of protection.
Direct mounting on normally flammable surfaces.
Class II luminaires.

www.reggiani.net 014
HAKO | ENG |
established by the law.
N.B. The free collection of a luminaire may
be refused if there is a risk of contamina-
tion for the personnel performing the ser-
vice, if it is evident that the luminaire does
not contain the essential components or if
it contains waste other than WEEE, or if the
weight of the luminaire collected is more
than double the weight of the new lumi-
naire acquired.
In these circumstances, disposal is the re-
sponsibility of the holder.
The WEEE symbol is shown on the packag-
ing of each of our products.
WEEE n° IT08010000000055E
According to European Directive
2002/96/EC, luminaires are defi
ned as Waste Electrical and Elec-
tronic Equipment (WEEE) and as
such, they cannot be disposed of
as municipal solid waste.
At the end of their life cycle, they must
therefore be correctly treated and dis-
posed of as substances of concern for both
the environment and human health due to
the presence of hazardous substances in
the electrical and electronic components.
The user must therefore consign used
luminaires to the distributor when pur-
chasing an equivalent new luminaire or,
exclusively in the case of Italy, directly to
Ecolight, the Consortium for the Disposal
of Waste Electrical and Electronic Equip-
ment (Consorzio per lo Smaltimento degli
Apparecchi di Illuminazione), delegated
by Reggiani S.p.A. Illuminazione, who will
collect the equipment free of charge and
deliver it to the special collection facilities
set up by the local authorities to recover,
treat and dispose of WEEE.
If lamps are disposed of with the lumi-
naire, they must not be crushed because
they contain highly polluting substances
for the environment.
The illegal or inappropriate disposal of
said waste is punishable by economic and/
or administrative sanctions of the amount

www.reggiani.net 015
HAKO | DEU |
ALLGEMEINE
EIGENSCHAFTEN
Die Produktreihe HAKO besteht aus ver-
stellbaren Strahlern für Stromschienen-
montage.
Für weitere technische Informationen zum
Produkt (fotometrische, elektrische Daten,
Abmessungen, Gewicht, Zertifi zierungen,
Zubehör) wird auf den Katalog oder das auf
der Website verfügbare technische Daten-
blatt verwiesen:
www.reggiani.net/Art.-Nr.
MONTAGEANWEISUNGEN
HINWEISE
Diese Anweisungen vor der Montage der
Strahler aufmerksam lesen, um deren
einwandfreien und sicheren Betrieb zu ga-
rantieren.
Diese Anweisungen müssen zum späteren
Nachschlagen sorgfältig aufbewahrt wer-
den. Bei etwaigen Problemen den Lieferan-
ten kontaktieren.
Der Strahler darf nicht verändert werden.
Bei Änderungen erlischt die Gewährleis-
tung hinsichtlich der Konformität mit den
geltenden Rechtsvorschriften und Richtli-
nien, und zudem kann der Strahler zu einer
Gefahrenquelle werden.
Reggiani SPA Illuminazione haftet nicht für
Schaden, die auf unsachgemäß, nicht ent-
sprechend diesen Anweisungen montierte
Strahler zurückzuführen sind.
Der Strahler ist sachgemäß zu montieren.
Vor dem Anschluss des Strahlers sicher-
stellen, dass die Netzspannung den An-
gaben auf der Leuchtenkennzeichnung
entspricht.
Die Elektroanlage, an die der Strahler an-
geschlossen ist, muss gemäß den gelten-
den gesetzlichen Bestimmungen herge-
stellt sein.
Um die Sicherheit zu garantieren, sind
Komponenten, die während des Betriebs
beschädigt werden, vor der Wiederverwen-
dung des Strahlers durch gleichwertige
Komponenten zu ersetzen.
Der Strahler muss einen Mindestabstand
von 0,5 m (bei LED-Quellen) bzw. von 0,8 m
(bei HALONGEN-METALLDAMPFLAMPEN)
zum beleuchteten Gegenstand aufweisen.
Den Strahler während des Betriebs nie-
mals abdecken.
Für die Reinigung des Glases keine Lö-
sungsmittel oder scheuernden Reinigungs-
mittel verwenden.
1
A
ONOFF
1
B
1
2
3
1
C

www.reggiani.net 016
HAKO | DEU |
VORBEREITUNG UND
MONTAGE DES STRAHLERS
Zur Montage des Strahlers
die Netzspannung unterbre-
chen und die nachstehenden
Anweisungen befolgen.
Die Serie HAKO umfasst montagefertige
Deckenstrahler für die Montage an 3-Pha-
sen-Reggiani-Stromschienen.
• Die Einsatzrichtung des Adapters beach-
ten Abb.1 A .
• Den Arretierhebel drehen Abb.1 B .
• Die Phase (1-2-3) je nach ausgewählter
Versorgungsleitung auswählen Abb.1 C .
Mit der Festlegung der Montagerichtung
des Adapters wird auch die Montagerich-
tung der Leuchte bestimmt. Nun kann
HAKO an der Stromschiene montiert wer-
den, denn der Adapter dient auch als me-
chanische Halterung (Abb.3 A), (Abb.3 B).
VERSTELLUNG DER OPTISCHEN EINHEIT
Zum Verstellen der optischen Einheit am
besten beide Hände benutzen: Mit einer
Hand den Bügel festhalten, mit der ande-
ren die optische Einheit verstellen (Abb. 2).
Der Strahler ist äußerst fl exibel verstell-
bar und kann um 356° gedreht und um
+/- 140° geschwenkt werden.
2
3
A
3
B
356°
+/-140°

www.reggiani.net 017
HAKO | DEU |
4
A
4
B
4
C
EINSETZEN/AUSWECHSELN
DER REFLEKTOREN
UND LICHTQUELLEN
Für HAKO sind 2 Arten von Lichtquellen
vorgesehen: LED und Halogen-
Metalldampfl ampen. Für weitere
Informationen zu den Lichtquellen wird
auf den Katalog oder das auf der Website
verfügbare technische Datenblatt
verwiesen:
www.reggiani.net/Art.-Nr.
Nach der Montage des Strahlers und
bevor die Anlage mit Strom versorgt
wird, den Refl ektor und die Lichtquelle
einsetzen bzw. auswechseln.
Die Netzspannung unterbre-
chen und die nachstehenden
Anweisungen befolgen.
Für Halogen-Metalldampfl ampen MT
G8,5 zu 20/35/70W:
A A Den Reflektor gegen den
Uhrzeigersinn drehen und abnehmen.
(Abb. 4).
B Die Lampe einsetzen/auswechseln (zu
verwenden sind Lampen, deren Leistung
dem dazugehörigen Vorschaltgerät –
siehe Typenschild – entspricht).
C Den Wechselrefl ektor wieder korrekt
einsetzen und hierzu im Uhrzeigersinn
drehen.
BEACHTE: Stets sicherstellen, dass das
Schutzglas unbeschädigt und perfekt am
Haltering befestigt ist.
Hinweis:
Gegen Ende der Betriebsdauer der Lampe
bzw. bei Nachlassen des Lichtstroms muss
die Lampe ausgewechselt werden, um
schwere Schäden am Betriebsgerät zu ver-
meiden.

www.reggiani.net 018
HAKO | DEU |
• Für LED-Lichtquellen:
IBei der Lieferung sind die Strahler be-
reits mit einer LED-Lichtquelle bestückt.
Vor dem Einschalten der LED die blaue
Schutzfolie abziehen (fig.5).
Die LED nicht berühren. Dies gilt insbe-
sondere für die Berührung mit spitzen
Gegenständen, die die internen Anschlüs-
se beschädigen können.
Der Bajonettverschluss des Refl ektors
(mit dem die meisten Produkte mit LED
ausgestattet sind) ermöglicht die Ände-
rung des Ausstrahlwinkels von eng zu
breit und Wall Washer Mira (für das ent-
sprechende gewünschte Zubehör wird
auf den Katalog oder das auf der Website
www.reggiani.net/Art.-Nr. verfügbare
technische Datenblatt verwiesen).
Die Befestigungsfl ügel in die optische
Einheit einsetzen. Den Reflektor eindrü-
cken und im Uhrzeigersinn drehen, bis er
einrastet.
Die Wall-Washer-Mira Reflektoren er-
möglichen eine weitere Ausrichtung
des elliptischen Lichtkegels, indem die
Schutzabdeckung gedreht wird.
Bei den LED-Strahlern ist kein Austausch
der Lichtquelle vorgesehen. Bei Störun-
gen wenden Sie sich an Reggiani Spa Illu-
minazione, um die Leuchte ersetzen
zu lassen.
R
I
M
U
O
V
E
R
E
D
O
P
O
L
’
I
N
S
T
A
L
L
A
Z
I
O
N
E
R
E
M
O
V
E
A
F
T
E
R
I
N
S
T
A
L
L
A
T
I
O
N
O
T
E
R
A
P
R
E
S
L
’
I
N
S
T
A
L
L
A
T
I
O
N
P
A
R
A
Q
U
I
T
A
R
D
E
S
P
U
É
S
D
E
L
A
I
N
S
T
A
L
A
C
I
Ó
N
5
A
5
B
5
C

www.reggiani.net 019
HAKO | DEU |
ALLGEMEINE HINWEISE
Für Halogen-Metalldampfl ampen
Konformität: Europäische Normen EN 60598-1, EN 60598-2-1;
EG-Richtlinien 2006/95/EG (Niederspannung), 2004/108/EG (Elektromagnetische
Verträglichkeit), 2009/125/EG (Ökodesign), 2002/96/EG (WEEE), 2011/65/EG (RoHS)
IP20 Schutzart.
Direkte Montage auf normal brennbaren Oberfl ächen.
Erdung.
0,xm 0,8m Mindestabstand zum beleuchteten Objekt.
Sostituire gli schermi di protezione se danneggiati. È vietata l’accensione degli apparecchi privi
degli schermi previsti. Utilizzare esclusivamente ricambi originali Reggiani.
UV
stop Ausschließlich UV-STOP-Lampen verwenden.
Für LED-Lichtquellen
IP20 Schutzart.
Direkte Montage auf normal brennbaren Oberfl ächen.
Leuchten der Klasse II.

www.reggiani.net 020
HAKO | DEU |
Leuchte entsorgt, dürfen sie nicht zer-
brochen werden, da sie stark umweltver-
schmutzende Stoffe enthalten.
Eine gesetzwidrige oder nicht ordnungs-
gemäße Beseitigung dieser Altgeräte zieht
Geld- oder Verwaltungssanktionen nach
sich, deren Höhe gesetzlich festgelegt ist.
N.B. Die kostenlose Rücknahme einer
Leuchte kann abgelehnt werden, wenn die
Gefahr einer Kontaminierung des mit der
Rücknahme beauftragten Personals be-
steht, oder wenn es offensichtlich ist, dass
die Leuchten die wesentlichen Bauteile
nicht mehr enthalten bzw. andere Abfäl-
le als Elektro- und Elektronik- Altgeräte
enthalten oder dass sie mehr als das Dop-
pelte des Gewichts bei Neuerwerb besitzt.
In diesen Fällen obliegt die Beiseitigung
dem Nutzer.
Das Symbol zur WEEE-Kennzeichnung ist
an der Packung all unserer Produkte an-
gebracht.
WEEE n° IT08010000000055E
Die europäische Richtlinie
2002/96/EG schreibt vor, dass
Leuchten defi nitionsgemäß Elek-
tro- und Elektronik-Altgeräte
(WEEE) sind und als solche nicht
mit festen Siedlungsabfällen gleichgesetzt
werden können.
Diese Elektro- und Elektronik-Altgeräte
müssen am Ende ihrer Nutzungsdauer
ordnungsgemäß behandelt und beseitigt
werden, da sie aufgrund des Anteils an
gefährlichen Stoffen in elektrischen und
elektronischen Bauteilen sowohl für die
Umwelt als auch für die Gesundheit po-
tentiell gefährlich sind.
Daher ist der Nutzer verpfl ichtet, die ge-
brauchten Leuchten an den Vertreiber zu-
rückzugegeben, wenn er eine gleichwerti-
ge neue Leuchte erwirbt, bzw., in Italien,
direkt an den von Reggiani S.p.A. Illumi-
nazione beauftragten Verband Ecolight
(Consorzio per lo Smaltimento degli Ap-
parecchi di Illuminazione - Verband für die
Beseitigung von gebrauchten Leuchten),
der für die kostenlose Rücknahme
und die Zustellung an spezialisierte, ent-
sprechend von den öffentlichen Verwal-
tungen eingerichtete Rücknahmestellen
zuständig ist, die in der Lage sind, WEEE
zu verwerten, zu behandeln und zu besei-
tigen.
Werden die Lampen zusammen mit der
Table of contents
Languages:
Other Reggiani Lighting Equipment manuals
Popular Lighting Equipment manuals by other brands

IN HOUSE LED
IN HOUSE LED SISN-100-WW2-14.5W user manuel

Tomar
Tomar Scorpion 970L Operational & Programming Instructions

Lampo
Lampo PT5LEDMC Assembly instructions

ABB
ABB Stanilite Quickfit Standard installation manual

GRAU
GRAU Team Cowork Color Tune user manual

Metalumen
Metalumen Rail RM2D installation instructions