Regin EXIGO TOOL User manual

MANUAL
EXIGO TOOL
WE TAKE BUILDING
AUTOMATION PERSONALLY
© Copyright AB Regin, Sweden, 2019

DISCLAIMER
The information in this manual has been carefully checked and is believed to be correct. Regin however, makes no warranties as
regards the contents of this manual and users are requested to report errors and discrepancies to Regin, so that corrections may
be made in future editions. The information in this document is subject to change without prior notification.
The software described in this document is supplied under licence by Regin and may be used or copied only in accordance with
the terms of the licence.
COPYRIGHT
AB Regin. All rights reserved.
TRADEMARKS
Some product names mentioned in this document are used for identification purposes only and may be the registered trademarks
of their respective companies.
Revision B, May 2019
Exigo software revision: 4.1

Table of contents
CHAPTER 1 ABOUT THIS MANUAL .................................................................................................4
CHAPTER 2 INSTALLATION .............................................................................................................5
CHAPTER 3 ABOUT EXIGO TOOL .................................................................................................... 6
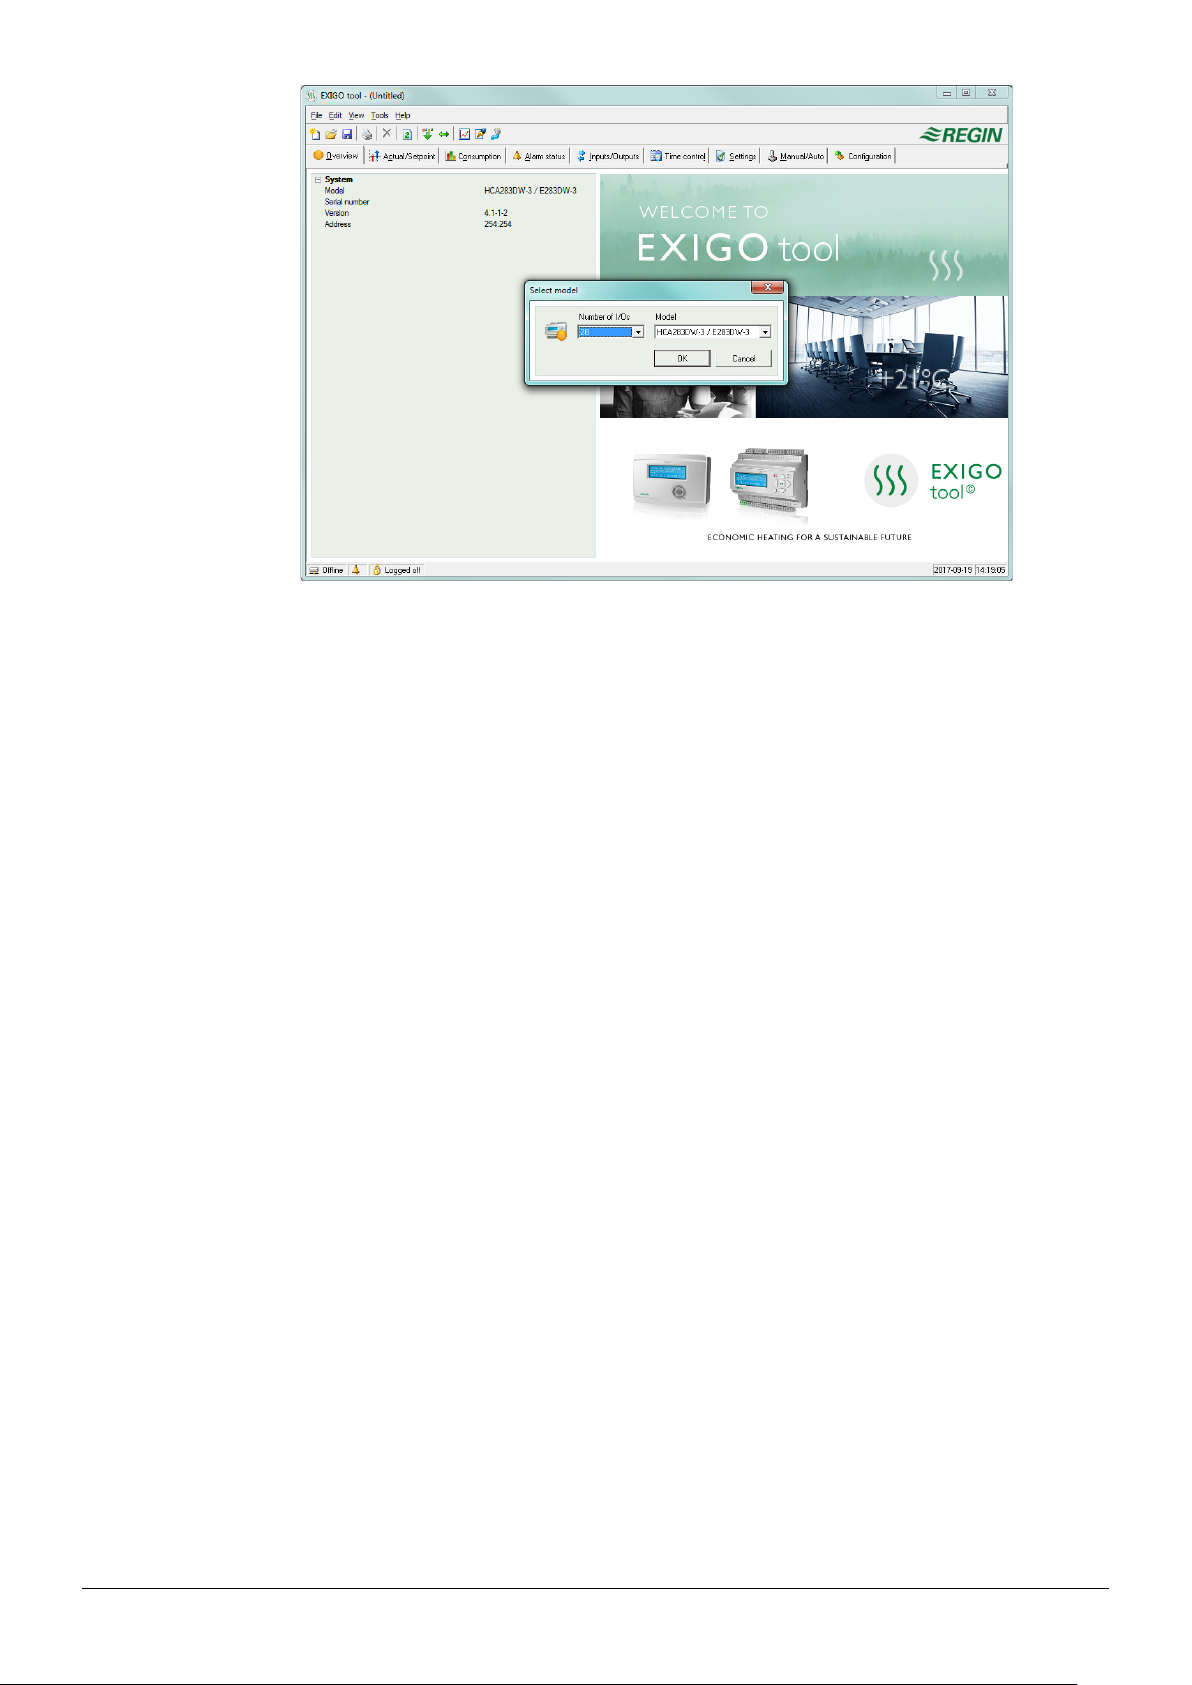
CHAPTER 4 STARTUP .....................................................................................................................7
CHAPTER 5 MENU BAR ..................................................................................................................9
5.1 File .........................................................................................................................................9
5.2 Edit.......................................................................................................................................10
5.3 View .....................................................................................................................................10
5.4 Tools ....................................................................................................................................11
5.5 Help......................................................................................................................................21
CHAPTER 6 TOOLBAR................................................................................................................... 22
CHAPTER 7 FOLDERS .................................................................................................................... 23
7.1 General ................................................................................................................................23
7.2 Overview..............................................................................................................................24
7.3 Actual / Setpoint..................................................................................................................24
7.4 Consumption .......................................................................................................................25
7.5 Alarm status.........................................................................................................................26
7.6 Inputs/Outputs ....................................................................................................................28
7.7 Time control.........................................................................................................................28
7.8 Settings ................................................................................................................................30
7.9 Manual / Auto......................................................................................................................31
7.10 Configuration .....................................................................................................................32
CHAPTER 8 EXPANSION UNITS..................................................................................................... 33
CHAPTER 9 TCP/IP – NETWORK TERMS........................................................................................ 34
9.1 Networks, subnets, routers .................................................................................................34
9.2 IP address, Subnet mask, Default Gateway, DNS server .....................................................34
9.3 DHCP, fixed and dynamic addresses....................................................................................35
9.4 White and black addresses ..................................................................................................35
9.5 Tunnels ................................................................................................................................36
CHAPTER 10 EXIGO WITH WEB INTERFACE .................................................................................. 37
10.1 Connection.........................................................................................................................37
10.2 Two or more Exigo behind the same router......................................................................37
10.3 Web server configuration ..................................................................................................39
CHAPTER 11 CLOUDIGO – A CLOUD SERVICE ............................................................................... 42

4 Chapter 1 About this manual Exigo tool manual©
Chapter 1 About this manual
This manual is designed to be an aid during installation and use of Exigo Tool. It describes all the
functions unique to the program. The Exigo control parameters however are not described here. For
detailed information on these, please see the Exigo manual.

Exigo tool manual Chapter 2 Installation 5
Chapter 2 Installation
To install and run Exigo Tool you need a PC running Windows 2000, Windows XP, Windows Vista,
Windows 7 or Windows 8, Windows 8.1 or Windows 10.
Communication with an Exigo requires a special communication cable, E-CABLE2-USB.
Exigo tool is a self-installing program that can be downloaded from Regin’s website
(www.regincontrols.com). Simply download the software and double-click the .exe file. Next, follow
the instructions provided by the installation program.

6 Chapter 3 About Exigo Tool Exigo tool manual
Chapter 3 About Exigo Tool
Exigo tool is a Windows-based PC program for configuration and maintenance of the Exigo series
controllers.
Exigo tool has not been designed with the intention of being a fully fledged SCADA program.
The display window is divided into several parts:
At the top, there is a menu bar with standard Windows type drop-down menus.
Below the menu bar is a toolbar that gives direct access to various functions. All functions in the
toolbar are also accessible through the menu bar system.
Below the toolbar there is a row of folder tabs giving access to several folders that can be shown, one
at a time in the area below the tabs.
At the bottom of the window is the status bar.
This manual will mainly describe the functions of the items in the menu bar and the buttons in the
toolbar. These functions are basically the same for all Exigo applications. Since the contents of the
folders vary depending on which of the programs you are running they will not be covered in detail
in this manual. Use the Exigo manual for reference.

Exigo tool manual Chapter 4 Startup 7
Chapter 4 Startup
The installation program will have placed an Exigo Tool folder in the All programs Regin folder
in the Start menu. This folder contains the link to Exigo Tool.
To start the program, click on the Start button at the lower left corner of the display. Then click on
All programs, the folder Regin, the sub folder EXIGO and finally on the program you wish to run.
To avoid having to go through the Start folder, you can create a shortcut on the desktop by pointing
at the program name, click and hold the left mouse button and drag the program name from the folder
onto the desktop. Release the button and click on "Create shortcut here".
During installation under Windows 8 or Windows 8.1, Exigo Tool is placed under “All apps”, which
can be reached using the Start screen. From here, it is only neccessary to click on the relevant icon to
start the program. It is also possible to create a shortcut to Exigo Tool in the taskbar. To do so, right-
click on the icon and select “Pin to taskbar” from the toolbar visible at the bottom of the screen.
On start-up Exigo Tool will automatically search for any controller connected to the computer and
connect to it if it is of a type suitable to the program being loaded. If no suitable controller is found,
the program will start offline.

8 Chapter 4 Startup Exigo tool manual
Exigo Tool always starts with a box where you enter which controller model you are using. The
Overview folder is also displayed. Make sure that you enter the correct model, or errors may occur in
the control and alarm handling.

Exigo tool manual Chapter 5 Menu bar 9
Chapter 5 Menu bar
The menu bar has five drop-down menus; File, Edit, View, Tools and Help.
5.1 File
These items are used to handle configuration files. The data describing a configuration can be saved
as a file. Any number of different configurations can be saved, the only limit being available disk
space. The files will be saved using the extension .htc and need about 104 kb of disk space. The files
contain only plain text and can be opened using regular editing programs like Notepad or WordPad.
New
New will open a new unnamed file. A box will appear, in which the relevant model of Exigo is
selected. If you are unsure of which model you are using, the article number can be located on the
right-hand (short) side of the controller. Make sure that you choose the correct model. If you load an
incorrect model, unexplainable alarms, etc., may appear, as certain functions not visible in the present
model may be activated.
Open
Opens a saved file.
Save
Saves the current file to disk. If the file is unnamed, you will be prompted for a name.
Save as
Saves the current file to disk using a new name of your choice.
Read only
This item can normally be ignored. Should you for some reason open two instances of the same file
one of them will be marked as Read only to prevent data conflict.
Print
Prints a list showing all the configuration settings of the present file.

10 Chapter 5 Menu bar Exigo tool manual
Exit
Close Exigo tool. If the present configuration is unsaved you will be asked if you wish to save it
before closing.
5.2 Edit
The Edit menu only contains one item:
Delete
Delete is only used in conjunction with holiday periods to remove assigned periods.
5.3 View
The View menu contains one item:
Refresh
Exigo Tool is not a dynamic program, meaning that if a parameter value is changed in a connected
Exigo (such as, for instance, a temperature), the corresponding value in Exigo Tool will not
automatically be updated. Instead, the Exigo Tool user must manually initiate reading of parameter
values from the controller.
Update initiates a reading of all dynamic parameters from the connected controller. The display is
updated with the new values.
When you change between display tabs, an update is automatically initiated.
Alternatively, the Update button in the toolbar (see Toolbar below) or the F5 key on the computer
keyboard can be used.
You can choose to auto refresh pictures with dynamic values, i.e. an automatic activation of the F5
update function at settable intervals. See section Options.

Exigo tool manual Chapter 5 Menu bar 11
5.4 Tools
Load all parameters
Download all present parameters from Exigo Tool to the connected Exigo controller.
Synchronize all parameters
All parameter values in the Exigo are compared with the corresponding values in Exigo Tool. All
discrepancies will be listed. All items in the list are normally tick-marked. By removing the tick-mark
from an item you can exclude it from the selection. You can then choose to update Exigo Tool using
the controller values or update the controller using the Exigo Tool values.
Reset all parameters to default values
Resets all Exigo Tool parameter values to their default values.

12 Chapter 5 Menu bar Exigo tool manual
Search for controllers
If, on startup, Exigo Tool fails to establish contact with a connected controller it is usually due to an
address mismatch. This function will search through all the possible addresses and list the addresses
of the unit that is connected to the computer. These addresses are then written into the address fields
in the folder Configuration / System.
Set controller date and time
Synchronizes the controller date and time with the computer date and time.
Change controller address
This function is used for changing the addresses of the connected controller. The address is normally
254:254. If the controller is intended to be used in an EXOline network, the addresses must be changed
since the connected controllers have different addresses.
Reload controller
Downloads the current control program from Exigo Tool to the controller.
Use this function to install updated program revisions. Note, though, that since the hardware differs
between controllers of different sizes, the Exigo Tool program and the Exigo model must be
compatible.
The below dialogue window will be displayed:

Exigo tool manual Chapter 5 Menu bar 13
Click “OK” to reload the controller. The “Synchronize parameters” dialogue window till be displayed:
Select whether differences in parameter configuration should be updated in Exigo Tool or in the
controller.
After the controller has been reloaded with the new application program, the below dialogue window
will be displayed:

14 Chapter 5 Menu bar Exigo tool manual
If the controller was manufactured before 2015, the following window will be displayed before it can
be reloaded:
Click “Yes”.
A warning message will now be displayed:
Click “OK”.
The controller has now been repartitioned to make room for the application.
Next, follow the directions above for reloading the controller.
Another warning message will now be displayed:
Click “Yes”.
Upgrade controller operating system
Unless the controller is brand new, it is advisable to upgrade the operating system.

Exigo tool manual Chapter 5 Menu bar 15
Log on
Exigo has four different log-on levels, 1, 2, 3 and 5.
5 is the basic level with the lowest access, 3 is the operator level giving more access, 2 is the service
level giving even more access and 1 is the Admin level with full access.
Exigo tool only uses the levels Logged off, Service, Operator and Admin.
As default Exigo comes with the following passwords for the different levels:
Admin 1111
Service 2222
Operator 3333
Should you try to perform an operation which requires a higher access level than the one you have,
you will be prompted to change log-on level.
Log off
Only active if you are logged on as Operator or Admin. Enables log-off to the basic level.
Change password
Only active if you are logged on as Operator or Admin. Permits change of the password for the
present log-on level.
Load new default passwords
When loading vtc-, htc-, or btc-files, it is possible to include new passwords for all the levels. The
files are text files describing a configuration. Open the file, for example in Wordpad or Notepad. At
the end of the vtc-file, there is a section, DiaPasswords, which deals with the log on codes.
To be able to load new default passwords, change LoadDiaPassWordVisible from ”No” to ”Yes”.
Change ”1111”, ”2222” and ”3333” to the values you want the levels Admin, Service and Operator
to have. ”4444” is not used by the controller and ”5555” for basic level should not be changed.
Save the file.
Start Exigo Tool and import the file.

16 Chapter 5 Menu bar Exigo tool manual
Real-time chart
Creates a real-time chart. Up to four parameters of your choice can be logged. The diagram has
vertical scales with individually settable left or right scaling. The chosen parameters are listed at the
bottom of the screen together with information on colour, which of the vertical scales it is referring
to and latest recorded value. The chart has left and right vertical scales with individually settable
ranges. The horizontal timeline can be changed so that the chart window can show longer or shorter
intervals. Using the scrollbar at the bottom of the chart you can scroll along the timeline to show any
position since the recording started. Values are recorded every 5 seconds. All recorded values can be
saved to a textfile for later use in, for example, a spread-sheet program such as Excel.
Several sessions of the real-time chart can be run at the same time if you wish to study more than four
parameters.
The charts cannot be saved. Upon exiting, all values and settings are lost. It is however possible to
use the Alt+PrtScr keys on the keyboard to take a screenshot of the current chart, which can then be
saved.
Real-time chart tools
Export
Exports all recorded values to a .txt file. The values are tab-separated for easy import to, for example,
Excel. Each line of the text file contains the values from one recording together with the time for the
recording. Recorded data are saved for approximately 24 hours.
Export
Show/hide left/right grid Options
Add curve Show cursor Zoom out Pause Time scale
Delete all curves
Show sample points Home

Exigo tool manual Chapter 5 Menu bar 17
Add curve
A click on this button reveals a list of all parameters that can be displayed in the chart. Choose up to
4 parameters.
Delete all curves
Deletes all the selected curves.
Show/hide left/right grid
Chart grids scaled to the left and right scales can be displayed or hidden.
Show node points
A marker can be displayed on each curve at the point of each recording.
Show cursor
Displays a vertical line on the chart display. The cursor can be moved along the timeline. When the
cursor is active, instead of showing the latest recorded values in the parameter list, the values at the
cursor position are displayed. In this way you can check back on earlier record values.
Go to home
Home position is the chart position in which the "recording pens" are close to the right hand edge of
the chart. If you have scrolled back along the timeline you can use this button to jump back to normal
position.
Pause
Pauses entry of new curve segments into the chart. Data acquisition continues, however, and new
readings are saved every 5 seconds. Pressing Pause again will cause all the saved readings to be added
into the chart.
Options
Set various options.
Time scale signifies the time width of the chart display.
Left scale / Right scale sets the scaling for the left and right chart scales.

18 Chapter 5 Menu bar Exigo tool manual
Time scale
Sets the time width of the chart display.
Parameter list
The list shows the parameters assigned to the chart. To remove a parameter, right-click on it and
choose Remove.
To change which of the right / left scales the parameter curve is referring to, right-click and choose
properties or double-click with the left mouse-button.
Note
Gives access to a notepad area. Any text written here is saved together with the configuration file. If
you make a printout of the configuration the notepad text is included in the printout.
Options
Permits the setting of some program parameters.
You can choose to auto refresh pictures with dynamic values, i.e. an automatic activation of the F5
update function at settable intervals.
Log-on timeout
After inactivity for longer than the set time the log-on level will be set to 5.
Number of decimals
Sets the number of decimals displayed. All calculations however, are always done with full precision.
Lock configuration
Blocks access to the configuration tab.

Exigo tool manual Chapter 5 Menu bar 19
Show not active signals in the in-/output tab
All inputs and outputs are displayed under the Inputs/Outputs tab.
Synchronize alarm texts when synchronizing all parameters
When synchronizing all parameters, alarm texts will also be synchronized.
Communication
Setting of the communication between Exigo tool and controller.
You can choose if the communication should take place via E-CABLE (serial) or the TCP/IP port.
Serial communication
Click on Communication channels and then on Serial.
Ensure that the suggested COM port corresponds to the COM port which the computer has assigned
to E-CABLE. You can see which Com port has been assigned in the Control panel System
Device Manager Ports (COM & LPT).

20 Chapter 5 Menu bar Exigo tool manual
TCP/IP communication
If the controller has a TCP/IP port, it can communicate via a TCP/IP network. This is done by
selecting Use a TCP/IP port in this controller.
By pressing on TCP/IP, website and e-mail settings, you can choose between three different
connection possibilities:
1. Crossover network cable
2. Automatically by DHCP (dynamic IP address)
3. Static IP address
See chapter 10 for the remaining setting options.
1. Crossover network cable
In the most basic case, a crossover network cable, E CABLE-TCP/IP, is used. The user is connected
directly to the controller. Connect a crossover TCP/IP-cable directly between the controller and the
computer. Start Exigo tool. Open the tool ”Communication settings” from the menu Tools or via the
icon in the toolbar.
Choose Use a TCP/IP port in this controller. The program will ask if you are using a crossover
network cable. Answer ”Yes” to this question. The program will now search for controllers. Since no
DHCP is available, a ”broadcast” address will be used. Therefore, it is important that the computer is
only connected directly to the current controller with a crossover Cat5-cable. If the search was
successful, the controller’s IP-settings will be shown: IP address, Subnet mask and Default Gateway
(if there is one). If no values are shown: press ”Search”. A search window will be opened and
hopefully the controller’s TCP/IP card will be found and its serial number will be shown in the
window. Select the row and press ”OK”.
If the program cannot find a controller:
•Check the cable and contacts.
•Control if there are more active network connections via Control panelNetwork
connections. Inactivate all except ”Local area connection”. If a wireless network connection
is active, it should also be deactivated.
•Press Searchagain.
•Enter the IP address, the Subnet mask and, if any, the Gateway for the controller and press
Load TCP/IP settings.
Table of contents
Other Regin Control Unit manuals
Popular Control Unit manuals by other brands

Sandpiper
Sandpiper s05 Service & operating manual

Software House
Software House PSX-NL4 Installation and operations

molex
molex SST-PB3-REM User reference guide

IBC
IBC P-1610 installation instructions

Datexel
Datexel Simply Modbus Setup manual

Rockwell Automation
Rockwell Automation Allen-Bradley 1794-IV16 installation instructions

Yamaha
Yamaha MusicCAST MCX-CA15 Install manual

AMS
AMS TMD2636 EVM quick start guide

Grundfos
Grundfos UP-ZV Series Wiring diagram

Newhaven Display International
Newhaven Display International NHD-1.69-AU-SHIELD user guide

Unitronics
Unitronics Uni-I/O UIS-WCB2 installation guide

Danfoss
Danfoss EKF Series installation guide