Regina Steemer Carpet Cleaner User manual

-#?€GINA,
OWNER'S MANUAL
Operating and Servicing
Instructions
Please readthese instruc-
tions carefully before using
your ReginaaSteemer
Carpet Cleaner.
Let us help you put your
vacuum together or
answer any questions, call:
1-877-REGINA6
(USA
&
Canada)
AWARNING:
Cleaner assembly may
include small parts. Small
parts can present a chok-
ing hazard.
For quick reference, please record your
vacuum information below.
Model
#:
Mfg. Code:
(Mfg.
code located on the lower backside of cleaner)
%pa
fro/
-
pagina
El
02003
All
rights reserved
#
1-113001-000
5/03

THlS CLEANER IS INTENDED FOR HOUSEHOLD USE ONLY
IMPORTANTSAFETY INSTRUCTlONS
When
you
use
an
appliance,
basic
precautions
should
be
followed, including
the
following:
READ ALL INSTRUCTIONS BEFORE USING THE APPLIANCE.
ALWAYS FOLLOW THESE SAFETY INSTRUCTIONS.
DO NOT LEAVE CLEANER UNATTENDEDWHEN PLUGGED IN.
OCCASIONALLYCLEAN DEBRIS FROM BRUSH.
WARNING
-
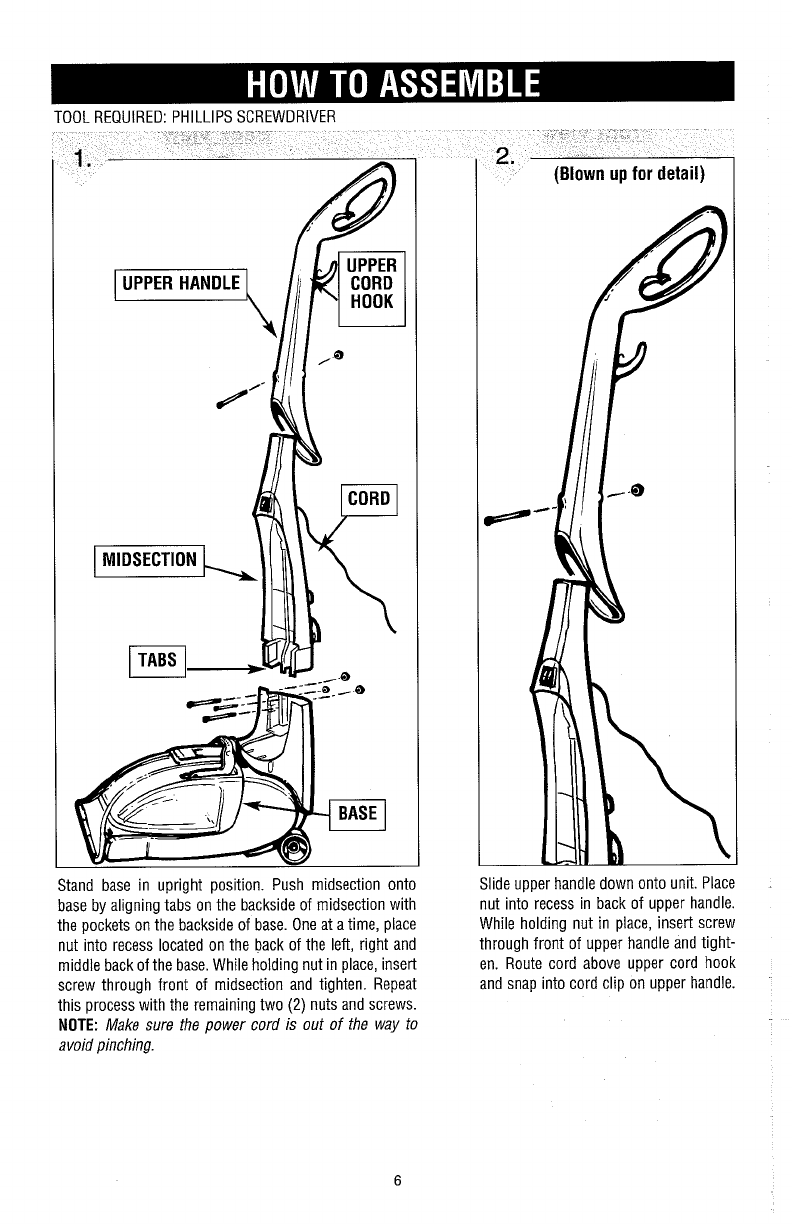
FULLY ASSEMBLE CLEANER BEFOREOPERATING.
WARNING -THECORDS, WIRES AND/OR CABLES SUPPLIEDWITH THlS
PRODUCT CONTAINS CHEMICALS, INCLUDINGLEAD OR LEADCOMPOUNDS,
KNOWNTO THE STATE OF CALIFORNIA TO CAUSE CANCER AND BIRTH
DEFECTS OR OTHER REPRODUCTIVE HARM. WASH HANDS AFTER USING.
READ ALL INSTRUCTIONS BEFORE USING
THE APPLIANCE.
WARNING: TO REDUCETHE RISK OF
FIRE, ELECTRICSHOCK OR INJURY:
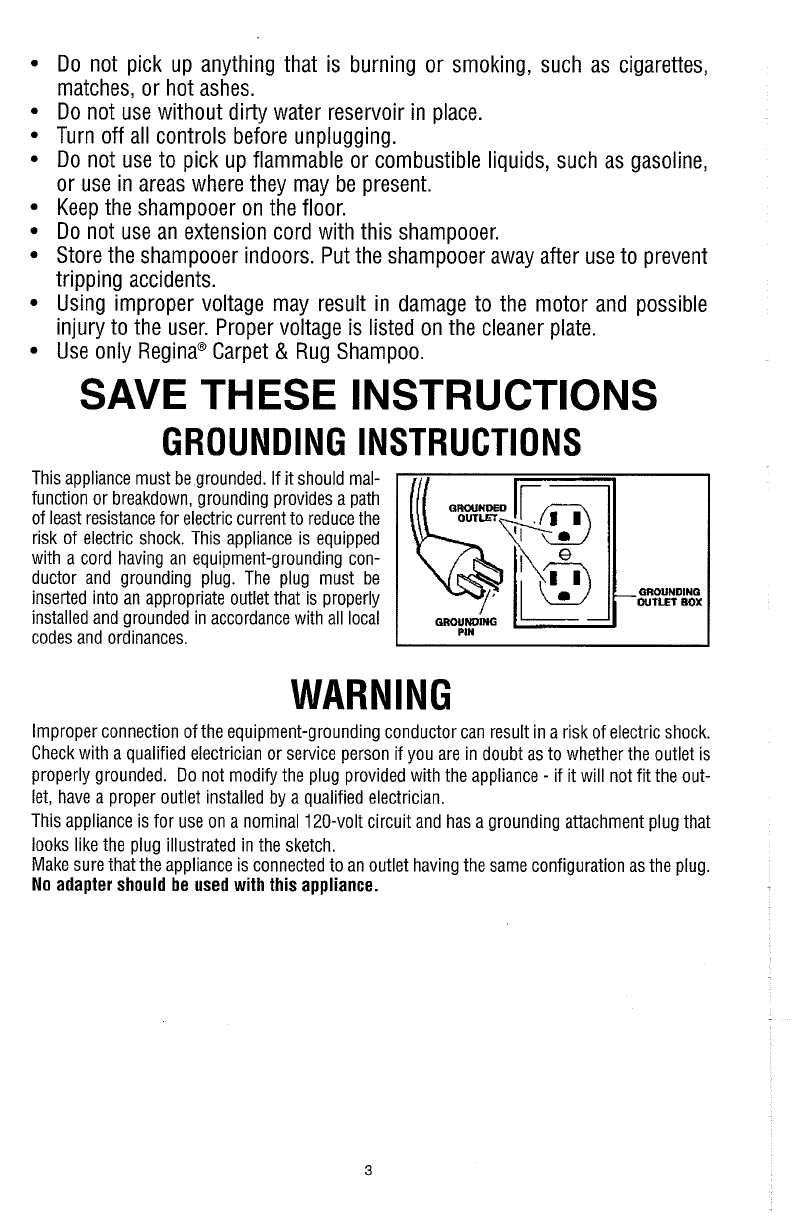
Connect to a properly grounded outlet only. See Grounding Instructions.
Do not leave appliance when plugged in. Unplugfrom outlet when not in use
and before servicing.
Do not use outdoors. Electrical shock coul'd occur.
Do not immerse.To reducethe risk of electric shock
-
use indoors only, and use
only on carpet moistened by cleaning process.
Do not allow to be used as atoy. Close attention is necessary when used by
or near children.
Use only as described in this manual.
Do not use with damaged cord or plug. If appliance is not working as it
should, has been dropped, damaged, left outdoors, or dropped into water,
return itto a service center for inspection. Call 1-877-REGINA6 for the near-
est service center.
Do not pull or carry by cord, use cord as handle, close a door on cord, or
pull cord around sharp edges or corners. Do not run appliance over cord.
Keep cord away from heated surfaces.
Do not unplug by pulling on cord. To unplug, grasp the plug, not the cord.
Do not handle plug or appliance with wet hands.
Do not putany objects into openings. Do not use with any opening blocked;
keep free of dust, lint, hair, and anything that may reduce air flow.
Keep hair, loose clothing, fingers, and all parts of body away from openings
and moving parts.

Do not pick up anything that is burning or smoking, such as cigarettes,
matches, or hot ashes.
Do not use without dirty water reservoir in place.
Turn off all controls before unplugging.
Do not use to pick up flammable or combustible liquids, such as gasoline,
or use in areas where they may
be
present.
Keep the shampooer on the floor.
Do not use an extension cord with this shampooer.
Store the shampooer indoors. Putthe shampooer away after useto prevent
tripping accidents.
Using improper voltage may result in damage to the motor and possible
injuryto the user. Proper voltage is listed on the cleaner plate.
Use only ReginaeCarpet
&
Rug Shampoo.
SAVE THESE INSTRUCTIONS
GROUNDING INSTRUCTIONS
This appliancemust be grounded. If itshould mal-
function or breakdown, grounding provides a path
of leastresistancefor electric current to reducethe
risk of electric shock. This appliance is equipped
with a cord having an equipment-grounding con-
ductor and grounding plug. The plug must be
inserted into an appropriate outlet that is properly
installedand grounded in accordance with all local
codes and ordinances.
BROUHDINQ
QROUNDING
PIN
WARNING
Improper connection of the equipment-grounding conductor can result ina risk of electric shock.
Checkwith a qualified electrician or service person if you are in doubt as to whether the outlet is
properly grounded. Do not modifythe plug provided with the appliance
-
if itwill not fit the out-
let, have a proper outlet installed by a qualified electrician.
This appliance is for use on a nominal 120-volt circuit and has a grounding attachment plug that
looks like the plug illustrated in the sketch.
Make sure that the appliance is connectedtoan outlet havingthe same configuration as the plug.
No adapter should be used with this appliance.

CONGRATULATIONS
You are now the proud owner of the ReginamSteemer Carpet
CleanerTM.We trust your new purchase will bring you many
years of satisfaction.
Our company designed and developed this product with you in
mind. The ReginamSteemer Carpet CleanerT"is the lightest full
size upright carpet cleaner available due to its lightweight
design. Thelarge
1
gallonsolutionreservoir makes cleaningeas-
ier with fewer fill-ups.
We arevery proud of our products and hope that you are equal-
ly satisfied with their quality and performance.
Thank you for your support of Reginaaproducts.
TABLE OF CONTENTS
Safety Instructions
............................................
Page
2,
3
Feature Descriptions........................................ Page
5
How to Assemble............................................ Page
6
PreparingCarpet
.............................................
Page
7
How To Operate............................................... Page
7
...
Remove and Replace Solution Reservoir Page
7
Carpet Cleaning..........................................Page 8
Emptyingand Cleaning Dirty Water Tank........Page
9
TroubleshootingGuide................................... Page
11
LIMITED
WARRANTY
To the consumer, Royal Appliance Mfg. Go. warrants this vacuum cleanerto be free of defects in materi-
al or workmanship commencing upon the date of the original purchase. Refer to your vacuum cleaner
carton for the length of warranty and save your origmal sales receipt to val~datestart of warranty penod.
Ifthe vacuum cleaner should become defective within the warranty period, we will repair or replace any
defective parts free of charge. The complete machine must be delivered
DreDaid
to any ROYALm
Authorized Sales &Warranty Service Station. Please include complete description of the problem, day
of purchase, copy of original sales receipt and your name, address and telephone number. If you are
not near aWarranty Station, callthe factory for assstance at USA
&
Canada: 1-877-REGINA6. Use only
genuine Royal" replacement parts.
The warranty does not include unusual wear, damage resulting from accident or unreasonable use of
the vacuum cleaner. This warranty does not cover brushes, flat belts, filters and bulbs. This warranty
does not cover unauthorized repairs. This warranty gives you specific legal rights and you may also
have other rights (Other rights may vary from state to state In the USA).
4

Front
View
Back
View
Front View
Non-Slip Grip Handle
Clean Solution Reservoir
Latch
Clean Solution Reservoir
Dirty Water Tank Latch
Dirty Water Tank Handle
5
Row BrushStrip
Dirty Water Tank
Dirty Water Tank Door
Dirty Water Tank Lid
Power OnlOff Switch
Upper HandleScrew
Back View
Power Cord
Carrying Handle
Quick Cord Release
HandleRelease Pedal
Cord Hook
Cord Clip
Solution Spray Trigger

TOOL REQUIRED: PHILLIPS SCREWDRIVER
Stand base in upright position. Push midsection onto
base
by
aligning tabs on the backside of midsection with
the pockets onthe backside of base. One at a time, place
nut into recess located on the back of the left, right and
middle back of the base.While holdingnut in place, insert
screw through front of midsection and tighten. Repeat
this processwith the remaining two
(2)
nuts and screws.
NOTE:
Make sure the power cord is out of the way to
avoid pinching.
Slide upper handle down onto unit. Place
nut into recess in back of upper handle.
While holding nut in place, insert screw
through front of upper handle and tight-
en. Route cord above upper cord hook
and snap into cord clip on upper handle.

IMPORTANT: DO NOT USE THE REGINAmSTEEMER CARPET CLEANER" AS A DRY VACUUM.
1.
Vacuum carpet thoroughly. Use a Reginaavacuum cleanerwith a revolving brushroll for best results.
2.
Removeas muchfurniture from the room as possible. If unableto remove the furniture, place plastic or
foil under and around the legs until the carpet has dried completely.
CHECK FOR COLOR FASTNESS:
Before cleaning carpet, test for color fastness. Dampen a white cloth with solution. Test a small area in a clos-
et. Gently rub the cloth over the area. Check each color for color bleeding. If the cloth remains clean, it should
be safe to clean the carpet.
HELPFUL HINTS FOR CLEANING CARPET:
1.
Do not oversaturate carpet with cleaning solution while using ReginaaSteemer Carpet Cleaner".
2.
For heavily soiled areas, additional applications may be necessary.
3.
Allow plenty of time to dry carpet thoroughly.
4.
Wipe cleaning solution from woodwork and wood to prevent any damage.
5.
Try not to walk on carpet until it is completely dry.
6.
After carpet is thoroughly dry, vacuum the carpet using a cleaner with a revolving brushroll.
7.
Beforecleaning,determinewhereyou will startandend, makingsurenottowalkover previouslycleanedareas.
AFTER CLEANING:
Allow carpet to dry completely. Try notto walk on the carpet until it is dry.
If you need to walk on the carpet, place white towels on the areas you want to walk.
If the carpet is not dry and the furniture must be placed back inthe room, use plastic or foil under the
furniture to prevent staining the carpet.
Thoroughly clean the dirty water tank with hot tap water. See page
9.
WARNING:
DO NOT STORE REGINABSTEEMER CARPET
CLEANERTMIN GARAGE OR AREA
WHERE UNIT COULD FREEZE.
RESER
Grasp solution reservoir Tilt solution reservoir away
under handleand press clean from cleaner and remove.
solution reservoir latch.

Unscrew measuring cap from Fill measuringcap with solution Fill remaining solution reser-
backside of solutionreservoir.
2
times
(approximately
4
oz.) voir with hot tap water.
and pour into clean water tank.
NOTE:
Use only Regin9 Caipet
&
Rug Shampoo. Using other
cleaning solubons may cause
excessive foaming. hcessive
foam willcause the float toshut
off
the vacuum prematurely.
Using other cleaning solutions
will voidyour wanan&.
CARPET CLEANING
Replace cap.
Place bottom of solution Plug cord into electrical
NOTE:
Never leave unit unat-
reservoir into cleaner and outlet. Step onto handle
tended with power on. Turn
rotatetop into position until release pedal to put into
OFF
whenemptyingandfilling
the lever snaps into place. cleaning position.
resemoir.
Do
NOT oversatu-
rate the carpet
Turn power
switch to the "on" position.
IMPORTANT:
FOR BEST CLEANING RESULTS USE A STEADY, MODERATE,
FORWARDAND BACKWARD MOTION. While depressing solution spray trig-
ger, pull unit in backward motion. Release trigger and push unit forward in
same pathto remove dirty water and solution from carpet. (For heavily soiled
areas, repeat if necessary).
IMPORTANT:
IF THE SOUND OF THE MOTOR
CHANGES TO A HIGH PITCH, THIS INDICATES THE DIRNWATER TANK IS
I
FULL AND MUST BE EMPTIED. A VISUAL INDICATOR
IS
WHEN THE BLUE
FLOAT HAS RISEN TO THE TOP OF THE DIRTY WATER TANK.

Your ReginaeSteemer CarpetCleaner" is equippedwith ashut off valve within your dirty watertank. Whenthe dirty
water tank becomesfull, the bluefloat (viewedfrom top of tank) will rise, shutting off the air flow thru the nozzle.
NOTE:
Thefloatinyour Reginrlg Steemer CarpetCleanerrMis the bluepiece in the dirty water tank lid,and willshutoff the
suction when the dirty water tankis full. For best results, usesmooth,steady motion keeping the nozzle flatagainst the
carpeting.
ripping
thecleanerandbreakingthe seal of thenozzle andcarpeting willcause the floattoriseandshutoff the
suction.Once the floatis activated,empty the dirty water tank If the dirty water tank does notappear full, turnthepower
switchoffand waitfor the floattosettleand reset If the floatrepeatedlyshutsoff the suction, emptythe dirty watertank
Forbestresults, useonlyReginrlgCarpet
&
Rug Shampoo.OtherSolutionsmaygenerateexcessivefoam whichwillcause
the floattoriseprematurely and shut offthesuction.Use two capfuls
(4
ounces)of ReginP Carpet
&
Rug Shampooper
fillupof the clean waterresewoir.
A
higher concentrationofshampoomay causeexcessivefoaming.
NOTE:
You willheara noticeable changein thepitch of the cleaner. Thisindicatesaneed toempty the ditiy watertank.
WARNING:
TO REDUCE THE RISK OF INJURY FROM MOVING PARTS
-
UNPLUG BEFORE SERVICING.
EMPTYING DIRTY WATER TANK
L
Grasp top of dirty water Grasp handle and pull tank
tank handle and push latch out of base.
to release.
To
empty
dirty
water tank, Rinse dirty water tank and
grasp handle with one hand filter with hot tap water.
and nozzle with the other Wipe and let dry thoroughly
and empty into sink. before storing to prevent
Replace dirt water tank lid. mildew from forming.
NOTE:
Do not use any
chemicals when cleaning.
Remove dirty water tank lid.

PLACING DIRTY WATER TANK IN BASE
OF
CLEANER:
Liftfront base of cleaner off
carpeting with one hand. Grasp handle and hook front of dirty water tank into base of cleaner,
making surefront of dirty water tank is resting onthe base (Diagram
2).
The DirtyWater Tank has
3
tabs on the underside which MUST
latch intothe underside of the base of the cleaner. Itis very important
to lift the base of the cleaner off of the carpeting and hook the nozzle
to the base so that the nozzle is flush with the base of the cleaner
(Diagram 2a). Failureto installthe Dirty Water Tank correctly (Diagram
2b), will result in poor dirty water pickup. The DirtyWater Tank will
need to be emptied once or twice perfill up of the Clean Water Tank.
I
I
While making sure the front
of the dirty water tank is rest-
ing onthe base, placethe rear
of thetank intothe baseof the
cleaner. Push handle down
until it latches.
NOTE:
Donot
storecleaner withsolutionin
resewoiror dirty water in dirty
water tank. Mineraldeposits
andmildew can fonnwhich llvill
affect theperformanceofyour
Regina
"
Steemer Carpet
Cleaner"'.

WARNING: TO REDUCE RISK OF PERSONAL INJURY
-
UNPLUG CLEANER BEFORE SERVICING
PROBLEM
Cleaner won't
run
Cleaner won't
pick-up or low
suction
Water escaping
from cleaner
Cleaner won't
dispense
solution
POSSIBLE REASON
1.
Power cord not firmlv
plugged into outlet.
2.
Blownfuse or trippedbreaker.
3.
Needs service.
1.
Dirtywater tank door not
installed.
2.
Dirtywater tank is not
installedcorrectly.
3.
Dirtywater tank is full.
4.
Dirtywater passage
clogged.
1.
Dirty Water Tank is full.
2.
Dirty Water tank not
installedcorrectly.
3.
Solution reservoir not
installed properly.
1.
Solution reservoir not
installed properly.
2.
Needsservice.
POSSIBLE SOLUTION
1.
Plug unit in firmly.
2.
Checkfuse or breaker. Replace
fuseheset breaker.
3.
Take to service center or call
1
-877-REGINA6.
1.
Insertdirty water tank door.
2.
Review Dirty Water Tank Removal
and Replacement
-
Pg.
9.
3. Empty Dirty Water Tank
-
Pg. 9.
4.
Clean Dirty Water Tank
-
Pg.
9.
1.
Empty DirtyWater Tank
-
Pg.
9.
2.
Review DirtyTank Removaland
Replacement
-
Pg.
9.
3.
Review Solution Reservoir Installation
-
Pg. 7.
1.
Review Solution Reservoir lnstallation
-Pg.7.
2.
Take to service center or call
1
-877-REGINA6.
ANY OTHER SERVICINGSHOULD BE DONE BY AN
AUTHORIZED SERVICE REPRESENTATIVE
CUSTOMER SERVICE
(1
-877-REGINA6)
Inthe event that further assistance is required,see your Yellow Pagesfor an authorized Royalm
Dealer. Costs of any transportationto and from any place of repair are to be paid by the owner.
The service parts used in this unit are easily replaced and readily available from an authorized
RoyalaDealeror retailer. Always identifyyour cleaner by the model numberand manufacturing
code when requesting informationor ordering replacementparts. (The model number appears
on the bottom of the cleaner.)


MANUAL
DEL
PROPlETARlO
*GINA,
Operacionlnstruccionesy Sewicode
AADVERTENCIA:
Elensamblede la aspirado-
ra puede incluir partes
pequeiias. Las partes
pequeiias pueden presen-
tar riesgo de ahogamiento.
Por favor lea estas
instruccionescon cuida-
do antes de usar su
lavadora de alfombras
ReginaeSteemer Carpet
CleanerTM.
Para permitirnos
ayudarle a armar su
aspiradora o para con
testar cualquier
pregunta, Name al:
1
-877-REGINA6
(EE.UU.
y
Canada)
Como referencia rapida, le suplicamos registre
la informacion de su aspiradora a
continuation.
Modelo:
Codigo de Fabricacion:
(El cddigo de fabricacidn se encuentra localizado
en la parte trasera inferior de la aspiradora)
02003 Derechos Reservados
#
1-113001-000
5/03
El

ESTA ASPIRADORA ESSOLO PARA US0DOMESTICO.
INSTRUCCIONES DE SEGURIDAD
Cuando se use un aparato electrico, deben tomarse ciertas
precauciones basicas de seguridad, incluyendo las siguientes:
LEA TODAS LAS INSTRUCCIONESANTES DE USAR EL APARATO.
SIEMPRE SlGA ESTAS INSTRUCCIONESDE SEGURIDAD.
NO DEJE LA ASPIRADORA DESATENDIDACUANDO ESTE CONECTADA.
LlMPlE LOS DESECHOS EN ELCEPILLO OCASIONALMENTE.
ADVERTENCIA
-
ARME LA ASPIRADORA POR COMPLETO ANTES DE
HACERLAFUNCIONAR.
ADVERTENCIA
-
LOSCORDONES
ELECTRICOS,
ALAMBRES Y10 CABLES
SUMINISTRADOSCON ESTEPRODUCT0 CONTIENEN
QU~MICOS,
INCLUYEN-
DO PLOMO
0
COMPUESTOS DE PLOMOQUE
SEGUN
EL ESTADO DE
CALIFORNIACAUSAN
CANCER
Y DEFECTOS DE NACIMIENTOUOTRO
DANO
REPRODUCTIVO. LAVESELAS MANOS
DESPUES
DE USARLOS.
LEA
TODAS
LAS
INSTRUCCIONES
ANTES
DE
USAR
EL
APARATO.
ADVERTENCIA: PARA EVITAR PELGRO
DE INCENDIO. DESCARGAS ELECTRI
AS
0
LESIONES:
Enchljfela solamente a un tomacorriente que este debidamente conectado a
tierra. Vea las instrucciones de conexion a tierra.
No deje la aspiradora conectada. Desconectela del tomacorriente cuando no la
use
y
antes de hacerle servicio.
No la use en exteriores. Pueden ocurrir descargas electricas.
No lasumerja. Para reducir el riesgode descargas electricas
-
usela linicamenteen
interiores,
y
uselasolamenteen alfombras humedecidas porel procesode limpieza.
No permita que jueguen con ella.
No use la aspiradora con la clavija o el cordon daiiados. Si no funciona como
debiera, o se ha caido, daiiado, dejado a la intemperie o caido al agua, llevela al
centro de servicio para que la revisen. Llame al 1-877-REGINA6 para localizar el
centro de servicio mas cercano.
No lajale ni la cargue del cordon, ni use el cordon como mango, ni cierre la puer-
ta sobre el cordon, ni pase el cordon alrededor de bordes o esquinas filosas. No
ruede la aspiradora sobre el cordon. Mantenga el cordon alejado de superficies
calientes.
No desconecte la aspiradora jalando el cordon. Para desconectarla, hagalo
tomando de la clavija, no del cordon.
No toque la clavija ni la aspiradora con las manos mojadas.
No coloque objetos en las aberturas. No la utilice con las aberturas obstruidas;
mantengalas libres de polvo, pelusa, cabellos o cualquier cosa que pudiera
reducir el paso de aire.

No aspire nada que este quemandose o que este desprendiendo humo corno
podrian ser cigarrillos, cerillos o cenizas calientes.
No la utilice sin el tanque de agua sucia puesto en su lugar.
Tenga mucho cuidado cuando aspire escaleras.
No la utilice para aspirar liquidos inflamables o combustibles corno por ejemplo
gasolina ni la use en areas donde estos puedan encontrarse presentes.
Mantenga la lavadora en el suelo.
No use una extension electrica con esta lavadora.
Guarde la lavadora en interiores. Guardela despues de su uso para evitar
accidentes de tropiezos.
El utilizar un voltaie incorrect0 puede daiiar el motor
y
causar lesiones al
usuario. El voltaje apropiado esta inscrito en la placa de la aspiradora.
Use solo champ[\ para Alfombras
y
Tapetes Reginaa.
GUARDE ESTAS INSTRUCCIONES
INSTRUCCIONES DE CONEXION A TIERRA
Este aparato debe estar conectado a tierra. En caso
de que funcione ma1o se descornponga, laconex-
ion a tierra perrnite un camino de menor resisten-
cia a lacorriente electrica para reducir el peligro de
descargas electricas. Este aparato esta equipado
con uncordon que tiene un conductor atierra para
el equipo
y
una clavija a tierra. La clavija debe
enchufarse en un tomacorriente apropiado que
este instalado
y
conectado a tierra debidamente de
acuerdo con todos 10s codigos
y
reglarnentos locales.
Una conexion incorrecta del conductor a tierra del equipo puede dar origen a descargas electri-
cas. Recurraa un electricistacalificado o a la personaque le hizo el servicio si no esta seguro(a)
de que el tornacorriente este debidamente conectado a tierra. No modifique la clavija que tiene
la aspiradora
-
si la clavija no entra en el tornacorriente, recurra a un electricista calificado para
que instale un tomacorriente apropiado.
Este aparato se debe usar en uncircuit0 de
120
volts nominales
y
tiene unaclavija detierra corno
la representada en la figura. Asegljrese que el aparato este conectado a un tornacorriente que
tenga la rnisrna configuracion que la clavija.
No se debe usar
un
adaptador con este aparato.

FELICITACIONES
Usted es ahora el orgulloso propietario de una lavadora de alfombras
Regina" Steemer Carpet Cleanern'.Estamos seguros que su compra le
traerii muchos aiios de satisfaccibn.
Nuestra compaiiia diseiib y desarrollb este product0 pensando en Ud. La
lavadora de alfombrasReginamSteemer Carpet Cleanern'
es
la lavadora de
alfombrasverticaldetamafioregularmkligeraqueseencuentradisponible
debidoa su diseiioligero. El depbsito grandede
1
galbn desolucibnfacilita
la lirnpieza debidoa que no
es
necesario rellenar el depbsito con frecuencia.
Estamosmuy orgullosos de nuestros productos y esperamosigualmente
que estC satisfecho con su calidad y funcionamiento.
Le agradecemossu preferencia por 10s productos Reginam.
INDICE
lnstrucciones de Seguridad
................................
Pagina
E2,
E3
Descripcionesde las Caracteristicas
..................
Pagina
E5
Como Preparar laAlfombra
................................
Pagina
E6
Preparacionde la Alfombra
................................
Pagina
E7
Como Operar
.......................................................
Pain
E7
Remocion
y
Reemplazodel Dep6sitoSolucion..
...
Pagina
E7
Cimpieza de Alfombras
...............................
Pagina
E8
ComoVaciar
y
Limpiar elTanque de Agua Sucia
...
Pagina
E9
Guiapara la Deteccion
y
Solucion de Problemas..Pagina
Ell
II
Para el consumidor, Royal Appliance Mfg. Co. garantiza esta aspiradora contra defectos de materia prima o
de manode obra, a partir de lafecha de lacompra original. Vea en lacaja del empaque laduracion de la garan-
tia y guarde su recibo de compra original para validar el inicio del periodo de garantia.
Si la aspiradora se descompone dentro del periodo de la garantia, repararemos o reemplazaremos las partes
defectuosas sin cargo alguno. Se debe enviar todo el aparato con porte paaado con antici~aciona cualquier
Estacion de Servicio de Ventas y Garantia Autorizada por ROYAL? Por favor incluya la descripcion completa
del problema, el dia de compra, copia del recibo original de compra
y
su nombre, direccion y nljrnero tele-
fonico. Si noseencuentra cerca de una Estacion de Garantia, lame a lafabrica para que le asistan en EE.UU.:
1-877-REGINA6
/
CANADA: 1-877-REGINA6. Use unicamente piezas de repuesto genuinas de Royal?
La garantia no incluye el desgaste inusual, 10s daiios que resulten de accidentes o del empleo no razonable
de la aspiradora. Esta garantia no cubre las bandas, cepillos, bolsas, filtros, focos o ventilador. Esta garantia
no cubre reparaciones no autorizadas. Esta garantia le otorga derechos especificos legalesy puedetener tam-
bien otros derechos. (Otros derechos pueden variar de estado a estado en 10s EE.UU.)

Vista Frontal Vista Posterior
Vista Frontal
1. Mango Non-Slip Grip
2.
Traba de Tanque de Solucion
Limpia
3. Tanque de Solucion Limpia
4. Traba de Tanque de Agua Sucia
5.
Mango de Tanque de Agua Sucia
6. Cepillo en Tira de
5
Hileras
7.
Tanque de Agua Sucia
8.
Puerta del Tanque de Agua Sucia
9.
Tapa del Tanque de Agua Sucia
10. lnterruptor de encendidolapagado
11. Perno del Mango superior
Vista Posterior
12.
Cordon Electrico
13. Mango para Transportar
14. Liberador Rapido de Cordon
15. Pedal del Liberador de Mango
16. Gancho para cordon
17. Grapa para cordon
18.
Gatillo de Espray de Solucion

HERRAMIENTASREQUERIDAS: DESTORNILLADOR EN CRUZ
ASA
SUPERIOR
ELECTRIO
Coloque la base en
position
verticale. Empuje la
section
media en la base al alinear las lengiietas de la parte pos-
terior de laseccion media con las ranuras de la parte pos-
terior de la base. Coloque las
2
tuercas grandes en las
cavidades que se encuentran en la parte posterior de 10s
lados izquierdo
y
derecho de la base. Coloque la tureca
pequeiia en la ranura localizada en la parte media de la
parte posterior de la base. Mientras sostiene latuerca en
su lugar, inserte-eltornillo a traves del frente de la sec-
cion media
y
aprietelo.
NOTA:
Asegljrese que el cordon
electric0 no se interponga
y
evite pellizcarlo.
Deslice la asa superior dentro de la
unidad. Coloque latuerca en la ranura de
la parte posterior de la asa superior.
Mientras sostiene la tuerca en
su
lugar,
inserte el tornillo a traves del frente de la
asa superior
y
aprietelo. Dirija el cordon
por arriba del gancho superior para
cordon e introd~jzcalodentro de la grapa
para el cordon en el mango superior.

COMO ASPIRADORA EN SECO.
1.
As~irebien la alfornbra. Para obtener rneiores resultados, use una aspiradora Reginaacon un
cepillo giratorio.
2.
Retire tantos rnuebles de la habitacion corno sea posible. Si no puede retirar 10s rnuebles, coloque
~lasticoo oa~elalurninio debaio
v
alrededor de las patas de 10s rnuebles y dejelo puesto hasta que se
haya secado iaalfornbra por cornpleto.
REVISE
LA
SOLIDEZ DEL COLOR:
Antes de lirnpiar la alfornbra pruebe la firrneza del color. Hurnedezcaun paiio blanco con la solucion. Haga la
prueba en un area pequeiia de un arrnario. Frote suavernente el paiio sobre el area. Fijese si 10s colores rnan-
chan el paiio. Si el paiio se rnantiene lirnpio, se puede lirnpiar la alfornbra sin correr ningirn riesgo.
SUGERENCIAS UTILES PARA LlMPlAR LA ALFOMBRA:
1.
No sature la alfornbra con solucion de lirnpieza cuando use la lavadora de alfornbras Regina" Steerner
Carpet CleanerTM.
2.
En areas percudidas, puede ser necesario dar mas aplicaciones.
3.
Tornara bastante tiernpo para que la alfornbra se seque bien.
4.
Lirnpie con un paiio la solucion que haya caido en 10s rnuebles de rnadera para evitar que se daben.
5.
No carnine por la alfornbra hasta que este cornpletarnente seca.
6.
Unavez que la alfornbra ha secado por cornpleto, aspire la alfornbra con una aspiradora que tenga
cepillo rotatorio.
7.
Antes de aspirar, determine 10s lugares del inicio y final, evitando carninar por las areas aspiradas
previarnente.
DESPUES DE LA LIMPIEZA:
Deje que la alfornbra seque por cornpleto. No carnine por la alfornbra hasta que este seca.
Si necesita carninar por la alfornbra, coloque toallas blancas en las areas donde va a carninar.
Si no esta seca la alfornbra y si se deben volver a colocar 10s rnuebles en la habitacion, use plastic0 o
papel alurninio para evitar que se ensucie la alfornbra.
Lirnpie bien el tanque de agua sucia con agua caliente del grifo. Vea la pagina E9.
ADVERTENCIA:
NO GUARDE LA LAVADORA DE ALFOMBRAS
Regina" Steemer Carpet CleanerTMEN EL GARAGE
Tome el deposit0 de solu- Incline el deposit0 de solu-
ci6n debajo delmangoy pre- cion apartandolo de la aspi-
sione la traba de solucion radoray retirelo.
lirnpiadora.
E7

Desenrosque la taza de Llene con
2
tazas de rnedida Llene el espacio restante del
rnedida que esta en la parte de
solution,
(aproxirnada- deposit0 con agua caliente
posterior del deposit0 de rnente
120
rnl). Llene el del grifo. Vuelva a colocar la
solution.
espacio restante del deposi- taza de rnedida.
to con agua caliente del
grifo.
NOTA:
Use solo
charnplj para Alfornbras y
Tapetes ReginP. El uso de
otras soluciones lirnpiado-
ras puede generar dernasia-
da espurna. Dernasiada
espurna hari que el flotador
apague la aspiradora antes
de tiernpo.
Utilizar otros
lirnpiadores anulara la
garantia.
LIMPIEZA DE ALFOMBRAS
Ponga la parte inferior del Enchufe el cordon en un
NOTA:
Nunca deje la unidad
deposit0 de solucibn en la tornacorriente. Pise el pedal
desatendida rnientras esti
aspiradora y gire la parte liberador de mango para
encendida. APAGUELA cuan-
superior hastaque la palanca poner la unidad en la posi-
do vaya a vaciar y llenar
se coloque en su lugar. cion de aspirar.
el deposito.
NO
irnpregne
dernasiado la alfornbra.
Enciendala aspiradora.
IMPORTANTE:
PARA LOGRAR LOS MEJORES RESULTADOS DE LIMPIEZA
ASPIRE CON MOVlMlENTOS CONSTANTES, MODERADOS HAClA ADELANTE Y
HAClA ATRAS. Cuando apriete el gatillo de espray de solucion, jale la unidad en
rnovirniento hacia atras. Suelte el gatillo y ernpuje la unidad hacia adelante por el
rnismo carnino para quitar el agua sucia
y
la solucion de la alfombra. (Para areas
percudidas, repita de ser necesario).
IMPORTANTE:
SI EL SONIDO DE MOTOR SE
VUELVE MUYAGUDO, INDICA QUE EL TANQUE DEAGUA SUClA
ESTA
LLENO Y
DEBEVACIARSE. UNA
INDICACION
VISUAL ES CUANDO EL FLOTADORAZUL HA
SUBIDO HASTA
LA
PARTE SUPERIOR DEL TANQUE DE AGUA SUCIA.
Table of contents