Rehau AWADOCK POLYMER CONNECT User manual
Construction
Automotive
Industry
* Des solutions polymères à l‘infini
www.rehau.com
AWADOCK POLYMER CONNECT
MONTAGEANLEITUNG/ INSTALLATION INSTRUCTIONS/ NOTICE DE MONTAGE/
INSTRUKCJA MONTAŻU/ NÁVOD K MONTÁŽI/ INSTRUCŢIUNI DE MONTAJ

2
AWADOCK POLYMER CONNECT
INHALT / CONTENT / TABLE DES MATIÈRES / OBSAH /
SPIS TREŚCI / CUPRINS
Montageanleitung. . . . . . . . . . . . . . . . . . . . . . 3
Installation instructions . . . . . . . . . . . . . . . . 9
Notice de montage . . . . . . . . . . . . . . . . . . . 15
Instrukcja montażu . . . . . . . . . . . . . . . . . . . 21
Montážní návod . . . . . . . . . . . . . . . . . . . . . . 27
Instructiuni de montaj . . . . . . . . . . . . . . . . . 33
Bau
Automotive
Industrie
Gültig ab April 2009
www.rehau.com
AWADOCK POLYMER CONNECT
MONTAGEANLEITUNG
4
AWADOCK POLYMER CONNECT
MONTAGEANLEITUNG
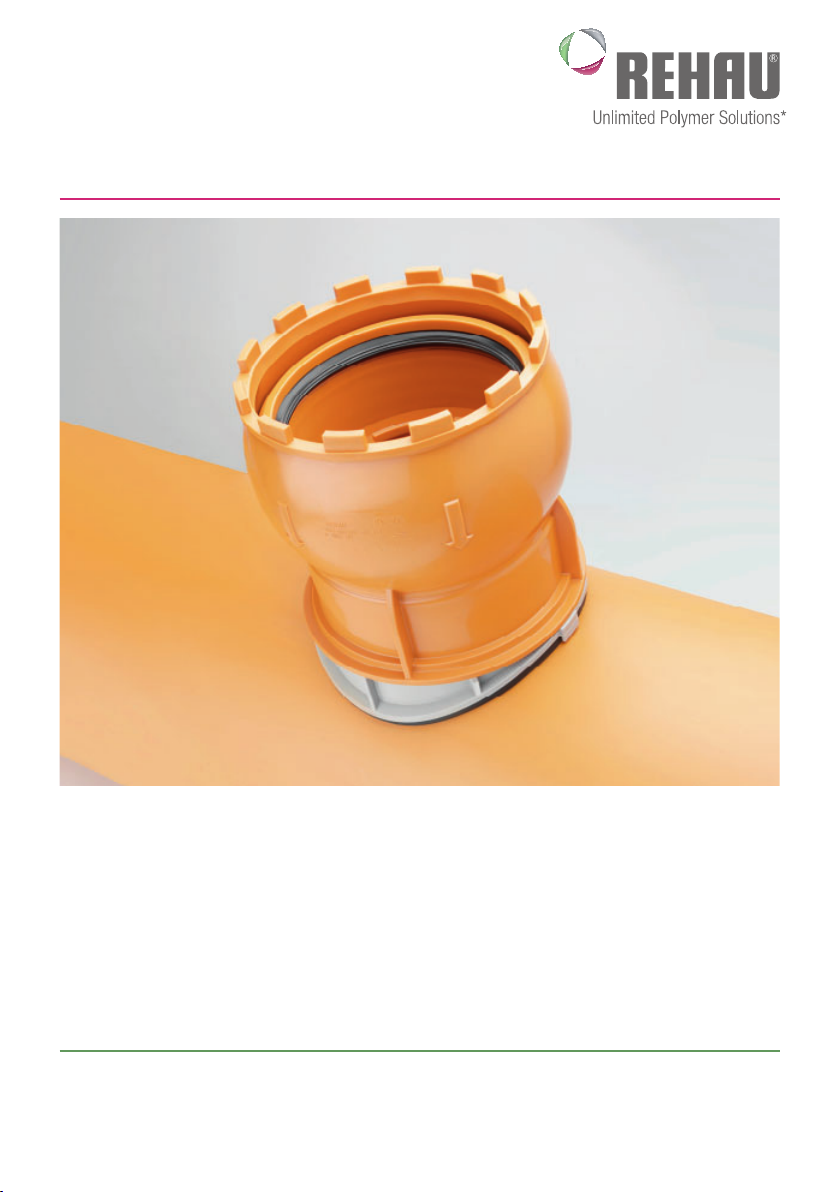
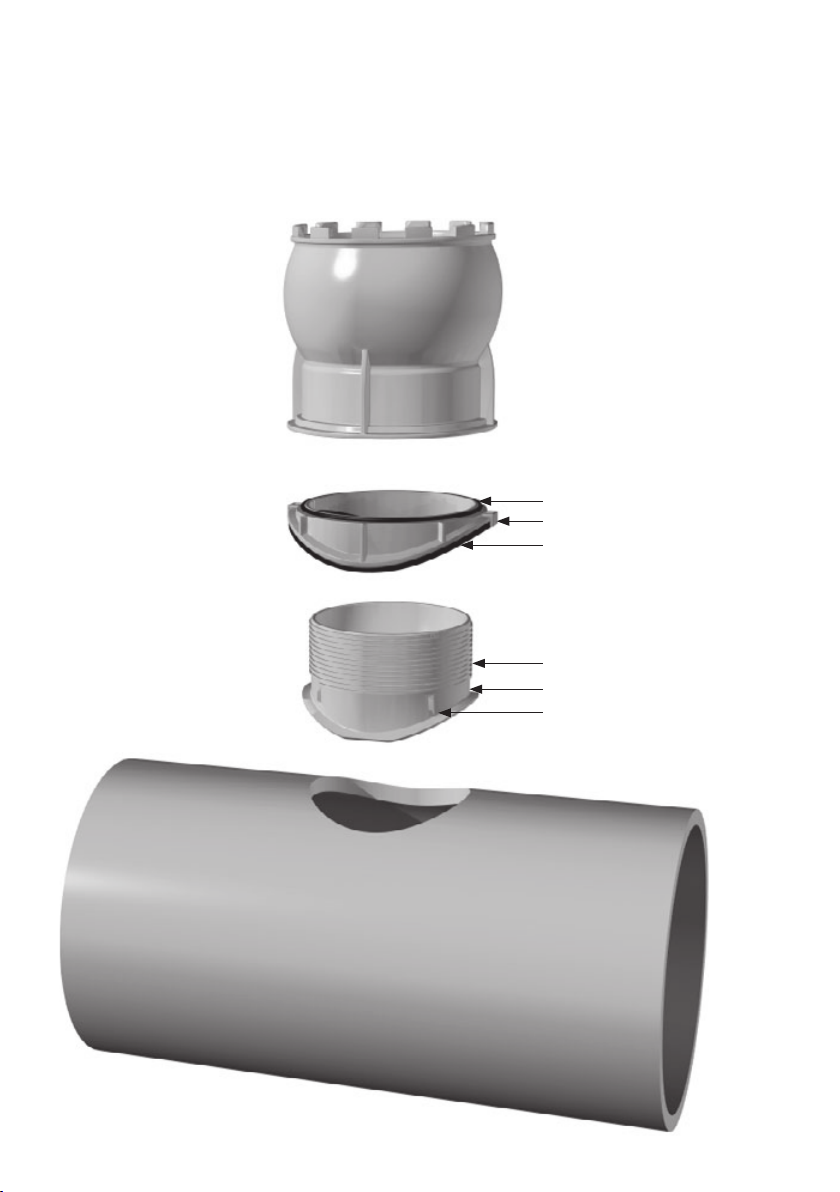
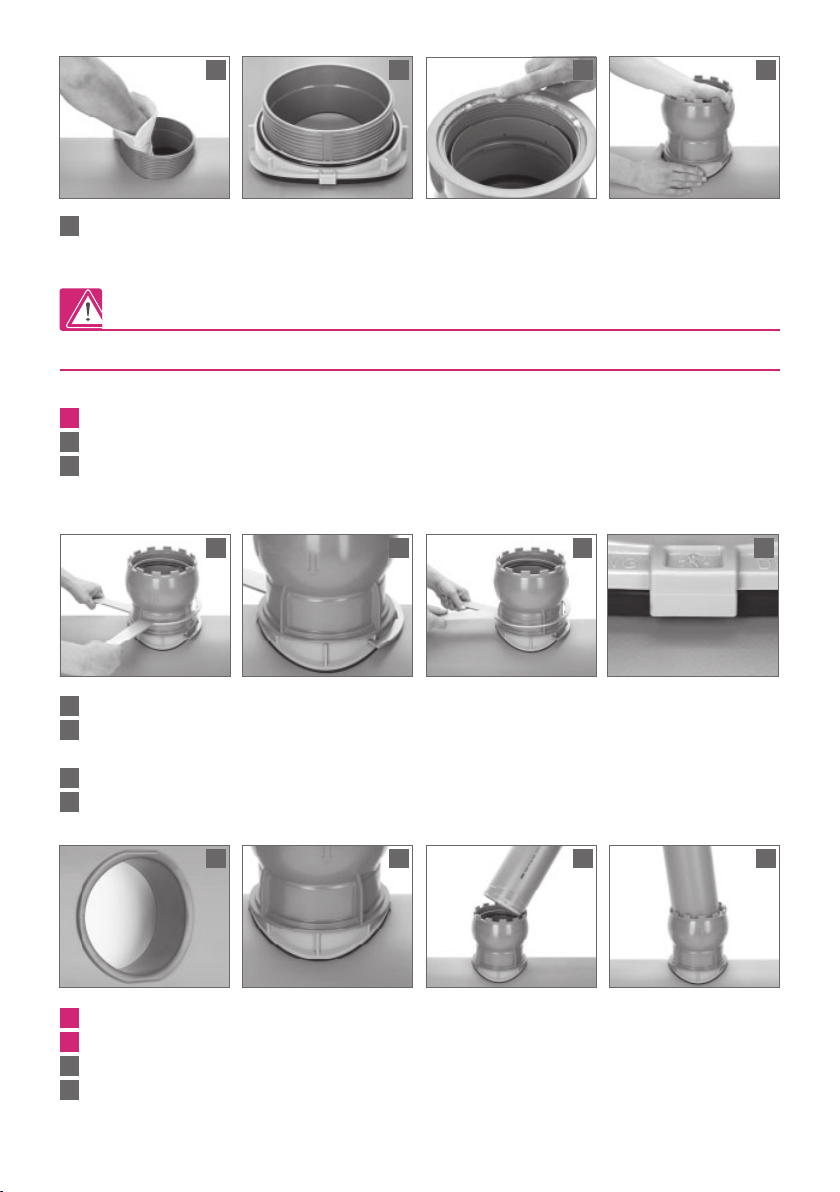
Schraubkrone mit integriertem
Kugelgelenk
Haltering
O-Ringdichtung
Abstandhalter
Anschlussdichtung mit Q-TE-C
Innenhülse
Nut
Innenanschlag
Haltenase
Hauptleitung

5
Einbauhinweise:
- Überprüfen Sie Ihr Set AWADOCK POLYMER CONNECT auf Vollständigkeit.
- Hauptleitung vor Montage auf Abwasserrückstau untersuchen.
- Achten Sie auf Sauberkeit während der Montage.
- Schützen Sie den Haltering mit Dichtung, bis zum endgültigen Einbau, vor Nässe.
- Für den richtigen Einbau ist ein Montageschlüsselset notwendig.
Dieses finden Sie im AWADOCK Zubehör-Programm. Art.-Nr. 190497-001.
- Angaben zu Durchmessern und Rohrwanddicke sind zu prüfen und mit dem Hauptrohr zu vergleichen.
Artikelnummer Hauptrohr/
Anschlussrohr DN/OD
Rohrwanddicke
Minimal Maximal
Material des Anschluss- und
Hauptrohres
171551-200 200/160 4,9 10,2
PVC nach EN 1401
PP nach EN 1852
PP-MD nach EN 14758
171561-250 250/160 6,2 12,7
171571-315 315/160 7,7 15,6
171581-400 400/160 9,8 19,5
171591-500 500/160 12,2 24,1
171601-630 630/160 15,0 33,0
Gehen Sie nun wie folgt vor:
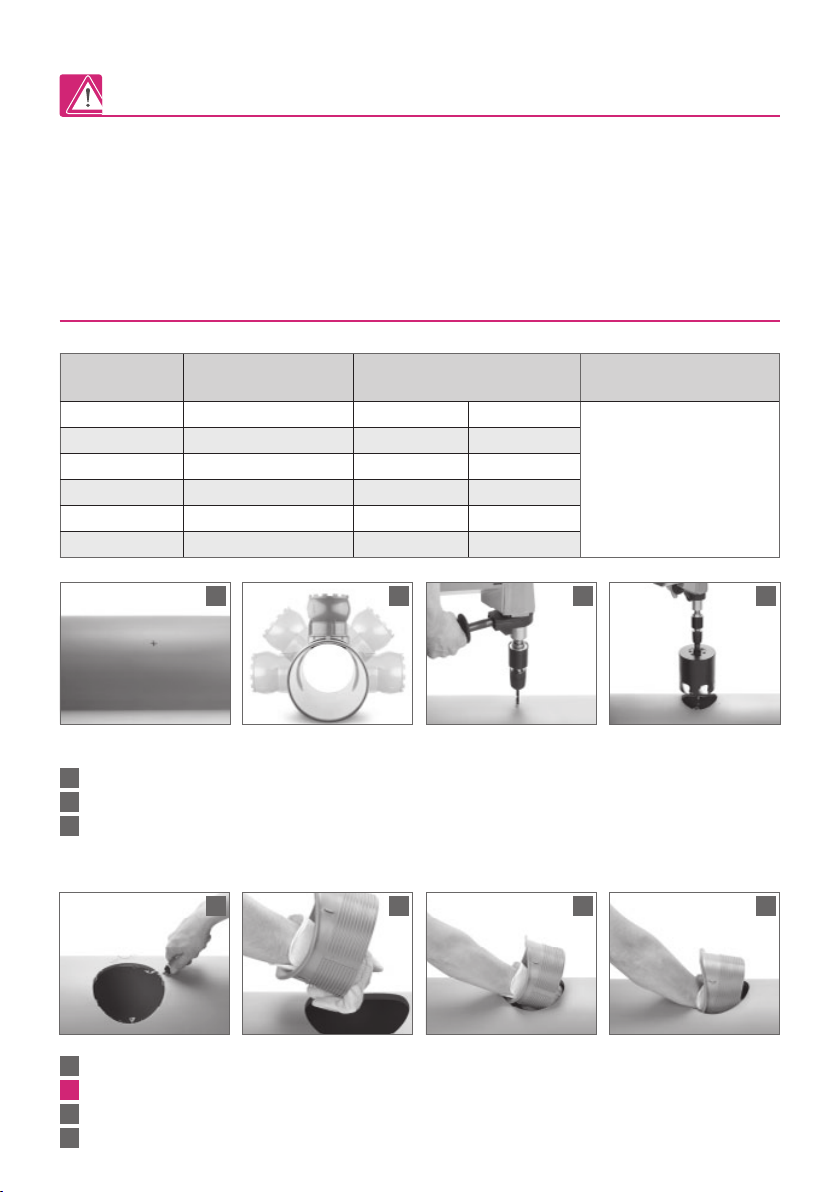
Anschlussposition mit einem geeigneten Stift markieren (zwischen 90° und 270°) siehe Skizze.
Markierte Stelle mit einem 8 mm Bohrer vorbohren.
Zentrierdorn-/bohrer in die vorgebohrte Bohrung einführen. Bohrung mit Lochsäge im 90° Winkel zur Rohr-
achse, Bohrdurchmesser muss 162 ± 1 mm betragen.
Entgraten Sie die Bohrung innen und außen mit einem geeignetem Werkzeug.
Halten Sie die Innenhülse wie oben gezeigt. Wir empfehlen, Handschuhe zu tragen.
Innenhülse am Bohrloch ansetzen.
Drücken Sie die Innenhülse kräftig in das Bohrloch.
1 2 31
4 6 75
7
6
5
4
3
2
1

6
Drehen Sie die Innenhülse so, dass die Nut parallel zur Rohrachse steht. Nun ziehen Sie die Innenhülse hoch.
Achten Sie darauf, dass die Dichtungen und Dichtflächen vollkommen sauber sind!
Setzen Sie den Haltering mit der Anschlussdichtung und der O-Ring Dichtung auf die
Innenhülse auf.
Bestreichen Sie die Dichtfläche der Schraubkrone mit Gleitmittel.
Schrauben Sie die Schraubkrone zunächst per Hand auf die Innenhülse.
Fixieren Sie mit der anderen Hand den Haltering.
Setzen Sie die zwei Montageschlüssel wie im Bild dargestellt an
Achten Sie darauf, dass der erste Montageschlüssel am Steg des Halterings greift. Dieser dient zur
Fixierung und wird nicht gedreht.
Mit dem zweiten Montageschlüssel die Schraubkrone fest anziehen.
Ein Abstandshalter am Haltering dient als „Drehmoment-Begrenzer“.
Prüfen Sie, ob der Innenanschlag gleichmäßig am Rohr anliegt.
Prüfen Sie den korrekten Sitz der Dichtung.
Bestreichen Sie das Anschlussrohr mit Gleitmittel und stecken es bis zum Anschlag in die Schraubkrone ein.
Je nach Einbausituation, kann das Anschlussrohr stufenlos horizontal oder vertikal um ± 7,5° abgewinkelt
werden.
8 10 119
16 18 1917
12 1513 14
19
18
17
16
15
14
13
12
10
9
8
11

7
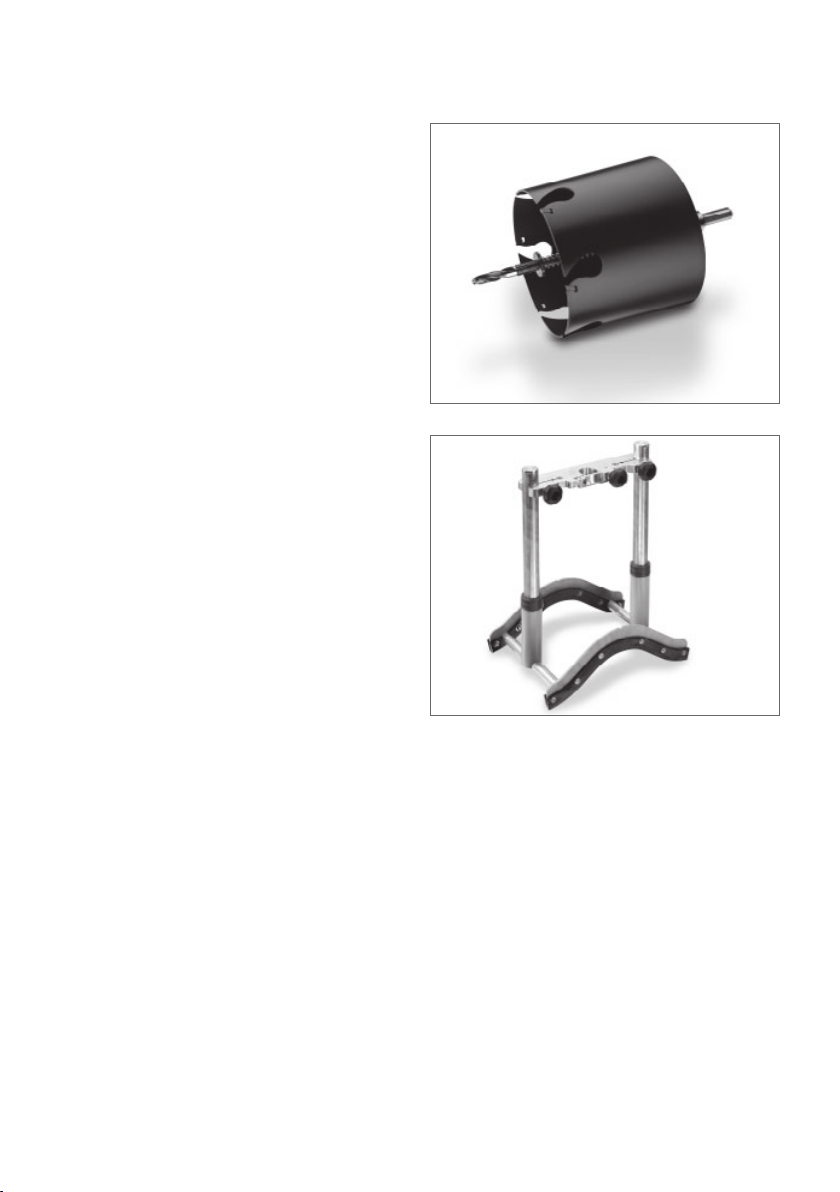
Nützliche Montagewerkzeuge für müheloses Bohren in Kunststoffkanalrohre
AWADOCK Lochsäge
- Sekundenschnelles Anbohren von Kunststoff-
Kanalrohren
- Glatte und saubere Bohrung – fast ohne Grat
- Hohe Standzeiten
- Der Bohrkern wird am Zentrierbohrer festgehalten
und kann leicht entfernt werden, ohne in das
Hauptrohr zu fallen.
AWADOCK Bohrstativ für eine rechtwinklige und
zentrische Bohrung
- Bequemes und geführtes Bohren
- Keine Befestigung auf dem Rohr notwendig,
dadurch kurze Rüstzeiten
- Exakte Bohrungen senkrecht zur Rohrachse –
ohne zu verkanten

8

Construction
Automotive
Industry
Valid from April 2009
www.rehau.com
AWADOCK POLYMER CONNECT
INSTALLATION INSTRUCTIONS

10
AWADOCK POLYMER CONNECT
INSTALLATION INSTRUCTIONS
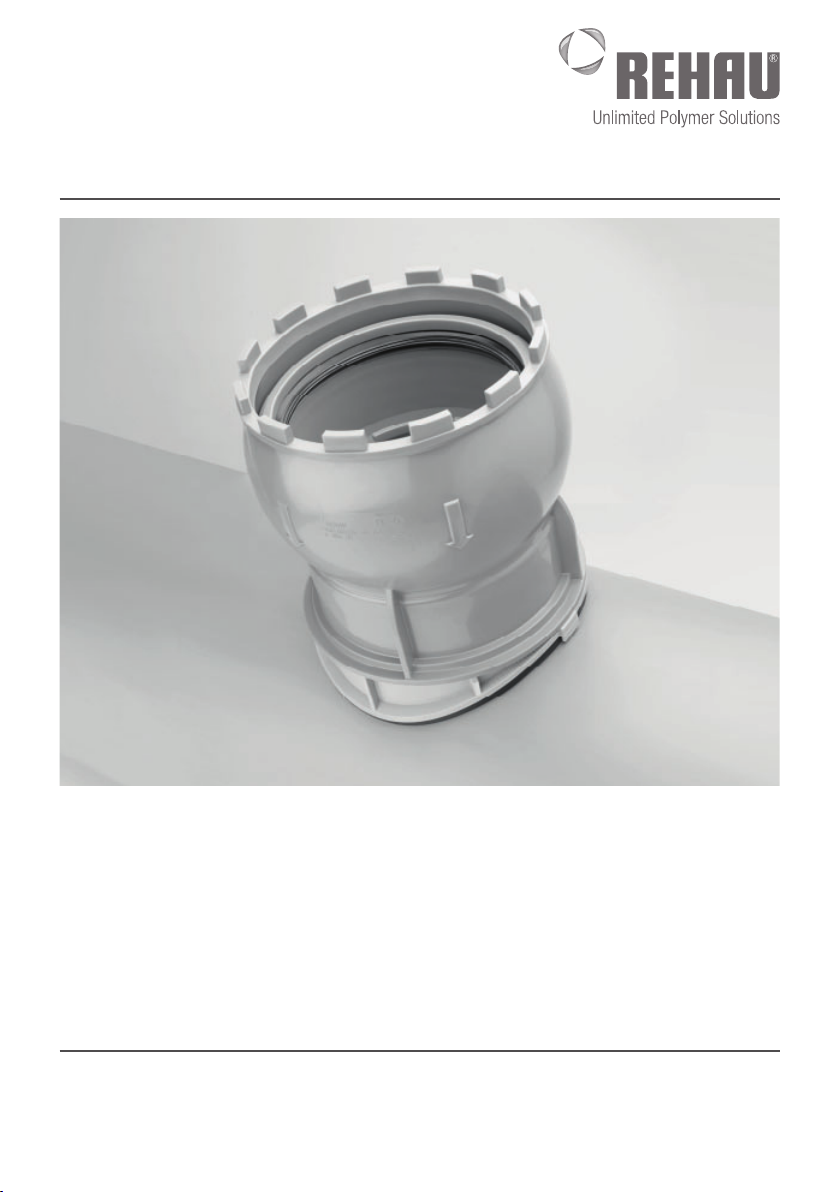
Screw-in crown with integrated
universal joint
Retainer ring
O-sealing
Spacer
Connecting seal with Q-TE-C
Inside casing
Nut
Inside stopper
Holding handle
Main pipe

11
Installation information:
- Check the set AWADOCK POLYMER CONNECT for completeness.
- Test the main pipe for sewage backup before installation.
- During installation, pay attention to cleanliness.
- Keep the retainer ring dry until the final connection.
- An installation wrench set is necessary for the correct fixing.
Please find in AWADOCK accessories program. Art.-No. 190497-001.
- Information about diameters and pipe wall thickness are to be tested and compared with the main pipe.
Article number Main pipe/
connecting pipe DN/OD
Wall thickness
Minimum Maximum
Material of connecting-
and main pipe
171551-200 200/160 4,9 10,2
PVC to EN 1401
PP to EN 1852
PP-MD to EN 14758
171561-250 250/160 6,2 12,7
171571-315 315/160 7,7 15,6
171581-400 400/160 9,8 19,5
171591-500 500/160 12,2 24,1
171601-630 630/160 15,0 33,0
Proceed as follows:
Mark the connecting position with a suitable pen (between 90° and 270°), see drawing.
Drill the marked place with an 8 mm drill.
Insert the centring pin-/borer in the pre-drilled hole. Bore with a keyhole saw a 90° angle off-axis to the pipe.
Hole diameter should be 162 ± 1 mm.
Chamfer the drilled section on the inside and outside with a suitable tool.
Hold the inside casing as you can see above. We recommend that gloves are worn.
Prepare the inside casing at the borehole.
Strongly push the inside casing into the borehole.
1 2 31
4 6 75
7
6
5
4
3
2
1

12
Rotate the inside casing until the nut is parallel to the axis of the pipe. Now raise the inside casing.
Pay attention that the sealing and surfaces are completely clean.
Place the retainer ring with connecting sealing and the O-sealing to the inside bushing.
Apply lubricant to the sealing surface of the crown.
Manually screw the screw-in crown head first onto the inside casing.
Fix the retainer ring with the other hand.
Hold both installation wrenches as in picture above.
Ensure that the first installation wrench grips on the ligament of the retainer ring.
This is for fixing and will not be rotated.
With the second installation wrench, tighten the screw-in crown in.
The spacer on the retainer ring is used as a “torque limiter”.
Check if the inside stopper is evenly on the pipe.
Check the sealing is installed correctly.
Apply lubricant to the connecting pipe and push into the screw-in crown up to the stopper.
If necessary, the connecting pipe can be adjusted horizontally or vertically about ± 7,5°.
8 10 119
16 18 1917
12 1513 14
19
18
17
16
15
14
13
12
10
9
8
11

13
Useful assembly tool for easy drilling in polymer sewer pipe.
AWADOCK keyhole saw
- Drilling done in seconds of polymer sewer pipe
- Flat and clean drilling - nearly without flash
- High durability
- The core is fixed by the centre drill but this can be
easily removed without it falling into the main pipe.
AWADOCK drilling stand for a square and centred
drilling.
- Comfortable and guided drilling
- Not necessary to make an attachment of the pipe,
therefore no set-up times
- Exact drilling vertical to the axis of the pipe
– without tilting

14

Bâtiment
Automobile
Industrie
Valable á partir de Avril 2009
* Des solutions polymères à l‘infini
www.rehau.com
AWADOCK POLYMER CONNECT
NOTICE DE MONTAGE

16
AWADOCK POLYMER CONNECT
INSTRUCTION DE MISE EN OEUVRE
Couronne filetée avec
connexion à rotule intégrée
Couronne d’arrêt
Bague d’étanchéité torique
Entretoise
Joint d’ étanchéité avec Q-TE-C
Pièce intérieure filetée
Rainure
Butée intérieure
Arête de fixation
Tube collecteur
17
Directives de pose:
- Vérifier si votre Set AWADOCK POLYMER CONNECT est complet
- Examiner avant montage si la canalisation principale n’est pas bouchée
- Veiller à la propreté pendant le montage
- Protéger la couronne d’arrêt avec le joint contre l’humidité jusqu’à la fin du montage
- Pour la pose, des clés de montage sont nécessaires.
Elles se trouvent dans le programme des accessoires AWADOCK Art.-Nr. 190497
- Les indications concernant les diamètres et les épaisseurs sont à verifier et à comparer avec le tube collecteur
Numéro d’article Tube collecteur / tube de
branchement DN/OD
Épaisseur du tube
Minimum Maximum
Matière des tubes collecteur et
de branchement
171551-200 200/160 4,9 10,2
PVC conformément à EN1401
PP conformément à EN1852
PVC conformément à EN 13476-2
171561-250 250/160 6,2 12,7
171571-315 315/160 7,7 15,6
171581-400 400/160 9,8 19,5
171591-500 500/160 12,2 24,1
171601-630 630/160 15,0 33,0
Suiver les indications suivantes:
Marquer le positionnement du branchement avec un marqueur (entre 90° et 270°) voir croquis
Percer l’emplacement marqué avec foret de 8 mm
Placer le foret de centrage dans le perçage. Percer avec la carotteuse perpendiculairement au tube.
Le diametre de perçage doit être de 162 ± 1 mm
Ébarber le perçage à l’intérieur et à l’extérieur avec un outil approprié
Fixer la pièce intérieure filetée comme montré ci-dessus. Nous conseillons le port de gant.
Positionner la piéce intérieure filetée
Pousser la pièce intérieure filetée avec force à l’intérieur du trou
1 2 31
4 6 75
7
6
5
4
3
2
1
18
Tourner la pièce intérieure filetée, de façon que la rainure soit parallèle à l’axe du tube.
Relever la pièce vers l’extérieur
Faites attention à ce que le joint et la surface d’étanchéité soit entièrement propre
Placer la couronne d’arrêt avec le joint d’étanchéité et le joint torique sur la pièce intérieure filetée
Enduire la surface à étancher de la couronne filetée avec du lubrifiant.
Visser la couronne filetée d’abord manuellement sur la pièce intérieure en fixant la couronne d’arrêt avec
l’autre main.
Positionner les clés de montage comme indiqué sur la photo
Veiller à ce que la première clé de montage ait prise sur la couronne d’arrêt.
Celle-ci sert à fixer et ne doit pas être vissé.
Visser la couronnne filetée à l’aide de la deuxième clé de montage jusqu’en butée
Une entretoise sur la couronne d’arrêt sert de limitateur de moment de couple
Vérifier que la butée intérieure est ajustée régulièrement sur le tube
Vérifier que le joint est placé correctement.
Enduire le tube de branchement avec le lubrifiant et emboîter le jusqu’en butée dans la couronne filetée
Selon les conditions de pose, le tube de branchement peut être décalé angulairement jusqu’à ± 7,5°
8 10 119
16 18 1917
12 1513 14
19
18
17
16
15
14
13
12
10
9
8
11
19
Outil de pose utile pour un perçage facile des tubes polymères
Carotteuse AWADOCK
- Perçage très rapide d’une canalisation polymére
- Trou lisse et propre presque sans bavure
- Durée de vie importante
- La carotte est retenue dans la carotteuse et
peut-être enlevée facilement sans qu´elle tombe
dans le collecteur
Trépied AWADOCK pour un perçage perpendiculaire
et centrique
- Perçage facile et guidé
- Pas de fixation nécessaire sur le collecteur, ainsi
court temps de préparation
- Perçage exact perpendiculaire à l’axe- sans caler

20
Table of contents
Languages:
Other Rehau Plumbing Product manuals


Popular Plumbing Product manuals by other brands


Lacava
Lacava 1586.1 owner's manual

newform
newform BLINK 70828E instructions

Kohler
Kohler Parigi K-2175 Installation and care guide

Gessi
Gessi RETTANGOLO 23407 manual

Hans Grohe
Hans Grohe Metris M71 220 2jet 73800 Series Instructions for use/assembly instructions

Central Brass
Central Brass 0289 Series installation instructions

Hans Grohe
Hans Grohe Modern Instructions for use/assembly instructions

resideo
resideo VR8215 Installation instruction

FRÄNKISCHE
FRÄNKISCHE FIPLOCK BHPA Assembly instruction

Kohler
Kohler K-2443 installation guide

IB RUBINETTERIE
IB RUBINETTERIE ELIO EO300 Fitting instructions

American Standard
American Standard 8340.243 Series parts list