manuals.online logo
Brands
  1. Home
  2. •
  3. Brands
  4. •
  5. Reliance Foundry
  6. •
  7. Outdoor Light
  8. •
  9. Reliance Foundry R-7593 User manual

Reliance Foundry R-7593 User manual

Decorave Bollard Installaon
Drop-In
Concrete Insert
1-877-789-3245 | info@reliance-foundry.com | www.reliance-foundry.com
Parts List
#PART QTY
1Bollard Base 1
2Bollard Cap 1
3Drop-In Concrete Insert 3/4" 1
4Threaded Rod 3/4" 1
5Washer 3/4" 1
6Hex Nut 3/4" 1
7Hexagon Socket Set Screw 3
8Plasc Plug 3
*Concrete insert manufacturers such as www.ucanfast.com
recommend specic measurements for minimum radii.
Installaon Equipment
Chalk 1" Masonry Drill Bit
Hammer 1-1/8" Socket Wrench
Vacuum Hammer Drill or Rotary Hammer
3/16" Hex Key Measuring Tape
Level Broom/Pressure Washer
3/4" Insert Seng Tool (or equivalent)
Before Installaon
STEP 1: Always check for hazards such as water pipes,
gas lines, and underground wiring before drilling.
STEP 2: Use a broom or pressure washer to clean the
concrete surface prior to bollard installaon.
STEP 3: Study the site plans to locate and mark the
precise center point of each bollard. For secure
installaon, ensure there is a minimum radius*of
solid concrete around each mark.
To protect the nish, keep bollards in packaging
unl exact moment of installaon.
Handle with care to avoid scratching or damaging
bollard surfaces as abrasions will lead to rust.
Once scratched, bollards cannot be repaired to
original form without re-nishing the enre surface.
R-7593
SECTION U-U
SCALE 0.38 : 1
PARTS LIST
DESCRIPTION
PART NUMBER
QTY
ITEM
R7593 BaseR7593B
11
R7593 CapR7593C
1
2
R7500 Threaded Bar
3/4" x 49"
R7500BAR
3/4"
1
4
Washer 3/4" OD 3 1/2"
Thick 1/4"
Washer 3/4"
OD 3 1/2"
1
5
Hex Nut 3/4" - requires
1 1/8" wrench
Hex Nut 3/4"
1
6
Hexagon Socket Set
Screw 3/8" x 1/2" -
requires 3/16" hex key
Hexagon
Socket Set
Screw 3/8" x
1/2"
3
7
Polyethylene Plug 3/8"Polyethylene
Plug 3/8"
3
8
Drop-in Concrete Insert
3/4" - requires 1" x 3
1/8" hole (dia. x depth)
Drop-in
Concrete
Insert 3/4"
1
3
U
U
1
5
6
4
3
2
7
8
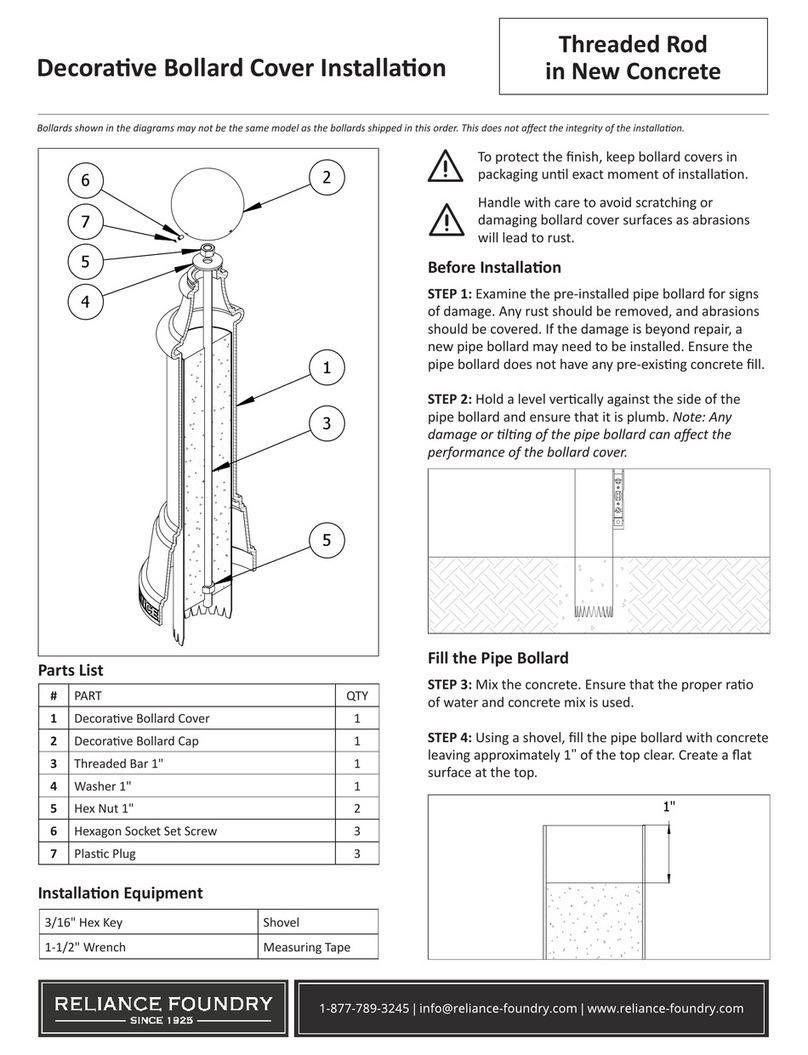
Decorave Bollard Installaon
Drop-In
Concrete Insert
1-877-789-3245 | info@reliance-foundry.com | www.reliance-foundry.com
Drill the Hole
STEP 4: Tap a pilot divot hole in the center of each mark.
STEP 5: Set the depth control on the hammer drill (or
rotary hammer) to 3-1/8". If depth control is not available,
mark 3-1/8"on the masonry bit.
STEP 6: Drill a hole that has a 1"diameter and 3-1/8"
depth. Drill on high speed, using the hammer funcon if
available.
Secure the Bollard
STEP 7: Clear the hole of all debris and/or standing water
using the vacuum.
STEP 8: Tap the drop-in insert (A) into the hole with the
sloed end facing down, and drive it down unl its top sits
ush with the concrete surface. Insert a seng tool (B) into
the threaded hole, then hammer down. This will cause the
internal expansion plug to set the concrete insert in place.
Note: If a proper seng tool is not available, an equivalent
at-end punch can be used.
STEP 9: Keep the bollard in its protecve packaging.
Carefully place the bollard base near the installaon
posion. When ready to install, remove the protecve
packaging.
STEP 10: Set the bollard base upright and maneuver it so
the center lines up with the threaded hole in the concrete
insert.
STEP 11: Lower the threaded rod through the bollard base.
STEP 12: Connue to thread the rod into the concrete
insert. Tighten** the threaded rod by hand unl it is secure
in the concrete insert.
STEP 13: Place the washer over the threaded rod so that it
rests on top of the bollard. Apply the 3/4"hex nut to the
threaded rod and ghten unl the bollard is secure.
**The manufacturer recommends ghtening the threaded rod to
a depth of approximately 1" into the concrete insert.
R-7593
1"
3 1/8"
3 1/8"

1"
SECTION W-W
SCALE 0.93
W
W
1
"
PARTS LIST
DESCRIPTION
PART NUMBER
QTY
ITEM
concrete
11
Drop-in Concrete Insert
3/4" - requires 1" x 3
1/8" hole (dia. x depth)
Drop-in
Concrete
Insert 3/4"
1
2
set_tool_3_4
1
3
hammer_publi
c
1
4
B
A
STEP 6
STEP 7
STEP 8 STEP 11
STEP 12 STEP 13
Decorave Bollard Installaon
Drop-In
Concrete Insert
1-877-789-3245 | info@reliance-foundry.com | www.reliance-foundry.com
Inspect the installaon. Abrasions should
be covered as soon as possible. For damage
repair or other servicing needs, please contact
Reliance Foundry’s sales department.
STEP 14: Remove bollard cap from its packaging. Place
the cap on the top of the sha of the bollard. Secure and
align the cap to the bollard base with the three set screws.
Tighten in equal amounts to ensure that the cap remains
centered.
STEP 15: Place the plasc plugs (C) over the set screw
heads.
STEP 14
STEP 15
R-7593
C

Other Reliance Foundry Outdoor Light manuals
Reliance Foundry R-7593 User manual

Reliance Foundry

Reliance Foundry R-7593 User manual

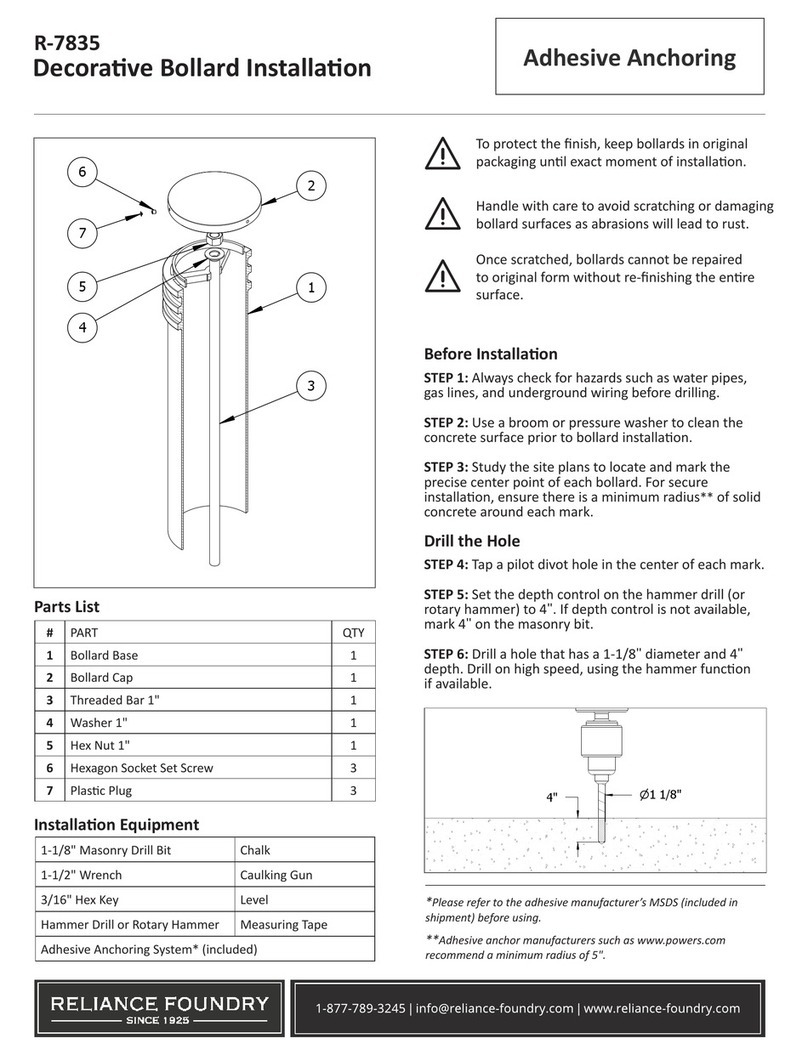
Reliance Foundry R-7530 User manual

Reliance Foundry

Reliance Foundry R-7530 User manual

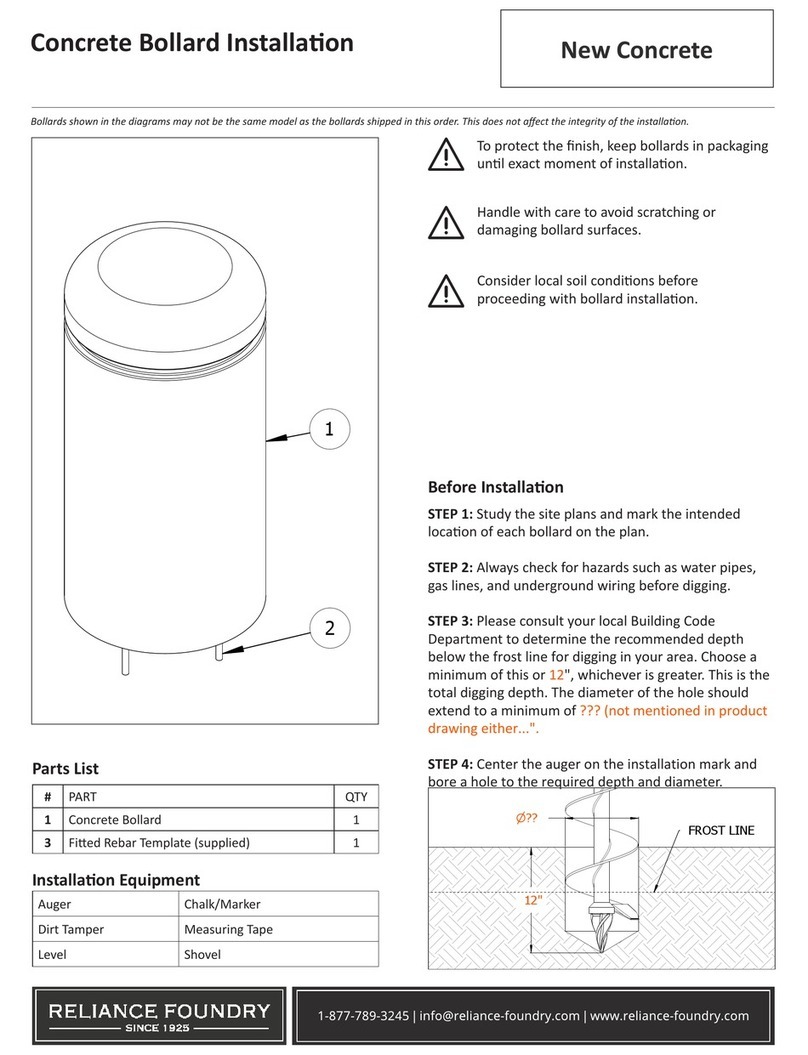
Reliance Foundry Concrete Bollard User manual

Reliance Foundry

Reliance Foundry Concrete Bollard User manual

Reliance Foundry R-8471 User manual

Reliance Foundry

Reliance Foundry R-8471 User manual

Reliance Foundry R-7535 User manual

Reliance Foundry

Reliance Foundry R-7535 User manual

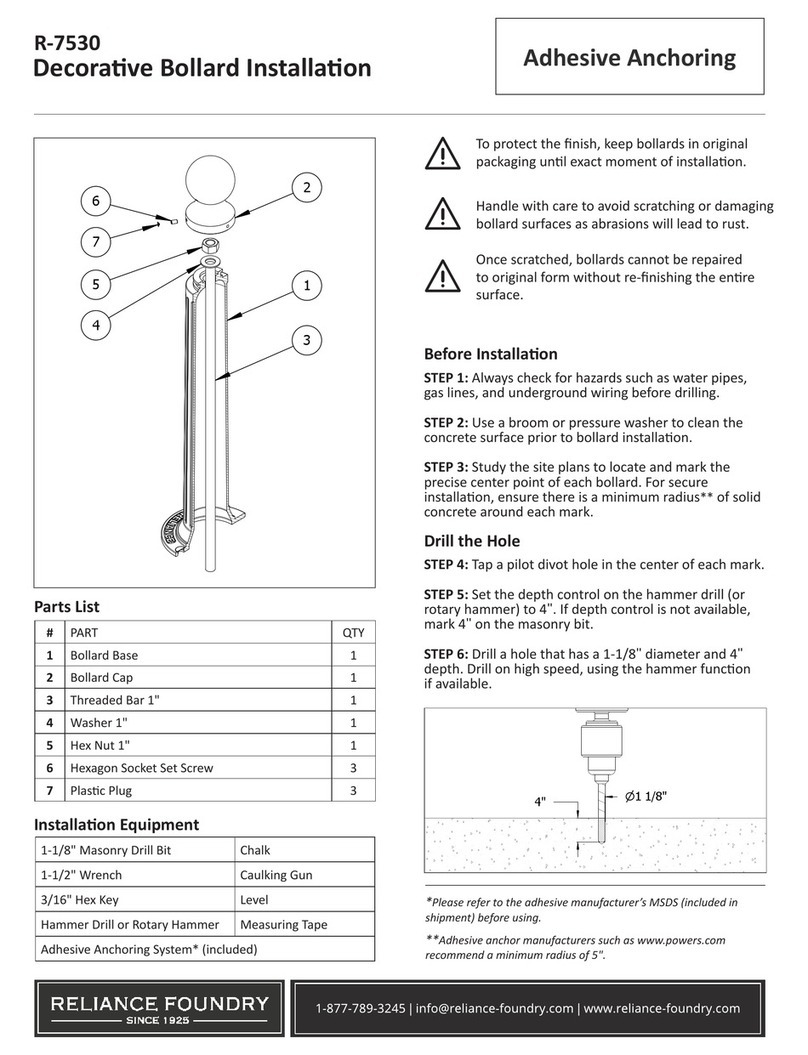
Reliance Foundry R-7835 User manual

Reliance Foundry

Reliance Foundry R-7835 User manual
Reliance Foundry R-7593 User manual

Reliance Foundry

Reliance Foundry R-7593 User manual

Reliance Foundry R-8464 User manual

Reliance Foundry

Reliance Foundry R-8464 User manual

Reliance Foundry R-7539 User manual

Reliance Foundry

Reliance Foundry R-7539 User manual
Popular Outdoor Light manuals by other brands

Hess CENTO Installation and operating instructions

Hess

Hess CENTO Installation and operating instructions

PROGRESSIVE DESK RGB Mood Lamp LT-03 user manual

PROGRESSIVE DESK

PROGRESSIVE DESK RGB Mood Lamp LT-03 user manual

marset Santorini C Assembly instructions

marset

marset Santorini C Assembly instructions

Winsome house WH072 instruction manual

Winsome house

Winsome house WH072 instruction manual

ring REIL2750 instructions

ring

ring REIL2750 instructions

SLV FENDA 155540 instruction manual

SLV

SLV FENDA 155540 instruction manual

Milwaukee M18 IL Original instructions

Milwaukee

Milwaukee M18 IL Original instructions

Unex TOM CONCAVE ROUND II LED operating manual

Unex

Unex TOM CONCAVE ROUND II LED operating manual

LIGMAN GA-31913 installation manual

LIGMAN

LIGMAN GA-31913 installation manual

LED Lighting XSY-AL Series Installation instruction

LED Lighting

LED Lighting XSY-AL Series Installation instruction

HEPER ZEROX S Hybrid Installation & maintenance instructions

HEPER

HEPER ZEROX S Hybrid Installation & maintenance instructions

Link LOON CHILL LITE manual

Link

Link LOON CHILL LITE manual

WHITECROFT LIGHTING Broadwalk RS Installation leaflet

WHITECROFT LIGHTING

WHITECROFT LIGHTING Broadwalk RS Installation leaflet

BOSS ILLUMINATION NIMBUS S product manual

BOSS ILLUMINATION

BOSS ILLUMINATION NIMBUS S product manual

Pro-Elec PELL0016 quick guide

Pro-Elec

Pro-Elec PELL0016 quick guide

Thorn ADELIE WIDE installation instructions

Thorn

Thorn ADELIE WIDE installation instructions

LIGMAN AM-80011 installation manual

LIGMAN

LIGMAN AM-80011 installation manual

Spear CLUB LED installation instructions

Spear

Spear CLUB LED installation instructions

manuals.online logo
manuals.online logoBrands
  • About & Mission
  • Contact us
  • Privacy Policy
  • Terms and Conditions

Copyright 2025 Manuals.Online. All Rights Reserved.