manuals.online logo
Brands
  1. Home
  2. •
  3. Brands
  4. •
  5. Reliance Foundry
  6. •
  7. Outdoor Light
  8. •
  9. Reliance Foundry Concrete Bollard User manual

Reliance Foundry Concrete Bollard User manual

1-877-789-3245 | info@reliance-foundry.com | www.reliance-foundry.com
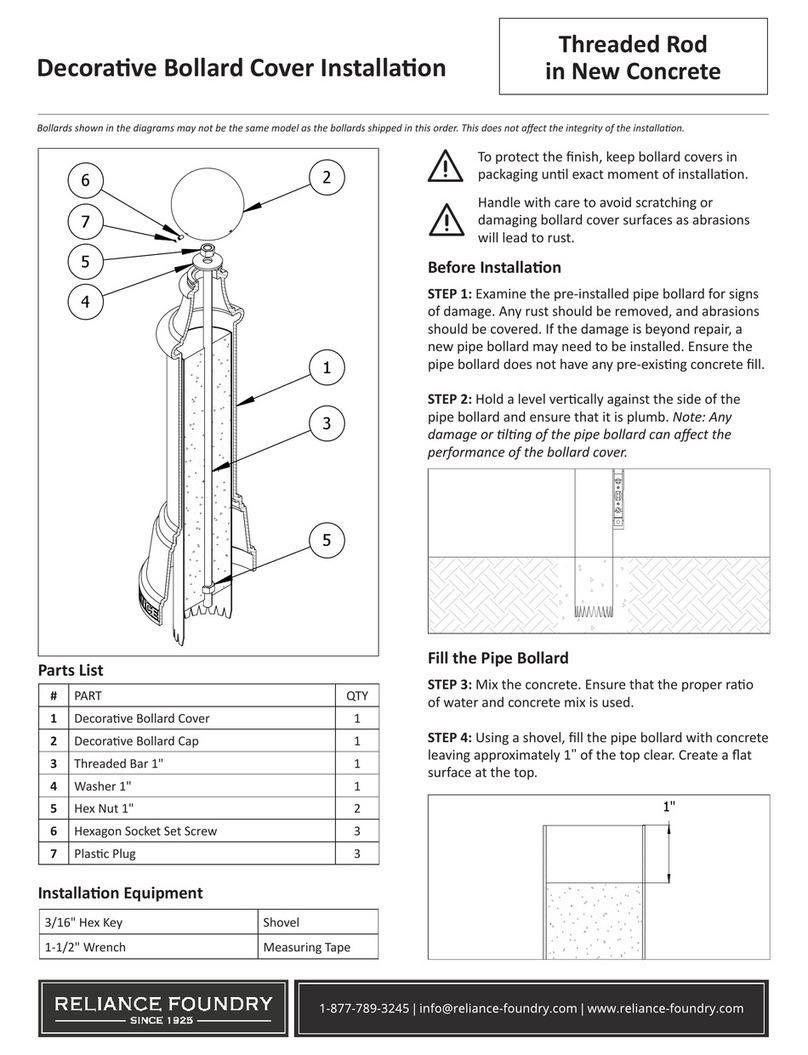
Concrete Bollard Installaon New Concrete
Parts List
Installaon Equipment
#PART QTY
1Concrete Bollard 1
3Fied Rebar Template (supplied) 1
Auger Chalk/Marker
Dirt Tamper Measuring Tape
Level Shovel
To protect the nish, keep bollards in packaging
unl exact moment of installaon.
Handle with care to avoid scratching or
damaging bollard surfaces.
Consider local soil condions before
proceeding with bollard installaon.
Bollards shown in the diagrams may not be the same model as the bollards shipped in this order. This does not aect the integrity of the installaon.
Before Installaon
STEP 1: Study the site plans and mark the intended
locaon of each bollard on the plan.
STEP 2: Always check for hazards such as water pipes,
gas lines, and underground wiring before digging.
STEP 3: Please consult your local Building Code
Department to determine the recommended depth
below the frost line for digging in your area. Choose a
minimum of this or 12", whichever is greater. This is the
total digging depth. The diameter of the hole should
extend to a minimum of ??? (not mentioned in product
drawing either...".
STEP 4: Center the auger on the installation mark and
bore a hole to the required depth and diameter.
PARTS LIST
DESCRIPTION
PART
NUMBER
QTY
ITEM
Concre
te
Bollard
R-9701
11
Rebar
15mm
Epoxy
Coated
rb1536
32
1
2
FROST LINE
12"
??
1-877-789-3245 | info@reliance-foundry.com | www.reliance-foundry.com
Concrete Bollard Installaon New Concrete
Inspect the installaon. Abrasions should be
covered as soon as possible. For damage repair
or other servicing needs, please contact Reliance
Foundry’s sales department.
STEP 5: Ensure the area is properly formed to create a
perimeter that will hold wet concrete. Use a dirt tamper to
compact the soil below the intended surface.
Pour the Concrete
STEP 6: Mix the concrete. Check that the proper rao of
water and concrete mix is used—the concrete should have
a similar texture to moldable clay.
STEP 7: Fill the hole with concrete unl it is level with the
surface grade.
Secure the Bollard
STEP 8: Keep the bollard in its protecve packaging. When
ready to install, remove the bollard’s protecve packaging.
Note: It is recommended to bend the rebar slightly before
embedding in wet concrete.
STEP 9: Set the bollard over the site, ensuring that the
rebars are embedded in the concrete.
STEP 10: Hold a level against the side of the bollard and
ensure that it is plumb. Note: Once the concrete has cured,
there will be no way to make any adjustments.
STEP 11: Patch the surface around the bollard to make it
smooth with the exisng surface.
STEP 12: Allow the concrete to cure for a minimum of
2–3 days. Note: Moisture in the environment and cool
temperatures can signicantly slow the process.
STEP 7
STEP 5
STEP 10

Other Reliance Foundry Outdoor Light manuals

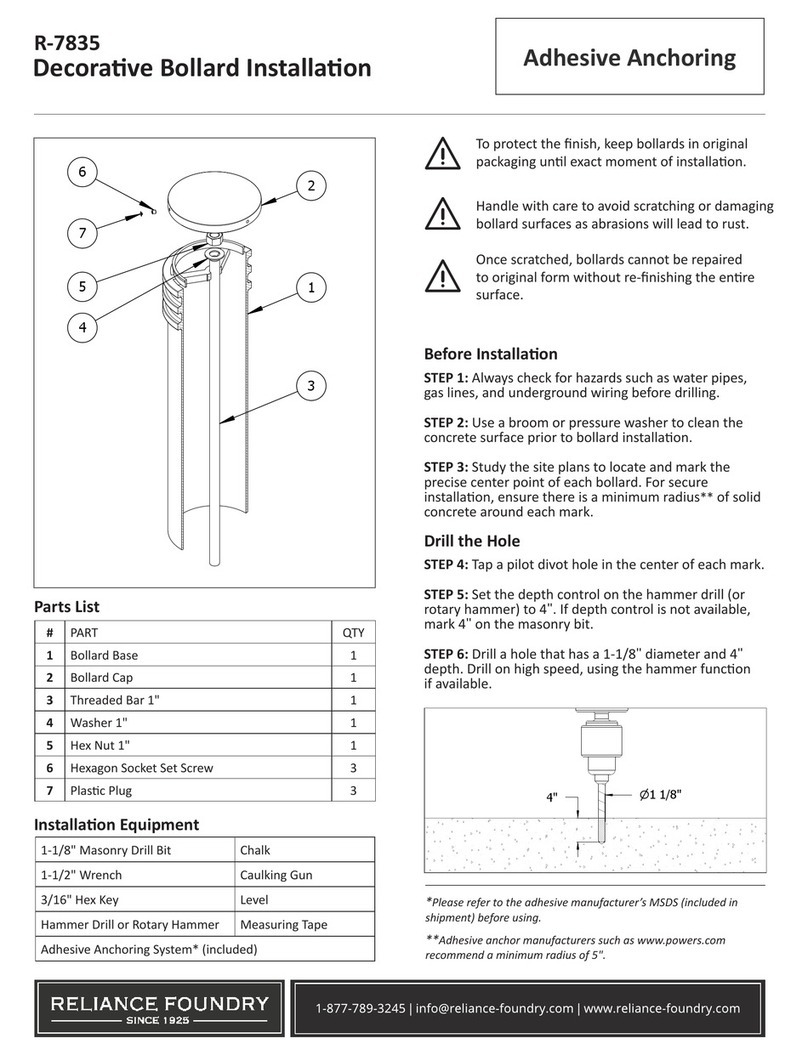
Reliance Foundry R-7530 User manual

Reliance Foundry

Reliance Foundry R-7530 User manual

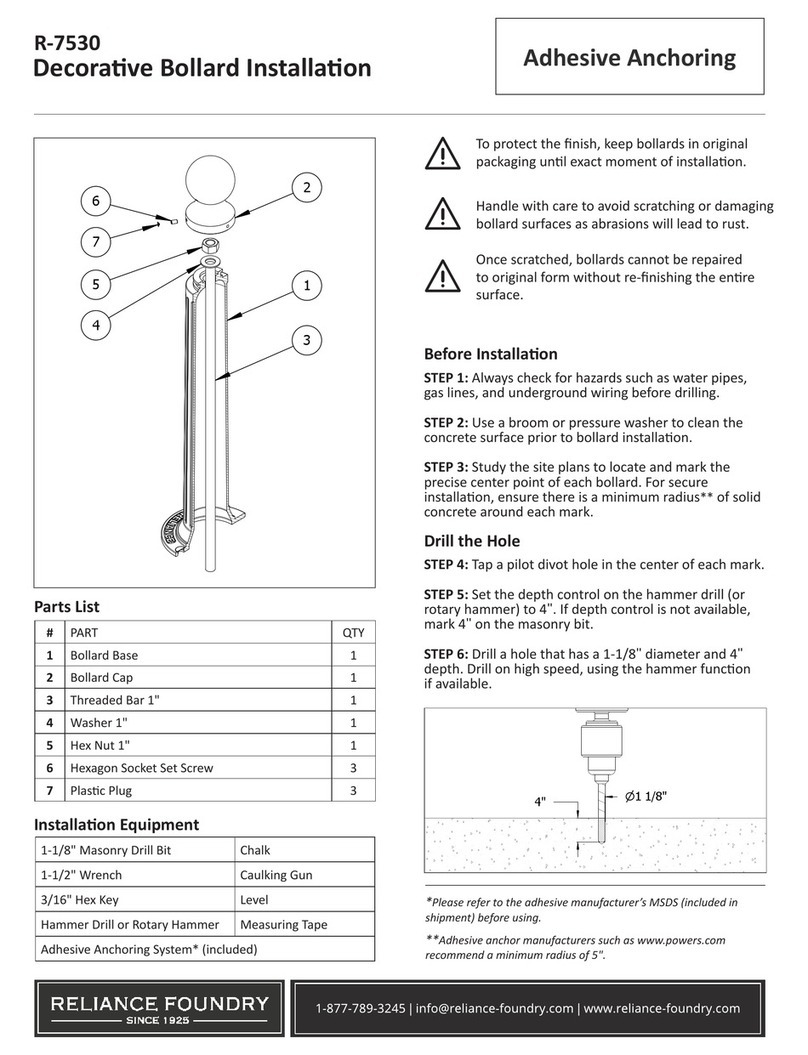
Reliance Foundry R-7835 User manual

Reliance Foundry

Reliance Foundry R-7835 User manual

Reliance Foundry R-7539 User manual

Reliance Foundry

Reliance Foundry R-7539 User manual

Reliance Foundry R-7593 User manual

Reliance Foundry

Reliance Foundry R-7593 User manual

Reliance Foundry R-8471 User manual

Reliance Foundry

Reliance Foundry R-8471 User manual

Reliance Foundry R-7593 User manual

Reliance Foundry

Reliance Foundry R-7593 User manual

Reliance Foundry R-8464 User manual

Reliance Foundry

Reliance Foundry R-8464 User manual

Reliance Foundry R-7593 User manual

Reliance Foundry

Reliance Foundry R-7593 User manual

Reliance Foundry R-7535 User manual

Reliance Foundry

Reliance Foundry R-7535 User manual
Popular Outdoor Light manuals by other brands

Kingfisher Viva-City Pro quick guide

Kingfisher

Kingfisher Viva-City Pro quick guide

MELINERA 103380 Operation and safety notes

MELINERA

MELINERA 103380 Operation and safety notes

Fiamma 98655-884 Installation and usage instructions

Fiamma

Fiamma 98655-884 Installation and usage instructions

LIGMAN ODESSA 2 OD-21025 installation manual

LIGMAN

LIGMAN ODESSA 2 OD-21025 installation manual

Griven AL5251 user manual

Griven

Griven AL5251 user manual

LIGMAN ALDO 6 installation manual

LIGMAN

LIGMAN ALDO 6 installation manual

Saxby Lighting Ikon Pro CCT Series Instruction leaflet

Saxby Lighting

Saxby Lighting Ikon Pro CCT Series Instruction leaflet

Haag-Streit BM 900 instruction manual

Haag-Streit

Haag-Streit BM 900 instruction manual

LIGMAN KI-60515 installation manual

LIGMAN

LIGMAN KI-60515 installation manual

Quoizel RO9018IZ installation guide

Quoizel

Quoizel RO9018IZ installation guide

EINHELL RT-CL 12 Li Original operating instructions

EINHELL

EINHELL RT-CL 12 Li Original operating instructions

Quoizel TFIK8411VA Assembly instruction sheet

Quoizel

Quoizel TFIK8411VA Assembly instruction sheet

LIGMAN VEKTER 27 installation manual

LIGMAN

LIGMAN VEKTER 27 installation manual

Quoizel MOI8408EK installation guide

Quoizel

Quoizel MOI8408EK installation guide

Thorn THOR L Series installation instructions

Thorn

Thorn THOR L Series installation instructions

Anolis ArcLine Mini Outdoor 9 User instructions

Anolis

Anolis ArcLine Mini Outdoor 9 User instructions

Home Decorators Collection Y37029A-151 Use and care guide

Home Decorators Collection

Home Decorators Collection Y37029A-151 Use and care guide

HAMPTON BAY 18165-000 Use and care guide

HAMPTON BAY

HAMPTON BAY 18165-000 Use and care guide

manuals.online logo
manuals.online logoBrands
  • About & Mission
  • Contact us
  • Privacy Policy
  • Terms and Conditions

Copyright 2025 Manuals.Online. All Rights Reserved.