manuals.online logo
Brands
  1. Home
  2. •
  3. Brands
  4. •
  5. Reliance Foundry
  6. •
  7. Outdoor Light
  8. •
  9. Reliance Foundry R-7593 User manual

Reliance Foundry R-7593 User manual

SECTION AA-AA
SCALE 0.45 : 1
PARTS LIST
DESCRIPTION
PART
NUMBER
QTY
ITEM
R7539 BaseR7539B
11
R7539 CapR7539C
1
2
Hexagon
Socket Set
Screw 3/8" x
3/4" -
requires
3/16" hex key
Hexago
n
Socket
Set
Screw
3/8" x
3/4"
3
7
Polyethylene
Plug 3/8"
Polyethy
lene
Plug
3/8"
3
8
R7500
Threaded
Bar 3/4"
Custom
Order Length
R7500B
AR 3/4"
1
4
Washer 3/4"
OD 3 1/2"
Thick 1/4"
Washer
3/4"
OD 3
1/2"
1
5
Hex Nut 3/4"
- requires 1
1/8" wrench
Hex
Nut 3/4"
1
6
010101
02b
115
Drop-in
Concrete
Insert 3/4" -
requires 1" x
3 1/8" hole
(dia. x depth)
Drop-in
Concret
e Insert
3/4"
1
3
AA
AA
1
3
4
2
5
6
8
7
Metal Decorave Bollard Cover
Installaon
Drop-In Concrete
Insert
1-877-789-3245 | info@reliance-foundry.com | www.reliance-foundry.com
Bollards shown in the diagrams may not be the same model as the bollards shipped in this order. This does not aect the integrity of the installaon.

3/16" Hex Key Vacuum
1-1/8" Wrench Chalk
1" Masonry Drill Bit Hammer
3/4" Seng Tool Level
Hammer Drill or Rotary Hammer
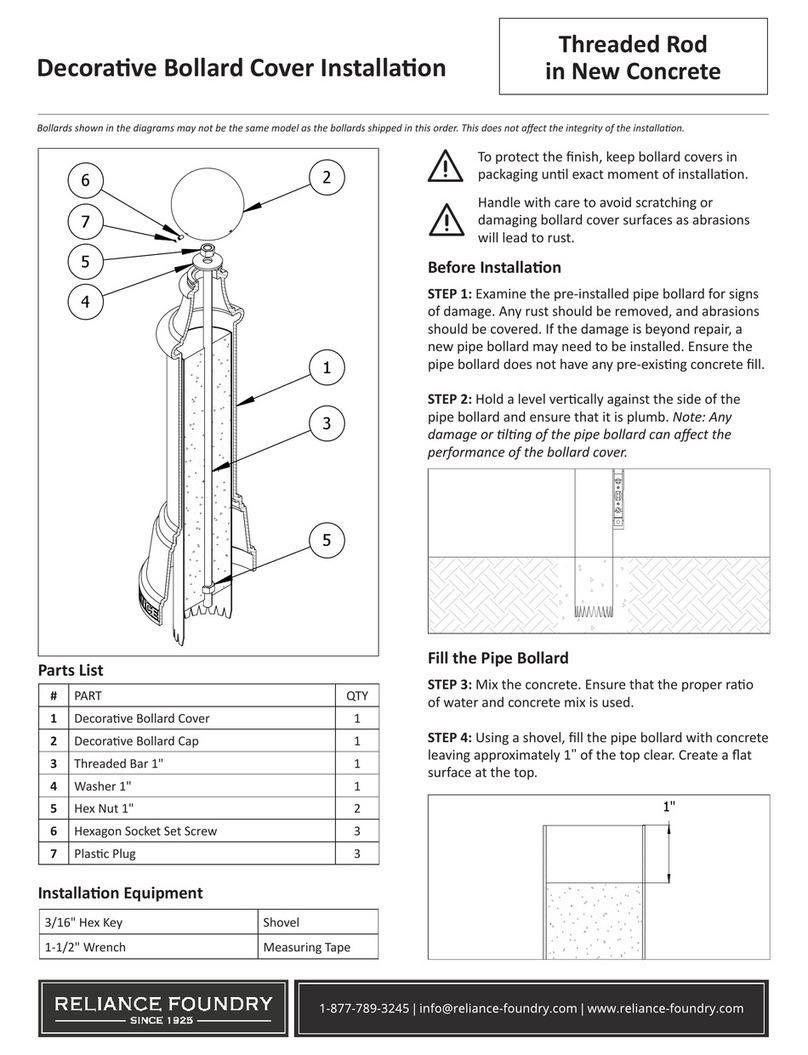
To protect the nish, keep bollard covers in
packaging unl exact moment of installaon.
Handle with care to avoid scratching or
damaging bollard cover surfaces as abrasions
will lead to rust.

#PART QTY
1Decorave Bollard Cover 1
2Decorave Bollard Cap 1
3Drop-In Concrete Insert 3/4" 1
4Threaded Rod 3/4" 1
5Washer 3/4" 1
6Hex Nut 3/4" 1
7Hexagon Socket Set Screw 3
8Plasc Plug 3

 Examine the pre-installed pipe bollard for signs
of damage. Any rust should be removed, and abrasions
should be covered. If the damage is beyond repair, a
new pipe bollard may need to be installed.
 Hold a level vercally against the side of the
pipe bollard and ensure that it is plumb. Note: Any
damage or lng of the pipe bollard can aect the
performance of the bollard cover.
Clean and dry the pipe bollard. Debris can oset
measurements and the placement of the bollard cover.
Use chalk to mark the center point on the
concrete inside the pipe bollard.


 
3 1/8" 1"
A
B
SECTION V-V
SCALE 1.5 : 1
V
V

MAX BAR
HEIGHT
1-877-789-3245 | info@reliance-foundry.com | www.reliance-foundry.com
Drop-In Concrete
Insert
Metal Decorave Bollard Cover
Installaon

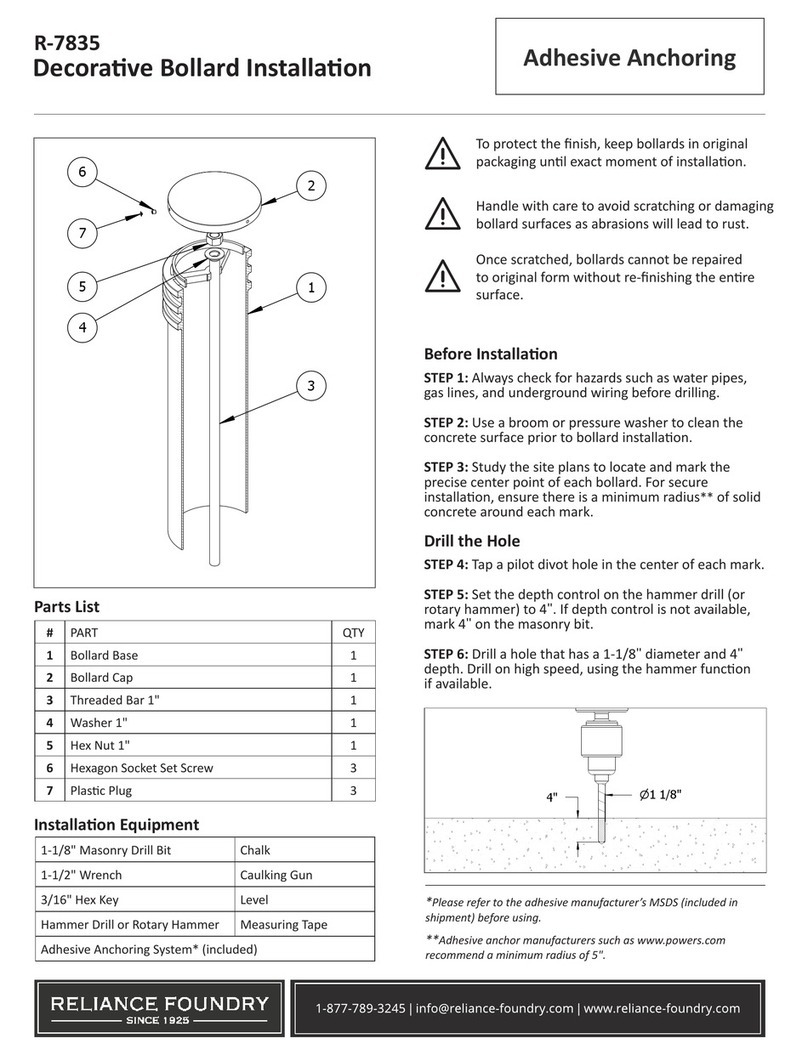
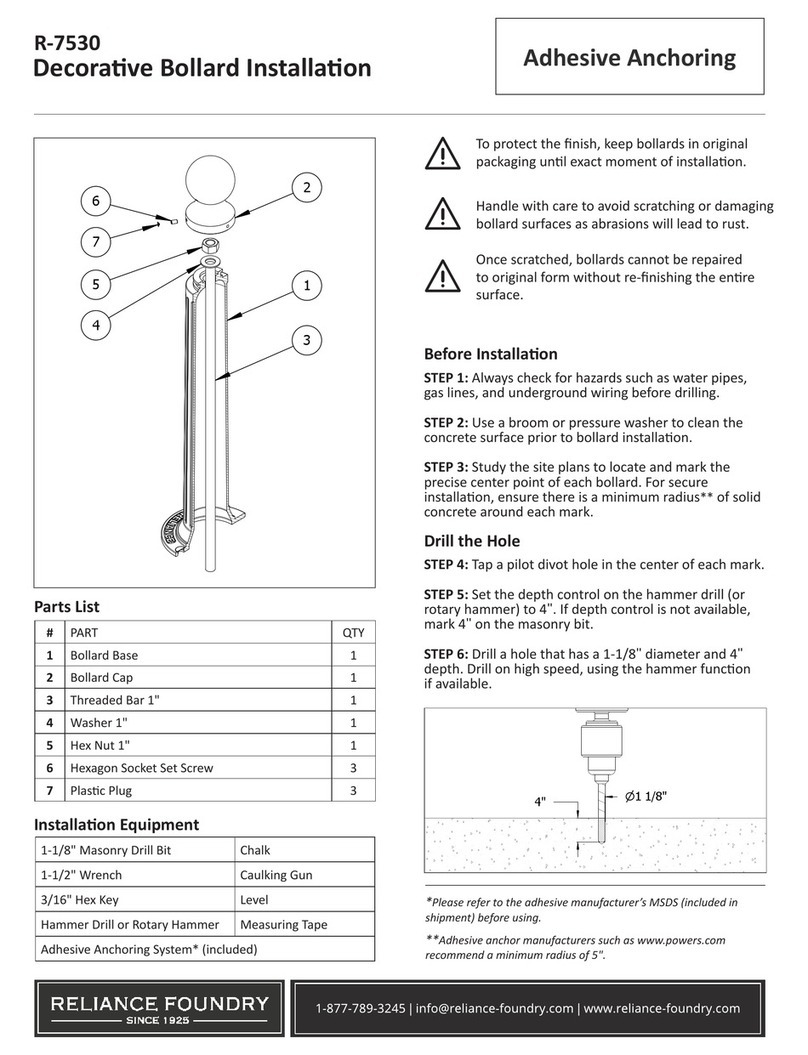
Tap a pilot hole in the center of the hole marking.
Set the depth control on the hammer drill (or
rotary hammer) to 3-1/8". If depth control is not available,
mark 3-1/8" on the masonry bit.
Drill a hole that has a 1" diameter and 3-1/8"
depth. Drill on high speed, using the hammer funcon if
available.
Clear the hole of all debris using the vacuum.
Tap the concrete insert (A) into the hole with
the sloed end facing down, and drive it down unl its
top sits ush with the concrete surface. Insert a seng
tool (B) into the threaded hole, then hammer down.
This will cause the internal expansion plug to set the
concrete insert in place. Note: If a proper seng tool is not
available, an equivalent at-end punch can be used.

There are two opons for installing the bollard cover and
inserng the threaded rod.


Use a cloth to clean the surface of the pipe
bollard.
 Li the bollard cover and carefully lower
over the pipe bollard. Note: Metal bollard covers can be
heavy—ensure the proper resources are available to li
them.
Lower the threaded rod through the top of
the bollard cover and into the concrete insert.
Tighten* the threaded rod by hand unl it is
secure in the concrete insert.
Measure the total distance from the surface
grade to the top of the threaded rod. Ensure that this
does not exceed the maximum measurment shown in the
product drawings.
 

SECTION W-W
SCALE 1.8 : 1
W
W
1
"
MAX BAR
HEIGHT
SECTION Y-Y
SCALE 1.5 : 1
Y
Y



PARTS LIST
DESCRIPTION
PART
NUMBER
QTY
ITEM
R7539 BaseR7539B
11
Drop-in
Concrete
Insert 3/4" -
requires 1" x
3 1/8" hole
(dia. x depth)
Drop-in
Concret
e Insert
3/4"
1
2
R7500
Threaded
Bar 3/4" x
30"
R7500B
AR 3/4"
1
4
Hex Nut 3/4"
- requires 1
1/8" wrench
Hex
Nut 3/4"
1
6
R7539 CapR7539C
1
7
Hexagon
Socket Set
Screw 3/8" x
3/4" -
requires
3/16" hex key
Hexago
n
Socket
Set
Screw
3/8" x
3/4"
1
8
Polyethylene
Plug 3/8"
Polyethy
lene
Plug
3/8"
1
9
Install Plastic
Screw Cap
1-877-789-3245 | info@reliance-foundry.com | www.reliance-foundry.com
Drop-In Concrete
Insert
Metal Decorave Bollard Cover
Installaon
*The manufacturer recommends ghtening the threaded rod to a depth of
approximately 1" into the concrete insert.


 Insert the threaded rod into the concrete
insert. Tighten* the threaded rod by hand unl it is secure
in the concrete insert.
Measure the total distance from the surface
grade to the top of the threaded rod. Ensure that this
total distance does not exceed the maximum measurment
shown in the product drawings.
 Use a cloth to clean the surface of the pipe
bollard.
Li the bollard cover and carefully lower
over the pipe bollard. Note: Metal bollard covers can be
heavy—ensure the proper resources are available to li
them.

Place the washer over the threaded rod so that
it rests on top of the sha of the bollard cover. Apply the
3/4" nut to the threaded rod and use a wrench to ghten
unl the bollard is secure.
 Remove the bollard cap from packaging and
place on top of the sha of the bollard. Secure and
align the bollard cap to the bollard base with the three
set screws. Tighten in equal amounts to ensure the cap
remains centered.
Place the plasc plugs over the set screws.
1"
. Abrasions should
be covered as soon as possible. For damage
repair or other servicing needs, please contact
Reliance Foundry’s sales department.

Other Reliance Foundry Outdoor Light manuals

Reliance Foundry R-8464 User manual

Reliance Foundry

Reliance Foundry R-8464 User manual

Reliance Foundry R-7835 User manual

Reliance Foundry

Reliance Foundry R-7835 User manual

Reliance Foundry Concrete Bollard User manual

Reliance Foundry

Reliance Foundry Concrete Bollard User manual

Reliance Foundry R-7593 User manual

Reliance Foundry

Reliance Foundry R-7593 User manual

Reliance Foundry R-7539 User manual

Reliance Foundry

Reliance Foundry R-7539 User manual

Reliance Foundry R-7593 User manual

Reliance Foundry

Reliance Foundry R-7593 User manual

Reliance Foundry R-8471 User manual

Reliance Foundry

Reliance Foundry R-8471 User manual

Reliance Foundry R-7535 User manual

Reliance Foundry

Reliance Foundry R-7535 User manual

Reliance Foundry R-7530 User manual

Reliance Foundry

Reliance Foundry R-7530 User manual

Popular Outdoor Light manuals by other brands

Stoane Lighting Frog Type X Installation and maintenance instructions

Stoane Lighting

Stoane Lighting Frog Type X Installation and maintenance instructions

LIGMAN NI-80513-A installation manual

LIGMAN

LIGMAN NI-80513-A installation manual

Collingwood Lighting FL01 installation instructions

Collingwood Lighting

Collingwood Lighting FL01 installation instructions

HEPER TURA LL2036.756-US Installation & maintenance instructions

HEPER

HEPER TURA LL2036.756-US Installation & maintenance instructions

Griven GRAPH-i-CELL instruction manual

Griven

Griven GRAPH-i-CELL instruction manual

Kenroy Home 32408 Use and care guide

Kenroy Home

Kenroy Home 32408 Use and care guide

BEGA 84 992 Instructions for use

BEGA

BEGA 84 992 Instructions for use

LIGMAN LE-40721-S installation manual

LIGMAN

LIGMAN LE-40721-S installation manual

XanLite PACK2PSO350 manual

XanLite

XanLite PACK2PSO350 manual

BEGA 77 910 Installation and technical information

BEGA

BEGA 77 910 Installation and technical information

Lake Lite LL-SDD-DOT quick start guide

Lake Lite

Lake Lite LL-SDD-DOT quick start guide

RH LEVI Assembly/installation instructions

RH

RH LEVI Assembly/installation instructions

OttLite 25783ABR quick start guide

OttLite

OttLite 25783ABR quick start guide

Sea gull lighting Sauganash installation instructions

Sea gull lighting

Sea gull lighting Sauganash installation instructions

urban ambiance UHP1311 installation instructions

urban ambiance

urban ambiance UHP1311 installation instructions

BEGA 84 020 Instructions for use

BEGA

BEGA 84 020 Instructions for use

BEGA 24 215 Installation and technical information

BEGA

BEGA 24 215 Installation and technical information

Monzana 106131 manual

Monzana

Monzana 106131 manual

manuals.online logo
manuals.online logoBrands
  • About & Mission
  • Contact us
  • Privacy Policy
  • Terms and Conditions

Copyright 2025 Manuals.Online. All Rights Reserved.