Repose R700 User manual


SAFETY PRECAUTIONS ----------------------------------------------------------------------1
E n v i r o n m e n t - - - - - - - - - - - - - - - - - - - - - - - - - - - - - - - - - - - - - - - - - - - - - - - - - - - - - - - - - - - - - - - - - - - - 1
Unsuitable users ---------------------------------------------------------------------------1
Remote Control -----------------------------------------------------------------------------1
Terms of use ---------------------------------------------------------------------------------1
Terminating use ---------------------------------------------------------------------------2
Assembly and maintenance ---------------------------------------------------------------2
Power cord -----------------------------------------------------------------------------------2
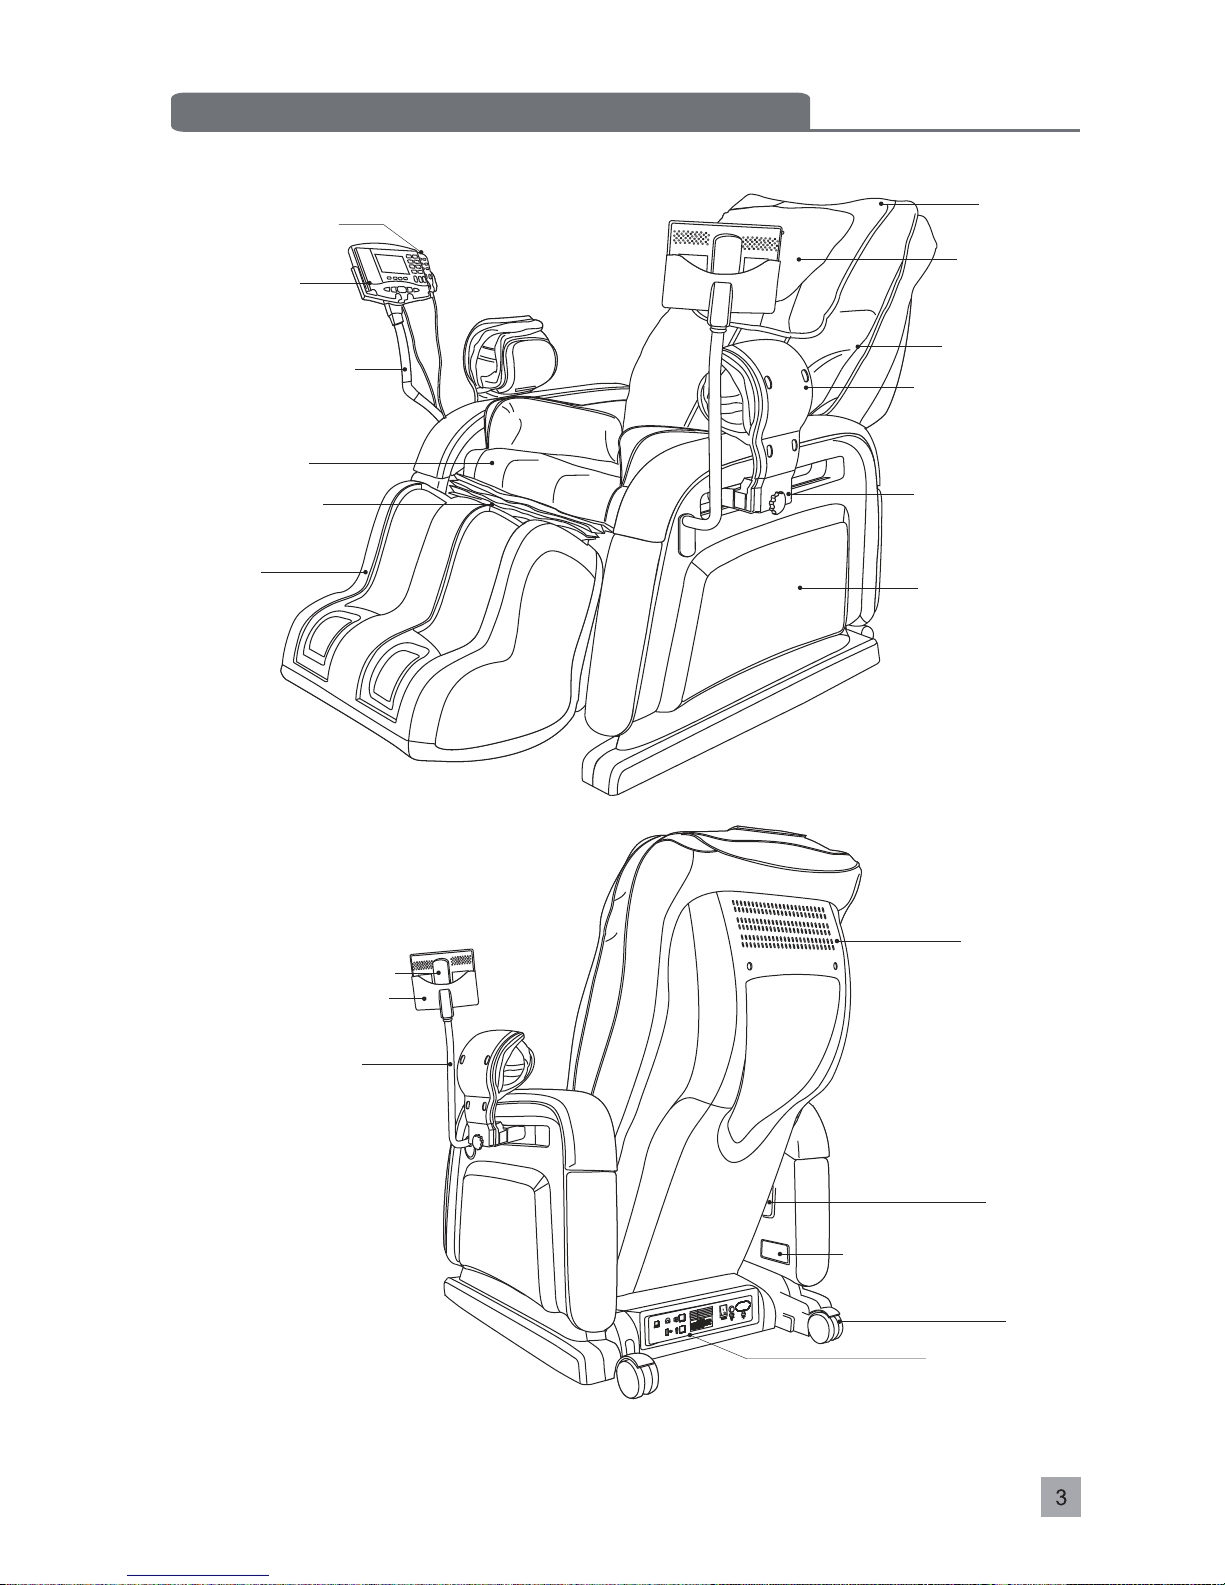
Chair Components and Functions -----------------------------------------------------------3
Exterior components ------------------------------------------------------------------------3
Power Terminal ------------------------------------------------------------------------------4
Internal components -------------------------------------------------------------------------4
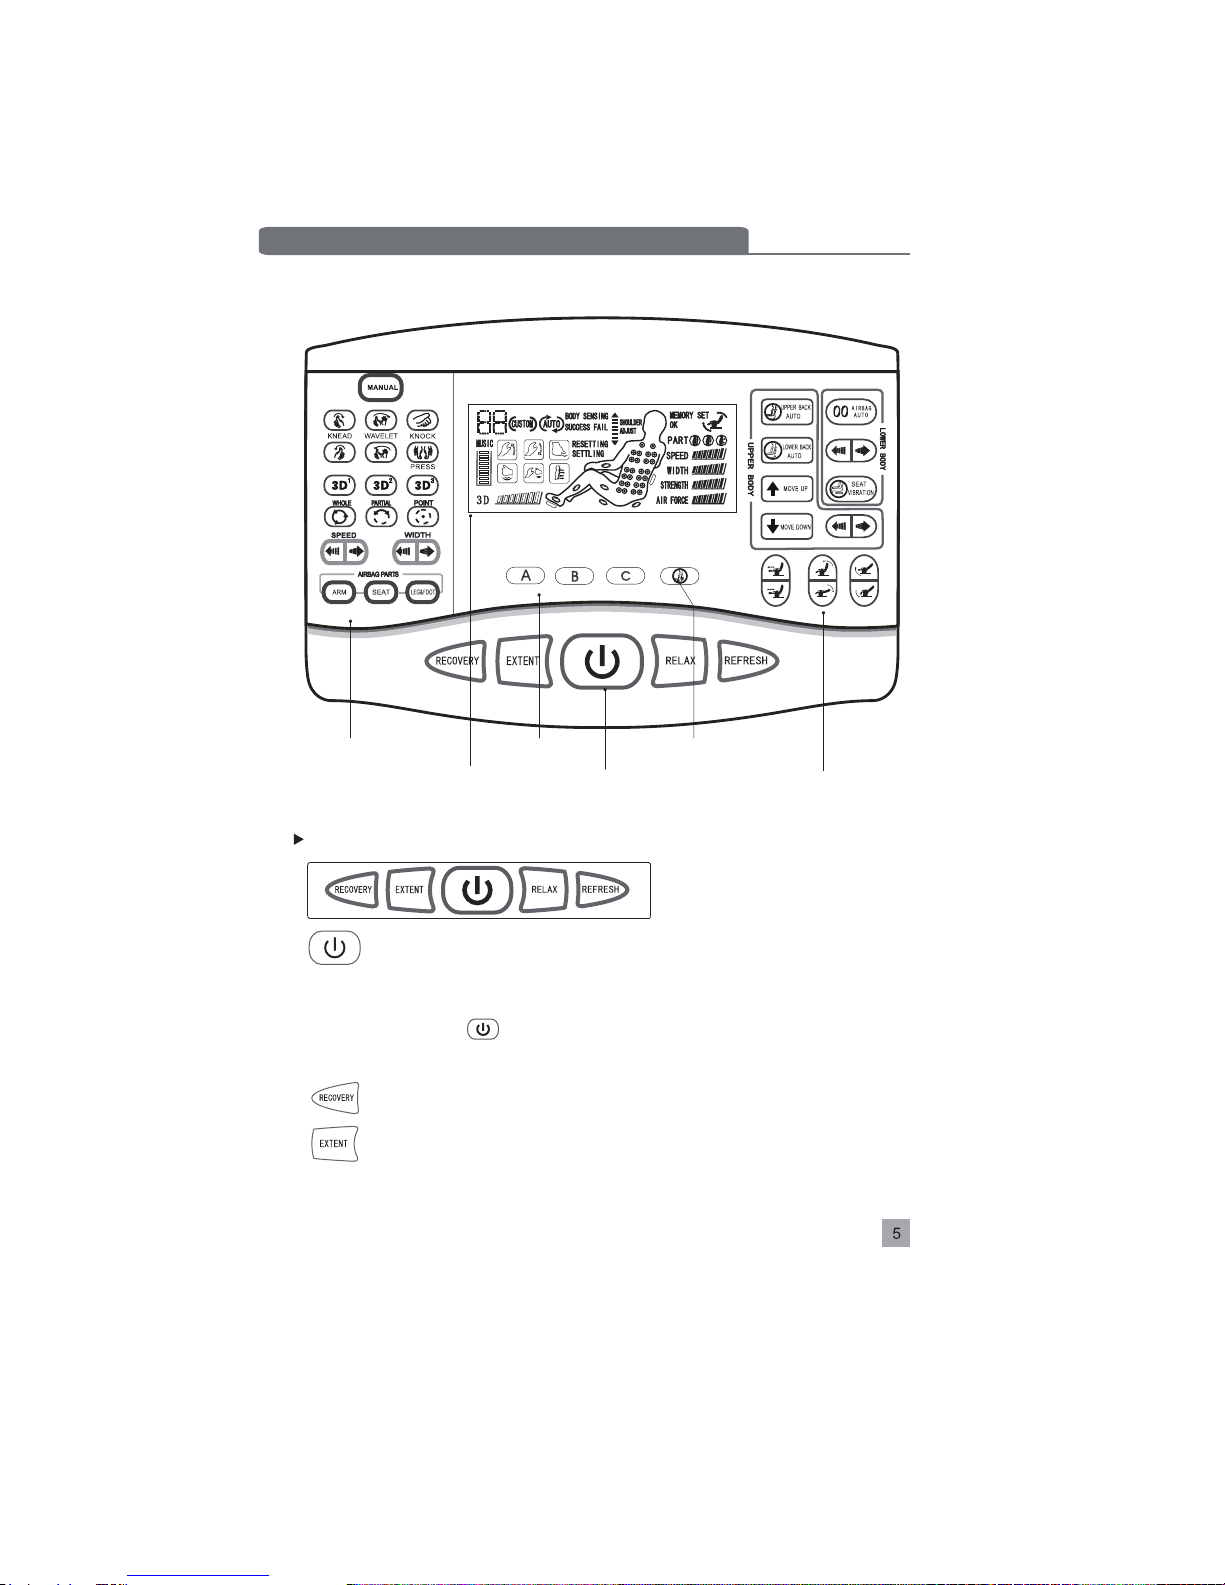
Main functions of Remote Control --------------------------------------------------------5
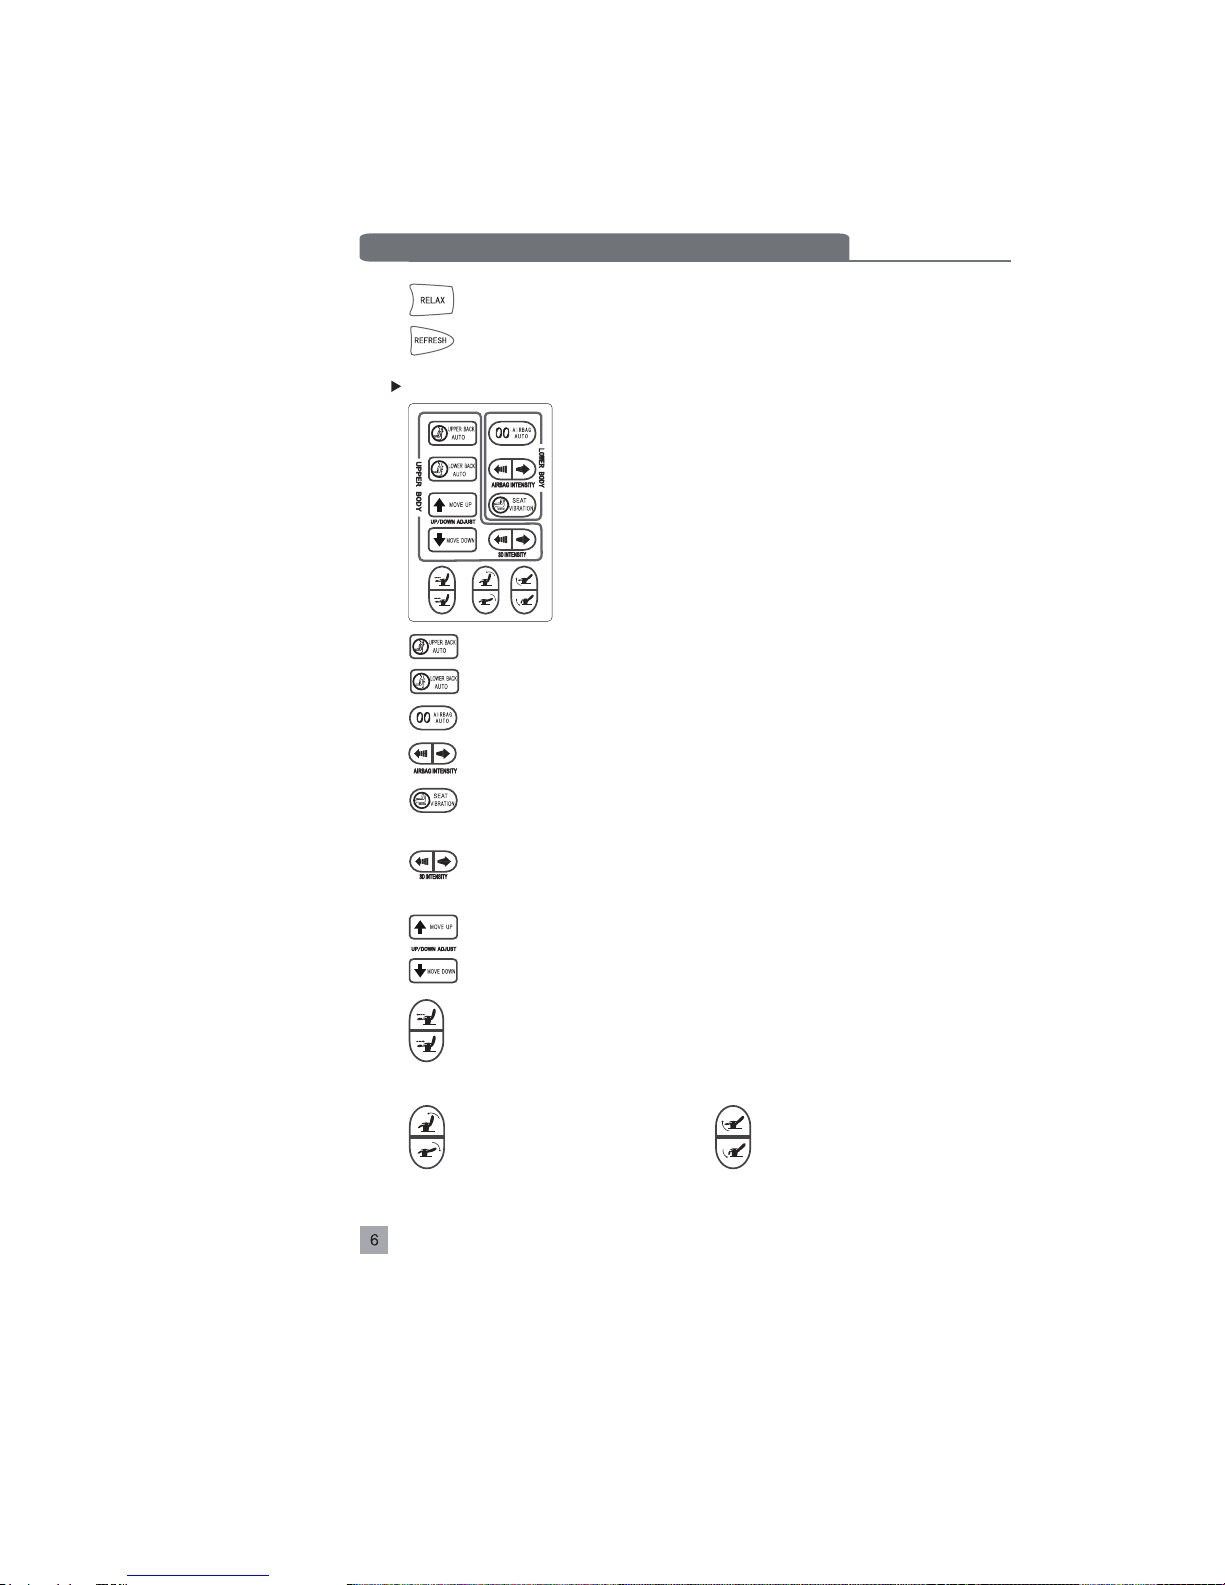
Remote Control features -----------------------------------------------------------------5-8
VFD Remote Control screen------------------------------------------------------------9-10
Operating the Audio Remote Control ----------------------------------------------------11
FEATURES --------------------------------------------------------------------------------------12
PREPARING THE CHAIR FOR USE--------------------------------------------------------13
Select a suitable location------------------------------------------------------------------13
Assembly -------------------------------------------------------------------------14-17
Moving assembled chair -------------------------------------------------------------------18
Powering on the power --------------------------------------------------------------------18
Positioning the chair -----------------------------------------------------------------------19
Before using --------------------------------------------------------------------------------19
User options --------------------------------------------------------------------------------19
OPERATING THE CHAIR --------------------------------------------------------------------20
Reclining and inclining -----------------------------------------------------------------20
MP3 music player ---------------------------------------------------------------------------21
DVD/MPEG/TV player(optional) --------------------------------------------------------21
After use --------------------------------------------------------------------------------------21
CARE AND MAINTENANCE -----------------------------------------------------------------22
TROUBLESHOOTING ------------------------------------------------------------------------23
SPECIFICATIONS ------------------------------------------------------------------------------24
Thank you for purchasing an R700 Massage Lounger. Before using, please read this
OPERATING INSTRUCTIONS carefully and pay special attention to all precautions
to avoid any improper or unsafe use.
Please keep the operating instructions for future reference.
INDEX
Thank you for purchasing an R700 Massage Lounger. Before using, please read this
OPERATING INSTRUCTIONS carefully and pay special attention to all precautions
to avoid any improper or unsafe use.
Please keep the operating instructions for future reference.
INDEX

Do not use the machine in damp and dirty places to avoid electric
shock or product damage
Do not use it in temperatures under 40°F or over 100°F
Do not store the machine outdoors
Always make sure to use it on a level surface
Environment
If entered in extremely cold or hot environments,
wait for one hour before use in a proper environment,
or the machine could be damaged.
Unsuitable users
People with the following conditions should consult with their
doctor before using
Currently receiving treatment for injuries or abnormalities
Serious tumor patients
Pregnant or menstruating women
Acute diseases
Cardiac problems
Osteoporosis patients
Use of heart pacemakers or any other internal medical electrical apparatus
To avoid possible injuries or damage to the product, do not use the chair
if it has been damaged in any way
It can not be used as medical treatment
Do not use the machine with other medical apparatus or electrical carpet
to avoid possible injury
Do not use it within half an hour after meals
To avoid any injury, do not allow children or pets to get close to the back of
chair, seat or underneath the legrest
Do not place anything heavy on the machine to avoid any damage to the
machine or injury to someone using the chair
Over 5 minutes of massage to a fixed position on human body could cause
over stimulate the area and have negative health effects
Instructions on using remote control
Terms of use
Do not operate the remote control with wet hands
Do not drop it onto the ground or under water
Do not pull connecting cord
Do not place anything heavy on the remote control
It is strongly advisable to keep it on its original stand after use

Make sure the rollers are moving along with the spine, otherwise
pain or discomfort may occur
Do not sleep on the chair when in use
Do not use it after consuming alcohol or drugs
Do not directly touch the massage rollers with any part of your body
other than your back
Each massage session should last a maximum of 20 minutes and the
massage should not focus on specific area for more than 5 minutes
Before using, remove keys, phones, watches rings and other items
that might be loosely stored on your body or clothing
The massage chair is only for use by one person at a time
Users must not exceed 265 lbs
Shut off power and detach plug from power socket if one of the following occurs
Contact manufacturer for repairs
Water has been spilled onto the machine accidentally, main remote controller or
auxiliary remote controller.
Any accessaries or cushions split and interior components exposed.
Any abnormalities from users occur during use
Any abnormalities on functions occur during use
Sudden power loss
Thunderstorms
Do not use if the leather cover is torn as there is a risk of electrical shock
and injury
Only trained personnel should work on the chair
Terminating use
Assembly and maintenance
Instructions on plug and power cord
Check the rated working voltage
Do not attach or detach power plug with wet hands to avoid electrical shock
or product damage
When detaching plug, please hold the insulated plug instead of power cord
Make sure to shut off power after use
Do not place anything heavy onto the power cord
If any damage occurs to the power cord, do not use the product any longer,
please turn off the power and detach the power plug and contact service
center for replacement

NAME AND FUNCTION OF EACH PART
Exterior structure
Auxiliary remote
control
Main remote
control
Remote control
holder
Seat cushion
Folded leather
cover
Calf rest
Armrest moving
mechanism
Easy-assembly
armrest
Big Pillow
cushion
Small Pillow
cushion
Back cushion
Armrest airbags
DVD remote control
DVD player(optional)
DVD player holder
(optional)
Back cover
Speaker
Armrest assembly
latch panel
Castor
Power terminal

NAME AND FUNCTION OF EACH PART
Interior structure
Power cabinet
Thigh sides air pressure
massage airbags
Upper calf massage
airbags
Buttock vibration
massage mechanism
Buttock air pressure
massage airbags
Lower caft
massage airbags
Tiptoe air pressure
massage airbags
Soles air pressure
massage airbags
Heel air pressure
massage airbags
Backrest 3D
massage
mechanism
Power socket
Fuse cover
Power switch
Specification label
Caution label
Main remote
control socket
Auxiliary remote
control socket
Head phone socket
USB interface
DVD player socket
Upper waist
& lower back
heater
Armrest air
pressure
massage
airbags
Calf rest extension
Thigh bottom air
pressure massage airbags

Function areas on main remote controller
Instructions on buttons
Power and the full auto controlling area
Manualfunction area
VFD screen area
Memory function
area
Full auto controlling area
Turn on/off the
heater in back
Semi-auto controlling area
Start the “RECOVERY”auto massage program.
Start the “EXTENT”auto massage program.
Power : Turn on/off massage functions .
When power on, VFD is lightened on, function buttons and memory
buttons are flashing for users' selection.
When power off, massage chair resets, at this moment, all buttons
are invalid, button keeps flashing to start standby mode. After
reset, VFD will be shut off.
NAME AND FUNCTION OF EACH PART

NAME AND FUNCTION OF EACH PART
Neck & shoulder AUTO: select neck and shoulder automatic programs.
Back &waist AUTO: select back and waist automatic programs
Air bags AUTO: Turn on/off air bags automatic programs.
Air bags strength: six air strengths for selection. when it reaches
minimum/maximum point, a double sound alarm will be heard.
Put the button for low middle high speed and close seat vibration
function. Shine in turn the light is for short time long time constant
shine and be off.
3D massage intensity adjustment: six massage intensities for
selection, when it reaches minimum/maximum point, a double
sound alarm will be heard.
Button for backrest massage mechanism up and down:
it is for manual mode and of body checking. When this function is
available, the LED indication light will be lighted, or a sound will
be heard.
Calf rest extend out: Manually controls calfrest extending out
Calf rest retracts : Manually controls calfrest retracting
Calf rest automatic extend adjustment function: It will always keep
the proper position by stretch adjustment when the calf rest is
ascending or descending.
Backrest ascending button.
Backrest descending button.
Footrest ascending button.
Footrest descending button.
Start the “RELAX”auto massage program.
Start the “REFRESH”auto massage program.
Semi-auto controlling area

NAME AND FUNCTION OF EACH PART
A B C three memory function buttons can be selected repeatedly.
Memory function setting: Under normal working status, keep pressing any
button of A/B/C for more than 1.5second, the current functions
combination and the position of backrest and calf rest will be stored to the
point position. In the mean time, LED keeps flashing while VFD shows
“memory complete” with “DI”sound.
Memory function starts: After press the power button, three memory buttons
A/B/C will be flashing, select any one of them more than 1.5 seconds , mean
while the button will flash constantly in VFD screen it will start the stored
functions.
Memory function area
Body figure and shoulder position inspection data can not be stored.
There will be a little difference from the real position of backrest and
calfrest during the memory function starts, which is just because of the
impact of power voltage and load of the body.
Caution
Manual function area
After selecting the manual button, the button is lighted and the other
buttons inside manual function area are activated at the meantime.
Backrest massage modes selection
Turn on/off clockwise kneading mode.
Turn on/off anti-clockwise kneading mode.

Turn on/off clockwise kneading and tapping mode.
Turn on/off anti-clockwise kneading and tapping mode.
Turn on/off pummel.
Turn on/off shiatsu mode.
Turn on/off 3D kneading mode.
Turn on/off 3D pummel mode.
Turn on/off 3D kneading and tapping mode.
Back massage locate
Select overall massage position
Select partial massage position
Select point massage position under the manual function; to
change the current massage position though pressing the button
for back under the automatic mode, to press the button means
repeat the current massage mode or “repeat the current
combination mode”.
Back massage speed adjustment
There are six speeds for selection, invalid for “shiatsu”massage
mode. When it reaches minimum/maximum point, “DI DI” sound
will be heard.
Back massage width adjustment
There are three sections for selection. Invalid for “shiatsu”and
“synchronization”massage modes. When it reaches minimum/
maximum point of width adjustment,“DI DI” sound will be heard.
Air bags positions selection
Turn on/off arms airbags massage.
Turn on/off seat airbags massage.
Turn on/off leg and foot airbags massage.

1. Time display: during working, it shows surplus time, the default working time
is 20 minutes.
2. Backrest manual function indications.
3. Backrest auto function indications: it will be lightened under six backrest auto
modes of “RECOVERY”, “EXTENT”, “RELAX”, “REFRESH”, “UPPER BACK AUTO”,
“LOWER BACK AUTO”, while they are invalid under any other modes.
4. Body detection. Area is lighted when body being detected, after finished, the body
detection & success are lighted, otherwise the body detection & fall are lighted.
5. Back massage mechanism resetting indications.
6. Back massage mechanism collection indications.
7. Shoulder position adjustment and back massage mechanism resets.
8. Status indications of volume of Mp3.
9. Massage mode: current massage mode indications.
10.Forward extending distance indications of the massage rollers
It will indicate the forward extending distance of the massage rollers synchronous.
11.Location of air pressure massage indications.
12.Indications of the points on back and the status of the massage mechanism.
13.Memory functions indication.
VFD area description
NAME AND FUNCTION OF EACH PART
When memory functions on, the “ ”will be lighted.
When memory setting complete,the indication will be lighted.“ ”

14.Ascending and descending adjustment indications
Indications of ascending and
descending of the calf rest
15.Back massage location mode
Overall mode: for the whole backrest.
Partial mode: on the basis of current position, massage area
extends one third of overall.
Point mode: under manual function to select the point mode to
repeat the current action or a union actions.
16.Back mechanism massage speed indication: six speeds in total for selection
17.Back mechanism massage width indication: three widths for selection.
18.3D massage strength indication: six strengths for selection.
19.Air strength indication: six strengths for selection.
20.Back heating indication.
Indications of ascending and
descending of the back rest
NAME AND FUNCTION OF EACH PART

NAME AND FUNCTION OF EACH PART
Note : Should any abnormality occurs on MP3 system or facilities have
not been installed, the“DIDI” sound will be heard when pressing
the buttons.
Play/pause current music.
Stop playing music and back to the first song when replaying.
Previous song.
Next song.
Turn up volume.
Turn down volume.
Backrest and footrest ascend and descend buttons on
auxiliary remote control fulfill the same functions as
on the main remote controller.
Instructions on auxiliary remote controller
MP3 music player instructions
Ascending and descending down Instructions

INSTRUCTIONS ON FUNCTIONS
1.3D massage mechanism
New design of 3D massage mechanism accords with ergonomics.
2.Body detection
The former body detection can only detect the position of shoulder, then
calculate the approximate value of every point according to a proper scale.
This model makes it more reliable and accurate on the collection of data on the
back because it adopted the technology of function 3D electric current sensor.
3.Six massage strengths
Six massage strengths for selection under the automatic function and the manual
function, you can choose the proper strength according to your body status.
4.Automatic/manual extension of the calf frame
The calf frame can be extended automatically or manually, and it can meet with the
need of the different of users because of its long extending distance up to 26cm.
5.Sensor organ at the sole
The sensor organ at the footrest can detect the position of your feet, and adjust the
extending distance automatically according to your height.
6.Touchdown sensor
The sensor organ at the bottom of the footrest can detect the floor or any
other fraise on the floor automatically. Two functions as follows:1.The footrest
can only extend and can not retract once it touches the floor;2.When the footrest
is descending down to the floor without enough retraction, it will stop descending
and retract automatically completely, then the footrest will go on descending until
get the proper position.
7.Air pressure massage on the foot and calf
Design of many of air bags brings you a comfortable and prompt massage on your
foot and calf.
8.Air pressure massage on the arm
Design of many of air bags brings you a perfect and wavily massage on your arms.
9.Air pressure massage and vibration on the seat
Lots of air bags are placed on the thigh and the sides of thigh , and there still a
vibration equipment on the buttock.
10.Fast-assembly armrest
Easy for assembly, disassembly and maintain, and you can finish the assembly
and disassembly fast even without any tool.
11.MP3 and DVD player
The function of MP3 is included in this model, and the DVD player is optional.
12.Others
The machine becomes much more reliable because of the adoption of non-touch
switch in detecting and controlling sensor instead of the traditional mechanical
switch.

PREPARING THE CHAIR FOR USE
Select a suitable location
Safe Requirements:
Floor protection
Location
Make sure there is at least 20″of space benlnd the chair.
Make sure there is at least 18
.
″of space in front of the
legrest
The massage chair could potentially damage your floor so we recommend
placing a rug under the chair.
Ground connection
In order to reduce the risk of eletrical shock, do not use the chair in damp
or wet locations such as a bathroom please do not use or store the chair
with high temperatures as the fabrie can be damaged,
This chair is equipped with a 3 prong grounded plug fpr your protection.
Do not alter the plug for any reason. Be sure to plug massage chair into
a properly grounded outlet.
Massage chair
Rug
Floor
20 inches18 inches

PEWPARING THE CHAIR FOR USE
Step 1: Prepare the components
Unpack the main box with the chair frame,cushions
and pillows.
Unpack the carron containg the footrests.
Unpack the carton countaing the armrests.
Check all parts for damage and contact your dealer if and components
are damaged.
Step 2: Attach chair arms to main frome
Connection speakes wire connections and air hoses from the main chair
to the armrests: 1.Connect speaker wires from main chair to armrests.
2.Connect air hoses from main to arm rest . Hoses are
numbered as are armrests.
Install armrest: Lift armrest so that the armrest coupiers are lineup
sligutly above the couplers on the main frame. Ligutly
push the LOWER section of the armrest into the chair
frame followed by the top of the armrest and press down
on the armrest. The armrest should now be locked into
place. Repeat process on other side.
Assembly
Speaker wire connection and tube diagram
Coupler1
Coupler2
Coupler3
Coupler4
Couplers
The airbag tubes to
connect the seat
cushion
Lift speaker
Right speaker
The airbag tubes
for leftarm
The airbag tubes
for right arm
The airbag tubes
for seat cushion

Disassembly of the armrest: open up the cover in the inner of the armrest,
pull the handle inside back and the armrest will break away automatically,
Lift the armrest up and away from the main frome.
Step 3: Counect the footrest to the chair.
Remove the phillips head screws from the
clrcular clamps on the chair. Open the clamps.
Lift footrest outes bass into circular clamp .
Close clamps, put screws back in and tighten
Clamp
PREPARING THE CHAIR FOR USE
cover
Velcro flap onto seat frame.
Note: You may need to
have someone jiggle
the release handle while
you lift the armrest up and
away.

Operating The Chair
Step 4:Remove the two small screws from the terminal on the front of chair.
Plug legresr cables into the connrctlon terminal. Put serews back in and
tighten
.
Step 4:Install Armrest massage
Line up the armrest massage with termlnal on the chair and geutly push
connectors together complete connection by firmly tightening the armrest
retaining bolt by hand..
Step 5:Install the remote control stand
Remove plastic cover from the armrest. carefully remove the two screws
inside the panel. Be careful not todropthese in the chair, ltolding the
armrest in place screw the screws back into the chair one at a time ,when
finished, put the plastic cover back into place.
Armrest massage
Armrest retaining bolf
legest cables
serews
Note: Drewings are upside down
Note: Switch step 3 &
step 3.5 Connection terminal on the
font of chair frame

PREPARING THE CHAIR FOR USE
Step 6:Install the back cushion and pillow cushion
Attach the back cushion bay fastening the zipperS on, the chair and back
cushion together, velcro the bottom of the cushion to the chair after
plugging. in the heqtes cunnection. Install pillow to backrest cushion with
vekro
Step 7:Install the seat unit
Put seat cusnion on chair. Plug air tubes from seat cushion into the
armrest. Conect the eletrical connector from seat to plug from chair
frame. Position seat cushion into place and push down to force the
velcro to wold the cushion in place.
Step 8:Install the rest parts
Connect main and auxiliary remote controller, DVD player(optivual, usb
stick and power infor the materhing sockets on the terminal.
When ready to use push the power switch to the “on”position.
Heater connector
Vibration electrical
connector
Airbag tubes
Zippers
Velcro pillow to
backrest cushion

PREPARING THE CHAIR FOR USE
Make sure these is no dauage to the power cord.
Make sure all switches are turned off before connecting power plug into
the wall outlet.
CAUTION
Moving assembled chair
Installed casters are used for moving the chair.
Lower the backrest to the lowest position.
Turn off the power and detach the power plug.
Tilt the chair back onto the casters and roll the
chair to the desired location .
Do not move the product with people on it.
Do not hold the armrests to move the chair, instead of holding chair base
and backrest (4 people are advisable).
At least two people recomended for moving the chair.
CAUTION
Powering On the chair
Connect the power plug into a properly grounded wall outlet.
Turn on the power switch on the back of the chair.
Table of contents
Other Repose Massager manuals