Retroaktiv MPG-8X User manual

retroaktiv
USER GUIDE AND REFERENCE
All rights reserved. 2021 Retroaktiv LLC.
Colorado, USA.

RETROAKTIV MPG-8X USER MANUAL
2
FEATURESFEATURES
Independent control of all parameters
on all layers of MKS-80 synthesizers.
Control 2 MKS-80s independently, or
as a single 16-voice polyphonic syn-
thesizer. (8-Voice in DUAL key mode)
On-board memory for storing tones,
patches, and setups on the controller.
Flexible MIDI matrix allows multiple
parameters to be controlled inde-
pendently in real-time, using af-
teouch, mod wheel or any CC, an
expression pedal, or the two ASSIGN
sliders on the MPG-8X front panel.
Chord mode for playing any combina-
tion of notes using a single key.
Store any PATCH with the push of
a buon. MPG-8X eliminates the
“shared-tones” system of saving
sounds on the MKS-80. Each MPG-8X
PATCH is stored with its own TONES.
Intelligent patch generator creates new
tones and patches at the push of a buon.
Choose from Basses, pads, bells, strings
and more.
CC to sysex translation allows for DAWs
and sequencers to record and playback
parameter changes on MPG-8X in
realtime. Each of the 4 layers on the con-
troller can be controlled independently by
CCs.
Each TONE, ASSIGN, PATCH, and SETUP
can be changed using program and bank
change messages. Independent control of
all layers.
MPG-8X allows users to store and name
custom CC maps, allowing users to create
their own custom control maps for other
gear using the MPG-8X panel.
Receive or transmit banks, individual
patches, or a full memory backup of all
stored user objects. Sysex utility allows
users to quickly load, store, and back up all
of their favorite soundbanks.
MIDI bootloader allows users to use sysex
files to update their MPG-8X allowing for
more new features to be added in the
future.

RETROAKTIV MPG-8X USER MANUAL
3
FRONT PANELFRONT PANEL
OLED DISPLAYOLED DISPLAY
Large white OLED display presents information about
the operation being peormed.
STORAGE & OBJECT TYPESTORAGE & OBJECT TYPE
Use these buons to select, store and load user
PATCH, TONE, ASSIGN, and SETUP objects.
LAYERLAYER
Use these buons to select which MKS-80 unit (UNIT
1 or UNIT 2) is being edited. Pressing both buons at
once will select both units.
EDIT SELEDIT SEL
Use these buons to select which layers of an MKS-
80 patch are being edited. Pressing both buons at
once selects both layers. When Key Mode is set to
WHOLE, only the UPPER layer will be available. LOWER
layers can be selected when Key Mode is set to DUAL
or SPLIT 1 & 2.
MENU NAVIGATION BUTTONSMENU NAVIGATION BUTTONS
The menu navigation buons are used to select
editor pages in the MPG-8X. The [LEFT] and [RIGHT]
buons are used to move the cursor in the menu
pages.
The [ENTER] buon is used to execute a variety of
operations within a menu.
[MIDI], [PATCHGEN], [MAIN], and [ASSIGN] buons
are used to navigate to their respective menu
pages.
JACKS & POWERJACKS & POWER
The labels for the power switch, power entry po,
expression pedal jack, and MIDI jacks are located
along the top of the MPG-8X front panel. The
associated jacks and power switch are located in
the recessed compament on the rear of the MPG-
8X.
ENCODER/SHIFTENCODER/SHIFT
The black encoder knob located directly under
the OLED is used to modify values of the currently
selected parameter. If you hold down the encoder
[SHIFT], parameter values will change by larger
increments.

RETROAKTIV MPG-8X USER MANUAL
4
QUICK STARTQUICK START
To begin using your MPG-8X, it’s impoant to understand the basic connections and setup requirements. The
most basic setup is to send the MIDI OUT from your DAW or MIDI controller, to the MIDI IN of the MPG-8X. The
MIDI OUT of the MPG-8X is connected to the MIDI IN of the MKS-80. The default state of the MPG-8X is for
MIDI ECHO to be enabled. This means that MIDI data received by the 8X on its MIDI IN will be immediately
processed and passed OUT to the MKS-80. The figure below shows the most common setup configuration of
the MPG-8X in a rig.
MKS-80
MIDI IN
MIDI CONTROLLER OR DAW
To begin making sound, let’s sta by creating a basic setup. Press the [MIDI] buon on MPG-8X and set the
MPG-8X MIDI seings as shown below, and set the MKS-80 to receive on channel 1 (By pressing [MIDI CHANNEL]
+ [BANK 1] on the MKS-80 panel) . Set your MIDI controller to send on channel 1. The MKS-80 should be
receiving data from the controller when a slider is moved, as well as when a key is pressed on your controller.
Basic MIDI menu seings on the MPG-8X
Basic MIDI configuration

RETROAKTIV MPG-8X USER MANUAL
5
MENUS AND NAVIGATIONMENUS AND NAVIGATION
The MPG-8X will boot up and display the MAIN menu screen. The diagram below shows the contents displayed
on the MAIN screen.
MPG-8X Navigation Console
1
2 3 4
MPG-8X MAIN Screen
The MAIN screen displays the following information:
1 - Current active parameter name and value
2 - Unit 1 Active Layers (U, L, or U+L if UPPER and LOWER layers are both selected)
3 - Unit 2 Active Layers (U, L, or U+L if UPPER and LOWER layers are both selected)
4 - MIDI Input Monitor - Displays channel of incoming MIDI activity received at MPG-8X MIDI IN po.
To return to the MAIN screen at any time, press the [MAIN] buon in the navigation console.
The encoder and arrow buons are used to navigate menus and change seings. The SHIFT function refers
to the switch on the encoder knob. To engage the SHIFT function (used for double-buon combos such as
SHIFT+MIDI buon = MIDI Panic), press and hold the encoder knob. To increment a value with the encoder,
simply turn the encoder knob. To increment or decrement by 8, hold the SHIFT buon in while turning the
encoder.
Use the [MIDI], [PATCHGEN], [ASSIGN], and [MAIN] buons to navigate to the different menu pages. To move
the cursor on a menu page, use the [LEFT] and [RIGHT] buons. To change the value of a highlighted menu
seing, use the [ENCODER} dial.

RETROAKTIV MPG-8X USER MANUAL
6
THE MIDI MENUS AND FUNCTIONSTHE MIDI MENUS AND FUNCTIONS
MIDI:SETTINGSMIDI:SETTINGS
The MIDI Seings menu contains all of the parameters that determine which MIDI channels the MPG-8X
receives data on, and which channels outgoing data will be transmied on. This page is also where we
configure program change handling, as well as CC to sysex translation.
The MKS-80 receives on a single MIDI channel when in WHOLE, DUAL, or SPLIT 2 mode. When in SPLIT 2 mode,
the LOWER voice will respond on the MKS-80 MIDI input channel, and the UPPER voice will respond on the
MKS-80 MIDI input channel + 1. For example, if the MKS-80 is set to receive data on channel 1, then when in
SPLIT 2 mode, the LOWER voices will play on channel 1, and the UPPER voices will play on channel 2. For this
reason, the MPG-8X MIDI channels are displayed in the format 1(2), 2(3), 3(4), etc. The number in parentheses
indicates which channel the UPPER voice will respond to when SPLIT 2 mode is used.
There is a second reason that we use the 1(2) format for MIDI channel seings. The MPG-8X is capable of
translating incoming CC messages into sysex messages. Because we have 2 layers on each MKS-80, each
layer (UPPER & LOWER) has its own CC channel. For example, if the Unit 1 In channel seing is 1(2) and CC
translation is turned on, then incoming CCs on channel 1 will change parameters on the LOWER voices, while
incoming CC data on channel 2 will affect the UPPER voices.
Now that we’ve become familiar with the way the MPG-8X midi channels are referred to, let’s discuss the menu
seings in detail:
The MIDI:Seings Menu
Unit 1 Ch & Unit 2 Ch:Unit 1 Ch & Unit 2 Ch: (MPG-8X MIDI OUT CH) This sets the MIDI channels that the MPG-8X will transmit on.
The MKS-80 should be set to the same MIDI channels as the Unit 1 & 2 seing. All incoming note and controller
data received at the MPG-8X MIDI IN channels will be sent out of the MPG-8X on the Unit1 and Unit2 MIDI
channels. Note that the Unit 1 & 2 Output channels correspond to the channels each MKS-80 is set to receiveNote that the Unit 1 & 2 Output channels correspond to the channels each MKS-80 is set to receive
on. Unit 1 & 2 Out Channels do not need to match the Unit 1 & 2 Input channels. Data received at MPG-8Xon. Unit 1 & 2 Out Channels do not need to match the Unit 1 & 2 Input channels. Data received at MPG-8X
input channel will be mapped to the 8X MIDI OUT on the Unit 1 & 2 channels. By doing this mapping, we caninput channel will be mapped to the 8X MIDI OUT on the Unit 1 & 2 channels. By doing this mapping, we can
effectively break a MIDI feedback loop when using a DAW to record and translate data in real-time. MPG-8Xeffectively break a MIDI feedback loop when using a DAW to record and translate data in real-time. MPG-8X
will display a notification if a MIDI feedback loop occurs.will display a notification if a MIDI feedback loop occurs.
•• Unit 1 Ch (MPG-8X Unit 1 MIDI OUT channel):Unit 1 Ch (MPG-8X Unit 1 MIDI OUT channel): The channel that the unit 1 MKS-80 receives data and the
channel that MPG-8X will transmit unit 1 data on. ( 1(2) to 15(16) ) Set MKS-80 #1 to this channel.Set MKS-80 #1 to this channel.
•• Unit2Ch (MKS-80 #2 MIDI OUT channel):Unit2Ch (MKS-80 #2 MIDI OUT channel): The channel that the unit 2 MKS-80 receives data and the
channel that MPG-8X will transmit unit 2 data on. ( 1(2) to 15(16) ) Set MKS-80 #2 to this channel.Set MKS-80 #2 to this channel.
•

RETROAKTIV MPG-8X USER MANUAL
7
Unit 1 In Ch & Unit 2 In Ch:Unit 1 In Ch & Unit 2 In Ch: (MPG-8X MIDI IN CH) Used to select which channels the MPG-8X will be receiving
note, CC, aeouch, and pitch bend data on. When MIDI Echo is enabled, data received by MPG-8X on UNITWhen MIDI Echo is enabled, data received by MPG-8X on UNIT
1 & 2 MIDI IN channels, that data will be sent back out of the 8X on the selected Unit1 and Unit2 MIDI OUT1 & 2 MIDI IN channels, that data will be sent back out of the 8X on the selected Unit1 and Unit2 MIDI OUT
channels.channels.
For example, if Unit 1 MIDI IN channels are set to 1(2), and Unit 1 MIDI OUT channels were set to 3(4), then
any note data received by MPG-8X on channel 1, would be passed back out of the 8X on channel 3. If this
data gets passed back to the controller on channel 3, which does not correspond to the channel that the 8X
is listening on (channel 1), and the data will be ignored. This mapping function allows you to break any MIDI
feedback loops in your setup.
•• Unit 1 In Ch (MPG-8X UNIT 1 MIDI IN CH):Unit 1 In Ch (MPG-8X UNIT 1 MIDI IN CH): Sets channel that MPG-8X will receive note/controller data on
for Unit 1. 1(2) to 15(16), where the number in parentheses indicates the 2nd MIDI channel when in SPLIT
2 mode.
•• Unit 2 In Ch (MPG-8X UNIT 2 MIDI IN CH):Unit 2 In Ch (MPG-8X UNIT 2 MIDI IN CH): Sets channel that MPG-8X will receive note/controller data on
for Unit 1. 1(2) to 15(16), where the number in parentheses indicates the 2nd MIDI channel when in SPLIT 2
mode.
Sysex:Sysex: Used to select whether the MPG-8X controls send sysex or CCs to be translated into sysex.
•• Send SysexSend Sysex - Sliders and buons will send sysex messages to the synth
•• Send/Translate CCSend/Translate CC - Sliders and buons will transmit CC messages when changed. When the MPG-8X
receives one of these sysex messages at the MIDI IN, it will translate the incoming CC into sysex data and
send the sysex to the synth.
MIDI Echo: On/Off.MIDI Echo: On/Off. When MIDI Echo is enabled, valid data received on Unit1InCh & Unit2InCh will be passed
THRU the MPG-8X back to the synth.
Prog Change Mode:Prog Change Mode: Internal/Echo/Internal + EchoInternal/Echo/Internal + Echo. This determines how incoming program change messages
are handled by MPG-8X.
•• InternalInternal - When a program change is received, it will be used to select an object stored in MPG-8X internal
memory.
•• EchoEcho - When a program change message is received, it will be transmied out to the MKS-80, and will not
select an MPG-8X object.
•• Internal + EchoInternal + Echo - When program change is received, it will select an object from MPG-8X internal memory,
athen the program change message will be sent to the MKS-80 as well.
Program Change:Program Change: When INTERNALINTERNAL program change is selected, each type of MPG-8X object can be recalledeach type of MPG-8X object can be recalled
using MIDI program changesusing MIDI program changes. Using this function, any tone, patch, assign or setup can be selected using MIDI
program change and bank change messages.
•• Patch U1Patch U1 - Sets MIDI channel that Unit 1 Patch program change messages will be selected on.
•• Patch U2Patch U2 - Sets MIDI channel that Unit 2 Patch program change messages will be selected on.
•• Tone U1 UpperTone U1 Upper - Sets MIDI channel that Unit 1 Upper Tone program change messages will be selected on.
•• Tone U1 LowerTone U1 Lower - Sets MIDI channel that Unit 1 Lower Tone program change messages will be selected on.
•• Tone U2 UpperTone U2 Upper - Sets MIDI channel that Unit 2 Upper Tone program change messages will be selected on.
•• Tone U2 LowerTone U2 Lower- Sets MIDI channel that Unit 2 LowerTone program change messages will be selected on.
•• AssignAssign - Sets MIDI channel that ASSIGN program change messages will be selected on.
•• SetupSetup - Sets MIDI channel that SETUP program change messages will be selected on.

RETROAKTIV MPG-8X USER MANUAL
8
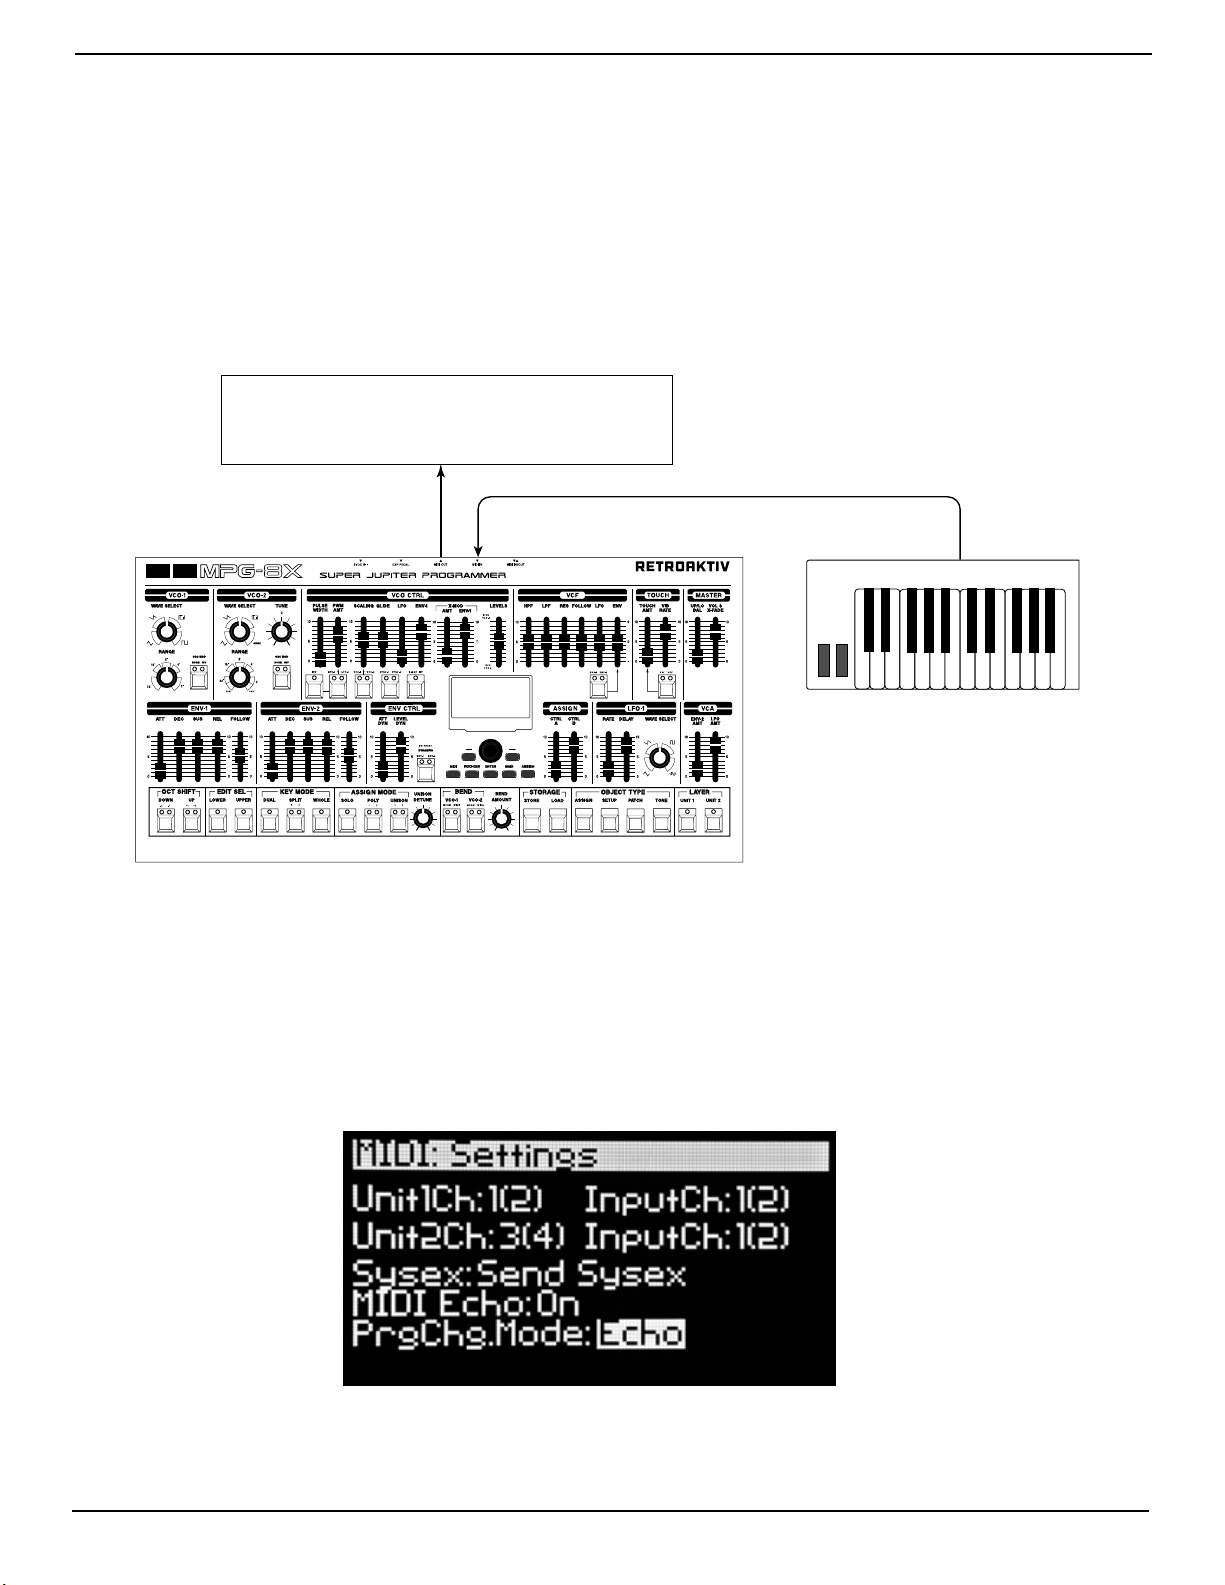
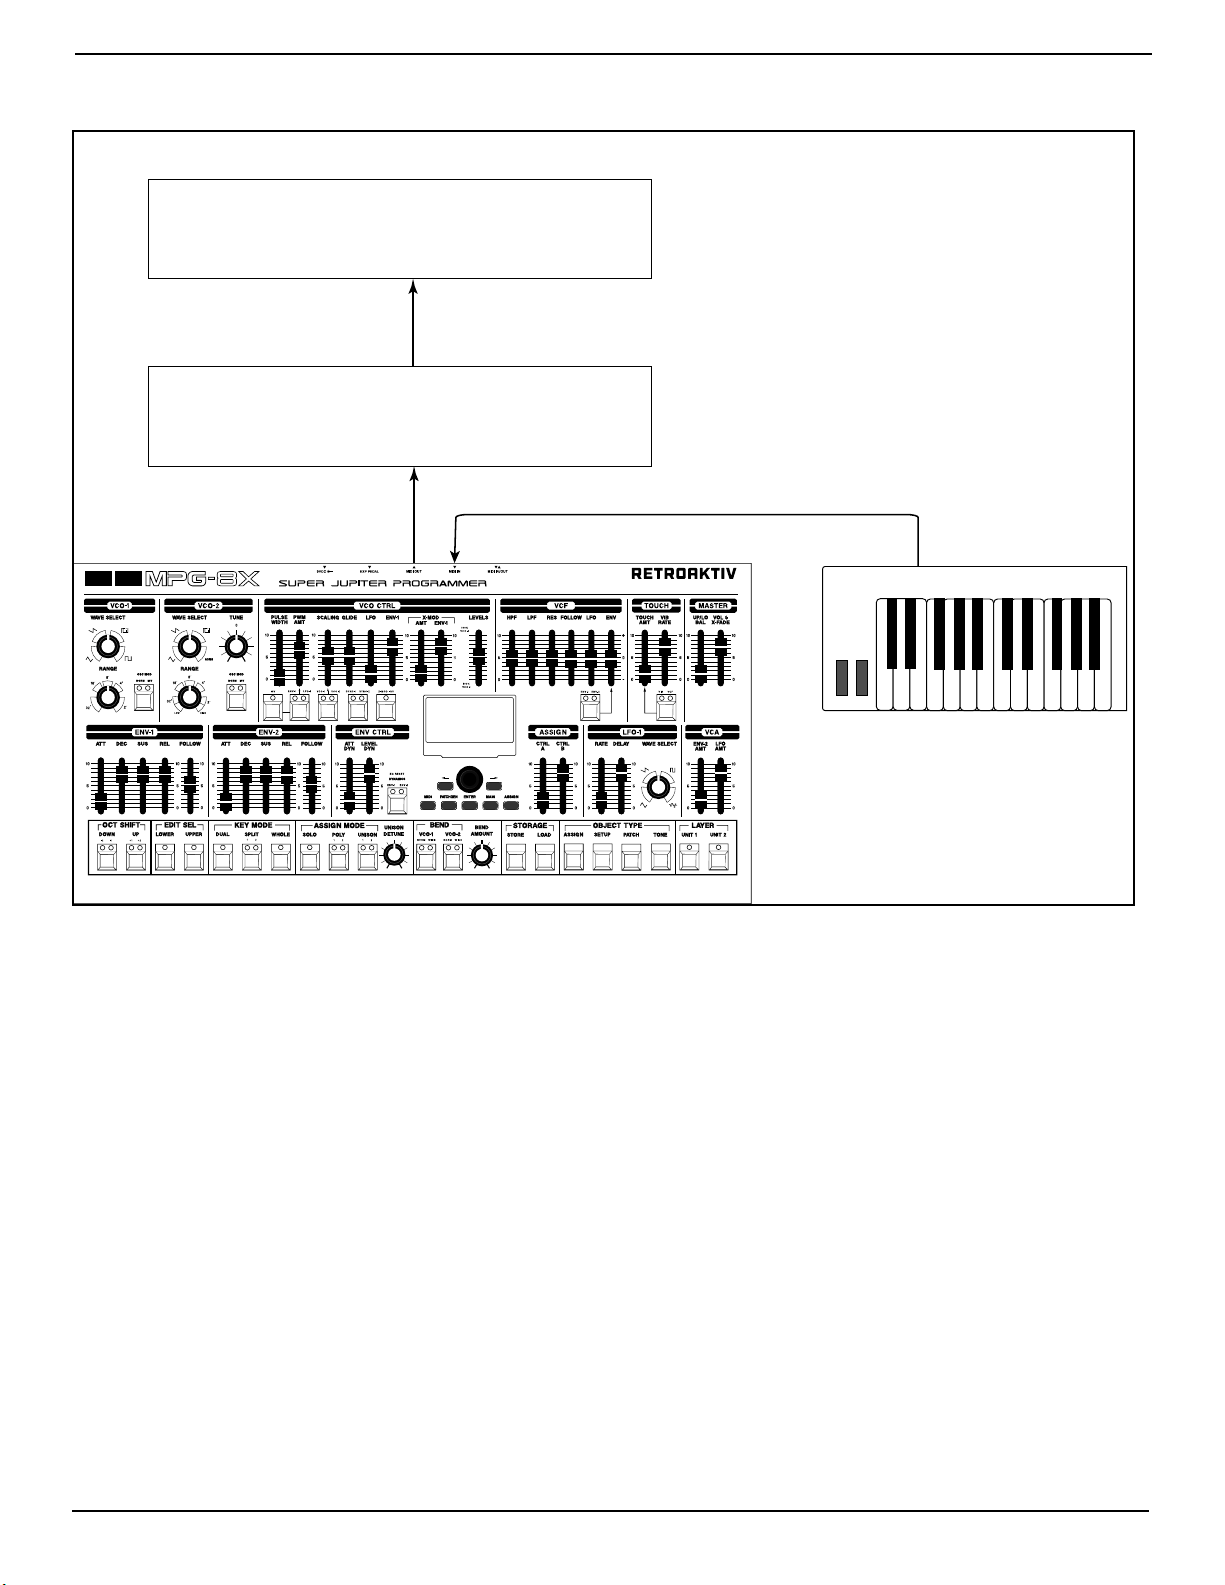
MIDI SETTINGS WHEN USING 2 MKS-80 UNITSMIDI SETTINGS WHEN USING 2 MKS-80 UNITS
When using 2 MKS-80 units, it is very impoant to understand how to set the MIDI seing in the MPG-8X.
Notice how the MIDI IN and MIDI OUT channels of the MPG-8X include two numbers, such as 1(2), 2(3), etc. This
is done for three reasons, the first being that when a unit is in SPLIT 2 mode, the the UPPER voice will respond
on the MIDI channel that the MKS is set to receive on, and the LOWER voice will receive on that channel + 1.
This means that if using SPLIT 2 mode, and the MKS is set to receive on channel 1, then the UPPER tone will
respond on channel 1, and the lower tone will respond to channel 2. (Channel 1 + 1)
The second reason we display both numbers is that the MPG-8X is capable of tranlating CC messages into
sysex messages. This is so we can record fader and buon movements with a DAW or sequencer. Since each
MKS connected to the 8X has two tone layers (UPPER and LOWER), that means that to address each tone
independently with CCs, each layer must respond to CCs on different channels. So if UNIT 1 CH IN is set to 1(2),
this would mean that incoming CCs on channel 1 would change the UPPER tone on unit 1, and incoming CCs on
channel 2 would affect the LOWER tone.
The third reason we display the channel numbers this way is that the MPG-8X has a MIDI MAPPING function.
This means that the MPG-8X can listen for note and controller data on a MIDI channel, and then relay that data
to the MKS on a different channel.
For example, if Unit 1 Ch (The channel that MPG-8X will transmit MIDI data on, and the channel that MKS-80 #1
will receive on) is set to channel 3(4), and the Unit 1 In channel (The channel that MPG-8X is listening for note
and controller data on) is set to 1(2), then incoming notes on channel 1 will be sent to MKS-80 #1 on channel 3.
This may not make immediate sense at first, but there is a reason we allow this. MPG-8X will block incoming
MIDI data that is not on the UNIT 1 IN or UNIT 2 IN channels. If you are loop recording with a DAW, and the 8X
is set to receive on channel 1 and send on channel 1, then it is possible for the 8X MIDI OUT to receive its own
messages at the 8X MIDI IN. This will cause a midi feedback loop. However, by seing UNIT 1 IN to 1(2) and Unit
1 OUT to channel 3(4), when incoming data on channel 1 enters the 8X, it is then transmied to the synth on
channel 3. When the data comes back through the loop to the 8X on channel 3, it will be rejected, because
channel 3 is not the Unit 1 IN channel. This mapping breaks any feedback loop.
When using two MKS-80 synths with the MPG-8X, it is recommended that you set the UNIT 1 IN and UNIT 2 IN
channels to different channels. The same goes for the UNIT 1 and 2 OUT channels. This is because seing up
this way prevents feedback loops from occurring.
Example:
Unit 1 Ch (MIDI OUT) = 3(4)
Unit 1 In Ch (MIDI IN) = 1(2)
Unit 2 Ch (MIDI OUT) =5(6)
Unit 2 In Ch = 7(8)
In this case, MIDI data received on channel 1 will be sent on channel 3 to MKS-80 UNIT 1. Channel 3 is not an
input channel for UNIT 1 or 2, so this data will be ignored if it gets passed back to MPG-8X. MIDI data received
on channel 5 will be passed to MKS-80 UNIT 2 on channel 7. Channel 7 is not an input channel for UNIT 1 or 2,
and will be ignored if passed back to MPG-8X.
It is also necessary to understand that when using 2 units, each MKS should be set to receive on a different
MIDI channel. This is because if you load a patch on the 8X, and both units are set to receive on the same

RETROAKTIV MPG-8X USER MANUAL
9
channel, the data intended for UNIT 2 (Which gets sent aer the UNIT 1 data when a patch is loaded), will be
sent to UNIT 1 and UNIT 2, because they are both set to receive on the same channel. If you set both units to
the same MIDI channel, there will be unexpected behavior when using Multi-Unit Poly Mode (See MIDI Process
& Filter Menu for more about enabling this mode) and when loading SETUPS.
It is good practice to always have each MKS set to a different MIDI channel.
MIDI: PROCESS & FILTERMIDI: PROCESS & FILTER
The MIDI Filter/Process menu contains an array of MIDI data filters, as well as special MIDI functions. To
navigate to this menu page, press [MIDI] until the menu shown below is displayed on the OLED.
The MIDI:Filter & Process Menu
MIDI Filters:MIDI Filters:
•• NoteNote - Filters incoming note data
•• CCCC - Filters incoming CC data
•• PitchPitch - Filters incoming pitch bend data
•• AeouchAeouch - Filters incoming aeouch data
Multi-unit Poly Mode:Multi-unit Poly Mode:
On/OffOn/Off - When enabled, this function allows Unit 1 and Unit 2 MKS-80 to act as a single synthesizer, which
doubles polyphony. When enabled Note/CC/control data will be received on Unit 1 In Ch only (Unit 2 In Ch willWhen enabled Note/CC/control data will be received on Unit 1 In Ch only (Unit 2 In Ch will
be ignored), and the MPG-8X will send note data on the Unit1Ch and Unit2Ch. For this mode to work, Unit1Chbe ignored), and the MPG-8X will send note data on the Unit1Ch and Unit2Ch. For this mode to work, Unit1Ch
and Unit2Ch must be different channels.and Unit2Ch must be different channels.
Multi-Unit Poly Mode mode is for setups that utilize two MKS-80 synthesizer modules. When enabled, this
allows for a 16-voice MKS-80 (8-voice in DUAL mode).
It is impoant to understand that when Multi-Unit Poly Mode is enabled, the MPG-8X will consider the 2
connected MKS-80s to be a single 16-voice polyphonic synth. For this reason, when using this mode, UNIT 1
and UNIT 2 should bothe be selected. This will allow you to load the same patch on both units, so both units
have the same sound loaded.

RETROAKTIV MPG-8X USER MANUAL
10
MULTI-UNIT POLY MODE CONNECTION DIAGRAMMULTI-UNIT POLY MODE CONNECTION DIAGRAM
MKS-80 #1 (UNIT 1)
MIDI IN
MIDI CONTROLLER OR DAW
MIDI OUT
MKS-80 #2 (UNIT 2)
MIDI IN MIDI OUT
MIDI THRU
Set Unit 1 and Unit 2 to separate MIDI channels.
Chord Mode:Chord Mode:
•• On/OffOn/Off - When enabled, playing a single note on the keyboard will play the selected chord.- When enabled, playing a single note on the keyboard will play the selected chord.
The MPG-8X CHORD MODE function allows users to input a chord, and then play it by keying a note. The chord
will be transposed anywhere on the keyboard where a new note is keyed. To access the CHORD MODE function,
navigate to the MIDI PROCESS/FILTER page in the MIDI menu. CHORD MODE functions are located at the
boom of this page. CHORD MODE can be enabled on UNIT 1, Unit 2, or BOTH units. Once enabled, a menu
dialog will appear, showing the notes in the current CHORD. (ChordNt) Each of the notes in the chord can
be entered manually, using the cursor and encoder, or the chord can be entered into the MPG-8X by holding
SHIFT and playing a chord into the unit. To clear the current chord, press SHIFT to delete the current chord
contents.
Chord Mode will allow 8 notes to be on at one time. Depending on the size of the chord and how many notes
being held, the MPG will not “steal” voices. It will instead play the chords with any available voices.
Note: Chord Mode creates a large amount of MIDI data, which must all be passed in sequence to the synth.Note: Chord Mode creates a large amount of MIDI data, which must all be passed in sequence to the synth.
If you are trying to play a lot of notes with a large chord, and simultaneously send slider data, there may beIf you are trying to play a lot of notes with a large chord, and simultaneously send slider data, there may be
timing issues, as all of the data cannot be passed to the synth quickly enough to prevent a delay.timing issues, as all of the data cannot be passed to the synth quickly enough to prevent a delay.
SHORTCUT: SHIFT + VCF ENV SEL will open CHORD MODE menu.SHORTCUT: SHIFT + VCF ENV SEL will open CHORD MODE menu.

MIDI: SYSEX MENUMIDI: SYSEX MENU
To navigate to MIDI:Sysex menu, press the MIDI buon until MIDI:Sysex is displayed in the menu bar at the top
of the screen. The MIDI sysex menu is used for impoing and expo patches and bank data. Here is a brief
explanation of each function in this menu:
The MIDI:Sysex Menu
•• Send MKS-80 Patch BankSend MKS-80 Patch Bank - Use this function to send a bank of patches to an MKS-80 from the MPG-8X’s
internal memory. Select the bank on the 8X to be transmied, then press ENTER to initiate the transfer.
Note: for this to work, bidirectional communication between the MPG-8X and MKS-80 is required. This
means that the MPG-8X MIDI OUT is routed to MKS-80 MIDI IN, and the MKS-80 MIDI OUT is routed to MPG-
8X MIDI IN. When transferring a bank of patches from MPG-8X, it should be understood that the format of
PATCH objects in the 8X is different than the format of PATCH objects in the MKS-80 memory. In the MKS-
80, there are 64 tones, and 64 patches, with each patch linking to 2 of the 64 tones. In MPG-8X, there are
64 patches in a bank, but 128 individual tones, which allows us to store a patch with a single buon press
instead of needing to store each tone separately, then link those 2 tones in the PATCH menu. Because
of this difference, when dumping a bank of 8X patches to MKS-80, only the first 32 PATCH objects will be
transferred to the MKS-80, and the MPG-8X will automatically handle the linking of the patches to the
tones in the MKS-80.
•• Receive MKS-80 Patch BankReceive MKS-80 Patch Bank - Use this function to request a bank of patches from the MKS-80. Note:
for this to work, bidirectional communication between the MPG-8X and MKS-80 is required. Select the
destination bank in the MPG-8X and hit ENTER to load the MKS-80 bank to the destination bank. Note that
instead of sharing tones, like the MKS-80 does, the MPG-8X will store the incoming patches as 64 patches,
each with their own 2 tones, thus eliminating the linkage between each tone and any other patch. This
means that if a “shared” tone is edited and stored on the 8X, it will not affect any other patches that also
use that tone.
•• Send MKS-80 PatchSend MKS-80 Patch - This sends the current patch to the MKS-80, where it can then be stored in MKS-80
format. Understand that when doing this, you may overwrite tones that are shared by other patches.
•• Receive MKS-80 PatchReceive MKS-80 Patch - Downloads the current patch from MKS-80 into the selected destination and
conves it into MPG-8X format.
•• Send Patch BankSend Patch Bank - Expos a bank of MPG-8X format patches in MPG-8X to a computer sysex librarian.
Note that these will be in MPG-8X format, not MKS-80 format. Bidirectional communication not required
for this operation.
•• Receive patch BankReceive patch Bank - Impos a bank of MPG-8X patches from a computer sysex librarian to the selected
MPG-8X PATCH bank. Bidirectional communication not required for this operation.

RETROAKTIV MPG-8X USER MANUAL
12
•• Full Card BackupFull Card Backup - Expos a backup of all ASSIGN, PATCH, SETUP and TONE objects from the MPG-8X. USed
for backing up the contents of memory. Bidirectional communication not required.
•• Full Card ImpoFull Card Impo - Allows a full-card backup file to be impoed to the MPG-8X. Warning: This will overwriteWarning: This will overwrite
the entire MPG-8X memory bank.the entire MPG-8X memory bank.
CONVERTING AN MKS-80 BANK INTO RETROAKTIV PATCH FORMATCONVERTING AN MKS-80 BANK INTO RETROAKTIV PATCH FORMAT
MPG-8X cannot receive MKS-80 banks directly from the computer. To do this type of transfer, the sound bank
must first be formaed to the Retroaktiv format. Once in this format, the bank can be loaded into the MPG-
8X directly from the computer. The Retroaktiv PATCH format eliminates the “tone sharing” scheme used on
the MKS-80. To conve an MKS-80 bank to Retroaktiv Non-Shared format, connect the programmer and synth
as shown below.
MKS-80
MIDI IN MIDI OUT
To conve a bank, do the followingTo conve a bank, do the following:
1. Send the bank from the computer to the MKS-80
2. Use the Receive MKS-80 Patch Bank function in the MPG-8X Sysex Menu to load the bank into the MPG-8X.
3. Use the Send Patch Bank function in the MPG-8X Sysex Menu to send the bank to the computer. (Once in
the MPG-8X, the bank has been conveed into Retroaktiv Patch format)
4. Now the conveed bank can be dumped directly to MPG-8X from the computer using the Receive Patch
Bank function in the Sysex Menu. The conversion just needs to be done once, then the bank can be
directly loaded into MPG-8X from a sysex librarian.
The conversion of MKS-80 banks is necessary because if a bank contains tones that are not pointed to by
patches in the MKS-80, then those tones will be lost, resulting in the transferred bank not being a carbon copy
of the original. Using the process above, no tone data will ever be lost. Once an MKS-80 bank is conveed
into Retroaktiv format, it can be expoed to a PC in Retroaktiv format, and dumped back into any MPG-8X
directly from the computer, without going through the MKS-80 first.

RETROAKTIV MPG-8X USER MANUAL
13
MIDI: USER CC MAPSMIDI: USER CC MAPS
The MPG-8X allows users to create their own user CC maps, which allow the 8X’s control suace to be
programmed to transmit CCs from any slider, making it ideal for controlling external gear.
To navigate to the CC map page, press the [MIDI] buon until USER CC Map is displayed in the menu bar.
The MIDI:CC Map Menu
Creating a User CC Map:Creating a User CC Map:
When on the User CC Map page, moving any slider will display that slider’s current CC# routing, as well as the
MIDI channel that CC slider will transmit on. The encoder can then be used to enter which CC# each slider
transmits on. Each slider can transmit on any CC and any channel independently.Each slider can transmit on any CC and any channel independently.
Pressing [ENTER] when in the User CC Map menu will cycle through all sliders that have active CC routings,Pressing [ENTER] when in the User CC Map menu will cycle through all sliders that have active CC routings,
making it simple to see which sliders in a map are active.making it simple to see which sliders in a map are active.
The Default state of the User CC Map feature is OFF. A User CC Map can only be used on the UNIT 2 layer of
the MPG-8X. To activate the User CC function, toggle the OFF seing so it reads UNIT 2.
Clearing a User CC Map:Clearing a User CC Map:
To clear all slider routings in a User CC Map, press [SHIFT]+[MIDI].
Storing and Loading User CC Maps:Storing and Loading User CC Maps:
MPG-8X internal memory can store 24 User CC Maps. To store or load a map, go to the User CC Map menu, and
press the STORE or LOAD buon once. A list of currently stored CC maps will be displayed. Select the desired
slot to be loaded or stored, then press the [STORE] or [LOAD] buon. A CC map can be stored with a SETUP.A CC map can be stored with a SETUP.

RETROAKTIV MPG-8X USER MANUAL
14
CC TO SYSEX TRANSLATECC TO SYSEX TRANSLATE
MPG-8X allows users to record and translate buon presses and fader movements with any DAW or sequencer,
by allowing CC to sysex translation.
To enableCC to SYSEX translate mode, navigate to MIDI: Seings menu, and toggle the Sysex seing to Send/To enableCC to SYSEX translate mode, navigate to MIDI: Seings menu, and toggle the Sysex seing to Send/
Tranlate CC.Tranlate CC.
When this mode is enabled, moving sliders and toggling buon parameters will send a CC message from the
MPG-8X instead of a sysex message.
When using the MPG-8X to translate CC messages into sysex messages for the MKS-80, each of the TONE
layers on each UNIT has its own MIDI channel. For example if the UNIT 1 IN channel is set to 1(2), and the UNIT
2 IN channel is set to 3(4), then incoming CCs on channel 1 would affect UNIT 1 UPPER tone parameters, CCs
on ch 2 would affect UNIT 1 LOWER tone parameters. CCs on channels 3 and 4, would affect UNIT 2 UPPER and
LOWER layers respectively. This table shows the implementation of the MPG-8X MIDI CC to SYSEX translation.This table shows the implementation of the MPG-8X MIDI CC to SYSEX translation.
12 LFO Rate
13 LFO Delay
14 LFO Wave
15 VCO LFO Mod
16 VCO Env. Mod
17 Pulse Width
18 Pulse Width AMT
19 VCO Scaling
20 XMOD Amount
21 XMOD Env-1
22 VCO-1 Range
23 VCO-1 Wave
24 VCO-2 Range
25 VCO-2 Fine Tune
26 VCO-2 Wave
27 VCO 1 / 2 Level
28 Highpass Freq.
29 VCF Freq.
30 VCF Resonance
52 VCF Env. Depth
53 VCF LFO
54 VCF Follow
55 VCA Env-2 Amount
56 VCA LFO Amount
57 Aack Dynamics
58 Level Dynamics
59 Env-1 Aack
60 Env-1 Decay
61 Env-1 Sustain
62 Env-1 Release
63 Env-1 Follow
70 Env-2 Aack
71 Env-2 Decay
72 Env-2 Sustain
73 Env-2 Release
74 Env-2 Follow
75 PWM Mode
76 PWM Polarity
77 VCO Scale
78 XMOD Polarity
79 VCO-1 Mod
80 VCO Sync
81 VCO-2 Mod
82 VCF Env. Select
85 Env1 Dynamics
86 Env2 Dynamics
87 Octave Shi
88 Key Mode
89 Assign Mode
90 Aeouch Mode
91 VCO-1 Bend
92 VCO-2 Bend
93 Aeouch Amount
94 Touch Vibrato Rate
95 Upper-Lower Balance
102 Unison Detune Amt
103 Pitch Bend Sens
104 VCO Glide Amt
105 VCF Env. Depth
106 ENV Reset
107 Split Point

RETROAKTIV MPG-8X USER MANUAL
15
When using CC to sysex translation, it is recommended that your connections are as shown in the diagram
below.
Take note that if using 2 MKS-80 units, there should be no overlap of either MIDI IN or MIDI OUT channels. This
means that seing UNIT 1 to receive on 1(2) and UNIT 2 to receive on 2(3) would result in CCs on channel
2 affecting UNIT 1 LOWER and UNIT 2 UPPER, which is undesirable in most situations. A good MIDI seing
configuation would be as follows:
UNIT 1 IN = 1(2), UNIT 1 OUT = 3(4) (CCs are translated on CH 1 & 2, sysex sent to MKS on CH 3)UNIT 1 IN = 1(2), UNIT 1 OUT = 3(4) (CCs are translated on CH 1 & 2, sysex sent to MKS on CH 3)
UNIT 2 IN = 5(6), Unit 2 OUT = 7(8) (CCs are translated on CH 5 & 6, sysex sent to MKS on CH 7)UNIT 2 IN = 5(6), Unit 2 OUT = 7(8) (CCs are translated on CH 5 & 6, sysex sent to MKS on CH 7)
With no channels overlapping, ech of the 4 layers will receive CCs independently.

RETROAKTIV MPG-8X USER MANUAL
16
THE PATCH GENERATORTHE PATCH GENERATOR
The Patch Generator tool is a poweul feature that creates intelligently randomized tones, as well as preset
“Init tones”. (Scratch Tones”) This tool provides an endless supply of new, musical tones, which can be created
on any layer of an MPG-8X SETUP. Here’s how it all works:
The Patch Generator uses categories so users can tell it which type of sound to create. Below is a cha
showing the various categories and subcategories, as well as a brief description of the types of sounds each
will generate. Note that these category and subcategory names are being used as “musical adjectives” to
describe characteristics of a sound. For example, the harpsichord category in the patch generator doesn’t
create hyper-realistic harpsichord sounds, it creates synth sounds that have the same characteristics as a
harpsichord. This common reference we all have allows us to easily categorize the types of sounds we want
the patch generator to create.
The Patch Generator Menu
GENERATING A TONEGENERATING A TONE
To generate a tone, select a category/sub-category, then use the [EDIT SEL] and [LAYER] buons to select
which synth layers the tone will be generated on. To generate the same tone on all selected layers, pressTo generate the same tone on all selected layers, press
[ENTER.][ENTER.] To generate different tones on each selected layer, hold down ENCODER (SHIFT) and press [ENTER].To generate different tones on each selected layer, hold down ENCODER (SHIFT) and press [ENTER].
Each section of the synth has its own ENABLE in the patch generator menu. Sections shown in the menu
correspond to the sections labeled on the front panel. (VCO-1, VCO-2, VCO CTRL, VCF, ENV-1, ENV-2, ENV DYN,
LFO-1 and VCA) Seing a section’s ENABLE to OFF prevents the patch generator from randomizing any ofSeing a section’s ENABLE to OFF prevents the patch generator from randomizing any of
the parameters in that section when a new tone is created.the parameters in that section when a new tone is created. To disable all sections, press PATCHGEN buon.
Pressing the PATCHGEN buon again enables all sections. This shocut makes it simple to do something such
as disable all sections, then set just one section to ON.
The tone generator does not randomize any patch seings (OCT SHIFT, KEY MODE, ASSIGN MODE, BEND),
volume and balance seings (UP/LO BAL, VOL & X-FADE), aeouch seings, or the VCA ENV-2 AMT. These
seings can be set manually.
To generate a patch generator tone from any menu, press SHIFT+PATCHGEN. The currently selected category
and sub-category of tone will be generated when this operation is executed.
PATCH GEN ERATOR CATEGORIESPATCH GEN ERATOR CATEGORIES
Bass - Synth bassesBass - Synth basses
•• AllAll - This sub-category generates a wide assoment of bass tones. Most do not have VCA ENV Release.
•• ReleaseRelease - Basses with VCA ENV Release

RETROAKTIV MPG-8X USER MANUAL
17
Pads - An assoment of different types of synth pads.Pads - An assoment of different types of synth pads.
•• AllAll - Randomly selects pads from any of the following sub-categories.
•• MellowMellow - So pads and pads with less high frequency content
•• SyncedSynced - Pads where OSC SYNC is used.
•• Env DetunedEnv Detuned -Pads where VCO detuning by envelope is used.
•• Pad 1Pad 1 - Pad algorithm 1
•• Fast PadFast Pad - Same as ALL category, but the VCE ENV Aack and Release values are faster.
•• PulsatePulsate - Pads that use LFO-1 to modulate VCA and VCF.
Pluck/Struck - Harp, guitars, harpsichords, clavinets, plucked string, struck stringPluck/Struck - Harp, guitars, harpsichords, clavinets, plucked string, struck string
•• AllAll - Randomly selects pads from any of the following sub-categories.
•• HarpsichordHarpsichord - Tones with a harpsichord-like envelope.
•• Dbl HarpsiDbl Harpsi - Similar algorithm to Harpsichord, but creates thicker sounding tones.
•• Harp/GtrHarp/Gtr - Harps, plucked strings, struck strings, celeste, koto
•• ClaviClavi - Synth Clavichord, Synth Clavinet
Brass - Synth Brass, Ensemble Brass, Solo Horn, ReedsBrass - Synth Brass, Ensemble Brass, Solo Horn, Reeds
•• AllAll - Randomly selects pads from any of the following sub-categories.
•• Synth BrassSynth Brass - Ensemble and Synth Brass.
•• SoloSolo - Trombone, Trumpet, Sax, Tuba, French Horn
Bell/Mallets - Chimes, Marimba, Vibes, Bells, PercussionBell/Mallets - Chimes, Marimba, Vibes, Bells, Percussion
•• AllAll - Randomly selects pads from any of the following sub-categories.
•• Tuned WoodTuned Wood - Marimba and struck woodblock instruments
•• Atonal WoodAtonal Wood - Struck woodblocks
•• Glass ChimeGlass Chime - Delicate-sounding,FM-like, Ice Bells
•• Synth ChimeSynth Chime - Synth bells
•• General BellGeneral Bell - Bells & Metal Algorithm 1
•• Atonal/MetalAtonal/Metal - Metallic and clangorous, Digital Bells, Shimmer
Piano-Instruments with Piano-like response.Piano-Instruments with Piano-like response.
•• AllAll - Randomly selects pads from any of the following sub-categories.
•• Ac. PianoAc. Piano - Bright pianos, synth pianos
•• So Tine EPSo Tine EP - Mellower Tine EPs
•• Tine EP 2Tine EP 2 - Tine EP Algorithm 2
•• Reed EP 1Reed EP 1 - Reed EP Algorithm 1
•• Reed EP 2Reed EP 2 - Reed EP Algorithm 2
Organ-Tones with organ-style harmonics and sustain.Organ-Tones with organ-style harmonics and sustain.
•• TonewheelTonewheel - Uses harmonics and waveforms found on tonewheel organs.
•• ComboCombo - Uses harmonics and waveforms found on transistor-based combo organs.
String - Various string & string machinesString - Various string & string machines
•• AllAll - Randomly selects pads from any of the following sub-categories.
•• PWM StringsPWM Strings - Uses PWM method of generating string textures.
•• Slow StringsSlow Strings - Various string tones with slow aack/release times.
•• Fast StringsFast Strings - Various string tones with fast aack/release times.
•• Vib StringsVib Strings - String textures with vibrato.

RETROAKTIV MPG-8X USER MANUAL
18
Sync-Tones that use VCO-Hard-Sync.Sync-Tones that use VCO-Hard-Sync.
•• AllAll - Randomly selects pads from any of the following sub-categories.
•• Rez SyncRez Sync - Algorithm that maximizes resonant, nasal, and aggressive qualities of osc sync.
•• Crazy SyncCrazy Sync - Algorithm that encourages more adventurous sync modulation routings.
Scratch-Non-randomized staer tone templates.Scratch-Non-randomized staer tone templates.
•• Dual-SawDual-Saw - Saw waves selected on VCOs, no modulation on VCOs, VCF, or VCA. Gated-VCA-type envelopes.
•• PWM LFOPWM LFO - LFO modulation applied to PW on both VCOs.
•• SyncSync - Basic oscillator sync template.
•• Dual LFO ModDual LFO Mod - LFO detuning OSC1 and OSC2.
Krazee!-Completely randomized parameters. This may or may not make sound.Krazee!-Completely randomized parameters. This may or may not make sound.
Any Category-Randomly selects a category and sub-category of tone.Any Category-Randomly selects a category and sub-category of tone.
PATCH GENERATOR SHORTCUTSPATCH GENERATOR SHORTCUTS
There are several “shocuts” that can be used to generate a tone when on a menu page other than the
PATCHGEN page. Below is a list of shocuts.
DUAL SAW INIT = [SHIFT] + [PWM INV]
PWM LFO INIT = [SHIFT] + [PWM SOURCE SEL]
SYNC INIT = [SHIFT] + [SYNC SEL]
DUAL LFO MOD INIT = [SHIFT] + [SCALING SEL]
GENERATE A RANDOM TONE = [SHIFT] + [PATCHGEN]
When in the PATCHGEN menu, pressing [PATCHGEN] will mask all and unmask all sections in the patch
generator. This can be useful if you want to mask all of the section except 1 or 2.
MANUAL MODEMANUAL MODE
To send the current slider and buon seings on the front panel to the synth, go to the MAIN menu by
pressing [MAIN]. Now press [SHIFT] + [ENTER]. A dialog box will pop up, reading “Sending all control positions”.
COPY & PASTECOPY & PASTE
A tone can be copied from any layer to any other layer in the MPG-8X. To copy, press [SHIFT] + [LOWER] or
[SHIFT] + [UPPER] to copy the desired tone. A dialog will pop up, asking which destination the copied tone
should be pasted to. This operation can be useful for moving tones to various layers on the controller.

RETROAKTIV MPG-8X USER MANUAL
19
ASSIGNASSIGN
The ASSIGN functions on the MPG-8X are a poweul MIDI modulation matrix, which allows users to create
complex modulation of multiple MKS-80 parameters using one control source, such as the ASSIGN sliders, an
expression pedal, aeouch, or any CC.
Each of the 7 assignable control sources can control up to 5 simultaneous parameters independently on anyEach of the 7 assignable control sources can control up to 5 simultaneous parameters independently on any
layer of either synth plugged into the MPG-8X.layer of either synth plugged into the MPG-8X. This allows us to do something like sweep the filter cutoff up
on the UPPER layer, while sweeping the cutoff down on the LOWER layer. Using the assigns and combinations
of assigns, a sound can be animated in ways not possible on other controllers.
To access the ASSIGN menu, press the ASSIGN buon once. The ASSIGN menu will be displayed on the OLED.
This menu gives us access to all of the parameters contained in the assignable control matrix.
The Assign Menu
ASSIGN SOURCEASSIGN SOURCE
There are 7 different ASSIGNs (Control sources):
CTRL A SliderCTRL A Slider
CTRL B SliderCTRL B Slider
Expression Pedal JackExpression Pedal Jack
AeouchAeouch
CC Source 1 (Any CC# 0-127)CC Source 1 (Any CC# 0-127)
CC Source 2 (Any CC# 0-127)CC Source 2 (Any CC# 0-127)
CC Source 3 (Any CC# 0-127)CC Source 3 (Any CC# 0-127)
The CTRL A and B sliders are located in the ASSIGN section of the MPG-8X front panel.
The Expression Pedal source is connected to the EXP PEDAL jack on the rear panel of the MPG-8X. Only
use passive expression pedals with the MPG-8X. Do not use a powered expression pedal.Do not use a powered expression pedal. This can result in
damage to the controller.
The Aeouch ASSIGN responds to incoming aeouch messages on the UNIT 1 and UNIT 2 MIDI IN channels.
CC Source 1-3 are controlled by incoming CC messages (CC#0 - CC#127) on the UNIT 1 and 2 MIDI IN channels.
These ASSIGNs are a great way to create automated “lanes” using a DAW. To automatically get the MPG-8X toTo automatically get the MPG-8X to
route a CC ASSIGN to a CC, simply navigate to the desired CC ASSIGN, hold [SHIFT] and move the CC (Such asroute a CC ASSIGN to a CC, simply navigate to the desired CC ASSIGN, hold [SHIFT] and move the CC (Such as
a mod wheel) and the 8X will automatically route that CC to the ASSIGN.a mod wheel) and the 8X will automatically route that CC to the ASSIGN.

RETROAKTIV MPG-8X USER MANUAL
20
DESTINATIONS AND ROUTINGDESTINATIONS AND ROUTING
Each of the 7 ASSIGN sources has 5 available destinations (parameters on the MKS-80) it can control. Each
parameter being controlled by an assign has its own range, polarity, UNIT destination (Unit 1, 2, or BOTH), and
layer destination (UPPER/LOWER/BOTH)
•• Dest (1-5)Dest (1-5): Selects which destination is being edited in the ASSIGN menu.
•• PARAMPARAM: Selects which parameter will be the current destination.
•• MINMIN: sets the minimum value of the current assign destination.
•• MAXMAX: sets the maximum value of the current assign destination.
•• UNIT 1UNIT 1: Selects which layers of Unit 1 the current destination will be routed to.
•• UNIT 2UNIT 2: Selects which layers of Unit 2 the current destination will be routed to.
•• INVERT/NORMALINVERT/NORMAL: Sets the direction (up or down) this parameter value will move in when the SOURCE value
is changed.
For example, if we use CTRL A as a SOURCE, then select Filter Cutoff as Destination 1, moving the CTRL A slider
will affect the Filter Cutoff parameter. To set the range of the filter control, we select the MIN and MAX values.
If MIN = 50 and MAX = 75, then moving the CTRL A slider from boom to top of its travel, will sweep the Filter
Cutoff between 50 and 75. If we want the response to be inveed, so moving the CTRL A slider up sweeps the
Filter Cutoff down from 75 to 50, then INVERT can be selected.
All of the 5 destinations within each ASSIGN can be routed in this way to any parameters on the synth. This
allows the user to create complex real-time modulations, which would normally require many hands or many
overdubs to accomplish, in a single movement.
To deactivate an ASSIGN layer, simply select NONE as the destination in a layer, and the routing will be
deactivated for that layer.
There are a few guidelines to follow to maximize the MIDI peormance of the MPG-8X when using assigns.
An ASSIGN has the potential to generate large amounts of MIDI data. If you’re using an ASSIGN with 5
layers, which is routed to BOTH layers of the synthesizer, this will generate 10 MIDI sysex messages with each
movement of the ASSIGN source. This amount of midi data can take many tens of milliseconds to transmit to
the synthesizer. If using many large ASSIGNs at one time, it may even be possible to ovelow the synth’s MIDI
buffer (Which holds incoming MIDI messages while the synth processes each one in the buffer).
ASSIGN Enable & DisableASSIGN Enable & Disable - Pressing the ASSIGN buon will alternate between the ASSIGN menu and the ASSIGN
Enable menu. Each of the 7 assigns has its own global enable, allowing you to turn the assigns on only when
you wish to use them.
Clearing all ASSIGNsClearing all ASSIGNs - To clear all ASSIGN data, navigate to the ASSIGN menu, then press [SHIFT]+[ASSIGN].
Clearing an ASSIGN SOURCEClearing an ASSIGN SOURCE - Navigate to the source to be cleared, then press [SHIFT]+[MAIN].
Clearing an ASSIGN DESTINATIONClearing an ASSIGN DESTINATION - Navigate to the destination to be cleared, then press [SHIFT]+[RIGHT].
Table of contents
Other Retroaktiv Dj Equipment manuals