Technician’s manual – Steam sterilizers mod. Sterilix Vacuum Plus e Sterilix Star
C:\Documenti1\Manuali superati non in uso\MANUALE DEL TECNICO GB-R03.doc
5. TESTS
TO CONDUCT WITH THE DOOR OPEN.
THE INDICATED LEDS ARE ILLUSTRATED IN THE ENCLOSED POWER
BOARD LAYOUT
1Leave the switch in the OFF position.
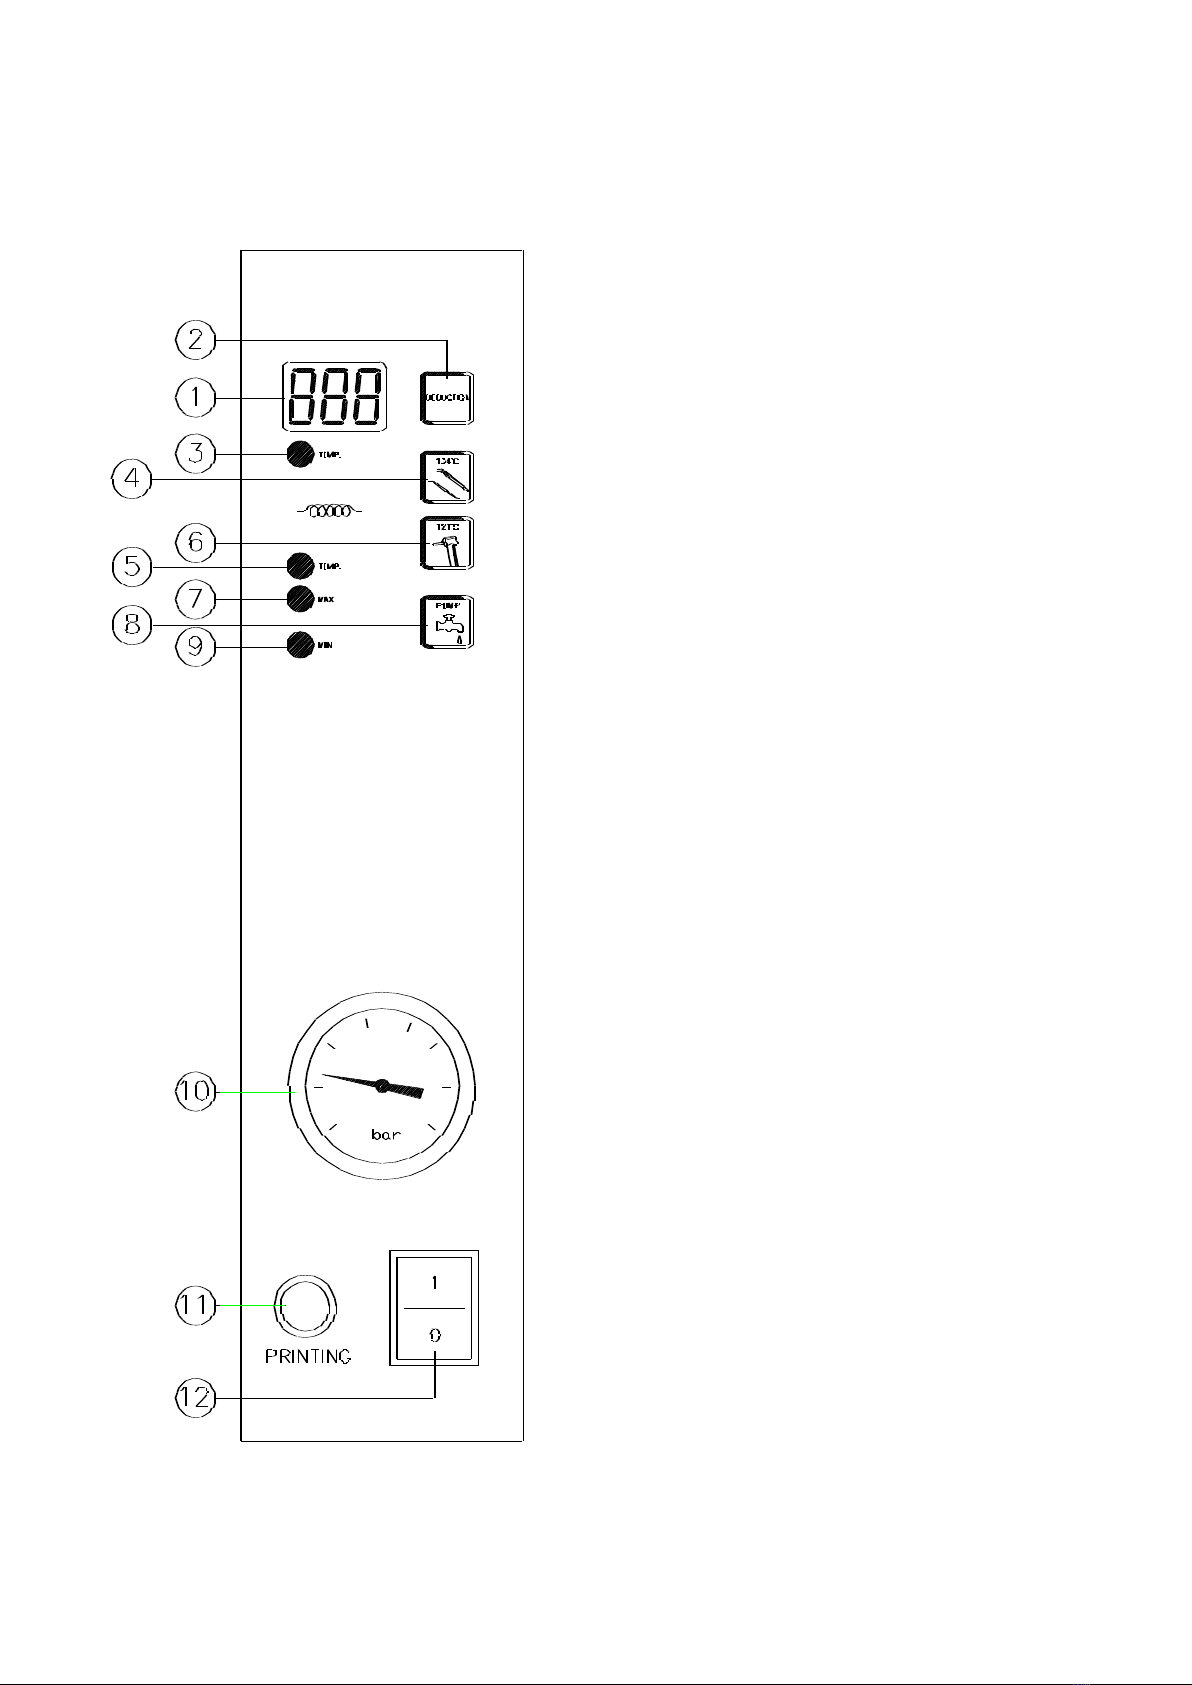
2Turn on the switch along with the DEDUCTION button and only release it when 888 appears.
3Either the program version will appear (only for models manufactured in the year 2000) or the
temperature in the chamber at that precise moment (e.g. 59-60).
Press intermittently after having read the message.
4rES - The heating element is powered.
If led N° 10 on the power board comes on, this means that the signal is being received.
Make sure that the heating element is actually heating by placing your hand inside the reservoir or
an amperometric instrument.
5ELI - The solenoid valve of the bacteriological filter is on. Listen for the "tick" noise indicating
that the solenoid valve has activated and make sure that led N° 7 is on.
6ELC - The pump that draws the water from the fill tank is on and delivers water to the boiler.
Led N° 3 will come on and the pump can be heard to operate.
7ELb - The N.O. solenoid valve near the condenser is on. To check that the solenoid valve is
energized, close and open the door and listen for the "tick" noise. Make sure that led N° 9 is
always on.
8ELP –Vacuum pump solenoid valve beginning from serial number 00131004
The 3-way solenoid valve and the vacuum pump will be independent and led N° 6 will come on.
9ELS - The air exhaust valve is on and Led N° 4 remains on.
10 PUP - The pump that delivers water to the chamber is on and led N° 1 remains on.
11 PoF - Indicates that there is no pressure and that the wires of pressure switch N° 1 are not in the
exact "normally open" position.
12 noL - Indicates that there is no water in the fill tank.
If there was water, the signal would be S.L No led.
13 APE - Signals that the door is open and that the door micro operates correctly. If the door is
closed when this signal is displayed, the message Ch must appear. No led on.
14 Leave the door closed and press DEDUCTION. This activates the vacuum test. The pump starts
and leds N° 9, N° 6 and N° 2 come on. The pressure gauge reading must drop below zero after
which the pump must stop. The message OCh must appear on the display after about 3 minutes,
meaning that there are no leaks from the machine. After this, led N° 2 will go out and leds N° 9
and N° 6 will remain on.
15 When the DEDUCTION button is pressed, the vacuum is relieved, led N° 7 will remain on for 5
seconds and then the flashing message STP will appear. All the messages will be printed if the
printer is connected at that moment. Press the DEDUCTION button with the door open to reset
any error message (with the exclusion of RET).
NOTE: The boldface captions are the messages that appear on the display.
Led N° 6 is installed on models from serial N° 00131004 onwards.