Revo Uno Dab+ User manual

DAB+ DIGITAL RADIO
www.revo.co.uk
Operating Guide
Guide de fonctionnent
Gebrauchsanleitung
Guida Operativa
ItalianoDeutschFrançaisEnglish
UNO DAB+ Manual.qxd 24/9/08 10:30 Page 1

Copyright and
Acknowledgements
Copyright © 2008 Revo Technologies Ltd.
All rights reserved.
Revo Technologies Ltd
The Inox Building
Caldwellside
Lanark
Scotland
United Kingdom
ML11 7SR
Tel. 01555 666 161
Fax. 01555 66 33 44
Email. [email protected]
Website: www.revo.co.uk
The information in this guide is believed to
be correct at the time of publication.
However, our policy is one of continuous
development and so the information is
subject to change without notice.
Revo®, UNO™ and M-Port™ are
trademarks or registered trademarks of
Revo Technologies Limited.
iPod®is a registered trademark of Apple
Computer, Inc.
Safety Warnings
Do not operate this radio near water.
Avoid small objects and liquids from getting
into this product.
Do not remove screws or casing parts.
Use only the power supply unit supplied.
EEC: This product has been designed and
type-tested to comply with EU requirements
and carries a CE mark.
Technical Support
Should you encounter any difficulties with
the operation of your radio, or should you
suspect that it may be faulty in some way,
please call our technical support
department on the number below:
01555 666 161
visit the troubleshooting section of our
website at: www.revo.co.uk/support
Preface
2
English
UNO DAB+ Manual.qxd 24/9/08 10:30 Page 2

Welcome to Revo 4
Benefits of DAB radio 4
Uno overview and key features 4
Warranty 4
Warranty registration 4
Controls and Connections 5
Powering Uno 5
Getting Started 6
Uno’s Control Method 6
Uno’s Menus Explained 7
DAB Operation 8
Choosing a station 8
Change display mode 9
Menu Options 10
To change station order 10
Manual Tuning 11
Set DRC 11
DRC - Dynamic Range Control 11
Local and Full Scan 11
Favourite Station Presets 11
Alarm 12
Setting an alarm 12+13
Sleep mode 14
FM Operation 15
M-Port™ 16
Trouble-Shooting 17
Technical Specification 18
3
English
Contents
UNO DAB+ Manual.qxd 24/9/08 10:30 Page 3

Benefits of Digital Radio
Clear, interference free digital sound
Many more stations, much more choice
No frequencies, select by station name
No re-tuning
Text information via LCD screen
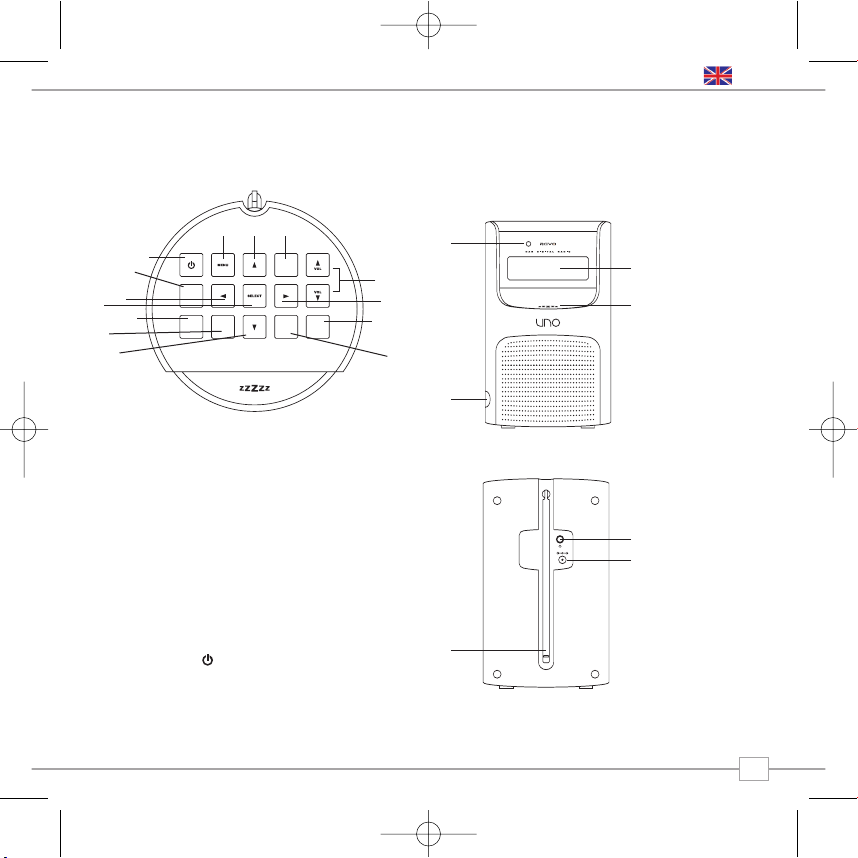
Uno Overview
Uno combines high quality DAB/DAB+ and
FM radio reception with sophisticated alarm
clock functionality including snooze and sleep
features.
Uno can also be used as a high quality
speaker system for your iPod™(or other
MP3 player of external sound source).
Simply connect your device to Uno’s
M-Port using the audio lead supplied.
Warranty
Revo Technologies Ltd warrants to the
purchaser that this product will be free
from parts and manufacturing defects in
the course of normal use for a period of
one year from the date of purchase.
This warranty does not apply in cases of
accidental damage, where the case has
been removed, wear and tear, negligence,
modification or inappropriate use.
Should you encounter problems with this
product, please contact your supplier or
alternatively see page 2 of this guide for
technical support contact details.
Warranty Registration
It is a warranty condition that you register
your purchase by either completing the
warranty card enclosed with your radio or
alternatively registering online at
www.revo.co.uk/register
Thank you for buying our Uno Digital Radio, we feel sure that it will provide
you with years of enjoyment and reliable service.
This guide has been designed to quickly get you up-and-running and listening
to DAB and DAB+ digital radio, offer guidance on the more complex features
of this product and provide information on safety, warranty and registration.
Welcome to Revo DAB
4
English
UNO DAB+ Manual.qxd 24/9/08 10:30 Page 4

5
English
Controls and Connectors
Powering Uno
Your Uno radio is powered from the mains
using the power adaptor supplied.
Insert the power adaptor plug into the DC
power socket on the rear of Uno.
Pressing the button will switch Uno on.
Only use the power adaptor supplied.
Replacements are available, visit
www.revo.co.uk for further details.
1. M-Port
2. Snooze
3. LCD Screen
4. Remote Control Sensor
1. Power
2. Presets
3. Back
4. Mode
5. Alarm
6. Info
7. Down
8. Scan
9. Sleep
10. Forward
11. Vol Up-Down
12. Mode
13. Up
14. Menu
1. Telescopic Antenna
2. 3.5mm Headphone Socket
3. DC Power Socket
MODE
SCANINFOALARM
PRESETS
SLEEP
1.
1.
2.
14.14. 13. 12.
7.
6. 5.
3. 10.
8.
4.
9.
11.
1.
4.
2.
2.
3.
3.
UNO DAB+ Manual.qxd 24/9/08 10:30 Page 5

Uno DAB+ is a sophisticated digital radio
device, with several modes of operation and
many advanced features.
In order for you to get the most out of
Uno’s functions, it is important that you
learn how to use the cursor based control
system, and also understand how Uno’s
menus work.
Uno DAB+’s Control Method
Uno DAB+’s control method is based around
seven main keys as identified below.
Diagram of the four cursor keys and the
select, menu and mode button
Label each of the keys as follows:
Scroll Up:
Press to scroll through menu options
Scroll Back:
Press to return to the previously selected
menu entry. Repeatedly pressing will return
you to the top level of the Mode menu (for
the mode you are in).
Scroll Forward:
When in text entry screens, this key can be
used to navigate through the characters.
It can also be used to move through to the
next menu level.
Scroll Down:
Press to scroll through menu options
SELECT – Press to select the current menu
entry. In FM mode, pressing SELECT will
initiate an FM scan.
Menu:
Press to enter (or return to) the Mode
menu for the mode of operation you are
currently in. Pressing for a second time will
return you to the ‘playing’ screen.
Mode:
Sequentially cycles through each of the
modes of operation.
Using these keys, you will be able to
perform most functions and navigate
through Uno DAB+’s various menus
Getting Started
6
English
UNO DAB+ Manual.qxd 24/9/08 10:30 Page 6

Uno DAB+’s Menus Explained
Uno DAB+ has three types of menu as
follows:
Main Menu
This is Uno’s principle (top level) menu, and
allows you to enter different operating
modes, setup the radio, and view
information such as software version and
your radio’s ID number.
Mode Menus
The Mode menus are so called because
they show the functions available within the
context of each of the operating modes
(internet radio mode, DAB mode, FM mode
etc. etc.).
Pressing the MENU button at any time will
take you to the Mode menu of the operating
mode your radio is currently in. Each Mode
menu includes a listing for Main Menu –
selecting this option will return you to the
top level Main Menu (as described above).
Main Menu
The Main menu provides access to the
following modes and sub-menus:
On powering-up Uno DAB+ for the first time,
you will be presented with this menu. To
select an option from the menu, simply use
the or keys to move through the menu
options, and press SELECT or to make a
selection or move to the next menu level.
DAB
FM
Mport
Info
Sleep
Alarms
System
Setup
7
English
UNO DAB+ Manual.qxd 24/9/08 10:30 Page 7

8
English
Choosing a Station
Firstly ensure that you have extended the
telescopic antenna found on the rear of
Uno.
Enter ‘DAB Mode’ from the Main Menu or
by pressing the MODE key until ‘DAB
Mode’ is displayed on Uno’s LCD display.
If this is the first time you have used Uno
it will scan for DAB stations in your area
and store them in memory. Uno will also
set its clock and date at this point.
Pressing the SCAN button will manually
instruct Uno to perform a station scan.
When the station scan has been
completed, stations will be displayed in
numeric then alphabetic order. The first
station in the list will be selected.
If no DAB signal is found, try relocating
your radio. Alternatively, it may be
necessary to check that DAB coverage is
available where you live.
Select your station choice by using the
and cursor keys, scroll through the
station list and press SELECT or the
key to make your selection.
DAB Mode
DAB Mode
Scanning... 10
•••••
>ArrwRock
BBCAsian
BBC 6Music
Service not ava
BBC 6Music
Playing
DAB Mode
Scanning... 10
•••••
>ArrwRock
BBCAsian
BBC 6Music
Service not ava
BBC 6Music
Playing
DAB Mode
Scanning... 10
•••••
>ArrwRock
BBCAsian
BBC 6Music
Service not ava
BBC 6Music
Playing
DAB Mode
Scanning... 10
•••••
>ArrwRock
BBCAsian
BBC 6Music
Service not ava
BBC 6Music
Playing
DAB Mode
Scanning... 10
•••••
>ArrwRock
BBCAsian
BBC 6Music
Service not ava
BBC 6Music
Playing
MODE
SCAN
UNO DAB+ Manual.qxd 24/9/08 10:30 Page 8

English
To Change the Display Mode
Uno DAB+ has nine different display
modes.
Simply press the INFO/SCAN button to
cycle through each mode. These display
modes are explained in the table opposite:
BBC Radio 1
calls cost max
BBC Radio 1
Pop Music
BBC Radio 1
12:34 22-08-2007
BBC Radio 1
12B 225.64MHz
BBC Radio 1
128kbps Stereo
Signal error 98
BBC Radio 6Music
11:48:03
BBC Radio 6Music
18/12/2007
tlkSPORT
BBC Radio 1
BBC National DAB
BBC Radio 1
Sig strength 96
BBC Radio 1
calls cost max
BBC Radio 1
Pop Music
BBC Radio 1
12:34 22-08-2007
BBC Radio 1
12B 225.64MHz
BBC Radio 1
128kbps Stereo
Signal error 98
BBC Radio 6Music
11:48:03
BBC Radio 6Music
18/12/2007
tlkSPORT
BBC Radio 1
BBC National DAB
BBC Radio 1
Sig strength 96
BBC Radio 1
calls cost max
BBC Radio 1
Pop Music
BBC Radio 1
12:34 22-08-2007
BBC Radio 1
12B 225.64MHz
BBC Radio 1
128kbps Stereo
Signal error 98
BBC Radio 6Music
11:48:03
BBC Radio 6Music
18/12/2007
tlkSPORT
BBC Radio 1
BBC National DAB
BBC Radio 1
Sig strength 96
BBC Radio 1
calls cost max
BBC Radio 1
Pop Music
BBC Radio 1
12:34 22-08-2007
BBC Radio 1
12B 225.64MHz
BBC Radio 1
128kbps Stereo
Signal error 98
BBC Radio 6Music
11:48:03
BBC Radio 6Music
18/12/2007
tlkSPORT
BBC Radio 1
BBC National DAB
BBC Radio 1
Sig strength 96
BBC Radio 1
calls cost max
BBC Radio 1
Pop Music
BBC Radio 1
12:34 22-08-2007
BBC Radio 1
12B 225.64MHz
BBC Radio 1
128kbps Stereo
Signal error 98
BBC Radio 6Music
11:48:03
BBC Radio 6Music
18/12/2007
tlkSPORT
BBC Radio 1
BBC National DAB
BBC Radio 1
Sig strength 96
BBC Radio 1
calls cost max
BBC Radio 1
Pop Music
BBC Radio 1
12:34 22-08-2007
BBC Radio 1
12B 225.64MHz
BBC Radio 1
128kbps Stereo
Signal error 98
BBC Radio 6Music
11:48:03
BBC Radio 6Music
18/12/2007
tlkSPORT
BBC Radio 1
BBC National DAB
BBC Radio 1
Sig strength 96
BBC Radio 1
calls cost max
BBC Radio 1
Pop Music
BBC Radio 1
12:34 22-08-2007
BBC Radio 1
12B 225.64MHz
BBC Radio 1
128kbps Stereo
Signal error 98
BBC Radio 6Music
11:48:03
BBC Radio 6Music
18/12/2007
tlkSPORT
BBC Radio 1
BBC National DAB
BBC Radio 1
Sig strength 96
BBC Radio 1
calls cost max
BBC Radio 1
Pop Music
BBC Radio 1
12:34 22-08-2007
BBC Radio 1
12B 225.64MHz
BBC Radio 1
128kbps Stereo
Signal error 98
BBC Radio 6Music
11:48:03
BBC Radio 6Music
18/12/2007
tlkSPORT
BBC Radio 1
BBC National DAB
BBC Radio 1
Sig strength 96
Normal display
with scrolling text
Display option Example
Type of broadcast
Broadcaster
Date
Station name and
frequency
Data rate and
broadcast type
Signal strength
BBC Radio 1
12:34 22-08-2007
BBC Radio 1
12B 225.64MHz
BBC Radio 1
128kbps Stereo
Signal error 98
BBC Radio 6Music
11:48:03
BBC Radio 6Music
18/12/2007
tlkSPORT
BBC Radio 1
Sig strength 96
Signal level,
indicator on bar
shows minimum
acceptable level
Time
9
UNO DAB+ Manual.qxd 24/9/08 10:30 Page 9

10
English
Uno DAB+ has a number of additional functions that are accessed through the DAB Mode
menu, as follows:
The following table describes the options
available under the ‘Station Order’ menu:
Station Order
Press the MENU key in DAB Mode then
select ‘Station order’.
To specify the order in which stations
are displayed
Select the Station order option.
Use the and cursor keys to scroll
through the options, and press SELECT or
the key to make your selection.
Alphanumeric Lists stations in alphabetical
order.
Ensemble Lists stations by multiplex.
Valid Lists only active stations.
Station order Description
DAB Mode Menu Options
UNO DAB+ Manual.qxd 24/9/08 10:30 Page 10

11
English
Manual Tune
Choose the ‘Manual tune’ option from the
DAB Mode menu.
The ‘Manual tune’ selection screen allows you
to select a particular frequency to tune to.
The list of frequencies displayed is dependant
on the currently-set frequency band and
contains all of the frequencies within that
band. It starts with the short name of the
frequency, for example 12B, and is followed
by the actual frequency in MHz.
If there is a station corresponding to this
station number and frequency, the display
will show the name, frequency, and a
tuning meter will show the signal strength.
DRC - Dynamic Range Control
Uno includes a dynamic range control that
automatically boosts the volume of quieter
sounds for listening in noisy environments.
The DRC control is found in the DAB Mode
menu under ‘DRC’. There are three pre-
defined settings as follows:
Local and Full Scan
As time passes, new stations will become
available in your area. To find them and
add them to your station list it is
necessary to perform either a ‘Local’ or
‘Full’ scan. Both operations can be
accessed via the DAB Mode menu.
A Local Scan performs a shorter scan of
only the ‘local’ ensemble range.
A Full Scan will take longer, but will cover
the complete DAB ensemble range.
Favourite Station Presets
Uno allows you to store 10 favourite station
presets, either via the 10 preset keys on
Uno itself, or on the Uno remote control.
To save the station you are currently
listening to as a preset, simply press the
PRESET button and use and to find an
unused location, then press SELECT to
store.
To listen to a stored station press the
PRESET button then use and to locate
your desired preset.
DRC Low Dynamic Range Control is
set to half
DRC High The recommended setting
for noisy environments
DRC Off Dynamic Range Control is
switched off
DRC Description
UNO DAB+ Manual.qxd 24/9/08 10:30 Page 11

12
English
Uno must have its clock and date set to use the alarm functionality.
To automatically set the time and date, tune to a DAB service and Uno will extract the
correct time and date from the DAB broadcast stream. Alternatively, the time and date can
be manually set via the ‘Time Setup’ option, this can be found under the ‘System Setup’
menu, which is located in the ‘Main Menu.”
Setting An Alarm
Uno allows you to store up to four different
alarm programmes in memory.
To set an alarm, press the ALARM button.
Uno will now ask you to choose which of the
four alarm memories you’d like to use.
Use the and keys too choose an alarm and
press SELECT.
To set the wake-up time, scrool to ‘Time’ then
press SELECT and use the and keys to set
the wake up hour, then press SELECT or the
button to move onto the minute setting. When
your wake-up time has been set, press SELECT.
To set the alarm type select ‘Days’. You will be
given the option of daily, once, weekdays or
weekends. Press the and to choose alarm
type, the press
SELECT
to confirm.
You can now decide whether you would like to be
woken up by DAB, FM or Buzzer. To choose the
wake-up mode press the key to view the ‘Mode’
option and press SELECT.
Alarms Mode
ALARM
Alarm1: Off
Alarm2: Off
Set Alarm Time
07:15
>Internet Radio
DAB Mode
Alarm Volume
•••••••••••
07:20:01
5:00
>Mode: DAB Mode
Last Listened
07:15
>off
Alarm1: Off
Alarm2: Off
Set Alarm Time
07:15
>Internet Radio
DAB Mode
Alarm Volume
•••••••••••
07:20:01
5:00
>Mode: DAB Mode
Last Listened
07:15
>off
Alarm1: Off
Alarm2: Off
Set Alarm Time
07:15
>Internet Radio
DAB Mode
>Buzzer
DAB
>Once
Weekdays
Alarm Volume
•••••••••••
07:30:10
10-10-2009
07:20:01
5:00
>Mode: DAB Mode
Last Listened
07:15
>off
08:05:10
10-10-2009
BBC Radio 1
calls cost max
Alarm1: Off
Alarm2: Off
Set Alarm Time
07:15
>Internet Radio
DAB Mode
>Buzzer
DAB
>Once
Weekdays
Alarm Volume
•••••••••••
07:30:10
10-10-2009
07:20:01
5:00
>Mode: DAB Mode
Last Listened
07:15
>off
08:05:10
10-10-2009
BBC Radio 1
calls cost max
UNO DAB+ Manual.qxd 24/9/08 10:30 Page 12

13
English
You can now decide whether you would like to be
woken-up by the last played station, or by a specific
preset (if none are set, Uno will wake you up using
the default Buzzer).
You will now have the option to set the wake-up
volume for your alarm. Use the and keys to
adjust the volume and press SELECT to set.
Finally, you should select ‘Save’ from the menu
to complete your alarm programme.
When Uno has an active alarm in its memory,
the alarm icon will appear on the top line of
Uno’s display at all times.
To halt an alarm, press any button on Uno’s
keypad. Alternatively, tap the SNOOZE button to
mute the alarm for a period of 5 minutes.
Multiple presses of the ‘Snooze’ button will
increase the ‘Snooze’ period by 5 minutes at a
time. The maximum ‘Snooze’ period is 30
minutes. When Uno is in Snooze mode, the
Snooze icon will be displayed on the LCD
screen, together with the current time and
remaining Snooze time.
To cancel a preset alarm, go back into the
ALARM programming mode and change ‘ON’ to
‘OFF. The details of the alarm will continue to be
retained in memory, and the alarm programme
can be switched back on again at a later date.
Alarm1: Off
Alarm2: Off
Set Alarm Time
07:15
>Internet Radio
DAB Mode
>Buzzer
DAB
>Once
Weekdays
Alarm Volume
•••••••••••
07:30:10
10-10-2009
07:20:01
5:00
>Mode: DAB Mode
Last Listened
07:15
>off
08:05:10
10-10-2009
BBC Radio 1
calls cost max
Alarm1: Off
Alarm2: Off
Set Alarm Time
07:15
>Internet Radio
DAB Mode
>Buzzer
DAB
>Once
Weekdays
Alarm Volume
•••••••••••
07:30:10
10-10-2009
07:20:01
5:00
>Mode: DAB Mode
Last Listened
07:15
>off
08:05:10
10-10-2009
BBC Radio 1
calls cost max
>Buzzer
DAB
>Once
Weekdays
07:30:10
10-10-2009
08:05:10
10-10-2009
BBC Radio 1
calls cost max
Alarm1: Off
Alarm2: Off
Set Alarm Time
07:15
>Internet Radio
DAB Mode
>Buzzer
DAB
Alarm Volume
•••••••••••
07:20:01
5:00
>Mode: DAB Mode
Last Listened
07:15
>off
08:05:10
10-10-2009
BBC Radio 1
calls cost max
Alarm1: Off
Alarm2: Off
Set Alarm Time
07:15
>Internet Radio
DAB Mode
Alarm Volume
•••••••••••
07:20:01
5:00
>Mode: DAB Mode
Last Listened
07:15
>off
08:05:10
10-10-2009
BBC Radio 1
UNO DAB+ Manual.qxd 24/9/08 10:30 Page 13

14
English
Sleep Mode
Setting A Sleep Period
It is possible to programme Uno to turn
off after a pre-defined period of time. To
do so, select the ‘System Set-up’ option
from the Main Menu.
Now select the ‘Time set-up Menu’.
Within this menu select ‘Sleep’.
Now, using the and keys, you can
select a sleep time period of 15, 30,
45, 60, 75 or 90 minutes.
Uno will now automatically put itself into
standby mode after the time has
elapsed.
Set sleep time
Sleep time off
Set sleep time
15 minutes
Set sleep time
Sleep time off
Set sleep time
15 minutes
UNO DAB+ Manual.qxd 24/9/08 10:30 Page 14

15
English
FM Operation
Extend the telescopic antenna found on the
rear of Uno.
Enter ‘FM Mode’ from the Main Menu or by
pressing the MODE key until ‘FM Mode’ is
displayed on Uno’s LCD display.
If this is the first time Uno has been in FM
mode, it will start at the beginning of the FM
frequency range. Otherwise, the last FM
station you were listening to will be selected.
To scan through the FM frequency range
press the and buttons.
To ‘SEEK’ the next active station, press the
SELECT button.
Favourite Station Presets
Uno allows you to store 10 favourite station
presets, either via the 10 preset keys on
Uno itself, or on the Uno remote control.
To save the station you are currently
listening to as a preset, simply press the
PRESET button and use and to find an
unused location, then press SELECT to
store.
To listen to a stored station press the
PRESET button then use and to locate
your desired preset, the press SELECT
FM Mode
FM Mode
87.50Mhz FM
87.50Mhz FM
BBC Radio 1
Preset Stored
> Preset 1 unset
> Preset 2 unset
> Preset 1 set
> Preset 2 unset
FM Mode
87.50Mhz FM
87.50Mhz FM
BBC Radio 1
Preset Stored
> Preset 1 unset
> Preset 2 unset
> Preset 1 set
> Preset 2 unset
FM Mode
87.50Mhz FM
87.50Mhz FM
BBC Radio 1
Preset Stored
> Preset 1 unset
> Preset 2 unset
> Preset 1 set
> Preset 2 unset
FM Mode
87.50Mhz FM
87.50Mhz FM
BBC Radio 1
Preset Stored
> Preset 1 unset
> Preset 2 unset
> Preset 1 set
> Preset 2 unset
FM Mode
87.50Mhz FM
87.50Mhz FM
BBC Radio 1
Preset Stored
> Preset 1 unset
> Preset 2 unset
> Preset 1 set
> Preset 2 unset
MODE
UNO DAB+ Manual.qxd 24/9/08 10:30 Page 15

16
English
Using MPort
Revo’s MPort connector allows for quick
and easy connection of an iPod®, similar
MP3 player or sound source.
Using the connection lead supplied, Uno is
transformed into a high quality digital
audio speaker system.
Connect one end of the supplied audio
lead to the headphone (or auxiliary out)
socket of your source device, then
connect the other end to the MPort
on the side of Uno.
Uno’s LCD screen will now display the
word ‘MPort’ on its screen.
You should adjust the output volume level
on both the source device and on Uno
itself to gain optimal volume levels and
sound performance.
MPort Mode
MPort Mode
M-Port
UNO DAB+ Manual.qxd 24/9/08 10:30 Page 16

17
English
Trouble-Shooting
DAB Digital Radio
Q. I hear a ‘burbling’ noise on some
stations.
A. If the signal strength is too low, a break-
up in reception can occur. This sound is
the result. Make sure that Uno’s antenna
is fully extended and in an upright
position. If the problem persists, move
Uno to another location or check that
you are in an area where reception of
this station is possible.
Q. I get a ‘No stations available’ message?
A. Make sure that your antenna is fully
extended and vertical. Check the signal
strength and move Uno to another
location if necessary.
Q. Uno’s clock isn’t set.
A. Uno needs to be able to pick-up a DAB
signal or have its clock set manually.
If Uno can find a DAB station, it can then
set its clock.
Factory Reset
In the unlikely event that Uno performs
erratically, it is possible to perform a software
reset to restore the original factory settings.
The factory reset option can be found under
the System Setup heading, which itself can be
found under the Main Menu.
UNO DAB+ Manual.qxd 24/9/08 10:30 Page 17

Technical Specification
18
General: Mono DAB and FM radio with full Band III reception.
Speaker: 2” full-range neodymium, 8W power handling
Audio Power Output: 2W
Frequency Ranges: DAB Band III (174 - 240 MHz)
DAB+ coverage
FM (87.5 - 108 MHz)
Antenna: Integral telescopic aerial
Input Connectors: DC power adaptor socket (230V adapter supplied)
3.5mm line-in for auxiliary devices (M-Port)
Output Connector: 3.5mm headphone socket
LCD Display: High resolution 2 x 16 character negative display
Alarm Clock: Alarm clock with snooze and sleep functions
Presets: 10 x DAB and 10 x FM presets
Remote Control: Infra-red remote control (optional accessory)
Mains Power Supply: 12V 1.2mA
Approvals: CE marked and RoHS compliant.
Dimensions: 167mm (H) x 105mm (W) x 105mm (D)
UNO DAB+ Manual.qxd 24/9/08 10:30 Page 18

DAB+ DIGITAL RADIO
Guide de fonctionnent
Français
UNO DAB+ Manual.qxd 24/9/08 10:30 Page 19

Droits d’auteur et
remerciements
Copyright © 2008 Revo Technologies Ltd.
Tous droits réservé
Revo Technologies Ltd
The Inox Building
Caldwellside
Lanark
Scotland
United Kingdom
ML11 7SR
Tél. 01555 66 61 61
Tél. Int. +44 1555 66 61 61
Fax. 01555 66 33 44
Fax. Int. +44 1555 66 33 44
Email. [email protected]
Site Internet : www.revo.co.uk
Les informations contenues dans ce guide
sont réputées exactes au moment de leur
publication. Cependant, nous observons une
politique de développement continu et ces
informations sont donc sujettes à
changement sans avertissement préalable.
Revo, UNO™ et M-Port sont des marques
déposées ou enregistrées de Revo
Technologies Limited.
iPod® est une marque enregistrée de Apple
Computer, Inc.
Règles de sécurité
Ne faites pas fonctionner cette radio près
de l’eau.
Évitez que de petits objets et des liquides
entrent dans ce produit.
N’ôtez pas de vis ou des parties du boîtier.
Utilisez uniquement le bloc d’alimentation qui
est fourni.
EEC : Ce produit a été conçu et testé de
manière à être conforme aux exigences EU
et porte la marque CE.
Support technique:
En cas de difficultés pour faire fonctionner
votre radio, ou si vous soupçonnez quelque
défaut, veuillez s’il vous plaît appeler notre
département de support technique ci-
dessous:
01555 666 161
Vous pouvez aussi nous écrire un email à
dépannage de notre site Web:
www.revo.co.uk/support
Préface
2
Français
UNO DAB+ Manual.qxd 24/9/08 10:30 Page 20
Table of contents
Languages:
Other Revo Radio manuals