Revolabs FLX UC 1000 Operating instructions

1
REVOLABS FLX™UC 1000 &
REVOLABS FLX™UC 1500
IP & USB Conference Phone
Installation and Operation Guide
Models:
10-FLXUC1000
10-FLXUC1500

2
© 2017 REVOLABS, INC. All rights reserved. No part of this document may be
reproduced in any form or by any means without express written permission
from Revolabs, Inc. Product specifications are subject to change without notice.
R e v o l a b s F L X U C 1 0 0 0 / F L X U C 1 5 0 0 I n s t a l l a t i o n a n d O p e r a t i o n
G u i d e
10- F L X U C 1500-EN
F e b r u a r y 2017 ( R e v 2 . 7 . 0 )

3
Online Resources
Resource
Website
Revolabs
www.revolabs.com
Revolabs FLX UC 1000
www.revolabs.com/uc1000
Revolabs FLX UC 1500
www.revolabs.com/uc1500
Customer Support
www.revolabs.com/support
Safety Warnings
Do not expose any component of the FLX UC 1000 of FLX UC 1500 to
water, moisture, or high humidity.
Do not expose any component to extreme high or low temperatures.
Do not expose any component to lit candles, cigarettes, cigars, or to open
flames, etc.
Do not drop, throw, or try to bend any component, as rough treatment
could damage them.
Do not open the casings of any component
Do not use any other accessories than Revolabs’ originals intended for use
with this product. Use of non-original accessories may result in loss of
performance, damage to the product, fire, electric shock or injury. The
warranty does not cover product failures which have been caused by use
of non-original accessories.

4
Contents
Online Resources ............................................................................................ 3
Safety Warnings.............................................................................................. 3
Contents ......................................................................................................... 4
Introduction.................................................................................................... 7
Getting Started ............................................................................................... 8
Content and Component Overview................................................................ 8
Base Unit .................................................................................................. 8
Dialer........................................................................................................ 9
Setting up the system................................................................................. 12
Connecting the Dialer.............................................................................. 13
Connecting to an IP Network for VoIP Calling........................................... 13
Connecting to a Computer....................................................................... 14
Connecting Extension Mics ..................................................................... 15
Using the Cable Clamps .......................................................................... 16
User Interface ............................................................................................... 17
Base Unit ................................................................................................... 17
Dialer......................................................................................................... 17
Menu Tree............................................................................................... 18
Home Screen........................................................................................... 19
Menu Options ......................................................................................... 21
Web User Interface (Web UI) .................................................................... 33
Basic Operations........................................................................................... 57
SIP phone operations ................................................................................. 57
Dialing a Number .................................................................................... 57
Redialing a Number................................................................................. 57
Dialing a Contact .................................................................................... 58
Initiating a second call while another call is active................................... 58
Answering an Incoming Call .................................................................... 58
Ignoring an Incoming Call ....................................................................... 58

5
Hanging Up a Call ................................................................................... 58
USB Audio ................................................................................................. 58
Conference USB and SIP Calls................................................................. 59
Using Do Not Disturb ................................................................................. 60
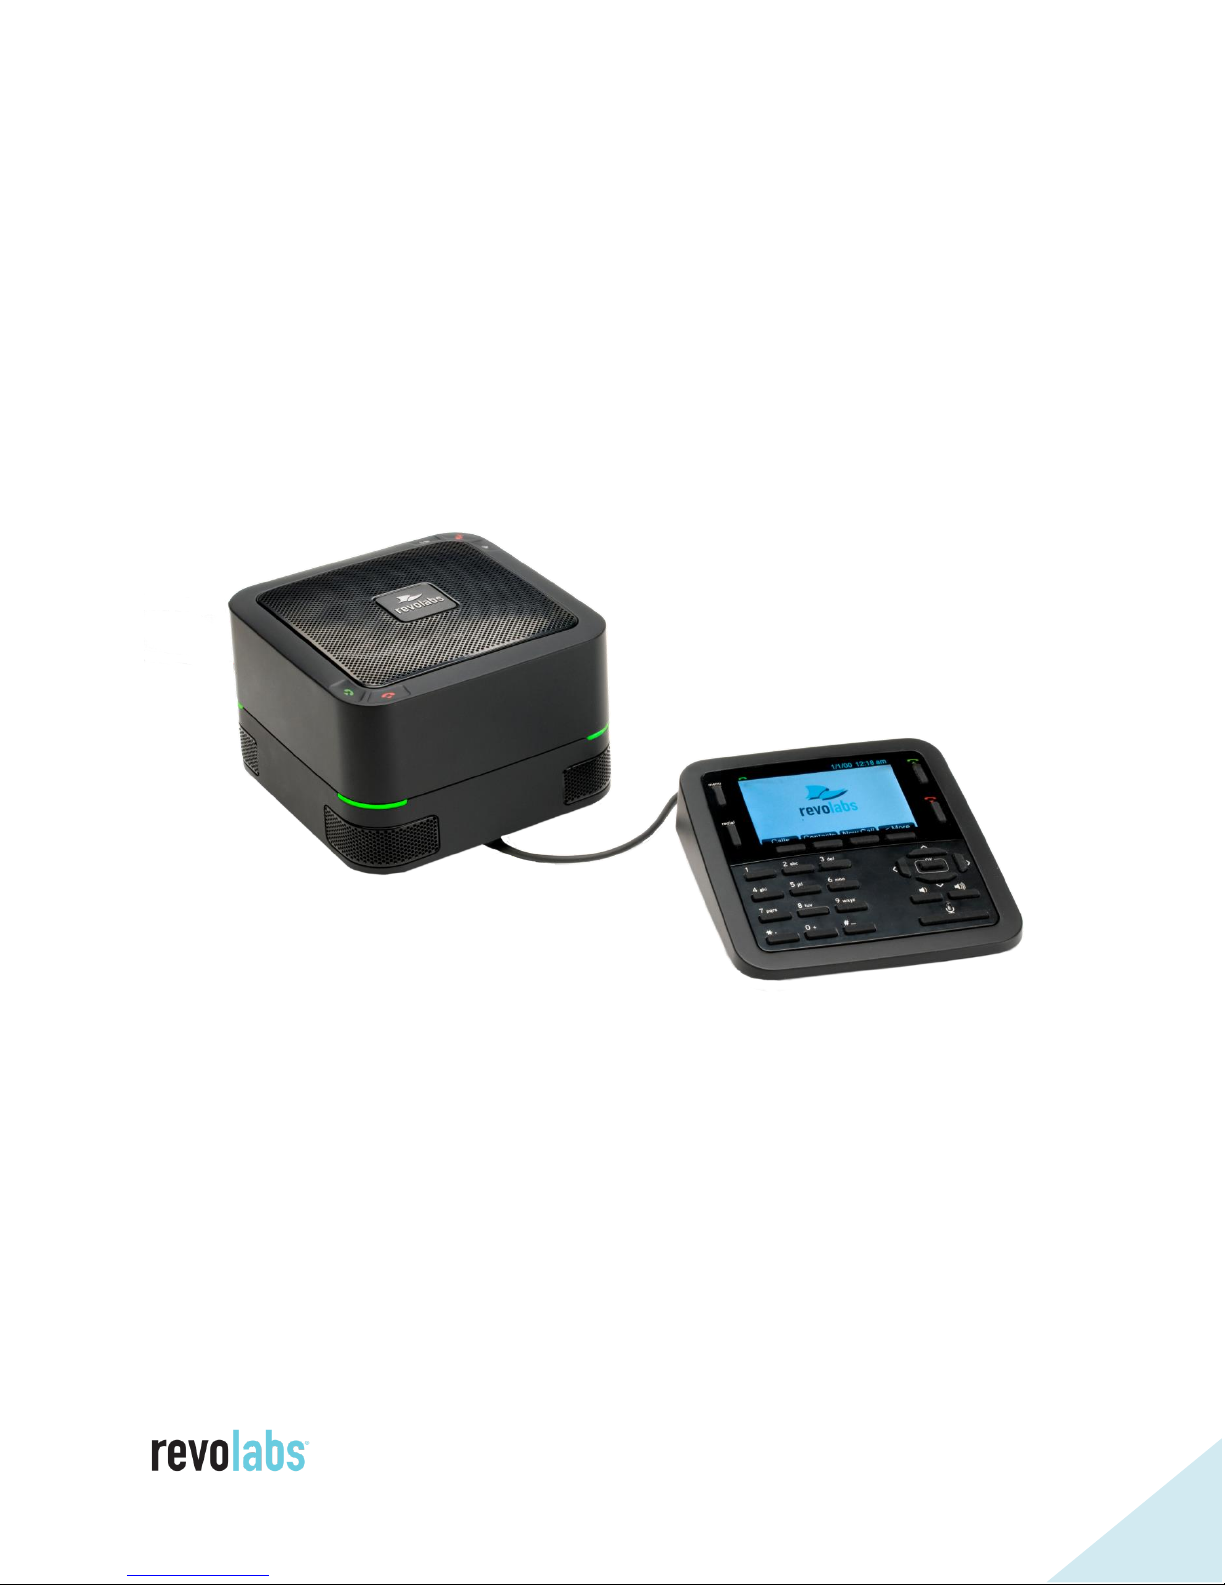
Configuring the FLX UC 1000 or FLX UC 1500 for your VoIP Network ........... 61
Configuring using the Web User Interface................................................... 61
Configuring using the Dialer ...................................................................... 61
Configuring using a Provisioning Server, Option 66 .................................... 62
Configuring using a Provisioning Server, Option 150 .................................. 62
Provisioning file.......................................................................................... 63
Sample device configuration file............................................................... 63
Provisioning file parameters ....................................................................... 65
Advanced Operations .................................................................................... 82
Dial Plan .................................................................................................... 82
Dial Plan Syntax...................................................................................... 82
Dial Plan Examples ................................................................................. 83
Device Manager............................................................................................. 84
Installation & Configuration ....................................................................... 84
For Windows operating systems .............................................................. 84
For Macintosh operating systems ............................................................ 85
For Chrome OS ....................................................................................... 85
Upgrading the Device Firmware..................................................................... 86
Through the Web Interface ......................................................................... 86
From the Provisioning Server...................................................................... 86
Compliance................................................................................................... 87
FCC Notice to Users ................................................................................... 87
Radio and Television Interference ............................................................... 87
Industry Canada Notice to Users ................................................................ 89
Notice to European Customers ................................................................... 89
WEEE Notification...................................................................................... 90

6
Environmental Requirements ........................................................................ 90
Appendix ...................................................................................................... 91
Call Control Functionality Details per Third Party Application .................... 91
Using Windows Computers...................................................................... 91
Using Apple Computers........................................................................... 91
Known Issues............................................................................................. 93
Configuring the FLX UC 1000 / 1500 in Windows ...................................... 95
Troubleshooting ......................................................................................... 96
Reboot..................................................................................................... 96
Restore Factory Defaults ......................................................................... 96
Cannot Access Web User Interface........................................................... 96
Change language..................................................................................... 97
USB Audio call Answering and Hang-Up not working .............................. 97
Call Forwarding Behavior ........................................................................ 98
Specific Call Manager Configuration.............................................................. 99

7
Introduction
Thank you for choosing a FLX UC 1000 or FLX UC 1500 IP & USB Conference
Phone by Revolabs. This conference phone allows you to communicate via
your call manager and a softphone, messaging, video conferencing, or webinar
application, as well as bridge these calls together. With the FLX UC products,
call performance is built to be of the highest quality to ensure every word of the
conversation is heard.
This document covers the FLX UC 1000 and the FLX UC 1500 as configuration
of these products is similar. Where there is a difference in capabilities or
configuration, the document will highlight that explicitly.

8
Getting Started
Content and Component Overview
Depending on the system you have purchased you will find the following
content in the box:
FLX UC 1000
FLX UC 1500
Base Unit
Base Unit
Dialer
Dialer
Ethernet Cable
Ethernet Cable
USB Cable
USB Cable
Extension Microphones (Qty. 2)
For setup of the device, remove all the items from packaging.
Base Unit
The base units of the FLX UC 1000 and FLX UC 1500 house the speaker
elements and four embedded microphones. On the top of the device are five
capacitive touch buttons for: volume up, volume down, mute, answer call, and
end call.
On the corners of the base unit, LED lights display the status of the unit.
Three different microphone states correspond to the color of the LEDs.
Speaker Elements
Directional
Microphones

9
Microphone State
LED Color
Active microphones, unmuted
Green
Active Microphones, muted
Red
Microphones not active
Configurable: Amber, Green, or Off
Ports on the bottom of the base unit are used to connect the dialer, the USB
cable, and Ethernet cable for the FLX UC 1000, and additionally two extension
microphones on the FLX UC 1500.
Dialer
The dialer has five categories of buttons:
Function Keys: menu, redial, answer call/new call, hang up
Soft Keys: 4 keys below the color display that correspond to changing
menu options presented on the display
Keypad: entering numbers, letters, and special characters
Navigation: to navigate the menus on the display
Volume Control &
Mute
Function
Keys
Soft Keys
Keypad
Navigation
& Selection
Buttons

10
Volume Control and Mute: adjusting the volume and toggling mute
on/off
Function Keys
The Menu button provides access to the main menu for the FLX UC 1000 or
FLX UC 1500. When already in a menu or submenu, pressing the menu
button will return the display to the home screen.
The Redial button will redial the last number used to place an outgoing call.
The Answer Call/New Call Button, labeled with the green phone icon, provides
the ability to answer an incoming call. It can also be used to open the dialer
menu to place a new call.
The End Call Button, labeled with the red phone icon, disconnect from an
existing call.
Soft Keys
Soft keys are used to activate menu options, and each button corresponds to
the text displayed above the button. The soft keys provide different options
depending on the current screen content.
If a menu has more than four options the soft key on the far right will
correspond to an option for [MORE>]. Pressing this key will navigate to the next
set of menu options. In the second set of menu options the soft key on the far
right will correspond to an option for [<MORE] to allow navigation back to the
first set of menu options.
Some menus have less than four options. In that case soft keys that have no
text above them have no function.
Keypad
The keypad provides access to numbers, alphabet characters, and special keys
such as *, #, space, and period which are typical on phone keypads.
When entering contacts in the FLX UC 1000 or FLX UC 1500, the keypad
buttons can be used to enter the alphanumeric values. When the button is
first pressed, the first letter shown above the button will be entered in lower
case. By pressing the button subsequent times, the character will iterate
through the other lower case letters, then the number, then upper case letters.
This sequence will repeat again from the beginning if the end of the series is
reached and the button is pressed again.

11
For example, the number “2” provides access to the letters a, b, and c; when
depressed multiple times, this button would iterate through the following
sequence:
a b c 2 A B C a b c 2 A B C
The button with “1” provides no other characters.
The * key cycles through the following sequence:
* . , - _ ( ) @ and then repeats
The # key cycles through the following sequence
# space and then repeats (space is a “ “)
When dialing a number that begins with a plus sign (“+”), press and hold the 0
button until the “+”appears.
Directional Buttons
The directional buttons include left, right, up, down to navigate menu options
and “OK” for making a selection.
In general, the up and down keys are used to select different submenu options,
where the right and left keys are used to select new menus or return to the
previous menu.
Based on the current menu item selected, pressing the “OK” button either
enters (selects) a sub menu, toggles a configuration item, or has no effect.
When editing a configuration item that uses a slider bar, the left and right
arrow keys are used to change the value in the slider.
Volume Control & Mute
The volume control and mute buttons perform the same function as the
buttons on the base unit. The speaker volume can be increased or decreased
using the volume up and volume down buttons. The microphones on the FLX
UC 1000 and FLX UC 1500 are muted using the mute button on the dialer.
The mute/unmute button is only functional when microphones are activated.

12
Setting up the system
All connectors can be found on the bottom of the case unit.
Ethernet
Port
USB Port
Microphone
Ports
(UC1500 only)
Dialer
Port

13
Connecting the Dialer
Use the captive cable of the dialer and insert the connector into the “Dialer
Only” port on the base unit until it clicks into place. Use the routing on the
bottom of the dialer to adjust the length of the cable to your requirements.
Connecting to an IP Network for VoIP Calling
The FLX UC 1000 and FLX UC 1500 are designed to be powered using 802.3af,
Power over Ethernet (PoE). If you have an Ethernet port that does not provide
PoE, a PoE Power Injector can be ordered from Revolabs to provide the device
with power.
Dialer Connection
Network port

14
Connect one end of the Ethernet cable into the network connection port on the
bottom of the base unit using the network port. Press the Ethernet connector
until it clicks into place. Connect the other end of the Ethernet cable into a
jack providing PoE or a PoE adapter. The phone will power on. When it is
ready to use, the base will chime and the dialer will display the home screen.
If the Ethernet cable needs to be removed from the FLX UC 1000 or FLX UC
1500, be sure to depress the lever on the connector and pull the cable out
gently. Using force when removing this cable may damage the cable and
render it useless.
In order to place and receive VoIP calls, your FLX UC 1000 or FLX UC 1500 will
need to be registered with a call manager. See the section in this document
called “Configuring the FLX UC 1000 or FLX UC 1500 for your VoIP Network”
to register your device with a call manager.
Connecting to a Computer
Using the included USB cable, connect the mini USB side of the cable into the
port identified by the icon on the bottom of the base unit.
Connect the other end of the cable to the USB port on the computer running
the third party softphone, webinar, or conferencing application.
The computer may detect new driver software and install it; wait until the
install has completed before continuing. A USB symbol will be shown in the
FLX UC 1000 or FLX UC 1500 dialer screen when the computer is connected.
USB Connection

15
For optimal audio performance when using a Window computers, please follow
the instructions in the appendix section. No additional configuration is
required when using Apple OS X or Chrome OS devices.
If a USB cable longer than the length of the one provided is required, an
approved USB extender should be used. The following USB extenders have
been tested and approved for use with the FLX UC 1000 or FLX UC 1500.
Please note the distance supported by each USB extender varies and is defined
by the manufacturer’s specifications:
USB Ranger 2212 Cat 5 Extender (IC2212R-05-307276) from Icron
Technologies
USB 1.1 Rover 1850 Single Port Cat 5e extender from Icron
Gefen USB 2.0 Extender
Extron USB Extender
Connecting Extension Mics
The FLX UC 1500 includes two ports on the base unit to connect the extension
microphone.

16
Using the Cable Clamps
To help securing the cables connected to the UC products and support that
they are not unintentionally removed, Revolabs provides a cable clamp kit.
The same kit works for the FLX UC 500, the FLX UC 1000, and the FLX UC
1500. Place the bottom part of the cable clamp into the cable cavity of the UC
unit before connecting the cables. Once the cables are connected and fit into
the respective areas of the cable clamp, place the second part of the cable
clamp on top, and using the two screws included with the kit fasten the clamp.
FLX UC 500
FLX UC 1000
FLX UC 1500

17
User Interface
Base Unit
The base unit provides volume up, volume down, mute, answer, and hang-up
buttons. Mute status will be reflected on the LEDs on the four corners of the
device; when microphones are active, these LEDs will be green when the
system is unmuted and red when the system is muted.
When the microphones are not active, the lights can be configured for an idle
color with options of solid amber, solid green, or unlit (default). In order to
change this color, an administrator can use the web UI or the settings menu on
the dialer to configure the desired idle color.
For additional call control functionality, i.e. using the device buttons to hang
up and answer calls using the preferred third party softphone, webinar, or
conferencing application, refer to the FLX UC Device Manager section in this
manual.
Dialer
The display on the dialer presents a series of screens as an interface for using
the device and configuring device settings. The details of those screens are
described in this section.

18
Menu Tree
Admin
Settings
Password VoIP
Settings
IPv4
Settings
VLAN
Settings
USB
Settings
Advanced
Audio
Room Size Speaker
EQ
High Pass
Filter
Highly
Reverberant
Room
Date/Time
Setting
Web
Access
Main Menu
Dialer (1) Recents (2) Contacts (3) Voicemail (4) Forwarding
(5)
Always
Busy
No Answer
No Answer
Delay
(seconds)
Audio (6)
Speaker
Volume
Ringer
Volume
Ring
Selection
Settings (7)
Language
Selection
Display
Settings
Admin
Settings
Info (8)
Product
Name
IP Address
Mac Address
Base FW
Version
Base Serial #
Dialer FW
Version
Dialer Serial #
Call 1
Statistics
Call 2
Statistics

19
Home Screen
When the device is powered on, the device will display the home screen. The
home screen provides information in three key areas: a quick reference bar on
top, information about the user ID of the device and call activity in the center,
and soft keys menu options on the bottom.
The quick reference bar provides information regarding the call status of the
system. The information available includes:
Call Icon (in Green): Displays information about call status (No Call, Call
in Progress)
Mute Indicator (microphones muted or unmuted)
USB Icon: Displays when a USB connection is established between the
FLX UC 1000 or FLX UC 1500 and a USB host (e.g. computer)
Do Not Disturb (DND): Displays when the system is configured for do not
disturb.
Voice Mail Icon: Displays when a voice mail is available
Missed Call: Displays when a call has been missed
Extension microphone status (FLX UC 1500 only): Displays the number
of connected extension microphones
Date: Displays current date. The format is configurable in the menu or
web interface
Time: Displays current time. Time zone is configurable in the menu or
web interface
Quick Reference Bar
User ID and
call information
Soft Key
menu options

20
The center area displays information on the status of USB and VoIP
connections. If a VoIP connection is configured for the unit, the user ID is
displayed directly under the quick reference bar in the upper left side of the
screen. If a VoIP user is configured but not registered or errors occurred
during registration, that status and possible error messages are displayed
instead.
Below the VoIP user ID information for active calls is being displayed. The
information for up to two concurrent VoIP calls is and on the USB audio
connections is provided. If no calls are active no information is displayed and
the Revolabs logo is seen instead.
The call state is indicated by the color of the bar:
Incoming Call: Yellow
Call in Progress/Active: Green
Call on Hold: Orange
Call Ended/Interface Inactive: Red
The soft key menu options are displayed at the bottom of the screen.
Depending on configuration of the USB interface, different home screen menu
options for the soft keys are offered.
When the USB port is configured as “User Determined” (factory default) the
following soft key options are presented:
[Calls]: Redirects to the Recent Calls menu
[USB On]: Turns USB audio on if USB audio is set to User Determined
[New Call]: Opens the Dialer menu
[More >]
After pressing [More >]
[DND]: Toggles Do Not Disturb mode
[Contacts]: Opens the Contacts menu
[< More]
When the USB port is configured as “Always On” the following soft key options
are presented:
This manual suits for next models
1
Table of contents
Other Revolabs Conference Phone manuals