Revolutionary Science saniclave 200 RS-SC-200 User manual


SC-200 tray and support rack in correct

Instruction Manual for the
Revolutionary Science RS-SC-200
Saniclave
R E V O L UT I O N A RY S C I EN C E
Making Scienc e Si mple
17319 Lake Blvd.
Shafer, MN 55074
Toll Free: (800) 775-7942
Fax: (775) 218-7015
R E V O L U T I O N A R Y S C I E N C E
E-mail: [email protected]
Website: www.revsci.com
1
Table of Contents
Introduction 2
Display, Symbols, Control and Parts 3
Installation, Instructions and Intended Use 4
Intended Use 4
Safeguards and Cautions 5
Operating the Saniclave 200 6
Printer 6
Troubleshooting and Error Modes 10
Warranty, Registration and Policy 12
Specifications 13
Contact Information 13
Checklist and Notes of Service Record 14
Care, Storage and Maintenance 15
Sterilization Monitoring Guidelines 16
NOTE: Read this manual before use! This manual contains important information,
safeguards and operating instructions for the operation of the REVOLUTIONARY
SCIENCE model Saniclave 200 by Alternative Pioneering Research & Development,
Inc. (APR&D, Inc.)
© Alternative Pioneering Research and Development, Inc.

R E V O L U T I O N A R Y S C I E N C E
Saniclave RS-SC-200
2
Introduction
Dear Valued Customer,
Thank you for purchasing the Revolutionary Science Saniclave 200. We are confident
that the Saniclave 200 will provide years of reliable service. The high quality of
construction and durable parts deliver a performance equivalent to much costlier
equipment.
You are invited to visit our web site at www.revsci.com. Please know that we
welcome any feedback that might help us enhance and improve future RevSci
products.
Sincerely yours,
REVOLUTIONARY SCIENCE

Saniclave RS-SC-200
R E V O L U T I O N A R Y S C I E N C E
3
Display, Symbols, Control and Parts

R E V O L U T I O N A R Y S C I E N C E
Saniclave RS-SC-200
4
Installation Instructions
Remove Saniclave 200 from packaging and place it on a dry level surface. Plug it into
an accessible 120 VAC power receptacle. For optional printer setup, see page 6.
The Saniclave 200 is now ready for use. See operating instructions on page 7.
Upon receiving the Saniclave 200, it is important that you follow
these simple steps:
1. Examine carton and contents for possible damage to the product caused
during shipping. If damage is present contact carrier at once. Failure to do so
immediately may release the carrier from any liability of damage.
2. Fill out the checklist (see instruction manual). If the shipment is incomplete,
3. Carefully read this instruction manual before operating the Saniclave 200.
4. Fill out warranty registration card and mail it to
Revolutionary Science
17319 Lake Blvd.
Shafer, MN 55074.
Intended Use
The Revolutionary Science Saniclave 200 is designed to be used in medical and dental
clinics, hospitals and other facilities where reusable sterile equipment is used. It is
intended to sterilize wrapped and unwrapped heat and moisture stable solid
instruments, mated surfaces, knurled and hinged devices (excluding lumened devices
and dental hand pieces) that are compatible with saturated steam sterilization at 121
degrees Celsius for 30 minutes.
Safeguards & Cautions
WARNING! Do not use this autoclave in an explosive or
oxygen rich atmosphere. Failure to do so may result in
serious injury or death.
CAUTION: Chamber contains hot water and steam during
and after operation. Hot water may drip from cover during
removal and can cause scalding.

R E V O L U T I O N A R Y S C I E N C E
Saniclave RS-SC-200
5
Limitations of Use
Revolutionary Science is not responsible for misuse of the Saniclave 200
1. NEVER attempt to dismantle or modify the Saniclave 200.
2. NEVER leave operating Saniclave 200 unattended.
3. NEVER block drain (located on the inside of the chamber below heating
element).
4. NEVER block steam trap (located on the inside of the chamber, near the top,
directly above drain).
5. NEVER operate the Saniclave 200 with a damaged cord or plug or after the
appliance malfunctions or has been damaged in any manner.
6. NEVER use accessory attachments not recommended by Revolutionary
Science. Their use may cause fire, electrical shock or injury.
7. NEVER place the Saniclave 200 or any part of the Saniclave 200 on or near a
hot gas or electric burner or other heating source.
8. NEVER use the Saniclave 200 or any purpose other than the intended use.
9. ALWAYS close the door properly before operating.
10. NEVER attempt to force the door open or release pressure while sterilizer is
in operation.
11. ALWAYS use distilled water. The sensor detects ion content in the wa-
ter. If distilled water is too pure, the autoclave may not detect the pres-
ence its presence. Salt may be added to the water to increase detecta-
bility. Class III distilled water is recommended.
12. NEVER reuse water left in the exhaust tank. Re-used water may contain
endotoxins. Drain water tank and refill chamber with clean, distilled water
before each cycle.
13. NEVER attempt to modify the plug to fit an outlet other than the required 3-
slot, grounded outlet. The enclosed 3 prong plug is equipped with a ground-
ed type 3 conductor wire to further ensure the safe operation of the Sani-
clave 200.
14. NEVER immerse the autoclave, cord, or plug in water or operate on wet
surfaces.
15. NEVER fill the exhaust tank with water (See page 3 for location of exhaust
tank and cap). The Saniclave 200 must be filled by pouring water directly
into the chamber.
16. ALWAYS load the Saniclave 200 with instruments compatible with steam
sterilization at 121 degrees Celsius for at least 30 minutes. Always contact
the instrument’s manufacturer if you are unsure that this sterilization
technique is suitable for instruments being sterilized.
17. ALWAYS inspect the silicone seal before each use for dirt, grime or cracks.
18. NEVER clean the Saniclave 200 with organic solvents like thinner or benzene.
It will damage the surfaces.
19. ALWAYS test regularly with Geobacillus stearothermophilus. See page 14
for sterilization monitoring and control for more information.
20. This sterilizer has not been validated for double pouching.

R E V O L U T I O N A R Y S C I E N C E
Saniclave RS-SC-200
6
Operating the Saniclave 200
Preparation for Sterilization (Default mode)
1. Preclean instruments according to their manufacturer's recommendations.
2. Follow instrument manufacturer’s instructions for correct cleaning and
lubricating procedures.
WARNING! Failure to properly clean instruments before autoclaving,
may result in unsterile equipment. Using unsterile equipment may result
in serious injury or death.
3. It is recommended that all instruments be dismantled, if possible.
CAUTION: Stacking instruments improperly may result in nonsterile
equipment.
4. Use a sterilization indicator strip with each set of instruments being autoclaved.
5. The recommended load is 4.5 lbs (not including the rack). Never exceed the
maximum load. Exceeding maximum load may result in nonsterile
equipment.
6. Run a biological indicator spore test (Geobacillus stearothermophilus) at least
weekly to confirm proper sterilization. For additional information on purchasing
biological indicators, see page 12.
Printer installation and operation
Saniclave 200: The recommended printer model is the Zebra 2844 with a serial cable
connection. Printer paper must accommodate printout width of 4 inches. Follow printer
manufacturer’s recommendations for regular repair, cartridge replacement and service.
The printer must be powered and connected to the Saniclave 200 via a serial cable prior to
use.
Saniclave 200P: The printer is affixed on the right side of the autoclave. The Saniclave 200P
printer requires 2” wide thermal paper.
Sufficient paper must be installed in the printer. At the end of the cycle (whether it is a
complete cycle or a failure), the SET button, found on the control panel may be pressed to
obtain the printout. If the Saniclave 200 is reset or powered down, the printout data
cannot be recovered.
Printouts should be made in accordance to your facility’s standard operating procedures.
A successful printout should look similar to the following sample printout:

R E V O L U T I O N A R Y S C I E N C E
Saniclave RS-SC-200
7
Operating Instructions
1. Place Saniclave 200 on a dry, level surface.
2. Remove chamber door by rotating door counter clockwise.
3. Fill chamber with approximately 500mL of distilled water (until the heating
element is fully submerged and the metal portion of the temperature sensor is
in contact with the water).
ALWAYS use distilled water. The sensor detects ion content in the water.
If distilled water is too pure, the autoclave may not detect the presence of
water. Salt may be added to the water to increase detectability. Class III
distilled water is recommended.
4. Place rack in the bottom of the chamber and place instruments to be sterilized
(wrapped or unwrapped) on top of rack.
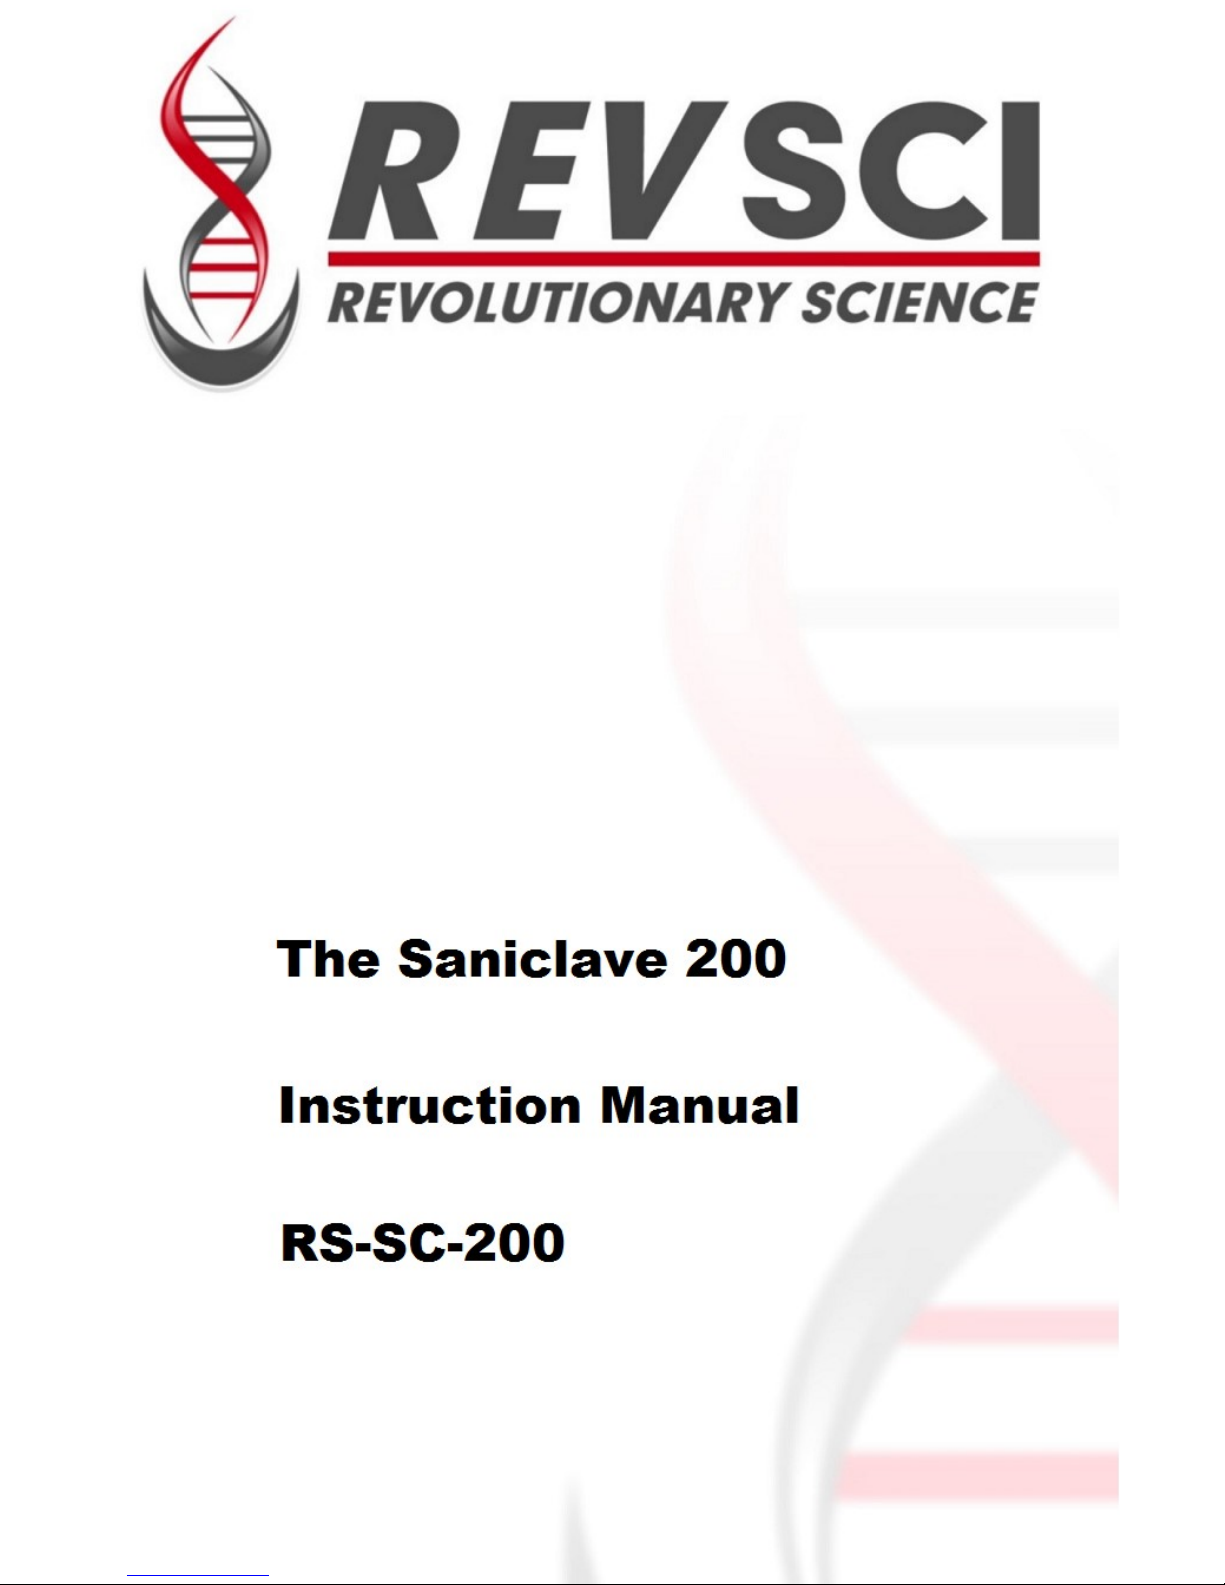
5. Inspect the door to assure that the seal is clean and not damaged. Be sure that
the inner portion of the door is also clean and clear, ensuring a secure fit.
6. If the silicone seal has been removed re-install silicone seal in the door by evenly
tucking seal under all lugs. Seal may be cleaned with warm, soapy water
(replace seal when it becomes noticeably cracked or worn).
7. Closing the door: Place the door on the chamber, aligning the marking on the
door with the “OPEN” marking on the autoclave. To close, rotate the door
clock wise, ensuring that the marking on the door is aligned with the “CLOSE”
marking on the autoclave. Never attempt to rotate the door past this
CLOSE marking! Improper closing of the door can cause pressure
leaks or damage to the autoclave.
8. Press the door in snugly and gently turn the door handle clockwise. The door
marking should be aligned with the marking on the autoclave.
9. Insert the plug of the cord into the wall outlet. NEVER modify the plug to make
it fit, as the plug will only fit in one way. Autoclave must be grounded
when in use.
10. Standby Mode: The 4-digit LED indicator will turn on and appear as “0000.”
11. Press 'START/STOP' to begin the default 30 minute sterilization cycle.
12. Preheat Mode: Display will change to 'Ph' for the preheat mode (about 25
minutes).
13. Observe the display. If an error warning is displayed, the cycle will be aborted
(see troubleshooting section on page 10).
14. Sterilization Mode: After the preheat mode, the display will automatically
begin to count down from 30 minutes. For your convenience, the display will
show the temperature reading. To view the pressure or cycle time left, see
page 8
15. To abort the cycle at any time, press 'START/STOP' again. Display will then
read “Err 1” and chamber will instantly depressurize. Allow a few minutes for
the chamber to depressurize before opening the door.
16. Drain Mode: At this point, the display will read “dry” and the unit will
automatically depressurize.
Due to door locking safety feature of the silicone seal, the opening of the door
is not possible until the chamber is completely depressurized.

R E V O L U T I O N A R Y S C I E N C E
Saniclave RS-SC-200
8
17. Dry Mode: After the chamber drains, the autoclave will sound an audible
alarm that reads “turn door.” Rotate door counter clockwise until it is in
the open position. Tuck the door under the retainer clips below the door
opening. Then press the ADVANCE button and the alarm will cease.
During this mode, the heater warms the chamber for 30 minutes. Moist air
vents out of the door gap.
18. Cycle Complete: “CC” will display if the cycle was successful.
19. Print Mode: If the Saniclave 200 is connected to a printer, a cycle report
will print when SET button is pressed, showing the date/time, preset and
achieved parameters.
Caution: internal chamber contents may be hot to the touch.
A Recommended Load Configuration
Load must not exceed 4.5 lbs. Stand packs upright if possible.
Cycle Phases
Fill Display reads “Fill” if the 'START' button is
pressed and the chamber has not yet been filled
with sufficient water.
Preheat Mode. Display will read 'Ph' for Preheat. This mode will
usually last for about 30 minutes, depending on
the load size.
Sterilization Mode Display will show temperature in Celsius:
• Press ADVANCE to view the pressure reading in
PSIg.
• Press SET to view the cycle time remaining.
Dry Mode When the sterilization cycle is successfully completed, the
display will read 'dry,' for drain mode. As the water
drains, the chamber completely depressurizes and shortly
thereafter (if selected), the Dry Mode begins. Display will
alternate between “dry” and the 30 minute timer. When
the display reads “turn door,” the door must be opened
by rotating the door counter clockwise to the open
position until the Dry Mode is complete.
CC Mode After a successful completion of the entire cycle, the
display will read 'CC' for Cycle Complete. Remove the
door and remove the instruments. Instruments may be
warm to the touch.
Print Date/time, preset and achieved parameters are printed.

R E V O L U T I O N A R Y S C I E N C E
9
Saniclave RS-SC-200
Setting Your Saniclave 200.
The sterilization cycle parameters are as follows: 30 minutes, 121C, 15psi. The
sterilization cycle parameters cannot be adjusted.
Load Settings
Note: For wrapped loads, the user must use wraps or pouches that are
cleared by the FDA for human use. Unwrapped loads must be used
immediately upon sterilization.
Set Time and Date –To set the time and date, press and hold the 'SET'
button. The 'ADVANCE' button may be used to advance from the time,
date and year. The 'START' and 'SET' buttons can be used to adjust the
settings up and down. Disconnecting the power between uses may
interrupt the clock's timing. Date and time may need to be reset. If set
correctly, the time and date will be printed on the printout.
Print –After a cycle is complete, when display reads 'CC,' press the SET button
once. Other than the printouts, the Saniclave 200 does not record cycle
data.
See page 6 for more printer information.
Load type Instructions
Wrapped
Loads
Press the WRAPPED button. The display should change from
0000 to 'C1' and the preheat mode will immediately follow.
After the sterilization mode is complete, the display will read
'turn door.' At this time, remove the door and insert the
bottom edge under the retainer clips. Press ADVANCE to
begin the dry mode. When the dry mode ends, the unit will
read 'CC'
This setting employs the dry mode .
Unwrapped
Loads
Press the UNWRAPPED button. The display should change
from 0000 to 'C2' and the preheat mode should commence.
When the sterilization cycle ends, the unit will read 'CC'
This setting does not employ the dry mode.

10
Saniclave RS-SC-200
Troubleshooting
Error Conditions and Display Readings
Note: If a failure occurs, the load must be considered non-sterile. The
sterilizer and load should then be investigated. Contact Revolutionary Science if
problem persists.
1. Manual Cycle Abort: If 'START' is pressed, display will read 'Err 1' for
cycle abort. User may abort the cycle anytime,
during, preheat, sterilize or dry modes. If cycle
is aborted, the contents of the load shall be
considered non-sterile. Press SET to
acknowledge the error.
2. Preheat too long (Door Ajar): If door is not closed properly and the cycle is
initiated, the cycle will fail when the autoclave
cannot pressurize. Display will read 'Err 2.'
Press SET to acknowledge the error. Take off
the door. Remove door gasket. Inspect the door
gasket for cracks. Replace with a new gasket if
necessary. Reinstall gasket into door. Properly
close door by lining up markings on door and on
body and twisting the door closed. Restart the
cycle.
3. Over Temperature Alarm: If temperature exceeds the maximum of 124°C
the display will read 'Err 3.' Allow unit to drain
the reservoir fully into the exhaust tank or sink.
Press SET to acknowledge the error. Open
door when chamber has cooled. Remove load
from chamber. Refill reservoir. Reinsert load.
Close the door. Restart cycle. If an over
temperature condition occurs again, contact
Revolutionary Science to investigate the
problem further. Discontinue use until problem
is resolved.
4. Under Temperature Alarm: If the temperature or pressure of the
chamber falls below sterilization temperature of
121°C during the sterilization cycle, the digital
display will read 'Err 4.' Press SET to
acknowledge the error. Open door when
chamber has cooled. Remove load from
chamber. Refill reservoir. Reinsert load. Close
the door. Restart cycle. If an under
temperature condition occurs again, contact
Revolutionary Science to investigate further.
Discontinue use until problem is resolved.
R E V O L U T I O N A R Y S C I E N C E

11
R E V O L U T I O N A R Y S C I E N C E
Saniclave RS-SC-200
5. Low Water: The display will read 'Err 5' if there is an insufficient
amount of water in the chamber. Press SET to
acknowledge the error. Fill reservoir up to the tempera
ture sensing probe. Restart cycle.
6. Exhaust tank full: After every five cycles, the Saniclave display will flash
'drn tank full.' At this point, the exhaust tank must be
emptied if the end of the drain tube is not already rest -
ing in a sink or bucket. Revolutionary Science recom
mends that the drain tube be left in the sink or other
reservoir for regular drainage. The drain tank warning
can be bypassed by pressing any button. If exhaust
tank is not drained after every sixth cycle, water may
overflow.
7. Door is difficult to open or close:
There may be a few reasons why the door is difficult to
open or close.
1) Ensure that the door seal is tucked under all lugs in the
door. (see picture on page 19)
2) The gasket offset spring must rest against the outside
diameter of the seal and should not overlap the seal.
3) Check to make sure door markings line up properly.
Misaligned door markings will inhibit the door functionally
4) The chamber may have not yet depressurized.
Wait up to five minutes and then attempt to open the
door.
5) the door stop may be caught on the door clip near the
bottom of the door. This can be dislodged by pushing up
on the bottom of the plastic door housing.
6) The door seal may need lubricant. To do this, remove
and dry the seal completely. lightly dust the seal with
talcum powder and spread evenly around the entire seal
(or talc based baby powder) approximately once every 50
to 100 cycles or as needed. Caution: Too much
lubrication may compromise the seal.
8. Display reads '8888'
This means that your real time clock has reset. The time
and date settings will reset if the Saniclave is left un
plugged longer than three days. See page 9 for setting the
date and time. Unplug and replug the power cord. The
display should now read '0000' and you can commence
with sterilization. The real time clock does not need to
be set properly in order to operate the Saniclave.

12
Saniclave RS-SC-200
Warranty Registration
Please fill out this page, or a copy of it, and send it to the address below to validate
your warranty. Warranty Registration Card for the REVOLUTIONARY SCIENCE
Saniclave 200. (Please Print)
Date Purchased _____________________ Serial Number___________________
Purchased From___________________________________________________
(Please check one) ______ Company ________ School ________ Individual____
Name of Department or Institution:
_______________________________________________________________
_______________________________________________________________
Address:
_______________________________________________________________
_______________________________________________________________
_______________________________________________________________
_______________________________________________________________
Intended use:
_______________________________________________________________
Where did you hear of our product?
_______________________________________________________________
Comments:
_______________________________________________________________
_______________________________________________________________
_______________________________________________________________
_______________________________________________________________
_______________________________________________________________
Warranty
Your REVOLUTIONARY SCIENCE Saniclave 200 is warranted to be free from
defects of material and workmanship under normal use for a period of two years
from date of purchase. If your Saniclave 200 proves to be defective within this
warranty period, APR&D, Inc. will repair or replace your unit at our option. This
warranty will be void if malfunction is caused by accident, misuse, negligence,
tampering, abuse, and/or damage in transit. This warranty excludes any relief for
incidental or consequential damages.
R E V O L U T I O N A R Y S C I E N C E

13
R E V O L U T I O N A R Y S C I E N C E
Saniclave RS-SC-200
Specifications
Power requirements: 120 VAC, 700 watts, grounded outlet
Net weight: 20 lb.
Dimensions: 16 in. tall x 13.5 in. wide x 21 in. deep
Internal chamber dimensions: 9 in. diameter x 10.5 in. long
Pressure: 15-18 psi
Normal operating temperature: 121-124°C
Temperature lower tolerance: 121°C
Temperature upper tolerance: 124°C
Preheat time: Automatic
Sterilization time: 30 minutes
Dry time: 30 minutes
Capacity: 10 Liters
Product Safety and Compliance Standards:
FDA Listing: RS-SC-200 is a 510k listed product for medical use.
K112811
FDA Registered: Revolutionary Science is an FDA Registered
Company
CE / IEC Safety: RS-SC-200 tested to and found to be compliant with
IEC 61010A and associated safety standards.
ISO 9001: Revolutionary Science is an ISO Registered Company
IQ/OQ/PQ: Revolutionary Science provides a range of compliance
statements and IQ/OQ/PQ documents that will enable
customers to successfully validate their products in
accordance with regulations and standards. Contact
Revolutionary Science for IQ/OQ/PQ documentation.
Contact Information
Revolutionary Science
17319 Lake Blvd
Shafer, Minnesota 55074, USA
Customer Service: 1(800) 775-7942
Technical Assistance: (651) 674-3112
Fax: (775) 218-7015
Web site: www.revsci.com E-mail: support@revsci.com

14
Saniclave RS-SC-200
Checklist
(See page 3 for visual identification of checklist parts)
Part: Model number:
_ Autoclave 200-A00001
_ Door 100-A00002
_ Silicone seal 200-A00003
_ Rack 100-A00004
_ Manual 310-A00001
Notes & Service Record
For your own future reference and to expedite answers to your questions, please
complete the following information:
Date Purchased: _________________________________________
Serial Number: __________________________________________
Model Number: __________________________________________
Purchased From: _________________________________________
Your Notes:
_______________________________________________________________
_______________________________________________________________
_______________________________________________________________
_______________________________________________________________
_______________________________________________________________
_______________________________________________________________
Revolutionary Science recommends the weekly use of G. Bacillus
Stearothermophilus biological indicator ampules. Place indicator in center of
full load and test weekly.
The use of FDA cleared class 5 integrators should be used with each load. Follow the
manufacturer's recommendations for class 5 integrator use.
R E V O L U T I O N A R Y S C I E N C E

15
R E V O L U T I O N A R Y S C I E N C E
Saniclave RS-SC-200
Care, Storage and Maintenance Instructions
Daily Inspect and clean door gasket wild mild soap or detergent. Rinse with
distilled water, wipe with damp lint-free cloth. Inspect for cracks.
Reinstall in door.
Clean Chamber with mild soap or detergent. Inspect chamber for
calcium or other deposits. Wipe with damp, lint-free cloth. If needed,
repeat cleaning procedure. Do not use harsh chemicals in autoclave.
Unplug unit at the end of each day.
Weekly Clean rack and coils with warm water and a mild soap or detergent.
Inspect rack and holder for residues or deposits. Repeat cleaning if
necessary. Rinse in warm, distilled water and wipe with a clean,
lint-free cloth.
As Needed Replace door gasket if torn or cracked. If a printer is installed, replace
paper and ink cartridges as needed and according to printer
manufacturer's instructions.
For regular Sterilizer Monitoring Guidelines, see page 16
When storing the Saniclave 200:
1. Disconnect Saniclave 200 from mains.
2. Drain all water from the chamber and exhaust water tank. To drain the
water exhaust tank (located in the rear, right side of the unit to the open
position).
In the rare situation where water remains in the chamber after use (such as after a
power failure). Drain the chamber by tipping the Saniclave 200 unit forward, emptying
the chamber into a shallow vessel or sink.
Caution: Water from the chamber may be warm or hot!
3. When your Saniclave 200 is cool, wipe both the exterior and the interior of
the autoclave with a clean, dry paper towel or terry cloth. If needed, clean
plastic parts with warm water or isopropyl alcohol. To remove calcium
buildup, pour a small amount of CLR® or Alfa Clean® into chamber and
clean thoroughly with a dry terry cloth.
All repairs must be performed by a trained professional. Contact
Revolutionary Science for more information. (See the contact section on
page 12)

16
Saniclave RS-SC-200
Saniclave 200 Cycle Documentation Table
R E V O L U T I O N A R Y S C I E N C E
Serial # Time cy-
cle start-
ed
Date Set cycle
parameters
(default):
121C for 30
minutes
Results according to
class 5 Integrator
Cycle
#
Display
reading
at cycle
end
Signature
102281A 10:45:00
AM
11/21/12 121C for 30
minutes
Parameters were met 1CC _________
_______
121C for 30
minutes
_________
_______
121C for 30
minutes
_________
_______
121C for 30
minutes
_________
_______
121C for 30
minutes
_________
_______
121C for 30
minutes
_________
_______
It is recommended to keep records of each sterilization cycle. This table may be copied.

17
R E V O L U T I O N A R Y S C I E N C E
Saniclave RS-SC-200
Sterilization Monitoring Guidelines
Note
Revolutionary Science provides the following information only for reference.
The user must contact state and local government for proper regulations
regarding sterilizer use and sterilization monitoring. In addition, the Centers
for Disease Control and Prevention (CDC), American Dental Association
(ADA) and the Organization for Safety and Asepsis Procedures (OSAP) may
be contacted for further information regarding infection control.
Physical Monitors
Sterilizer malfunctions may be detected by pressure and temperature measurement
devices. The sterilizer's programming aborts the cycle and displays a message on the
display screen if physical conditions exceed the proper limits.
Note
Only FDA cleared chemical indicators and biological indicators designed for
steam sterilization are to be used. Additionally, such indicators must be
compatible with the cycle parameters of the Saniclave 200. When
monitoring the cycle with such indicators, load the chamber according to
your facility's standard operating procedures.
Chemical Indicators
The purpose of chemical indicators (CI) is to determine whether the sterilization
cycle parameters are sufficient to accomplish an effective sterilization. CI's are not
intended to be used to validate the sterility of the load. However, if the CI shows
failure, the load must be considered non-sterile and the load configuration and
sterilizer shall be investigated, due to the fact that proper cycle parameters may have
not been correctly achieved. Note: Wrapping, packing and loading improperly may
result in failures. In addition, the failure may be a result of sterilizer malfunction.
Check load configuration and verify that it is in accordance with the manufacturer's
instructions. Also, check the CI's instructions for proper use, storage and disposal.
Only CI's that are cleared by the FDA and labeled for use with the same cycle
parameters (of exposure time and temperature) of the Saniclave 200 shall be used to
monitor sterility conditions of loads processed in Saniclave 200.

18
Saniclave RS-SC-200
Biological Indicators
Microbial devices such as biological indicators (BI) are designed to accompany a load
to be sterilized. When a BI shows failure, the load must not be considered sterile.
Note: Wrapping, packing and loading improperly may result in failures. In addition, the
failure may be a result of sterilizer malfunction. Check load configuration and verify
that it is in accordance with the manufacturer's instructions. Also, check the BI's
instructions for proper use, storage and disposal. Only BI's that are cleared by the
FDA and labeled for use with the same physical parameters (of exposure time and
temperature) of the Saniclave 200 shall be used to monitor sterility of loads
processed in Saniclave 200.
Class 5 Integrators
A Class 5 integrator are a type of chemical indicator. It does not contain microbial
organisms. A Class 5 Integrator monitors the time, temperature and pressure. These
single use devices are calibrated to confirm that parameters have been met. Only use
FDA cleared integrators that are validated for 121C for 30 minutes. Follow
manufacturer's recommendations.”
Use an FDA approved biological indicator (BI) weekly to confirm sterility and
STEAMPlus Class 5 integrators with each load. Follow the BI manufacturer's
instructions. Revolutionary Science recommends the use of biological indicators and
class 5 integrators manufactured by SPS Medical.
SPSmedical Supply Corp. 6789 W Henrietta Road Rush, NY 14543 USA
(800) 722-1529 www.spsmedical.com
R E V O L U T I O N A R Y S C I E N C E
Table of contents
Other Revolutionary Science Laboratory Equipment manuals

Revolutionary Science
Revolutionary Science incufridge233 basic RS-IF-233 User manual

Revolutionary Science
Revolutionary Science incufridge professional series User manual

Revolutionary Science
Revolutionary Science SANICLAVE FRONT-LOADER Series User manual

Revolutionary Science
Revolutionary Science Saniclave RS-SC-102 User manual
Popular Laboratory Equipment manuals by other brands

CURIOSIS
CURIOSIS Celloger Mini Quick manual

Thermo Scientific
Thermo Scientific 180 Series Operating and maintenance manual

NuAire
NuAire Labgard NU-427-400 Operation & maintenance manual

Brooks
Brooks MARATHON LEAP AX user manual

Thermo Scientific
Thermo Scientific Finnpipette FOCUS Instructions for use

GenScript
GenScript eZwest Lite manual