10
Destruction de CD/DVD
Le destructeur est doté d’un bac à déchets de CD/DVD séparé pour récupérer
les morceaux de CD/DVD détruits. Veillez à bien l’installer sur la corbeille avant
de procéder à la destruction.
1
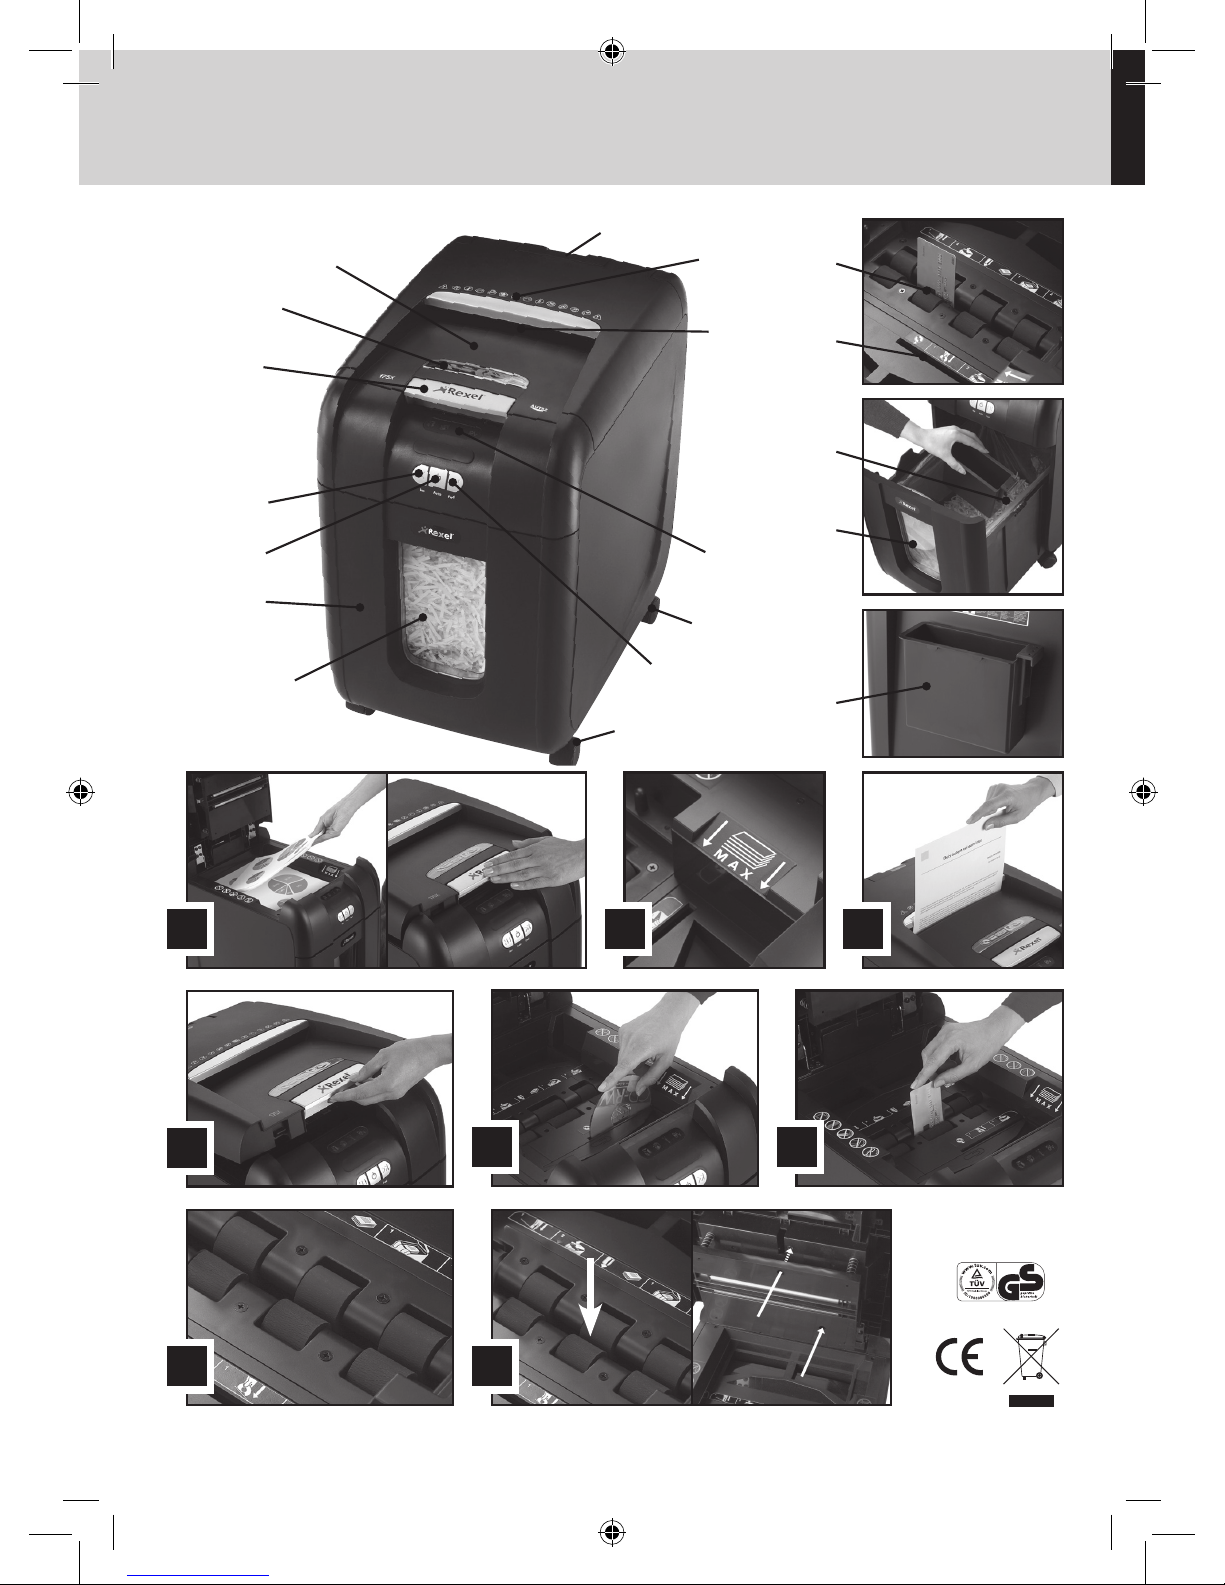
Soulevez le couvercle du compartiment (voir g. 4).
2
Insérez toujours les CD/DVD dans la fente d’alimentation pour CD/DVD (voir
g. 5). Ne détruisez qu’un seul CD/DVD à la fois.
3
Fermez le couvercle du compartiment.
4
Videz le bac à déchets de CD/DVD après la destruction de 8 CD/DVD pour
éviter que les déchets retombent dans la corbeille à papier.
5
Retirez le bac à déchets de CD/DVD avant de reprendre la destruction de
papier.
Fonction marche arrière
1
Si, lors de la destruction de papier, vous souhaitez faire ressortir les feuilles
par l’avant, utilisez la touche marche arrière ( ) mise à votre disposition
à cet effet.
2
Faites ressortir le papier par l’avant, puis mettez le destructeur hors tension
à l’aide du commutateur marche/arrêt situé à l’arrière de l’appareil. Retirez
le papier de la fente d’alimentation manuelle (en cas d’utilisation) ou ouvrez
le couvercle du compartiment et retirez les feuilles restantes, puis enlevez le
papier du mécanisme de coupe.
3
Pour reprendre la destruction, mettez l’appareil sous tension à l’aide du
commutateur marche/arrêt situé à l’arrière de l’appareil et appuyez sur la
touche de mode automatique ( ).
Fonctionnement
1
Déballez l’appareil.
2
Branchez le destructeur à une prise secteur.
3
Vériez que le commutateur marche/arrêt situé à l’arrière de l’appareil est
en position de marche
()
.
4
Pour démarrer la destruction automatique, appuyez sur la touche centrale
de mode automatique
()
, auquel cas le symbole de mise en veille bleu
sur la touche de mode automatique s’allume. Vous pouvez maintenant
commencer à détruire vos documents.
5
Pour ouvrir le couvercle et charger le destructeur, soulevez simplement la
poignée du couvercle du compartiment (voir g. 1) et insérez les documents.
Vous pouvez ouvrir le couvercle à un angle de 90 degrés pour faciliter la
manipulation si besoin est. Chargez jusqu’à 175 feuilles à la fois dans le
compartiment d’auto-alimentation. Ne dépassez PAS le niveau MAXIMUM
de 175 feuilles au risque d’endommager le destructeur (voir g. 2).
6
Le destructeur se mettra automatiquement à fonctionner UNIQUEMENT si
vous avez fermé le couvercle du compartiment (voir g. 1). S’il reste encore
du papier dans le compartiment d’auto-alimentation après la première
tentative de destruction, ouvrez et fermez le couvercle du compartiment une
seconde fois.
7
Si vous ne voulez détruire que jusqu’à 7 feuilles, vous pouvez utiliser la
fente d’alimentation manuelle à condition que le compartiment d’auto-
alimentation soit vide (voir g. 3).
8
Insérez les feuilles à détruire dans la fente d’alimentation manuelle. Le
destructeur détecte le papier et lance automatiquement la destruction.
9
Si le destructeur est laissé en mode automatique pendant plus de 2 minutes
sans servir, il se met automatiquement en mode de veille an d’économiser
de l’énergie.
J
À l’alimentation de papier dans la fente d’insertion ou à l’ouverture du
couvercle du compartiment, le destructeur passe automatiquement du
mode de veille au mode de fonctionnement. Il est inutile d’appuyer sur la
touche de mode automatique
()
.
Rares cas de bourrage
Dans le cas improbable de bourrage, l’Auto+ 175X s’arrête de fonctionner.
Vériez alors si la corbeille est pleine, puis essayez d’éliminer le bourrage à
l’aide des touches marche arrière ( ) et marche avant en continu ( ),
puis remettez-le en mode automatique ( ). Si le bourrage persiste, suivez les
instructions d’utilisation de la fonction de marche arrière.
Fonction d’arrêt automatique en cas
de corbeille ou couvercle ouvert
Par mesure de sécurité, si la corbeille ou le couvercle du compartiment est
ouvert pendant la destruction, le destructeur s’arrête de fonctionner et l’icône
s’allume ( ).
Surchauffe
Si l’Auto+ 175X sert continuellement pendant plus de 10 minutes, il risque de
surchauffer auquel cas l’indicateur de refroidissement rouge s’allume ( ).
Veuillez alors laisser l’appareil se refroidir. Lorsque le destructeur peut être de
nouveau utilisé, le symbole à thermomètre s’éteint. S’il a besoin de se refroidir
en cours de destruction, votre intervention est inutile. En effet, il recommence
automatiquement la destruction du papier dès qu’il s’est refroidi après une
période d’utilisation continue. Il vous suft de vérier que le papier est chargé
dans le compartiment d’auto-alimentation et que la corbeille est vide pendant
que l’appareil se refroidit.
Technologie d’auto-alimentation
L’Auto+ 175X a été conçu pour détruire automatiquement jusqu’à 175 feuilles
placées dans le compartiment d’auto-alimentation et jusqu’à 7 feuilles par le
biais de la fente d’alimentation manuelle. Le mécanisme d’auto-alimentation a
été conçu pour détruire les feuilles attachées avec une agrafe et un trombone et
pour n’introduire que quelques feuilles de papier à la fois sur le mécanisme de
coupe an de réduire les risques de bourrage.
Corbeille pleine
Le destructeur ne fonctionne pas si la corbeille est pleine, auquel cas le symbole
corbeille pleine ( ) s’allume. Vous devez alors vider la corbeille.
• Retirez lentement la corbeille pour la vider.
• Remettez la corbeille vide en place en la poussant et appuyez sur la touche
mode automatique pour relancer la destruction.
Élimination de bourrage automatique
Dans le cas peu probable d’un bourrage, l’Auto+ 175X met automatiquement
le mécanisme de coupe en marche arrière puis avant à trois reprises an de
dégager le papier. L’indicateur de bourrage de papier clignote pendant cette
procédure ( ).