3125 North 126th Street, Brookfield, WI 53005
Technical
S
upport
:800.669.9946, option 5 (tech@rft.com) Customer Care: 800.669.9946, option 2 ([email protected]om) ©2019 RF Technologies, Inc. All specifications subject to change without notice.
0510-0570 Rev A 09-19
How do I discharge and remove the transmitter?
When it is time for an infant to leave your facility, he/she must be discharged
from the software (refer to the applicable Series Software User Guide).
1. Assure that clamps are firmly closed on both sides with banding in place.
2. Check the software to confirm that the transmitter is communicating with the
system.
3. Tend to and clear any alarms displayed on the screen for the transmitter.
4. Request a discharge function for the transmitter in the software and
complete the action within the allotted time specified by your facility.
5. Open the transmitter clamps to remove the banding material.
6. Discard the used banding material.
7. Finally, disinfect the transmitter so that it is ready to be used again.
How do I clean the transmitter?
1. Remove the banding material from the transmitter and dispose of it.
2. Disinfect the transmitter with an approved cleaner (*use of non-
approved cleaners can cause permanent damage to the transmitter
and piercing contacts and will void any and all warranties).
3. Allow the cleaner to remain on the transmitter for the amount of time
specified by the manufacturer. When using surface disinfectants and
decontaminant cleaners, always follow the manufacturer’s
instructions.
4. Wipe the transmitter with a clean cloth or towel, and then allow the
transmitter to air-dry. The transmitter can also be rinsed with water, if
required to in the manufacturer’s instructions.
5. Inspect the piercing contacts on the transmitter. The contacts must be
gold in color and not bent or out of alignment. If the piercing contacts
are NOT gold in color or are bent out of alignment, discard the
transmitter.
6. Close the clamps on the transmitter
7. Place the clean transmitter in a storage container for future use.
How do I replace damaged transmitter clamps?
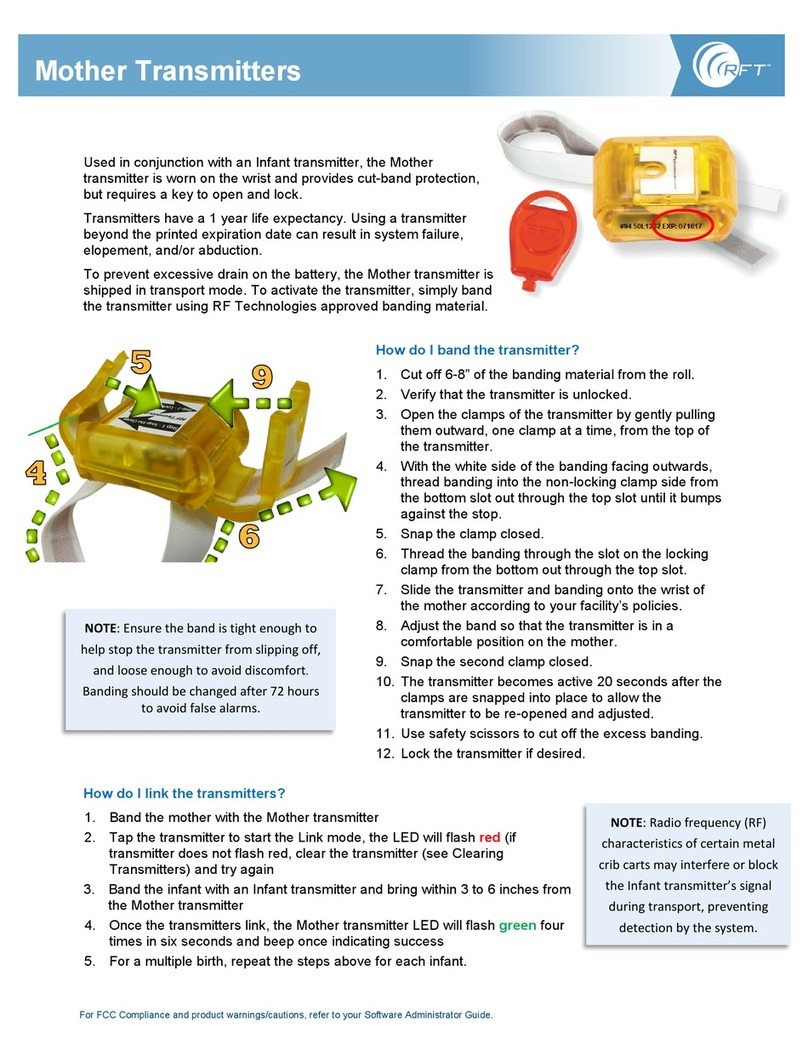
1. Open the clamps all the way and gently remove.
2. Insert the first clamp by inserting the right oval-shaped pin into the hole on
the right side of the transmitter.
3. Next, line the left oval-shaped pin up with the hole on the left side of the
transmitter.
4. Gently snap the pin into the hole.
5. Close the clamp.
6. Repeat the previous steps for the second clamp.
NOTE: The transmitters may be
wiped, sprayed or rinsed with
water or the approved cleaners
during cleaning, but must not
be soaked. Soaking transmitters
may result in equipment and/or
system failure.
NOTE: Do not slip the
banding material off the
infant’s extremity; doing
so may result in an alarm.
Do not leave the banding
material in the transmitter
clamps after discharge;
doing so may result in the
transmitter re-enrolling.
* For an up-to-date list of approved cleaning solutions, visit:
www.rft.com/Resources/Manuals & Specs/Transmitters/Transmitter Approved Cleaning Solutions


