RIB RIBW B-EN2 Series Instructions for use

393230C
Bulletin B1594 Code Version 1.x
RIBWxxxB-EN2 Application Manual
Building Automation Applications
Bi-directional Control and Status: RIBWxxxB-EN2 installed at controller to RIBWxxxB-EN2 installed at load
• Transmits ON command when dry contact input is closed and OFF command when dry contact input is opened.
• Retransmits dry contact input state every 70-140 seconds.
• Relay output state is saved at power loss. Relay output is restored when power is recovered. (See *note at end of document)
• In this mode, one RIB can only be paired with one other RIB and no other devices.
• Dry contact input closure on RIB1 will activate relay output of RIB2. Dry contact input opening on RIB1 will deactivate relay output of RIB2. RIB2 controls RIB1 in same manner.
• Optional modes: Repeater (see page 5)
Load
60Hz A/C Power
DO
DI
BAS Panel
BAS Controller
Org
Yel
Wht/Red and Wht/Blu
Wht/Blu
Wht/Red
Yel
Org
Blk
Wht or Red
RIBWxxxB-EN2
RIBWxxxB-EN2
RIBX Series
(not included)
Bi-directional Relay Output and Dry Contact Sensor Input: Controller with Enocean Gateway [Enocean Equipment
Profile A5-38-08] to RIBWxxxB-EN2 [Enocean Equipment Profile A5-30-02] installed at load
Bi-directional Learn Procedure
1. Apply power to both RIB’s.
2. Press and hold CLR button on RIB1 for 3 seconds until LED begins to flash.
3. LED will blink slowly.
4. Press and hold LRN button on RIB2 for 3 seconds to transmit teach telegram.
5. LED on RIB1 will stay ON for 4 seconds indicating telegram reception.
6. RIB2 will automatically listen for corresponding teach telegram which is automatically sent
from RIB1.
7. LED on RIB2 will turn ON for 4 seconds to indicate reception of teach telegram.
• Transmits on opening and closing of dry contact input and retransmits status every 70-140 seconds.
• Relay output state is stored at power loss. Relay output initiates in last stored state when power is restored. (See *note at end of document)
• In this mode, one RIB can only be paired with one PHC Gateway and no other devices.
• RIBWxxxB-EN2 only responds to Switching Command telegram from PHC Gateway (DB3 = 0x01). DB0.0 = 0 deactivates relay output and DB0.0 = 1 activates relay output.
• Optional modes: Repeater (see page 5)
Load
60Hz A/C Power
BAS Panel
BAS Controller
with EnOcean®
Gateway
Wht/Blu
Wht/Red
Yel
Org
Blk
Wht or Red
RIBWxxxB-EN2
RIBX Series
(not included)
Bi-directional Learn Procedure
1. Apply power to RIB.
2. Press and hold CLR button on RIB for 3 seconds until LED begins to flash.
3. LED will blink slowly.
4. Follow instruction from PHC Gateway manufacturer to send teach telegram.
5. LED on RIB will stay ON for 4 seconds indicating telegram reception.
6. PHC Gateway should automatically listen for corresponding teach telegram which is
automatically sent from RIB.
page 1

RIBWxxxB-EN2 Application Manual B1594 Code Version 1.x
One Way Relay Load Control: RIBWE24TDC-EN2 installed at controller to RIBWxxxB-EN2 installed at load
• RIBWE24TDC-EN2 transmits ON command when dry contact input is closed or voltage is applied to 5-25Vac/dc input. It also transmits OFF command when dry contact input
is opened or voltage is removed from 5-25Vac/dc input.
• RIBWE24TDC-EN2 retransmits dry contact input state every 180 seconds.
• Relay output state is stored at power loss. Relay output initiates in last stored state when power is restored. (See *note at end of document)
• Relay can learn only one RIBWE24TDC-EN2.
• Optional modes: Repeater (see page 5), Alarm (see page 5), Delay (see page 5)
Learn Procedure
1. Apply power to RIBWxxxB-EN2 and RIBWE24TDC-EN2.
2. Press and hold LRN button on RIBWxxxB-EN2 for ½ second.
3. LED will blink slowly.
4. Press TCH button on RIBWE24TDC-EN2.
5. LED on RIBWxxxB-EN2 will stay ON for 4 seconds indicating telegram reception.
Load
60Hz A/C Power
DO
BAS Panel
BAS Controller
Wht/Red
Wht/Blu
Yel
Org
Blk
Wht or Red
RIBWE24TDC-EN2
RIBWxxxB-EN2
Go/No-go Current Sensing: RIBXJF-EN2 installed at load to RIBWxxxB-EN2 installed at controller)
• RIBXJF-EN2 transmits ON command when current flowing through CT is above 3 Amps. It also transmits OFF command when current flowing through CT is significantly below
3 Amps or not present.
• RIBXJF-EN2 retransmits ON status every 70-140 seconds when current is above 3 Amps. OFF command is only transmitted once when current is not present.
• Relay output state is stored at power loss. Relay output initiates in last stored state when power is restored. (See *note at end of document)
• Optional modes: Repeater (see page 5), Alarm (see page 5), Delay (see page 5)
Learn Procedure
1. Apply power to RIBWxxxB-EN2 and run current greater than 3 Amps through RIBXJF-EN2.
2. Press and hold LRN button on RIBWxxxB-EN2 for ½ second.
3. LED will blink slowly.
4. Press TCH button on RIBXJF-EN2.
5. LED on RIBWxxxB-EN2 will stay ON for 3 seconds indicating telegram reception.
Dryer 1
Dryer 2
50/60 Hz
24/120/208/240/277 Vac
RIBXJF-EN2
RIBWxxxB-EN2
Remote Exhaust/Booster Fan
Lighting Applications
Simple Lighting Control: (RIBWxxxB-EN2 and Switch Transmitters)
A. Rocker Mode (typically used with WST-EN)
• Relay activates when ON is pressed on switch. Relay deactivates when OFF is pressed on switch.
• Relay output state is stored at power loss. Relay output initiates in last stored state when power is restored. (See *note at end of document)
• In this mode, RIB’s can be paired with up to 30 switches.
• Optional modes: Repeater (see page 5)
Rocker Mode Learn Procedure
1. Apply power to RIB.
2. Press and hold LRN button on RIB for ½ second.
3. LED will blink slowly.
4. Press and release rocker switch you are learning three times quickly.
5. LED on RIB will stay ON for 4 seconds indicating telegram reception.
6. To learn another switch, repeat steps 2-5.
Load
60Hz A/C Power
Yel
Org
Blk
Wht or Red
RIBWxxxB-EN2
WST-EN
Continued on page 3
page 2

RIBWxxxB-EN2 Application Manual B1594 Code Version 1.x
Simple Lighting Control: (RIBWxxxB-EN2 and Switch Transmitters)
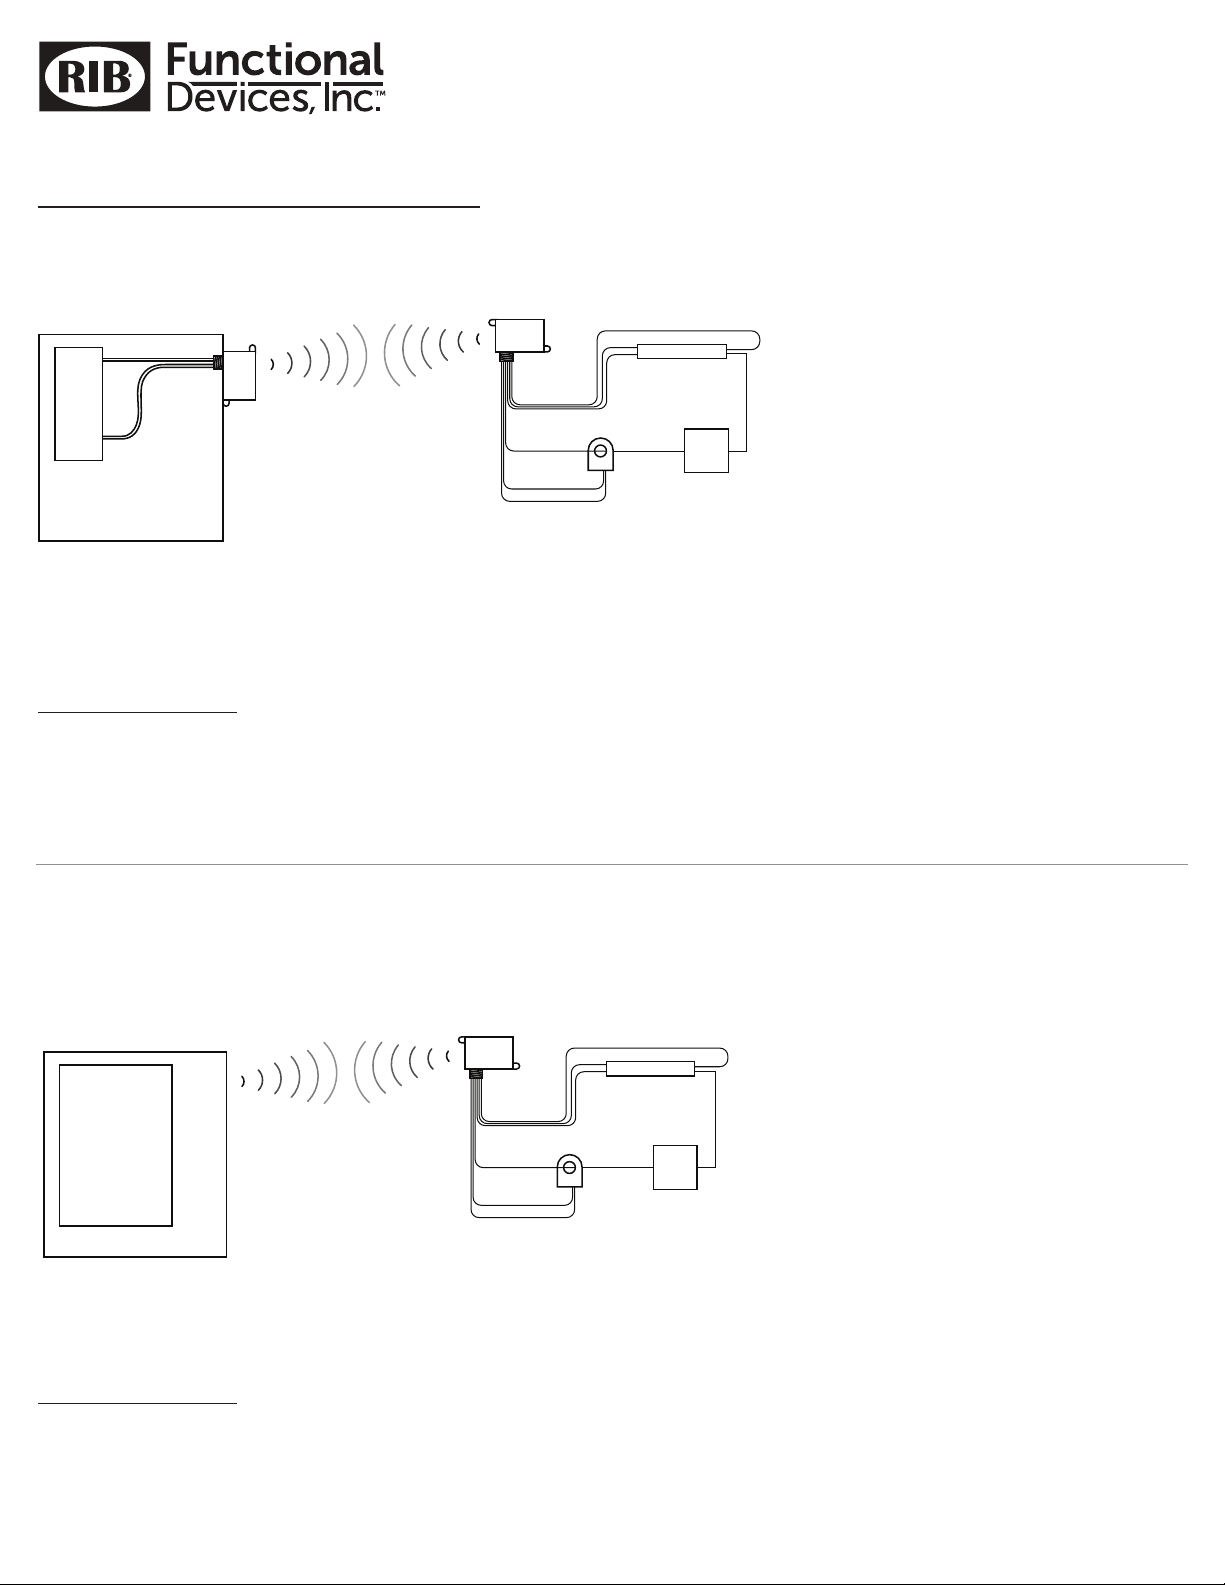
B. Momentary Mode (typically used with SWSK-EN)
• Relay activates when switch is pressed (card inserted in case of SWSK-EN) and deactivates when switch is released (card removed in case of SWSK-EN).
• Relay output state is stored at power loss. Relay output initiates in last stored state when power is restored. (See *note at end of document)
• In this mode, RIB can be paired with up to 30 switches.
• Optional modes: Repeater (see page 5)
Momentary Mode Learn Procedure
1. Apply power to RIB.
2. Press and hold LRN button on RIB for ½ second.
3. LED will blink slowly.
4. Press and hold LRN button on RIB for 3 seconds until LED pattern changes.
5. LED pattern will be FLASH, FLASH, OFF (2 flashes).
6. Press and release switch (insert and remove card in case of SWSK-EN) three times quickly.
7. LED on RIB will stay ON for 4 seconds indicating telegram reception.
8. To learn another switch, repeat steps 2-7.
Continued from page 2
Load
60Hz A/C Power
Yel
Org
Blk
Wht or Red
RIBWxxxB-EN2
WST-EN
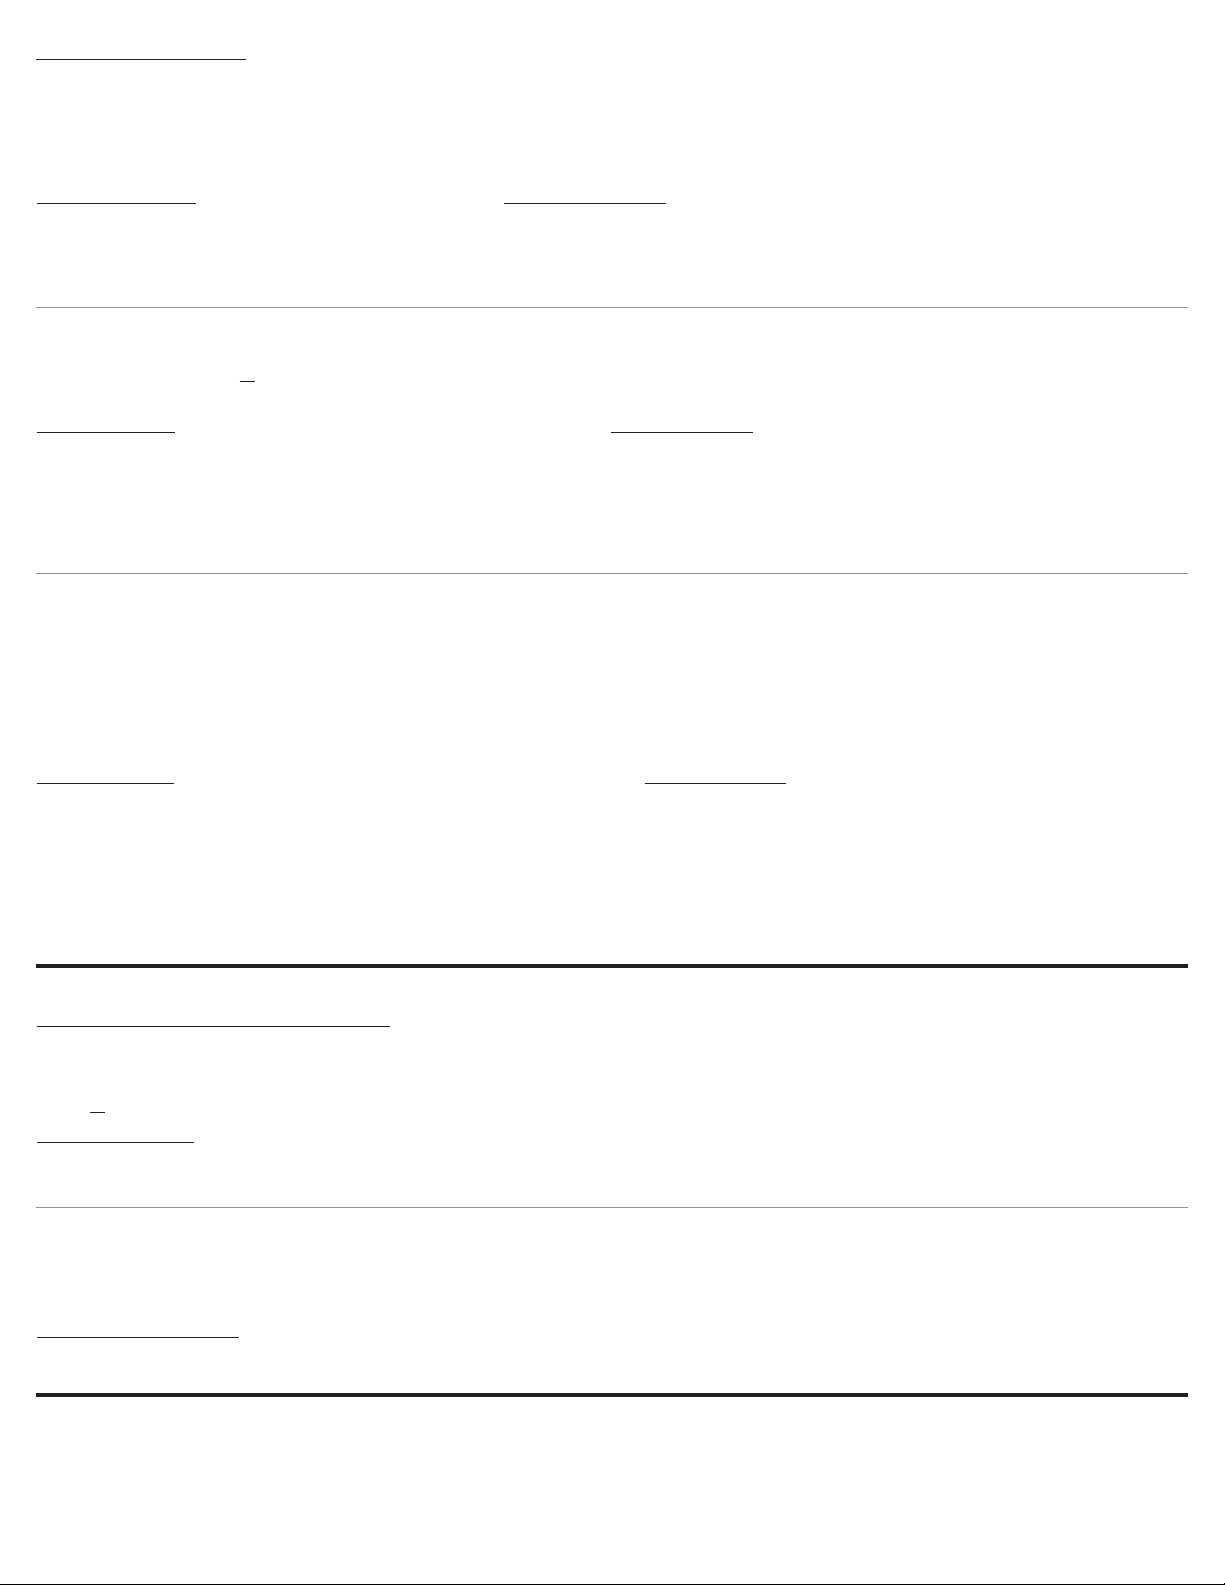
C. Toggle Mode (typically used with SWH-EN)
• Each press of the switch causes the relay to toggle between activated and deactivated states.
• Relay output state is stored at power loss. Relay output initiates in last stored state when power is restored. (See *note at end of document)
• In this mode, RIB can be paired with up to 30 switches.
• Optional modes: Repeater (see page 5)
Toggle Mode Learn Procedure
1. Apply power to RIB.
2. Press and hold LRN button on RIB for ½ second.
3. LED will blink slowly.
4. Press and hold LRN button on RIB for 3 seconds until LED pattern changes.
5. LED pattern will be FLASH, FLASH, OFF (2 flashes).
6. Press and hold LRN button on RIB for 3 seconds until LED pattern changes again.
7. LED pattern will be FLASH, FLASH, FLASH, OFF (3 flashes).
8. Press and release the button on the switch you are learning three times quickly.
9. LED on RIB will stay ON for 4 seconds indicating telegram reception.
10. To learn another switch, repeat steps 2-9.
Occupancy Detection
A. Manual ON – Auto OFF (Occupancy Sensor [Enocean Equipment Profile A5-07-01] and WST-EN to RIBWxxxB-EN2)
• Relay activates when switch is pressed (card inserted in case of SWSK-EN) and deactivates when switch is released (card removed in case of SWSK-EN).
• Relay output state is stored at power loss. Relay output initiates in last stored state when power is restored. (See *note at end of document)
• In this mode, RIB can be paired with up to 30 switches.
• Optional modes: Repeater (see page 5)
Manual ON – Auto OFF Learn Procedure
1. Apply power to RIB and allow Occupancy Sensor to charge.
2. Press and hold LRN button on RIB for ½ second.
3. LED will blink slowly.
4. Press and release TCH button on Occupancy Sensor.
5. LED on RIB will stay ON for 4 seconds indicating telegram reception.
6. Press and hold LRN button on RIB for ½ second.
7. LED will blink slowly.
8. Press and release rocker switch you are learning three times quickly.
9. LED on RIB will stay ON for 4 seconds indicating telegram reception.
10. To learn another switch, repeat steps 6-9.
B. Occupancy (Occupancy Sensor [Enocean Equipment Profile A5-07-01] to RIBWxxxB-EN2))
• Relay activates when occupancy is detected and deactivates 30 minutes after last detection of occupancy.
• It may take up to 2 minutes for the RIB to respond to the Occupancy Sensor immediately following learn-in.
• Optional modes: Repeater (see page 5)
Occupancy Only Learn Procedure
1. Apply power to RIB and allow Occupancy Sensor to charge.
2. Press and hold LRN button on RIB for 1/2 second until LED begins to flash.
3. LED will blink slowly.
4. Press and release TCH button on occupancy sensor.
5. LED on RIB will stay ON for 4 seconds indicating telegram reception.
page 3

RIBWxxxB-EN2 Application Manual B1594 Code Version 1.x
Energy Saving Applications
Door and Window Switches: (SWSDS-EN to RIBWxxxB-EN2)
• RIB activates with closed command from SWSDS-EN and deactivates with open command from SWSDS-EN.
• SWSDS-EN retransmits contact state every 70-140 seconds.
• Relay output state is stored at power loss. Relay output initiates in last stored state when power is restored. (See *note at end of document)
• In this mode, RIB’s can be paired with up to 30 SWSDS-EN. It is recommended to use Alarm mode if more than one SWSDS-EN is learned.
• Can be used with any devices with Enocean Equipment Profile A5-30-02 or D5-00-01.
• Optional modes: Repeater (see page 5), Alarm (see page 5), Delay (see page 5)
SWSDS-EN Learn Procedure
1. Apply power to RIB and allow SWSDS-EN to charge.
2. Press and hold LRN button on RIB for ½ second.
3. LED will blink slowly.
4. Press and release TCH button on SWSDS-EN to transmit teach telegram.
5. LED on RIB will stay ON for 4 seconds indicating telegram reception.
6. To learn more SWSDS-EN, repeat steps 2-5.
SWSDS-EN
SWSK-EN
PTAC unit with RIBWxxxB-EN2
in Hotel Room Energy Control Mode
RIBWxxxB-EN2
in Momentary Mode with SWSK-EN
(Wired through J Box)
Hotel Room Energy Control: (SWSDS-EN and SWSK-EN to RIBWxxxB-EN2)
• Relay controls HVAC unit in hotel room.
• If occupant removes keycard from SWSK-EN or opens patio door, the relay will shut down the HVAC unit or put it into setback mode if HVAC unit has that feature. HVAC unit
will be powered (or taken out of setback) when keycard is reinserted and patio door is closed.
• It is recommended to activate delay mode for this application.
• Optional modes: Repeater (see page 5), Delay (see page 5)
Hotel Room Energy Control Learn Procedure
1. Apply power to RIB and charge SWSDS-EN.
2. Press and hold LRN button on RIB for ½ second.
3. LED will blink slowly.
4. Press and release TCH button on SWSDS-EN to transmit teach telegram.
5. LED on RIB will stay ON for 4 seconds indicating telegram reception.
6. Press and hold LRN button on RIB for ½ second.
7. LED will blink slowly.
8. Press and hold LRN button on RIB for 3 seconds until LED pattern changes.
9. LED pattern will be FLASH, FLASH, OFF (2 flashes).
10. Press and release switch (insert and remove card in case of SWSK-EN) three times quickly.
11. LED on RIB will stay ON for 4 seconds indicating telegram reception.
page 4

RIBWxxxB-EN2 Application Manual B1594 Code Version 1.x
Alarm Mode
• Activating alarm mode forces all learned contact switches, such as SWSDS-EN or RIBTE24TDC-EN, to transmit a CLOSED telegram before relay will activate. Relay will deactivate
if any contact switch transmits an OPEN telegram.
Enabling Alarm Mode
1. Apply power to RIB.
2. Press and hold LRN button on RIB for ½ second.
3. LED will flash slowly.
4. Press and hold LRN button on RIB for 3 seconds until LED pattern changes.
5. LED pattern will be FLASH, FLASH, OFF (2 flashes).
6. Press and hold the CLR button for 3 seconds until LED blinks twice
indicating alarm mode is enabled.
Disabling Alarm Mode
1. Apply power to RIB.
2. Press and hold LRN button on RIB for ½ second.
3. LED will flash slowly.
4. Press and hold LRN button on RIB for 3 seconds until LED pattern changes.
5. LED pattern will be FLASH, FLASH, OFF (2 flashes).
6. Press and hold the CLR button for 3 seconds until LED blinks three times
indicating alarm mode is disabled.
Delay Mode
• Typically used with Hotel Room Energy Control and door/window contacts.
• Activating delay mode allows the relay to ignore temporary changes in switch states.
• The delay mode gives a delay ON of 10 seconds and a delay OFF of 90 seconds. It also prevents the relay from activating after a deactivation for 90 seconds.
• The OFF delay allows the load to continue to run while the switch or transmitter is temporarily open. This is helpful when monitoring window and door contacts that may be
opened and closed. If the contact remains open for longer than 90 seconds the relay will deactivate.
• The ON delay prevents the relay from immediately responding to a closed contact.
• The 90 second OFF to ON delay is intended specifically for HVAC units so that they will not short cycle.
Enabling Delay Mode
1. Apply power to RIB.
2. Press and hold LRN button on RIB for ½ second.
3. LED will flash slowly.
4. Press and hold LRN button on RIB for 3 seconds until LED pattern changes.
5. LED pattern will be FLASH, FLASH, OFF (2 flashes).
6. Press and hold LRN button on RIB for 3 seconds until LED pattern changes again.
7. LED pattern will be FLASH, FLASH, FLASH, OFF (3 flashes).
8. Press and hold the CLR button for 3 seconds until LED blinks twice
indicating delay mode is enabled.
Disabling Delay Mode
1. Apply power to RIB.
2. Press and hold LRN button on RIB for ½ second.
3. LED will flash slowly.
4. Press and hold LRN button on RIB for 3 seconds until LED pattern changes.
5. LED pattern will be FLASH, FLASH, OFF (2 flashes).
6. Press and hold LRN button on RIB for 3 seconds until LED pattern changes again.
7. LED pattern will be FLASH, FLASH, FLASH, OFF (3 flashes).
8. Press and hold the CLR button for 3 seconds until LED blinks three times
indicating delay mode is disabled.
Clearing ID’s from Memory
Global Clear
• Clears all learned ID’s, disables optional modes, and turns relay OFF.
Performing Global Clear
1. Press and hold CLR button on RIB for 3 seconds until LED begins flashing.
2. Press and hold LRN button for ½ second to exit LRN mode.
Single Device Clear
• Allows the user to remove a single device from memory.
• Maintains all optional mode settings.
Performing Single Device Clear
1. Repeating the learn procedure specific to the device that you want to clear will remove that device from memory.
page 5
• Activating repeater mode allows relay to repeat signal from other Enocean devices within range.
• Relay will allow signal to be repeated up to two times.
Enabling Repeater Mode
1. Apply power to RIB.
2. Press and hold LRN button on RIB for ½ second.
3. LED will flash slowly.
4. Press and hold the CLR button for 3 seconds until LED blinks
twice indicating repeater mode is enabled.
Disabling Repeater Mode
1. Apply power to RIB.
2. Press and hold LRN button on RIB for ½ second.
3. LED will flash slowly.
4. Press and hold the CLR button for 3 seconds until LED blinks
three times indicating repeater mode is disabled.
Optional Modes
Repeater Mode
* Note: Unit will not save last state when powered from 24 Vdc.
Table of contents
Other RIB Door Opening System manuals